Instrukcja obsługi Swarovski ATS 65 HD
Przeczytaj poniżej 📖 instrukcję obsługi w języku polskim dla Swarovski ATS 65 HD (6 stron) w kategorii Lornetka. Ta instrukcja była pomocna dla 20 osób i została oceniona przez 7 użytkowników na średnio 4.9 gwiazdek
Strona 1/6
ATS/STS / DE
19
ATS/STS / DE
18
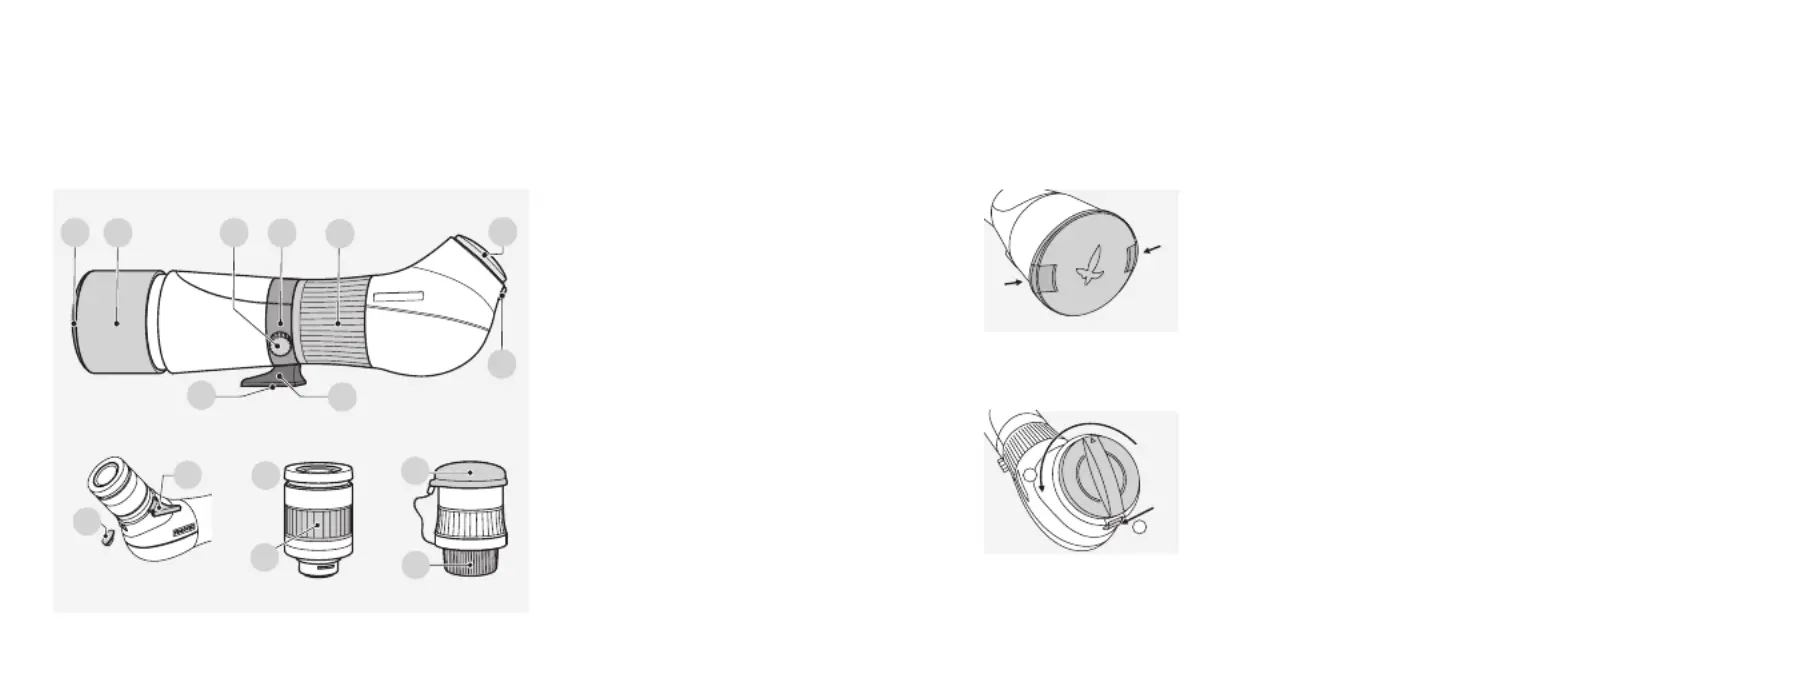
ATS/STS / ENATS/STS / EN
1 Protective cap for objective
lens
2 Sunshield
3 Tripod ring
4 Tripod base
5 Connection thread for tripod
6 Locking screw
7 Adjustment ring for focusing
8 Locking mechanism
9 Aiming aid
10 Cover of aiming aid
connection
11 Protective cover for bayonet
12 Eyepiece
13 Adjustment ring for changing
magnification
14 Protective cap for eyepiece
15 Protective cap for bayonet
SWAROVSKI
8
4
3
2
7
6
1
11
5
SWAROVSKI
10
9
S
W
A
RO
V
S
K
I
13
12
15
14
1.
DESCRIPTION
2.
OPERATION
2.1 REMOVE THE PROTECTIVE CAP FROM THE LENS
To remove the cap, press together the protruding snap ele-
ments at the rim of the cap.
2.2 REMOVE THE PROTECTIVE COVER FOR THE BAYONET FROM THE BAYONET LOCK
To remove the cover, slide the locking mechanism of the
eyepiece downward and turn the protective cover to the left
(anti-clockwise).
2
1
Specyfikacje produktu
| Marka: | Swarovski |
| Kategoria: | Lornetka |
| Model: | ATS 65 HD |
Potrzebujesz pomocy?
Jeśli potrzebujesz pomocy z Swarovski ATS 65 HD, zadaj pytanie poniżej, a inni użytkownicy Ci odpowiedzą
Instrukcje Lornetka Swarovski

27 Marca 2025
15 Września 2024
14 Września 2024
14 Września 2024
14 Września 2024
12 Września 2024
11 Września 2024
11 Września 2024
11 Września 2024
9 Września 2024
Instrukcje Lornetka
Najnowsze instrukcje dla Lornetka
8 Kwietnia 2025
3 Kwietnia 2025
1 Kwietnia 2025
30 Marca 2025
30 Marca 2025
28 Marca 2025
28 Marca 2025
28 Marca 2025
28 Marca 2025
27 Marca 2025