Instrukcja obsługi V7 HSW100-1N
Przeczytaj poniżej 📖 instrukcję obsługi w języku polskim dla V7 HSW100-1N (2 stron) w kategorii Słuchawki. Ta instrukcja była pomocna dla 21 osób i została oceniona przez 7 użytkowników na średnio 4.4 gwiazdek
Strona 1/2
Stumm
Ein/Aus
Anzeige
Ein/Aus
+
–
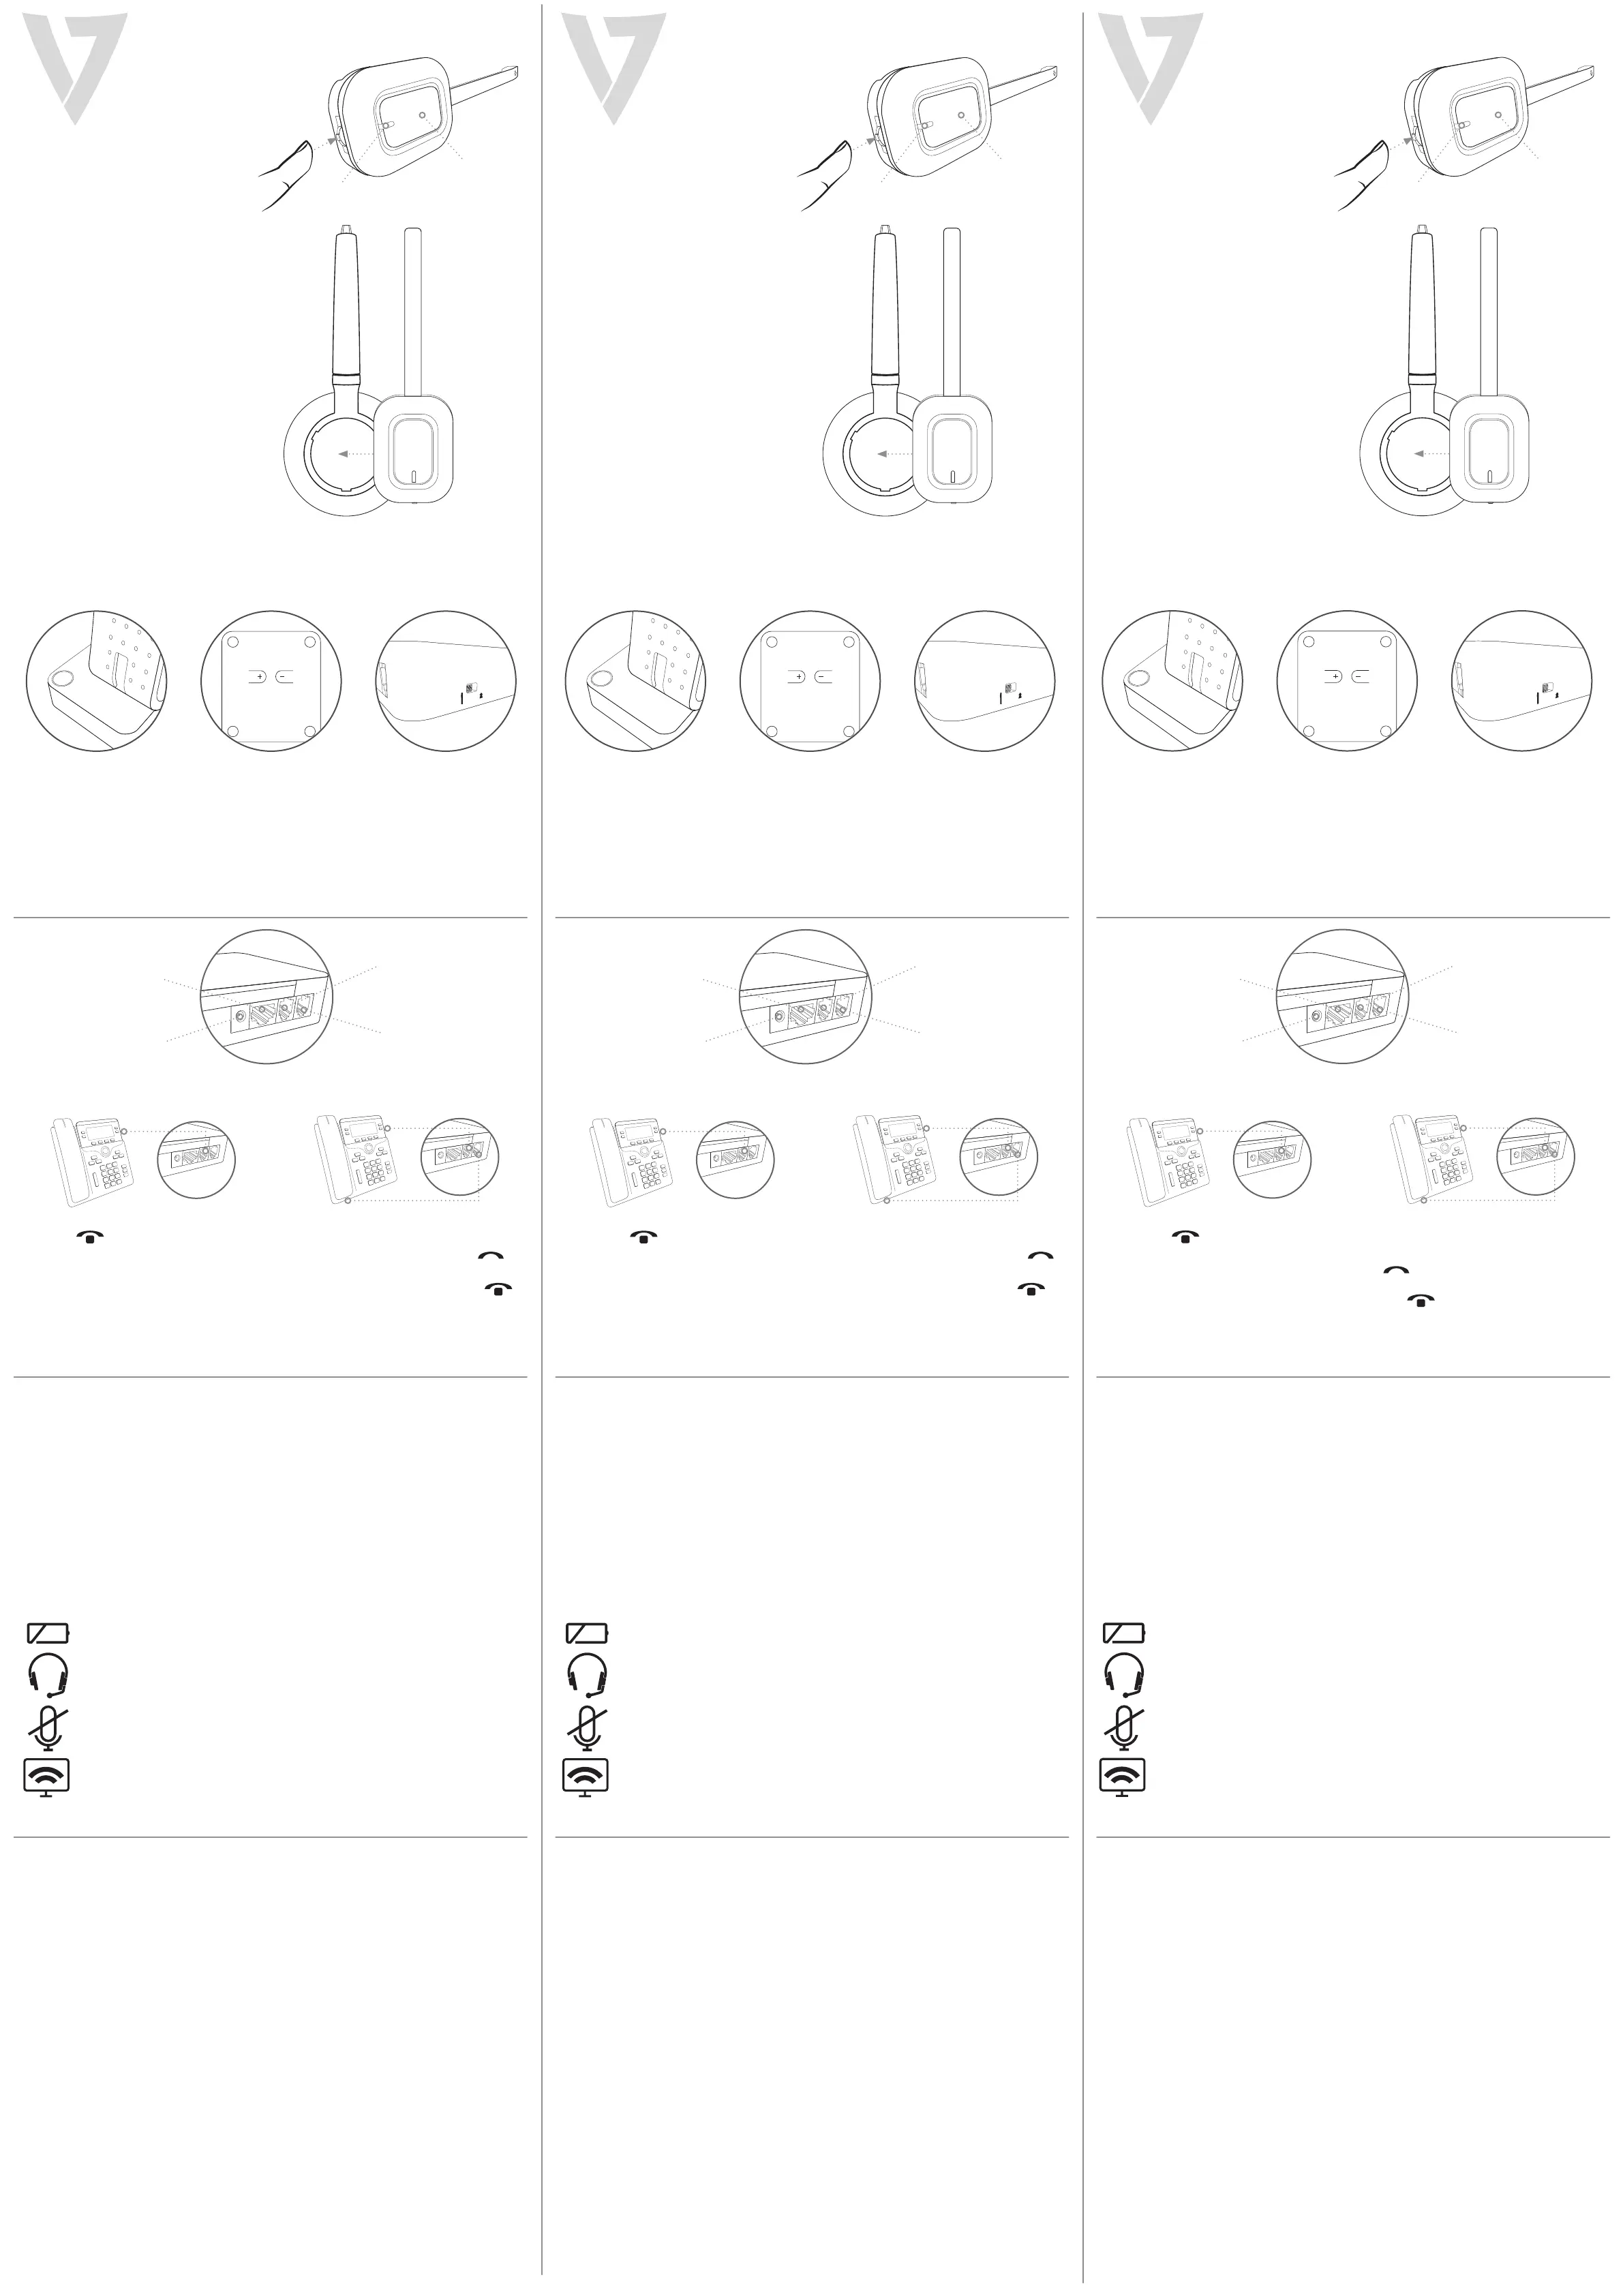
HEADSET an Bügel anbringen:
Vertikal am Bügel ausrichten
und zur Befestigung drehen.
• Lauter: Richtung (+) rollen.
• Leiser: Richtung (-) rollen.
• Stumm: drücken
HSW100
Stummschalttaste
Drücken, um Anruf stumm
zu schalten
DC-Buchse
Schließen Sie den
Netzadapter an die DC-
Buchse an
AB
AUX-Anschluss
Verbindung zum
Handset (optional)
Telefonanschluss
Schließen Sie das
Telefonkabel an den
Headset-Anschluss an
Handset-Anschluss
(Option B)
Handset-Kabel vom
Telefon mit dem
Handset-Anschluss
verbinden
BASISSTATION OBENBASISSTATION UNTENBASISSTATION SEITE
Kompatibilitätsschalter
Wählen Sie '1' oder '2' aus,
bis ein Wählton über
die Telefonverbindung zu
hören ist
•Stecken Sie das mitgelieferte Telefonkabel
in den Anschluss der BASISSTATION
•Verbinden Sie das Telefonkabel mit dem
HEADSET-Anschluss des Tischtelefons
•Die Einheit und das Headset benötigen
3Minuten, um die automatische
Verbindung zum Telefon herzustellen
•Stecken Sie den DC-Stecker des Netzadapters in die Rückseite der BASISSTATION
•Drücken Sie den Ein-/Ausschalter, um einen Anruf zu tätigen
•Wählen Sie '1' oder '2' mit dem Kompatibiltätsschalter, bis Sie einen Wählton hören
•Passen Sie die Lautstärke für Lautsprecher und Mikrofon an
•Drücken Sie den EIN-/AUSSCHALTER, um einen Anruf zu beenden
3.Echo im Headset
•Passen Sie die Sensitivität des Telefons an. Passen Sie bei Bedarf die Sensitivität des Mikrofons in
der BASISSTATION durch eine niedrigere Einstellung an
4.Headset hat funktioniert, aber funktioniert nicht mehr
•Eventuell muss die Verbindung mit der Basisstation wiederholt werden. Siehe Abschnitt "Anruf
tätigen"
AkkustandsanzeigeVoll aufgeladen: Licht ist AN
Niedriger Akkustand: Licht blinkt
AktivitätsanzeigeHeadset abgesetzt: Licht AN
StummschaltungsanzeigeStumm: Licht AN
TEL-Anzeige
•Am Tischtelefon: Ziehen Sie das HANDSET-
Kabel aus dem Telefon heraus
•Stecken Sie das Handset-Kabel in den
Anschluss der BASISSTATION
•
Stecken Sie das Telefonkabel in den
Anschluss der BASISSTATION und das andere
Ende des Telefonkabels in den HANDSET-
Anschluss des Tischtelefons
Installation
Anruf tätigen
Fehlerbehebung
Überblick
Mikrofoneinstellung
Sensitivität des Mikrofons
einstellen
Hinweis:Der Verbindungsvorgang beginnt automatisch, sobald Sie den Netzadapter in die
BASISSTATION stecken. (Vergewissern Sie sich, dass das Headset auf der Basisstation
aufsitzt, bevor Sie den Strom einschalten. Ansonsten schlägt der Verbindungsvorgang
möglicherweise fehl.)
1.Kein Wählton zu hören
•Prüfen Sie die Kabelverbindung zwischen BASISSTATION und Telefon
•Prüfen Sie, ob der Netzadapter angeschlossen ist und mit Strom versorgt wird
•Prüfen Sie den Kompatibilitätsschalter. Regeln Sie den Kompatibilitätsschalter solange, bis Sie
den Wählton hören
2.Summton im Headset
•Die BASISSTATION sollte mindestens 30 cm/12 Zoll entfernt sein.
Muet
Marche/Arrêt
Indicateur DEL
Marche/Arrêt
+
–
Pour xer le CASQUE au bandeau:
alignez-le verticalement avec le
bandeau et tournez pour verrouiller.
• Pour augmenter le volume, tournez
dans la direction du (+).
• Pour réduire le volume, tournez
dans la direction du (–)
• Pressez pour couper le son
HSW100
Bouton Sourdine
Appuyez pour couper le
son de l’appel
Jack C.C
Branchez l’adaptateur
d’alimentation
jack à courant continu
AB
Port AUX
Connexion du
combiné (en
option)
Port du téléphone
Connectez le câble
téléphonique au port
du combiné
Port du combiné
(Option B)
Branchez le cordon
du combiné depuis le
téléphone vers le port
du combiné
DESSUS DE LA BASEDESSOUS DE LA BASEPARTIE LATÉRALE
DE LA BASE
Commutateur de
compatibilité
Sélectionnez « 1 » or « 2 »
jusqu'à ce qu'une tonalité
se fasse entendre via la
connexion du téléphone
•Branchez le cordon téléphonique fourni
au port de la BASE
•Branchez le cordon téléphonique au port
CASQUE du téléphone de bureau
•Il faudra 3 minutes pour connecter
automatiquement l'unité et le casque au
téléphone
•Branchez l'adaptateur d'alimentation à courant continu à l'arrière du MODULE DE BASE
•Appuyez sur le commutateur d'APPEL MARCHE/ARRÊT pour eectuer un appel
•Sélectionnez les positions « 1 » ou « 2 » du commutateur de compatibilité jusqu'à ce que vous
entendiez une tonalité
•Réglez les volumes du haut-parleur et du microphone
•Appuyez sur le commutateur d'APPEL MARCHE/ARRÊT pour terminer l'appel
3.Echos dans le casque
•Réglez la sensibilité du téléphone. Si nécessaire, réglez la sensibilité du microphone sur la BASE
en la réduisant
4.Le casque d'écoute a cessé de fonctionner
•Le casque d'écoute peut nécessiter un appairage à la base. Référez-vous à la section Eectuer
un appel
Indicateur de batteriePleine charge : Voyant MARCHE
Batterie faible : Clignotement du voyant
Indicateur d'utilisationCasque désactivé : Voyant MARCHE
Indicateur MuetMuet : Voyant MARCHE
Indicateur TEL
•Sur le téléphone de bureau, débranchez le
câble du COMBINÉ du téléphone
•Branchez le câble du combiné au port
de la BASE
•Branchez le cordon téléphonique au
port de la BASE et branchez l'autre
extrémité du cordon téléphonique au port
du COMBINÉ sur le téléphone de bureau
Installation
Eectuer un appel
Dépannage
Présentation
Réglage du microphone
Réglage de la sensibilité du
microphone
Remarque :Le processus d'appairage démarre automatiquement lorsque vous branchez l'adaptateur
d'alimentation à la BASE. (Assurez-vous que le casque est placé sur le socle avant la mise
sous tension. Si le casque n'est pas posé sur le socle, l'appairage peut échouer)
1.Impossible d’entendre une tonalité
•Vériez le câble de connexion reliant la BASE et le téléphone
•Vériez que l'adaptateur d'alimentation est branché à une prise électrique
•Vériez le commutateur de compatibilité. Réglez le commutateur de compatibilité jusqu'à ce
que vous puissiez entendre la tonalité
2.Bruit de ronement dans le casque
•Déplacez la BASE sur une distance d’au moins 30 cm/12 inches
Mute
On/O
Indicator
On/O
+
–
To attach HEADSET to
headband: line up vertically
with headband and turn to lock.
• To Increase volume roll toward (+)
• To reduce volume roll toward (–)
• To mute press down
HSW100
Mute Button
Press to Mute Call
DC Jack
Connect Power
Adapter to DC Jack
AB
AUX Port
Connection for
Handset lifter
(optional)
Telephone Port
Connect
telephone cord to
the headset port
Handset Port (Option B)
Connect Handset
Cord from the phone to
the handset port
TOP OF BASEBOTTOM OF BASESIDE OF BASE
Compatibility Switch
Select '1' or '2' until a dial
tone is heard via the
telephone connection
•Plug the supplied telephone cord into
the port of the BASE unit
•Connect the telephone cord to the
HEADSET port of the desk phone
•It may take 3 minutes for the Unit
and headset to auto connect to the
telephone
•Plug the Power Adapter DC Jack into the back of the BASE UNIT
•Press the CALL ON/OFF switch to make a call
•Select Compatibility switch '1' or '2' position until you can hear a dial tone
•Adjust speaker and microphone volume
•Press the CALL ON/OFF switch to end a call
3.Headset Echoes
•Adjust the telephone’s sensitivity. If necessary, adjust your microphone sensitivity on the BASE
by lowering the setting
4.Headset was working but it has stopped
•Headset may need pairing to the base again. Refer to MAKE-A-CALL section
Battery IndicatorFully Charged: Light is ON
Low Battery: Light is Flashing
In-Use IndicatorHeadset o: Light ON
Mute IndicatorMute: Light ON
TEL Indicator
•On the desk phone, unplug the
HANDSET cable from the phone
•Plug the handset cable into the
port on the BASE
•
Plug the telephone cord into the
port on the BASE and plug the other
end of the telephone cord into the
HANDSET port on the desk phone
Installation
Make-A-Call
Trouble Shooting
Overview
Microphone Adjustment
Adjust microphone
sensitivity
Note:The pairing process automatically starts when you plug the power adapter into the BASE.
(Make sure that headset is placed on the cradle before power is turned on. If the headset is not
placed on the cradle pairing may fail)
1.Can not hear a dial tone
•Check the cable connection between BASE and Phone
•Check that the power adapter is plugged in and has power
•Check the compatibility switch. Adjust compatibility switch until you can hear the dial tone
2.Buzzing sound on the Headset
•Move the BASE at least 30 cm or 12 inches away
Specyfikacje produktu
| Marka: | V7 |
| Kategoria: | Słuchawki |
| Model: | HSW100-1N |
Potrzebujesz pomocy?
Jeśli potrzebujesz pomocy z V7 HSW100-1N, zadaj pytanie poniżej, a inni użytkownicy Ci odpowiedzą
Instrukcje Słuchawki V7

1 Października 2024
Instrukcje Słuchawki
Najnowsze instrukcje dla Słuchawki
9 Kwietnia 2025
3 Kwietnia 2025
3 Kwietnia 2025
3 Kwietnia 2025
2 Kwietnia 2025
1 Kwietnia 2025
1 Kwietnia 2025
1 Kwietnia 2025
1 Kwietnia 2025
1 Kwietnia 2025