Instrukcja obsługi Zotac GeForce GT 730
Zotac karta graficzna GeForce GT 730
Przeczytaj poniżej 📖 instrukcję obsługi w języku polskim dla Zotac GeForce GT 730 (2 stron) w kategorii karta graficzna. Ta instrukcja była pomocna dla 52 osób i została oceniona przez 7 użytkowników na średnio 4.7 gwiazdek
Strona 1/2
Copyright© 2015 ZOTAC International (MCO) Limited. All Rights Reserved
No part of this manual, including the products and software described in it, may be reproduced, transmitted, transcribed,
stored in a retrieval system, or translated into any language in any form by any means, without the express written
permission of ZOTAC International (MCO) Limited.
Product warranty or service will not be extended if: (1) the product is repaired, modied or altered, unless such repair,
modication or alteration is authorized in writing by ZOTAC International (MCO) Limited, or (2) the serial number of the
product is damaged or missing.
ZOTAC INTERNATIONAL (MCO) LIMITED PROVIDES THIS MANUAL “AS IS” WITHOUT WARRANTY OF ANY
KIND, EITHER EXPRESS OR IMPLIED, INCLUDING BUT NOT LIMITED TO THE IMPLIED WARRANTIES OR
CONDITIONS OF MERCHANTABILITY OR FITNESS FOR A PARTICULAR PURPOSE. IN NO EVENT SHALL ZOTAC
INTERNATIONAL (MCO) LIMITED BE LIABLE FOR ANY INDIRECT, SPECIAL, INCIDENTAL, OR CONSEQUENTIAL
DAMAGES (INCLUDING DAMAGES FOR LOSS OF PROFITS, LOSS OF BUSINESS, LOSS OF USE OR DATA,
INTERRUPTION OF BUSINESS AND THE LIKE), EVEN IF PC PARTNER HAS BEEN ADVISED OF THE POSSIBILITY
OF SUCH DAMAGES ARISING FROM ANY DEFECT OR ERROR IN THIS MANUAL OR PRODUCT.
SPECIFICATIONS AND INFORMATION CONTAINED IN THIS MANUAL ARE FURNISHED FOR INFORMATIONAL USE
ONLY, AND ARE SUBJECT TO CHANGE AT ANY TIME WITHOUT NOTICE, AND SHOULD NOT BE CONSTRUCTED
AS A COMMITMENT BY ZOTAC INTERNATIONAL (MCO) LIMITED. ZOTAC INTERNATIONAL (MCO) LIMITED
ASSUMES NO RESPONSIBILITY OR LIABILITY FOR ANY ERRORS OR INACCURACIES THAT MAY APPEAR IN
THIS MANUAL, INCLUDING THE PRODUCTS AND SOFTWARE DESCRIBED IN IT.
Products and corporate names appearing in this manual may or may not be registered trademarks or copyrights of their
respective companies, and are used only for identication or explanation and to the owner’s benet, without intent to
infringe.
NVIDIA is a trademark of NVIDIA Corporation
Windows is a trademark of Microsoft Corp.
Macrovision
This product incorporates copyright protection technology that is protected by method claims of certain U.S. patents
and other intellectual property rights owned by Macrovision Corporation and other rights owners. Use of this copyright
protection technology must be authorized by Macrovision Corporation, and is intended for home and other limited viewing
uses only unless otherwise authorized by Macrovision Corporation. Reverse engineering or disassembly is prohibited.
Precautions - Read this rst!
1) Before playing video games
Do not play when you are tired or short of sleep. Make sure that the room is well illuminated and lighting is adjusted to
the brightness of the monitor. Keep a suitable distance from the display monitor. Take a break of 10 to 15 minutes every
hour while playing.
Extremely pronounced lighting effects such as fast image changes, repetitions of simple geometric shapes, ashes of
light may induce epileptic ts or blackouts in some persons. Even persons with no previous known tendency to epilepsy
may be in danger. If you or member of your family has been diagnosed as prone to epilepsy, please consult your
physician before playing the video game. Parents should monitor their children carefully when they play video games.
Stop playing immediately if the following symptoms are detected: nausea, vision disturbance, muscle tension or cramps,
orientation problems, involuntary movements or brief loss of consciousness.
2) Static electricity precautions
Do not take the graphics card out from the original static electricity protection package until you are ready to install it.
Before installing, wear a grounded wrist strap if possible, or discharge static electricity by touching the bare metal surface
of the system chassis. Carefully hold the graphics card by its rear bracket, and avoid touching the “gold nger” PCB
edge connector unless it is necessary.
3) Turn off system power before installing the graphics card
Turn off the AC main power to the system, by the AC main power switch or by detaching the AC power cord. Damage
to the graphics card or the system components, or injury to you may result if power is turned on during the installation.
Please consult a qualied technician if necessary. The manufacturer assumes no liability for any damage, caused
directly or indirectly, by improper installation by unauthorized service personnel.
ZOTAC International (MCO) Ltd. stands by the quality of its products with a limited warranty. The ZOTAC warranty
ensures all products, including motherboards and graphics cards are free of material and workmanship defects
from the factory. The warranty applies to the original purchaser and is non-transferable.
The ZOTAC warranty is only applicable under the following conditions:
• A copy of the original sales receipt is kept.
• Damage to the product was not due to user installation.
• User did not damage the product, including abuse, overclocking, natural disaster, negligence, misuse,
modications (cooling included), power supply, damage due to the result of other damaged components,
etc...
• Product was used according to ZOTAC guidance
Failure to follow the warranty terms and conditions will result in an automatic void of the ZOTAC warranty. The
warranty does not cover normal wear and tear items such as the cooling fan.
It is up to the original purchaser to obtain warranty repairs. To submit a ZOTAC graphics card for repair, the owner
must contact ZOTAC Customer Service in the US or the original reseller in other regions within the rst 2 years.
Only the original reseller can return products to ZOTAC within the rst 2 years in other regions. Owners seeking
warranty repairs past 2 years may contact ZOTAC directly.
For more warranty details, please visit: http://www.zotac.com/en/support/warranty-manager/register.html
ZOTAC DISCLAIMER -- ZOTAC International (MCO) Ltd. reserves the right to void the warranty if:
• The product is physically modied, unless otherwise stated.
• Replacing the graphics cooler will not void the warranty unless the installation or use of an aftermarket cooler
resulted in product failure.
• If user purchased the card second hand.
• If user fails to produce a copy of the original sales receipt.
• User used the product in a way it was not intended for.
Under no circumstances is ZOTAC International (MCO) Ltd. held liable for any lost wages or revenues incurred
due to defective or damaged products. ZOTAC International (MCO) Ltd. does not provide any additional warranty
for its products except as stated in the warranty terms, whether by implication or merchant implication.
Hardware Installation
1. Locate the slot; insert the card
rmly into the PCI-Express/AGP/
PCI slot
2. Plug the display cable into the
VGA card.
Installing the VGA Card Driver
1. Insert the VGA Card Installation
CD into your CD-ROM drive.
If Windows® runs the CD
automatically, proceed to step 5.
2. Click Start.
3. Select Run.
4. Type the following:
D:\Launch.exe
(If D is not your CD-ROM drive,
substitute D with the correct drive
letter.)
5. Click on Driver Installation to begin
the Installation.
6. Select the Model type and
Operating System type.
7. Click OK to proceed.
8. Follow the on-screen instructions
to complete the installation.
9. Restart the computer.
Updating the Graphics Card Driver
The installation driver CD that
came with your VGA card is the
latest driver available at the time
of manufacturing. However, these
drivers are updated frequently.
Updating to the latest version of
the VGA card driver may improve
its performance. Checking the
NVIDIA website from time to time is
recommended to see if a new driver
is available: http://www.nvidia.com.
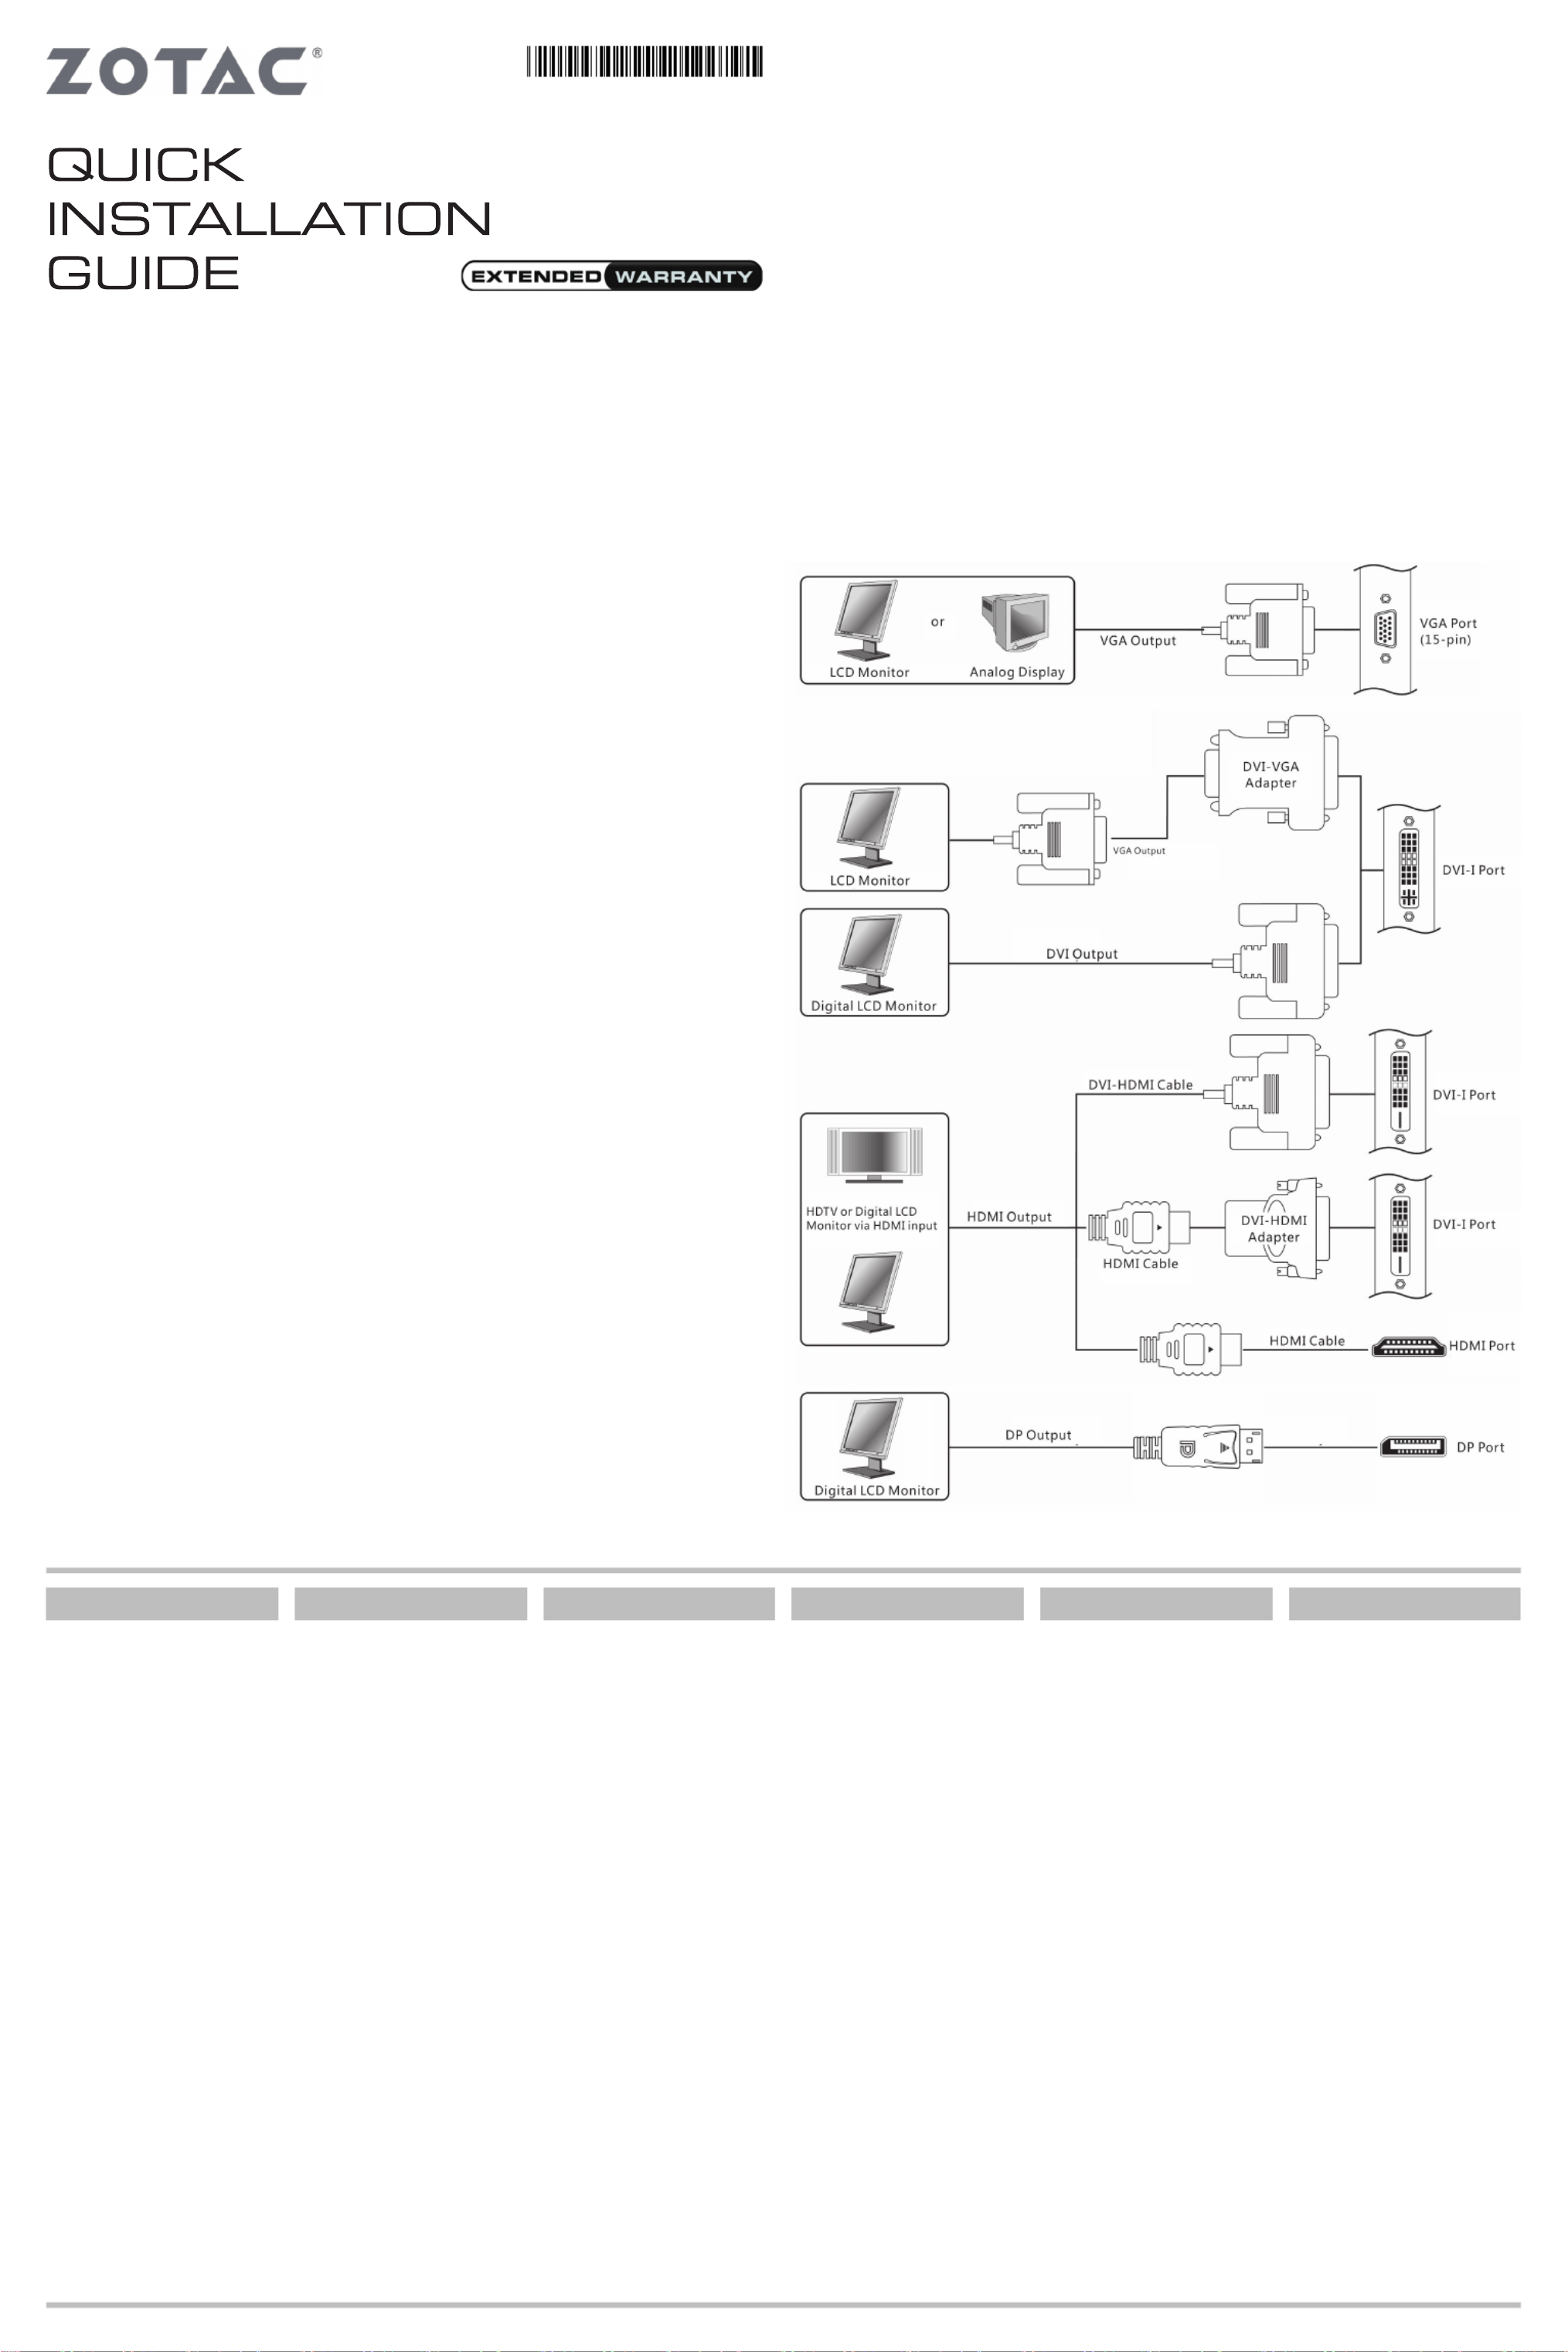
Connecting Your Monitor
安装ZOTAC显示卡
1.找到插槽;将显卡牢固地插入
PCI-Express/AGP/PCI 插槽
2.将显示器的数据线插到显卡上
安装显示卡驱动程序
1.插入显卡安装光盘到你的光盘
驱动器中。
如果Windows操作系统自动运行光
盘安装程序,则可以直接跳到第
五步骤。
2.点击“开始”。
3.选择“运行”。
4.根据你计算操作系统的类型:
D:\SETUP
(如果D盘不是你的光驱盘符,请
选择您的光驱盘符名称替换D:)
5.点击“安装驱动程序”并开
始安装。
6.选择你显示卡的类型与操作系
统的类型。
7.点击“OK”继续安装。
8.按照屏幕上的提示来安装驱
动程序。
9.重新启动计算机。
升级显卡驱动程序
驱动程序安装光盘是随着显示卡
一起被制造出来的,然而会有一
些驱动程序会被不断更新。升级
最新版本的驱动程序有可能提升
显示卡的性能。经常检查NVIDIA
的网页看是否有最新的驱动程序
发布出来。
Instalacija hardvera
1. Pronađite utor; umetnite karticu
čvrsto u PCI-Express/AGP/PCI utor
2. Ukopčajte kabel zaslona u VGA
karticu
Instalacija uređaja VGA kartice
1. Umetnite instalacijski CD VGA
kartice u vaš CD-ROM uređaj.
Ukoliko Windows® pokreće CD
automatski, prijeđite na korak 5.
2. Kliknite Start.
3. Odaberite Run.
4. Utipkajte sljedeće:
D:\Launch.exe
(Ukoliko D nije vaš CD-ROM uređaj,
zamijenite D ispravnim slovom
uređaja.)
5. Kliknite na Driver Installation za
početak instalacije.
6. Odaberite tip modela i tip
operativnog sustava.
7. Kliknite OK za nastavak.
8. Slijedite upute na zaslonu za
dovršetak instalacije.
9. Ponovno pokrenite vaše računalo.
Nadogradnja uređaja gračke
kartice
Instalacijski CD uređaj koji ste dobili
uz vašu VGA karticu je posljednji
dostupni uređaj tijekom proizvodnje.
Međutim, ovi uređaji se često
nadograđuju. Nadogradnja posljednje
verzije uređaja VGA kartice
može poboljšati njegovu izvedbu.
Preporučuje se provjera NVIDIA
web-stranice s vremena na vrijeme,
kako biste saznali je li dostupan novi
uređaj: http://www.nvidia.com.
Instalace hardvéru
1. Najdete správný slot na vaší základní
desce (PCI-Express / AGP / PCI) a
opatrně zasuňte kartu dovnitř.
2. V případě potřeby zapojte kabel
napájení gracké karty.
3. Do obrazového výstupu vaší gracké
karty zapojte kabel na přepojení s
monitorem.
Instalace ovládače gracké karty
1. Vložte instalační CD gracké karty do
vaší optické mechaniky. Jestli Windows®
automaticky spustí CD, pokračujte na
krok 5.
2. Zvolte tlačítko Start.
3. Vyberte položku Spustit.
4. Zadejte následovné:
D:\Launch.exe
(V případě jestli D nereprezentuje
písmeno vaší optické mechaniky, upravte
ho dle potřeby)
5. Klikněte na položku „Driver
Installation“ pro zahájení instalace
ovládače.
6. Vyberte model gracké karty a
nainstalovaný operační systém.
7. Zvolte tlačítko OK pro pokračování v
procese instalace.
8. Pokračujte dle pokynů, které uvidít
azovce počítače.
9. Restartujte počítač.
Aktualizace ovládače gracké karty
Instalační CD, které jste získali spolu s
grackou kartou, obsahuje nejnovější
dostupné ovladače k datu jeho výroby.
Tyto ovladače jsou však poměrně často
aktualizované a jejich novější verze
mohou přinést zvýšení výkonu, stability,
či odstranění některých chyb. Pro
nejnovější ovladače navštivte prosím
internetovou stránku:
http://www.nvidia.com
Hardware-Installation
1. Stecken Sie die Karte in den PCI
Express/AGP/PCI-Steckplatz.
2. Schließen Sie das Display-Kabel an
der VGA-Karte an.
Installation des VGA-Kartentreibers
1. Legen Sie die Installations-CD der
VGA-Karte in das CD-ROM-Laufwerk
ein.
Wenn Windows® die CD automatisch
startet, gehen Sie zu Schritt 5.
2. Klicken Sie auf Start.
3. Wählen Sie Ausführen.
4. Geben Sie Folgendes ein:
D:\Launch.exe
(Ist D nicht der Buchstabe Ihres
CD-ROM-Laufwerks, geben Sie anstelle
von D den richtigen
Buchstaben ein.)
5. Klicken Sie auf ‚Treiberinstallation’, um
die Installation zu beginnen.
6. Wählen Sie das Modell und das
Betriebssystem aus.
7. Klicken Sie auf OK.
8. Befolgen Sie die
Bildschirmanweisungen, um die
Installation abzuschließen.
9. Starten Sie den Computer neu.
Update des Grakkartentreibers
Die Installations-CD, die Sie mit
Ihrer VGA-Karte erworben haben,
enthält die aktuellen Treiber zum
Herstellungszeitpunkt. Diese Treiber
werden jedoch häug neu aktualisiert.
Die Performance des VGAKartentreibers
kann verbessert werden, indem
der Treiber auf die neueste Version
aktualisiert wird. Informieren Sie sich
daher regelmäßig auf der NVIDIA
Website, ob neue Treiberupdates
verfügbar sind:
http://www.nvidia.com.
Instalación del Hardware
1. Localice el slot, inserte la tarjeta
rmemente en el slot PCI-Express/
AGP/PCI.
2. Enchufe el cable del display en la
VGA.
Instalar el driver de la VGA
1. Inserte el CD de instalación de la
VGA en el CD-ROM.
Si Windows® pasa el CD
automáticamente, entonces vaya al
paso 5.
2. Haga click en Start.
3. Seleccione Run.
4. Teclee lo siguiente:
D:\Launch.exe
(Si D no es su driver de iCD-
ROM, sustituye D con la letra
correspondiente.)
5. Haga click en Driver Installation
para comenzar la instalación.
6. Seleccione el Tipo de Modelo y el
Sistema Operativo.
7. Haga click en OK para proceder.
8. Siga ñas instruccionespara
completer la instalación.
9. Reinicie el PC.
Actualizar el Driver de la Tarjeta
Gráca
El CD de instalación que vienen
con su VGA es el último driver
disponible. Sin embargo esos drivers
son actualizados frecuentemente.
Actualizar la última version del
driver de su VGA puede mejorar
notablemente su rendimiento.
Chequee la web de NVIDIA de tiempo
en tiempo para ver si está disponible:
http://www.nvidia.com.
Quick Installation Guide
快 速 安 装 手 册
Korisničke Upute Za Brzu Instalaciju
Rychlý Průvodce Instalací
Kurzinstallation
Guia de Instalacion Rápida
291-CN001-21ZTF
Specyfikacje produktu
| Marka: | Zotac |
| Kategoria: | karta graficzna |
| Model: | GeForce GT 730 |
| Wysokość produktu: | 111.15 mm |
| Szerokość produktu: | 144.53 mm |
| Podręcznik użytkownika: | Tak |
| Szerokość opakowania: | 260 mm |
| Wysokość opakowania: | 160 mm |
| Głębokość opakowania: | 58 mm |
| Typ interfejsu: | PCI Express x16 2.0 |
| Układ: | Full-Height/Half-Length (FH/HL) |
| Taktowanie procesora: | 700 MHz |
| Pobór mocy: | 49 W |
| Rodzaj chłodzenia: | Aktywne |
| Obsługa przetwarzania równoległego: | Nieobsługiwany |
| Maks. rozdzielczość: | 2560 x 1600 px |
| Wersja DirectX: | 12.0 |
| NVIDIA G-SYNC: | Nie |
| Liczba portów VGA (D-Sub): | 1 |
| HDCP: | Tak |
| Wbudowany tuner tv: | Nie |
| Pełny HD: | Tak |
| Prędkość zegara pamięci: | 1333 MHz |
| Procesor graficzny: | GeForce GT 730 |
| CUDA: | Tak |
| Rodzina procesorów grafiki: | NVIDIA |
| Maksymalna rozdzielczość analogowa: | 2560 x 1600 px |
| Pamięć adaptera dedykowanej karty graficznej: | 1 GB |
| Typ pamięci adaptera grafiki: | GDDR3 |
| Magistrala pamięci: | 128 bit |
| Ilość portów DVI-I: | 2 |
| PhysX: | Tak |
| Wersja OpenGL: | 4.4 |
| Dual Link DVI: | Tak |
| Ilość gniazd: | 1 |
| Wysokość wspornika: | Full-Height (FH) |
| Minimalna moc zasilacza: | 300 W |
| Ilość portów DVI: | 2 |
| RAMDAC: | 400 MHz |
| Rdzenie CUDA: | 96 |
| FireStream: | Nie |
| NVIDIA GameWorks VR: | Nie |
| Liczba portów Mini HDMI: | 1 |
Potrzebujesz pomocy?
Jeśli potrzebujesz pomocy z Zotac GeForce GT 730, zadaj pytanie poniżej, a inni użytkownicy Ci odpowiedzą
Instrukcje karta graficzna Zotac

20 Września 2024
20 Sierpnia 2024
20 Sierpnia 2024
20 Sierpnia 2024
20 Sierpnia 2024
20 Sierpnia 2024
20 Sierpnia 2024
20 Sierpnia 2024
20 Sierpnia 2024
20 Sierpnia 2024
Instrukcje karta graficzna
Najnowsze instrukcje dla karta graficzna
1 Kwietnia 2025
30 Marca 2025
30 Marca 2025
29 Marca 2025
29 Marca 2025
29 Marca 2025
29 Marca 2025
29 Marca 2025
29 Marca 2025
29 Marca 2025