Instrukcja obsługi ATen VS182A
Przeczytaj poniżej 📖 instrukcję obsługi w języku polskim dla ATen VS182A (2 stron) w kategorii Rozłupnik. Ta instrukcja była pomocna dla 26 osób i została oceniona przez 5 użytkowników na średnio 4.0 gwiazdek
Strona 1/2
VS182A/VS184A 2/4-Port HDMI Splitter Quick Start GuideVS182A/VS184A Repartidor de HDMI de 2, 4 puertos Manual del usuario
Répartiteur HDMI à 2/4 ports VS182A/VS184A – Guide de l'utilisateurGuida per l’utente splitter HDMI a 2/4 porte modelli VS182A/VS184A
VS182A/VS184A 2-, 4-Port-HDMI Splitter BenutzerhandbuchКраткое руководство пользователя 2/4-портового HDMI-разветвителя VS182A/VS184A
www.aten.com www.aten.com
www.aten.com www.aten.com
www.aten.com www.aten.com
© Copyright 2013 ATEN® International Co., Ltd.
ATEN and the ATEN logo are trademarks of ATEN International Co., Ltd. All rights reserved.
All other trademarks are the property of their respective owners.
This product is RoHS compliant.
Part No. PAPE-1285-470G Printing Date: 11/2013
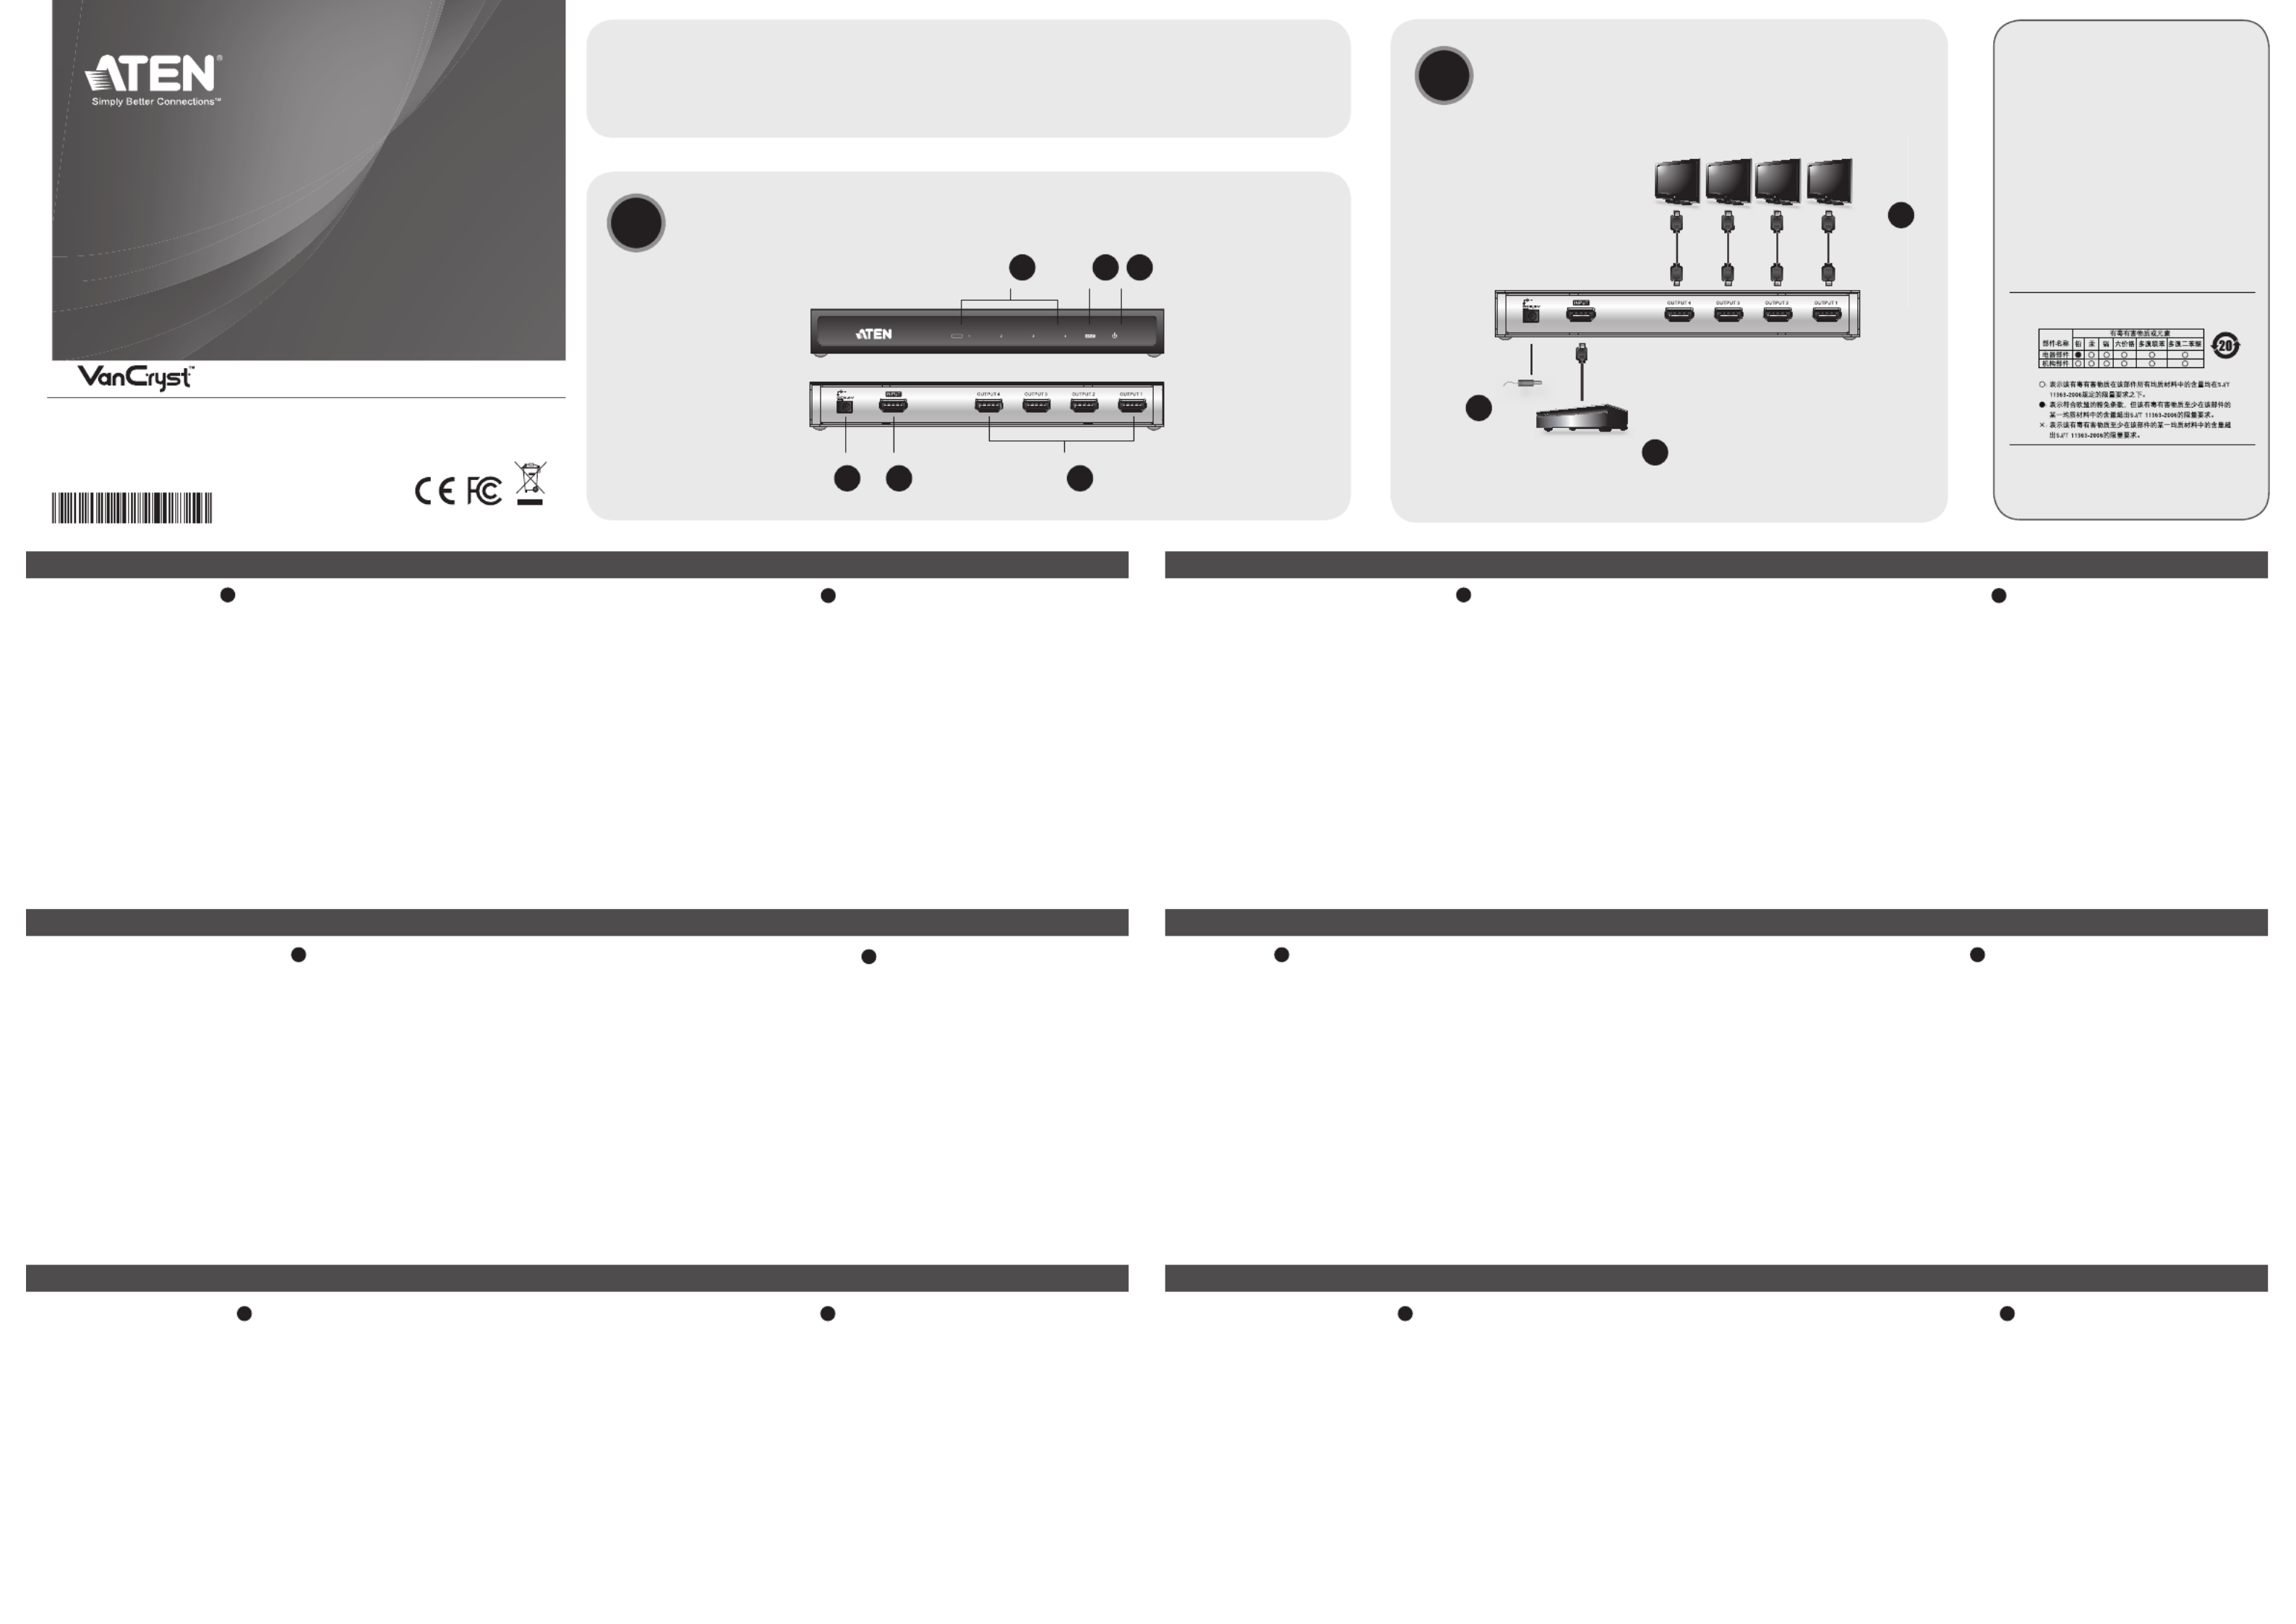
Hardware Review
A
Front View
1. Port Output LEDs
2. Input LED
3. Power LED
Rear View
1. Power Jack
2. HDMI Input Port
3. HDMI Output Ports
Presentación del hardware
A
Vista frontal
1. Indicadores LED de los puertos de salida
2. Indicador LED de entrada
3. Indicador LED de alimentación
Vista posterior
1. Entrada de alimentación
2. Puerto de entrada HDMI
3. Puertos de salida HDMI
Description de l’appareil
A
Vue avant
1. Voyants des ports de sortie
2. Voyant d’entrée
3. Voyant d’alimentation
Vue arrière
1. Prise d’alimentation
2. Port d’entrée HDMI
3. Ports de sortie HDMI
Hardware
A
Vista anteriore
1. LED delle porte d’uscita
2. LED d’entrata
3. LED d’alimentazione
Vista posteriore
1 Presa d’alimentazione
2. Porta d’ingresso HDMI
3. Porte d’uscita HDMI
Hardwareübersicht
A
Vorderseitige Ansicht
1. LED-Anzeigen der Ausgänge
2. LED-Anzeige des Eingangs
3. LED-Betriebsanzeige
Rückseitige Ansicht
1. Stromeingangsbuchse
2. HDMI-Eingang
3. HDMI-Ausgänge
Обзор оборудования
A
Вид спереди
1. Индикаторы выходов
2. Индикатор входа
3. Индикатор питания
Вид сзади
1. Гнездо питания
2. Вход HDMI
3. Выход HDMI
Hardware Installation
B
1. Use a Male-to-Male Type A HDMI cable to connect your computer or
HDMI source device to the VS182A/VS184A HDMI Input port.
2. Use up to four Male-to-Male Type A HDMI cables to connect up to four
HDMI display devices to the VS182A/VS184A Output ports.
3. Plug the power adapter that came with the VS182A/VS184A package into
an AC power source, the plug the power adapter cable into the splitter’s
Power Jack.
Note:
The VS182A/VS184A will detect the resolution of the monitor connected to
port 1 of the installation. If you would like to change the resolution, simply
adjust the settings from the HDMI source device con guration menu.
Instalación del hardware
B
1. Conecte el ordenador o dispositivo fuente de señal HDMI al puerto de
entrada HDMI del VS182A/VS184A. Para ello, emplee un cable HDMI
de tipo A (macho – macho).
2. Conecte un máximo de cuatro dispositivos de visualización HDMI a los
puertos de salida del VS182A/VS184A. Para ello, emplee cables HDMI
de tipo A (macho – macho).
3. Conecte el adaptador de alimentación incluido con el VS182A/VS184A a
una toma eléctrica y el cable del adaptador a la entrada de alimentación
del repartidor.
Nota:
El VS182A/VS184A detectará automáticamente la resolución del monitor
conectado al puerto 1 de la instalación. En caso de que desee cambiar la
resolución, cambie los ajustes en el menú de con guración del dispositivo
fuente de señal HDMI.
Installation du matériel
B
1.
Reliez votre ordinateur ou votre périphérique source HDMI au port d’entrée
HDMI du VS182A/VS184A à l’aide d’un câble HDMI mâle-mâle de type A.
2. Vous pouvez utiliser jusqu'à quatre câbles HDMI mâle-mâle de type A
pour relier jusqu'à quatre périphériques d'af chage HDMI aux ports de
sortie du VS182A / VS184A.
3. Connectez l’adaptateur électrique, fourni avec le VS182A/VS184A à une
prise secteur, puis le cordon de l’adaptateur à la prise jack du répartiteur.
Remarque :
le VS182A/VS184A détectera la résolution du moniteur connecté au port
1 du système. Pour changer la résolution, il suf t de régler les paramètres
correspondants dans le menu de con guration du périphérique source
HDMI.
Installazione hardware
B
1. Utilizzare un cavo HDMI di tipo A maschio-maschio per collegare il
proprio computer o il dispositivo sorgente HDMI alla porta in entrata del
VS182A/VS184A.
2. Utilizzare no a un massimo di 4 cavi HDMI di tipo A maschio-maschio
per collegare no a 4 dispositivi di visualizzazione HDMI alle porte in
uscita del VS182A/VS184A.
3. Inserire la spina dell’alimentatore in dotazione al VS182A/VS184A in
una presa di corrente CA, quindi inserire il cavo dell’alimentatore nella
presa d’alimentazione dello splitter.
Nota :
Il VS182A/VS184A rileverà la risoluzione del monitor connesso alla porta
1 dell’installazione. Per modi care le risoluzione, è suf ciente regolare le
impostazioni dal menu di con gurazione del dispositivo sorgente HDMI.
Hardware installieren
B
1. Verwenden Sie ein HDMI-Kabel Typ A (Männlein auf Männlein), und
verbinden Sie Ihren Computer bzw. die HDMI-Signalquelle mit dem
Signaleingang am VS182A/VS184A.
2. Verwenden Sie bis zu vier HDMI-Kabel Typ A (Stecker auf Stecker),
und verbinden Sie maximal vier HDMI-Anzeigegeräte mit den
Signalausgängen am VS182A/VS184A.
3. Verbinden Sie das mitgelieferte Netzteil mit einer stromführenden
Steckdose und anschließend mit der Netzeingangsbuchse am Splitter.
Hinweis:
Der VS182A/VS184A erkennt die Aufl ösung des an Port 1 der Installation
angeschlossenen Monitors automatisch. Wenn Sie die Aufl ösung ändern
möchten, tun Sie dies im Einrichtungsmenü der HDMI-Signalquelle.
Установка оборудования
B
1. Используя кабель HDMI типа А с двумя штыревыми концами,
подключите компьютер или устройство-источник HDMI ко входу
HDMI устройства VS182A/VS184A.
2. Используйте до четырех кабелей HDMI типа А с двумя штыревыми
концами для подключения к выходам VS182A/VS184A до четырех
устройств отображения HDMI.
3. Подключите адаптер питания из комплекта поставки VS182A/VS184A
к источнику переменного тока, после чего подключите кабель
адаптера питания к гнезду питания разветвителя.
Примечание.
VS182A/VS184A определяет разрешение монитора, подключенного
к порту 1 системы. Если требуется изменить разрешение, измените
настройки в меню конфигурации устройства-источника HDMI.
Important Notice
Considering environmental protection, ATEN
does not provide a fully printed user manual
for this product. If the information contained
in the Quick Start Guide is not enough for
you to configure and operate your product,
please visit our website www.aten.com, and
download the full user manual.
Online Registration
http://eservice.aten.com
Technical Phone Support
International:
886-2-86926959
North America:
1-888-999-ATEN Ext: 4988
United Kingdom:
44-8-4481-58923
All information, documentation, rmware, and
specifications contained in this package are
subject to change without prior noti cation by
the manufacturer.
The following contains information that relates
to China:
2/4-Port HDMI Splitter
Quick Start Guide
VS182A/VS184A
Package Contents
1 VS182A / VS184A 2/4-Port HDMI Splitter
1 Power Adapter
1 HDMI Cable
1 User Instructions
AHardware Review
Hardware Installation
B
1
DVD Player
HDTV (HDMI)HDTV (HDMI)HDTV (HDMI)HDTV (HDMI)
3
2
Output
12 3
1 23
VS184A
Front View
VS184A
Rear View
Specyfikacje produktu
| Marka: | ATen |
| Kategoria: | Rozłupnik |
| Model: | VS182A |
Potrzebujesz pomocy?
Jeśli potrzebujesz pomocy z ATen VS182A, zadaj pytanie poniżej, a inni użytkownicy Ci odpowiedzą
Instrukcje Rozłupnik ATen

22 Września 2024
22 Września 2024
22 Września 2024
22 Września 2024
22 Września 2024
21 Września 2024
21 Września 2024
21 Września 2024
21 Września 2024
21 Września 2024
Instrukcje Rozłupnik
Najnowsze instrukcje dla Rozłupnik
7 Kwietnia 2025
27 Marca 2025
20 Lutego 2025
12 Stycznia 2025
8 Stycznia 2025
8 Stycznia 2025
5 Stycznia 2025
1 Stycznia 2025
1 Stycznia 2025
1 Stycznia 2025