Instrukcja obsługi Blackstar AMPED 1
Blackstar Niesklasyfikowane AMPED 1
Przeczytaj poniżej 📖 instrukcję obsługi w języku polskim dla Blackstar AMPED 1 (2 stron) w kategorii Niesklasyfikowane. Ta instrukcja była pomocna dla 23 osób i została oceniona przez 6 użytkowników na średnio 4.8 gwiazdek
Strona 1/2
8
567
USA VOICE
A clean, high headroom classic American style
channel. Use the interactive tone controls to
sculpt pristine clean tones.
Un canal de style CLEAN américain classique
et avec une dynamique élevée. Utilisez les
commandes de tonalité interactives pour
sculpter des sons clairs immaculés.
Suggested setting - Boutique Clean
UK VOICE
Built around a vintage tone stack and gain
structure, producing a shimmering top-end and
a great crunch sound when used with higher
gain settings.
Construit autour d'un égaliseur de tonalités et
d'une structure de gain vintage, produisant un
haut de gamme scintillant et un excellent son
crunch lorsqu'il est utilisé avec des réglages de
gain plus élevés.
Suggested setting - Top Boosted Crunch
FLAT VOICE
To be used with external preamps or multi-fx
units. The EQ is an active cut and boost, giving
an extra layer of flexibility to your tone.
À utiliser avec des préamplis externes ou des
unités multi-effets. L'égaliseur est actif, donnant
une couche supplémentaire de flexibilité à votre
son.
Suggested setting - Transparent Power Amp
PRESETREVERB
USA
UK
FLAT
VOICE
1W
20W
100W
POWER
KT88
6L6
LINEAR
EL34
6V6
EL84
TREBLEMASTERBASSMIDDLE
REVERB
GAIN
RESPONSE
PRESETREVERB
USA
UK
FLAT
VOICE
1W
20W
100W
POWER
KT88
6L6
LINEAR
EL34
6V6
EL84
TREBLEMASTERBASSMIDDLE
REVERB
GAIN
RESPONSE
PRESETREVERB
USA
UK
FLAT
VOICE
1W
20W
100W
POWER
KT88
6L6
LINEAR
EL34
6V6
EL84
TREBLEMASTERBASSMIDDLE
REVERB
GAIN
RESPONSE
PRESETREVERB
USA
UK
FLAT
VOICE
1W
20W
100W
POWER
KT88
6L6
LINEAR
EL34
6V6
EL84
TREBLEMASTERBASSMIDDLE
REVERB
GAIN
RESPONSE
1
34
2
RECALL
LED
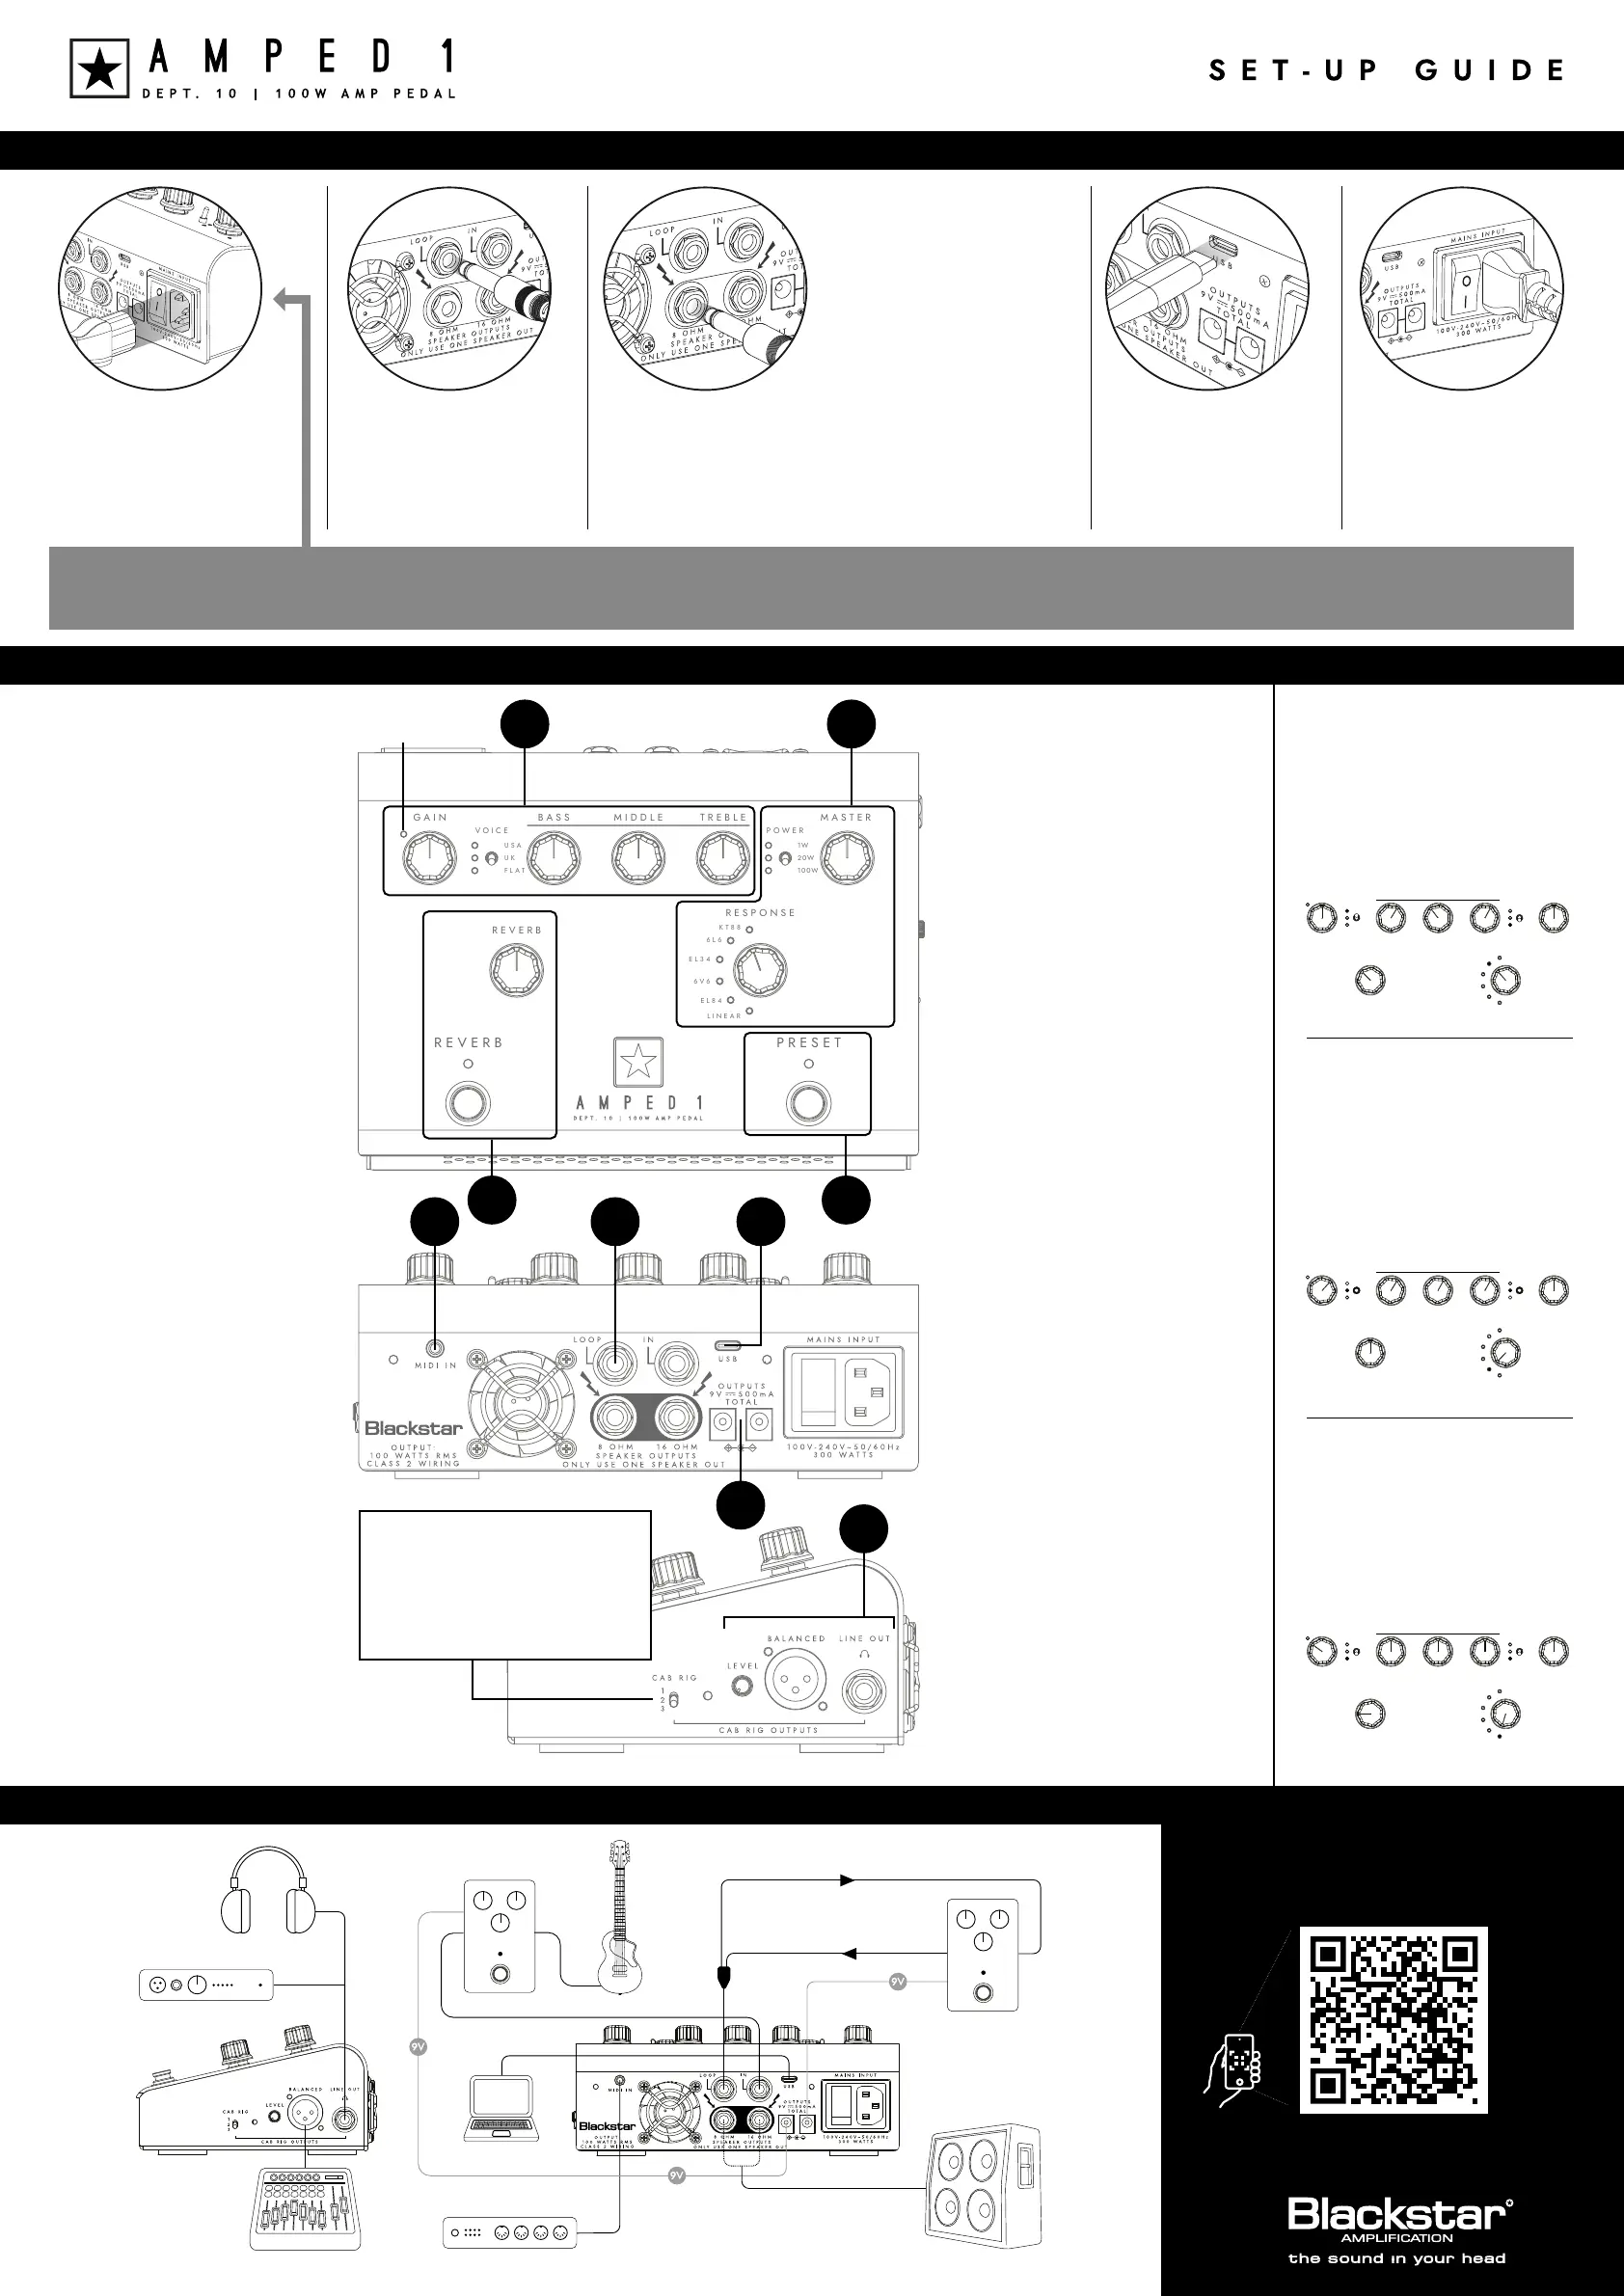
GETTING STARTED
CONGRATULATIONS ON BUYING THIS
DEPT. 10 AMPED 1 AMPLIFIER PEDAL
Your new AMPED 1 gives you unparalleled versatility and the power to fill any venue, in an all-in-one package
that fits in your backpack. Dial in the sound in your head, with a wide range of preamp voices and power amp
responses. Transform your pedalboard into the ultimate compact 100W amplifier.
Connect the mains lead to the amplifier
MAINS INPUT.
Connectez le cordon d'alimentation
à l'entrée MAINS INPUT de
l'amplificateur.
1235
Plug your guitar into the IN socket. Always
use a good quality screened guitar lead.
Branchez votre guitare dans la prise IN.
Utilisez toujours un câble de guitare
blindé de bonne qualité.
Switch your amplifier on using the
Power Switch.
Allumez votre amplificateur à l'aide de
l'interrupteur d'alimentation.
Connect to a computer or full range active
speaker using the Cab Rig outputs.
Connectez-vous à une l'ordinateur ou à
un haut-parleur actif à l'aide des sorties
Cab Rig.
WARNING:
The power lead should only be connected to a power outlet that is compatible with the voltage, power and frequency requirements stated on the rear panel. If in doubt get advice from a qualified technician.
AVERTISSEMENT : Le câble d'alimentation doit être connecté uniquement à une prise de courant compatible avec les exigences de tension, de puissance et de fréquence indiquées sur le panneau arrière. En cas de doute,
demandez conseil à un technicien qualifié
4
Connect a suitable guitar speaker cabinet to the
matching impedance SPEAKER OUTPUT: either
8 Ohms or 16 Ohms. Always use a good quality
speaker cable for speaker outputs.
WARNING: Do not use both speaker outputs
at the same time, doing so will damage your
amplifier. Connect the speaker cable to your
cabinet first, then your AMPED pedal.
Connectez un haut-parleur de guitare approprié
à la sortie SPEAKER OUTPUT d'impédance
correspondante : soit 8 Ohms, soit 16 Ohms.
Utilisez toujours un câble de haut-parleur de
bonne qualité pour les sorties des haut-parleurs.
AVERTISSEMENT : N'utilisez pas les deux
sorties haut-parleurs en même temps,
cela endommagerait votre amplificateur.
Connectez d'abord le câble du haut-parleur à
votre baffle, puis à votre pédale AMPED.
SETTING UP
CONNECTION GUIDE
VOICES
5. USB AND ARCHITECT
Connect your AMPED 1 to a PC or Mac and use our free
Architect software to manage multiple presets and deep
edit our state-of-the-art Cab Rig emulator DSP. Architect is
also used to program the 3 quick access Cab Rig presets
using the 3-way toggle switch. Use the USB-C Cab Rig
output to record high quality tones straight into your
computer without the need for a separate audio interface.
Connectez votre AMPED 1 à un PC ou un Mac et utilisez
notre logiciel gratuit Architect pour gérer plusieurs
préréglages et éditer en profondeur notre émulateur DSP
Cab Rig qui est à la pointe de la technologie. Architect est
également utilisé pour programmer les 3 préréglages Cab
Rig à accès rapide à l'aide de l'interrupteur à bascule à 3
positions. Utilisez la sortie USB-C Cab Rig pour enregistrer
des sons de haute qualité directement dans votre
ordinateur sans avoir besoin d'une interface audio séparée.
6. FX LOOP
Connect the supplied TRS signal splitter cable here to use
the effects loop. Use Architect to set the routing, series or
parallel modes and pre or post the built-in reverb.
Connectez ici le câble séparateur de signal TRS fourni
pour utiliser la boucle d'effets. Utilisez Architect pour
définir les modes de routage, série ou parallèle et pré ou
post la REVERB intégrée.
7. MIDI
Use the supplied TRS MIDI to 5 pin MIDI adaptor to control
all features via MIDI. Default is MIDI channel 1 and can be
changed via Architect.
Utilisez l'adaptateur TRS MIDI vers MIDI 5 broches fourni
pour contrôler toutes les fonctions via MIDI. La valeur par
défaut est le canal MIDI 1 et peut être modifié via Architect.
8. DC OUTPUT
Power your pedals directly from your AMPED 1. Use
the 9V DC outputs to power any compatible pedals up to
a maximum current of 500mA. Do not exceed a combined
total current of 500mA from the two outputs.
Alimentez vos pédales d’effets directement depuis votre
AMPED 1. Utilisez les sorties 9V DC pour alimenter toutes
les pédales compatibles jusqu'à un courant maximum de
500mA. Ne dépassez pas un courant total combiné des
deux sorties de 500 mA.
9. CAB RIG OUTS
Use the stereo LINE OUT to connect to headphones or
mixer using a TRS cable. The balanced XLR can be used
to connect directly to ‘Front of House’ or an interface. The
LEVEL control sets the overall level of all CAB RIG outputs.
Utilisez la sortie stéréo LINE OUT pour vous connecter à
un casque ou à une table de mixage à l'aide d'un câble
TRS. Le XLR symétrique peut être utilisé pour se connecter
directement à une table de mixage ou à une Interface
audio. La commande LEVEL règle le niveau global de
toutes les sorties CAB RIG.
9
1. AMPLIFIER
Dial in your amp tone with these controls. Choose a
preamp voice from one of 3 options using the toggle
switch. Adjust the controls to shape your tone. A good
place to start is with all of the controls at 12 o’clock.
Composez la tonalité de votre ampli avec ces
commandes. Choisissez une voix de préampli parmi
l'une des 3 options à l'aide de l'interrupteur. Ajustez les
commandes pour façonner votre ton. Un bon point de
départ est avec toutes les commandes au milieu.
2. POWER AMP
Choose your power amp RESPONSE and POWER rating,
then set your MASTER volume level.
Choisissez la résponse (RESPONSE) et la puissance
(POWER) de votre ampli de puissance, puis réglez votre
niveau de volume MASTER.
3. REVERB
Press to activate the built-in REVERB and set the effect
level with the control. When REVERB is on, press and
hold the footswitch for a FREEZE effect.
Appuyez pour activer la REVERB intégrée et régler le
niveau d'effet avec la commande. Lorsque REVERB est
activé, appuyez et maintenez le commutateur au pied
pour un effet FREEZE.
4. PRESET
Press to activate the stored PRESET (Gain, Voice, Bass,
Middle, Treble, Reverb and Response).
Hold down the PRESET footswitch until the RECALL LED
lights and PRESET LED flashes to save a new preset.
Note: The position of the knobs may not reflect the
stored patch. The recall LED will flash each time the
physical knob ‘passes through’ the saved preset value,
allowing you to recall and edit your preset.
Appuyez pour activer le PRESET enregistré (Gain, Voice,
Bass, Middle, Treble, Reverb et Response).
Maintenez enfoncé le commutateur au pied PRESET
jusqu'à ce que la LED RECALL s'allume et que la LED
PRESET clignote pour sauvergarder vos préréglages.
Remarque : La position des boutons peut ne pas refléter
le patch stocké. La LED de rappel clignotera chaque
fois que le bouton physique "passera" la valeur de
préréglage enregistrée, vous permettant de rappeler et
de modifier votre préréglage.
Welcome to AMPED 1
Let's get you started
www.blackstaramps.com/amped1-welcome
PEDAL
GUITAR
CAB
PEDAL
COMPUTER
MIDI DEVICE
DESK
HEADPHONES
INTERFACE
WARNING: USE ONLY ONE SPEAKER OUTPUT
Use the Cab Rig
switch to select
from 3 different
customisable
options. Deep edit,
load and store your
favourite settings
using our free
Architect software.
Utilisez le commutateur
Cab Rig pour choisir
parmi 3 options
personnalisables
différentes. Modifiez et
stockez en profondeur
vos paramètres préférés
à l'aide de notre logiciel
gratuit, Architect.
Specyfikacje produktu
| Marka: | Blackstar |
| Kategoria: | Niesklasyfikowane |
| Model: | AMPED 1 |
Potrzebujesz pomocy?
Jeśli potrzebujesz pomocy z Blackstar AMPED 1, zadaj pytanie poniżej, a inni użytkownicy Ci odpowiedzą
Instrukcje Niesklasyfikowane Blackstar

9 Stycznia 2025
9 Stycznia 2025
9 Stycznia 2025
9 Stycznia 2025
9 Stycznia 2025
18 Grudnia 2024
17 Grudnia 2024
23 Września 2024
23 Września 2024
23 Września 2024
Instrukcje Niesklasyfikowane
Najnowsze instrukcje dla Niesklasyfikowane
29 Stycznia 2025
29 Stycznia 2025
29 Stycznia 2025
29 Stycznia 2025
29 Stycznia 2025
29 Stycznia 2025
29 Stycznia 2025
29 Stycznia 2025
29 Stycznia 2025
29 Stycznia 2025