Instrukcja obsługi Brondi Amico Semplice+
Przeczytaj poniżej 📖 instrukcję obsługi w języku polskim dla Brondi Amico Semplice+ (1 stron) w kategorii smartfon. Ta instrukcja była pomocna dla 25 osób i została oceniona przez 9 użytkowników na średnio 4.4 gwiazdek
Strona 1/1
1
AMICO + SEMPLICE
Instruction Manual – English
2
3
1 Lock/Unlock
Key
7
USB hole
2 Torch
8
Speaker
hole
3 Call Key
9
SOS Key
4 End / Power
On/Power Off
10
Torch
5 Number Key
11
Receiver
6 FM key
5
Slide to
Power
On FM
Radio
6
KEY FUNCTIONS
KEYSDESCRIPTIONS
Friend
number
key
Standby interface:
1) Press to enter the list of friends and family
numbers.
2) Instead of the function of left soft key in some
menus, such as options, determine and so on.
SOS key
Long press SOS button for emergency calls, if the
issues caused by misuse emergency call, press hang
up key to end.
Lock side
key Slide up and down to lock and unlock
Navigator
UP key
Standby interface, short press to enter the User
Profiles.
Call key
1) When input a number, or select a number in the
phone book or relatives number, press this key to
make a call.
2) Click the button in the Standby interface directly into
a list which will show you the last call records.
3) Instead of the function of left soft key in some
menus, such as OK, options and so on.
7
PHOTO CONTACT DIAL
PHOTO DIAL is a procedure to DIAL DIRECT the CONTACT
PERSONS in PHONEBOOK THRU PICTURES SAVE in your GSM
PHONE.
1.Go to Phone book
2. SELECT PHOTO CONTACT
You can see (8) EIGHT PHOTO CONTACT to SET , EDIT and
SAVE.
Input NAME, MOBILE NUMBER , CALLER PICTURE PHOTO
(You can use CAMERA to make CALLER PHOTO for
DESIGNATED CONTACT ) , CALLER RINGTONE.
After you SET all, PRESS SAVE.
3.Start to use Phote Dial
Press NEVIGATOR DOWN KEY , then you can see all 8 PHOTO
CONTACT.
If you want to CALL No. 1 PHOTO, just PRESS “1” then it will DIAL.
4. If you want to Change SETTING , just same procedure GO TO
PHONEBOOK and SELECT PHOTO CONTACT
Then SELECT OPTIONS, You can EDIT, CALL, DELETE and
SEND MESSAGE.
End key
1) When the phone has power off, long press this key
to power on. When the phone has power on, long
press this key to shutdown in standby interface.
2) Call or during a call press to hang up.
3) Nonediting interface, return to the standby screen.-
FM/Torch
key
1)Standby interface, Slide to turn on/offFM radio.
When FM is background play, press key into main FM
interfaces.
2)Slide key to swift on or off.
1-9
number
keys
1) Standby screen press the corresponding number of
friends and relatives can call the number.
2) Standby interface, when someone is not set
numbers press to enter setup menu relatives
numbers.
8
FUNCTION MENU
2.1 Using function menus
In standby state, press the Left soft key or the OK key to access
Main menu; in all menus and submenus, you can enter or exit the
menu by pressing the Left soft key or the Right soft key.
Exit: Generally, press the Right soft key to return to the previous
menu;press the End Call key to return in standby state.
2.2 Phonebook
Phonebook Memory : 500 telephone numbers.
Into the you can create, edit, search, delete, copy, business contacts
cards and other operations, manage contacts through the menu
contents.
2.3 Organizer
2.3.1 Family Numbers( Speed dial)
You have to set Status is ON, and then set Family Number from M1
M2 11 1- 9, totalspeed dial number.
Main screen Press and hold one of the ten speed dial number keys
when the phone is in the standby state, the phone will make phone
call to the corresponding phone number which has been existed in
the speed dial number list.
2.3.2 SOS setting
Go to ORGANIZER, then SOS SETTING
There are 5 SOS NUMBERS to set.
You can turn the settings in SOS STATUS to on / off ALARM, SOS
numbers, SOS message editing.
By pressing the SOS BUTTON, you can hear a ALARM TONE and
indicator on LCD that is activating the SOS FUNCTIONS.
2.4 Multimedia
9
2.4.1 Video Player
Enter it and select the video you need, then press the 4 key or 6 key
to change video, and press Up key for full screen, and 5 key to play.
2.4.3 Audio player
Choose the Audio player to get into the interface. The screen of the
music player shows the caption: List, Back. Accessing list will show
the name of the music that you have downloaded. Selecting one
song of them, you can enter into a list: Play, Details, Add to
ringtones, Refresh list and settings by choosing "options" which is
under the detailed list. If your detailed list is empty, you can only see
Refresh list and Settings.
and : Press the Up key can open or close the music player, or stop it
for short time.
Press the Down key to stop music.
And Press the number to switch to the previous song key 4 or 6
and the next song separately .
Volume: Press the side keys (+,-) to change the volume for playing.
2.4.4 Sound recorder
Enter it to get into the interface of soundrecording file list directly: -
Select one of the existed files and enter Options: Record, Play,
Append, Rename, Delete, Delete all files, Settings, Use as and Send.
Please select Record to startrecording. If thers is no file, there will
only be Record and Settings in Options.
2.4.5 FM radio
It provides the function of FM radio, and you need not input an
earphone in the phone before using this function.
Turn on FM Radio:
Option 1: Handset Lock/unlock, Slide FM buttom on side,
Option 2: Unlock phone, Menu>FM Radio.-->Multimedia
Channel: FM Radio interface:> 2.Manual input ( To input Options-
the channel.)
10
-Item 3 Auto Search > Yes. (After Search, you can find in channel
List).
Swift channel/ channel Adjustment
In the interface of FM radio, pressing the Up keycan open or close
the function of searching automatically. After opening this function,
pressing the number key 4 or 6 can carry on the forward searching
or the backward searching automatically, until search a channel.
Press the number key will increase or reduce 0.1 HZ.UP or DOWN
Select the and start or close the FM radio playing; 5 key
press the * # keyto adjust the volume. Get into the interface of the
radio, select [options]and carry on the following operations:
Channel list
: Getting into this menu, it will show all the detailed
list of 90 channels that you have been edited and kept in your phone.
You can also play the existed channel directly. To delete or edit the
existed
channel is allowed.
Manual input:
You can input the broadcast frequency by hand
which you want to hear, and then it will broadcast automatically after
you press the assurance key.
Auto search:
Choose this menu and search broadcast
channels automatically.
Settings:
Set the function of Background play or Loudspeaker as
On or Off.
2.4.6 Security settings
Use this function to set the security options to avoid your phone or
SIM card be used illegally.
SIM security settings:
SIM lock: PIN code.
11
PIN codecan prevent your SIM card from illegal operation.
If the PIN code is disabled, choose Enable and you can start PIN
code protection. The mobile phone will ask you to enter PIN code
the next time when you turn on the phone.
If the PIN code is enabled, choose Disable and then you can stop
PIN code protection.
Note: If you enter invalid PIN code three times consecutively,
the SIM card will be locked and you will need PUK code to
unlock the SIM card. The PIN code and PUK code may be
provided together with SIMcard. Please contact your network
operator if not. The default PIN code is 1234. Please change it
into your own private password as soon as possible.
Fixed dial:
It supported by your SIM card and you can select some telephone
numbers to dial. If this service is activated, you can only dial the
telephone number in the FDN list or the number started with some
numbers which is stored in the list.
Enter the submenu of fixed dialing:
Mode:
Enable or disable fixed dialing function (need to enter PIN2
code).
Fixed dial list:
Enter the telephone numbers of fixed dialing.
Note: You need to enter PIN2 code to enable or disable fixed
dialing function. Please contact your network operator to get
PIN2 code. The numbers which are fixed dialing numbers will
carry on the fixed dialing function if FDN function is enabled.
Barred dial
: It is opposite to fixed dialing and you can set to
disable dialing certain numbers.
Change password:
Change password, including PIN and
PIN2 password.
12
Phone lock:
The phone lock can prevent your mobile phone
from illegal operation. You can set the phone lock as On or Off and
change the phone password.
Select Phone lock to enable the protection and then you need to
enter the password when you switch on the phone; press the Dial
key to access Phone lock and input the password again to disable
phone lock.
Note: The default phone lock password is 1122. Please change
into your own private password as soon as possible.
Auto keypad lock
: Close this function or open it by setting the
waiting time of keypad lock. After setting, the keypad will be locked
automatically if the mobile phone hasn’t been used in specified time.
Change password:
Change password of the phone lock.
2.4.7 Dual SIM setting
You can select one of them: Double SIM open, Only SIM1 open,
Only SIM2 open or Flight mode.
2.4.8 Connectivity
Getting into connectivity you will see Bluetooth.
2.4.9 Restore factory settings
The default password of Restore factory settings is 1122.
Menu>Setting-->8.Restore settings, after input “1122”, ->OK,- >YES
3. INPUT METHOD
This mobile phone supports these input methods: ABC/abc,
ABC/abc, Numeric, Insert symbol and so on.
3.1 Key definitions
13
The general definition of keypad is as follows (please refer to
Chapter 4.2 “Text input” for the keypad definition in specific input
method):
The Left soft key:
Press it to confirm.
The Right soft key:
Press it to clear a character.
The * key:
Input symbols.
The # key:
Switch input methods.
Number keys (1-9):
Input the letters on each key.
3.2 Text input
3.2.1 English and number input methods
The specific definition of keypad in English and number input
methods:
KeysCharacters or functions
Number key 1
Input symbols
Number key 2
ABCabc2
Number key 3
DEFdef3
Number key 4
GHIghi4
Number key 5
JKLjkl5
Number key 6
MNOmno6
Number key 7
PQRSpqrs7
Number key 8
TUVtuv8
Number key 9
WXYZwxyz9
Number key 0
0 and space
The * keyInput symbols.
The # key Switch input methods.
Left soft key Confirm
Right soft key Clear
14
To input English letters:
Each key allows you to input more than one character. Press
the key repeatedly and quickly until the needed character
appears. Input next character when the cursor moves.
Press the key to change an input method. #
Press the number key “0” once to input one space in English input
method.
Press the Right soft key to clear mistakes.
To input numbers:
Press the number keys repeatedly and quickly until the
corresponding number appears when the current input
method is ABC / abc.
Change the input method as Numeric and press [0]-[9]
to input corresponding numbers directly.
This mobile phone supports Tflash card to extend the memory -
space. The operations are as follows :
Note : AMICO Semplice+ need to use the prescribed
Main Adaptor packed on this Gift box to avoid any risk
accident and Using another adaptor will results in NON –
Compliance with EN609501 and will invalidate any -
approval and Warranty.
EC COMPLIANCY DECLARATION
The company Brondi S.p.A., with legal headquarters in Via
Cesare Pavese No:43500144 Roma and operative base in Via -
Guido Rossa 310024 Moncalieri (TO), declaration that the -
15
device AMICO Semplice+complies with all the requirements
specified in the 99/5/EC European Directive Concerning radio
and equipment and that it complies with the following
telecommunication regulations
EN 301 489-1 V1.9.2
EN 301 4897 V1.3.1-
EN 301 489-17 V2.2.1
EN 300 328 V1.8.1
EN 301 511 V9.0.2 (2003-03)
EN 60950.1:2006+A11:2009+A1:2010+A12:2011
EN622091:2006, EN622092:2010, --
EN50360:2001, EN50360:A1:2012
EN50566:2013, EN62479:2010
The compliance with the above mentioned requirements is shown by
the label
The product complies with the 2004/108/EC Directive relating to the
electromagnetic
compliancy and with the 2006 /95 / EC (LVD) concerning safety
regulations.
The Product complies with the ROHS 2011 / 65 / EU Standard.
16
BRONDI S.p.A.
www.brondi.it
info@brondi.it
Version: 08 July 2016
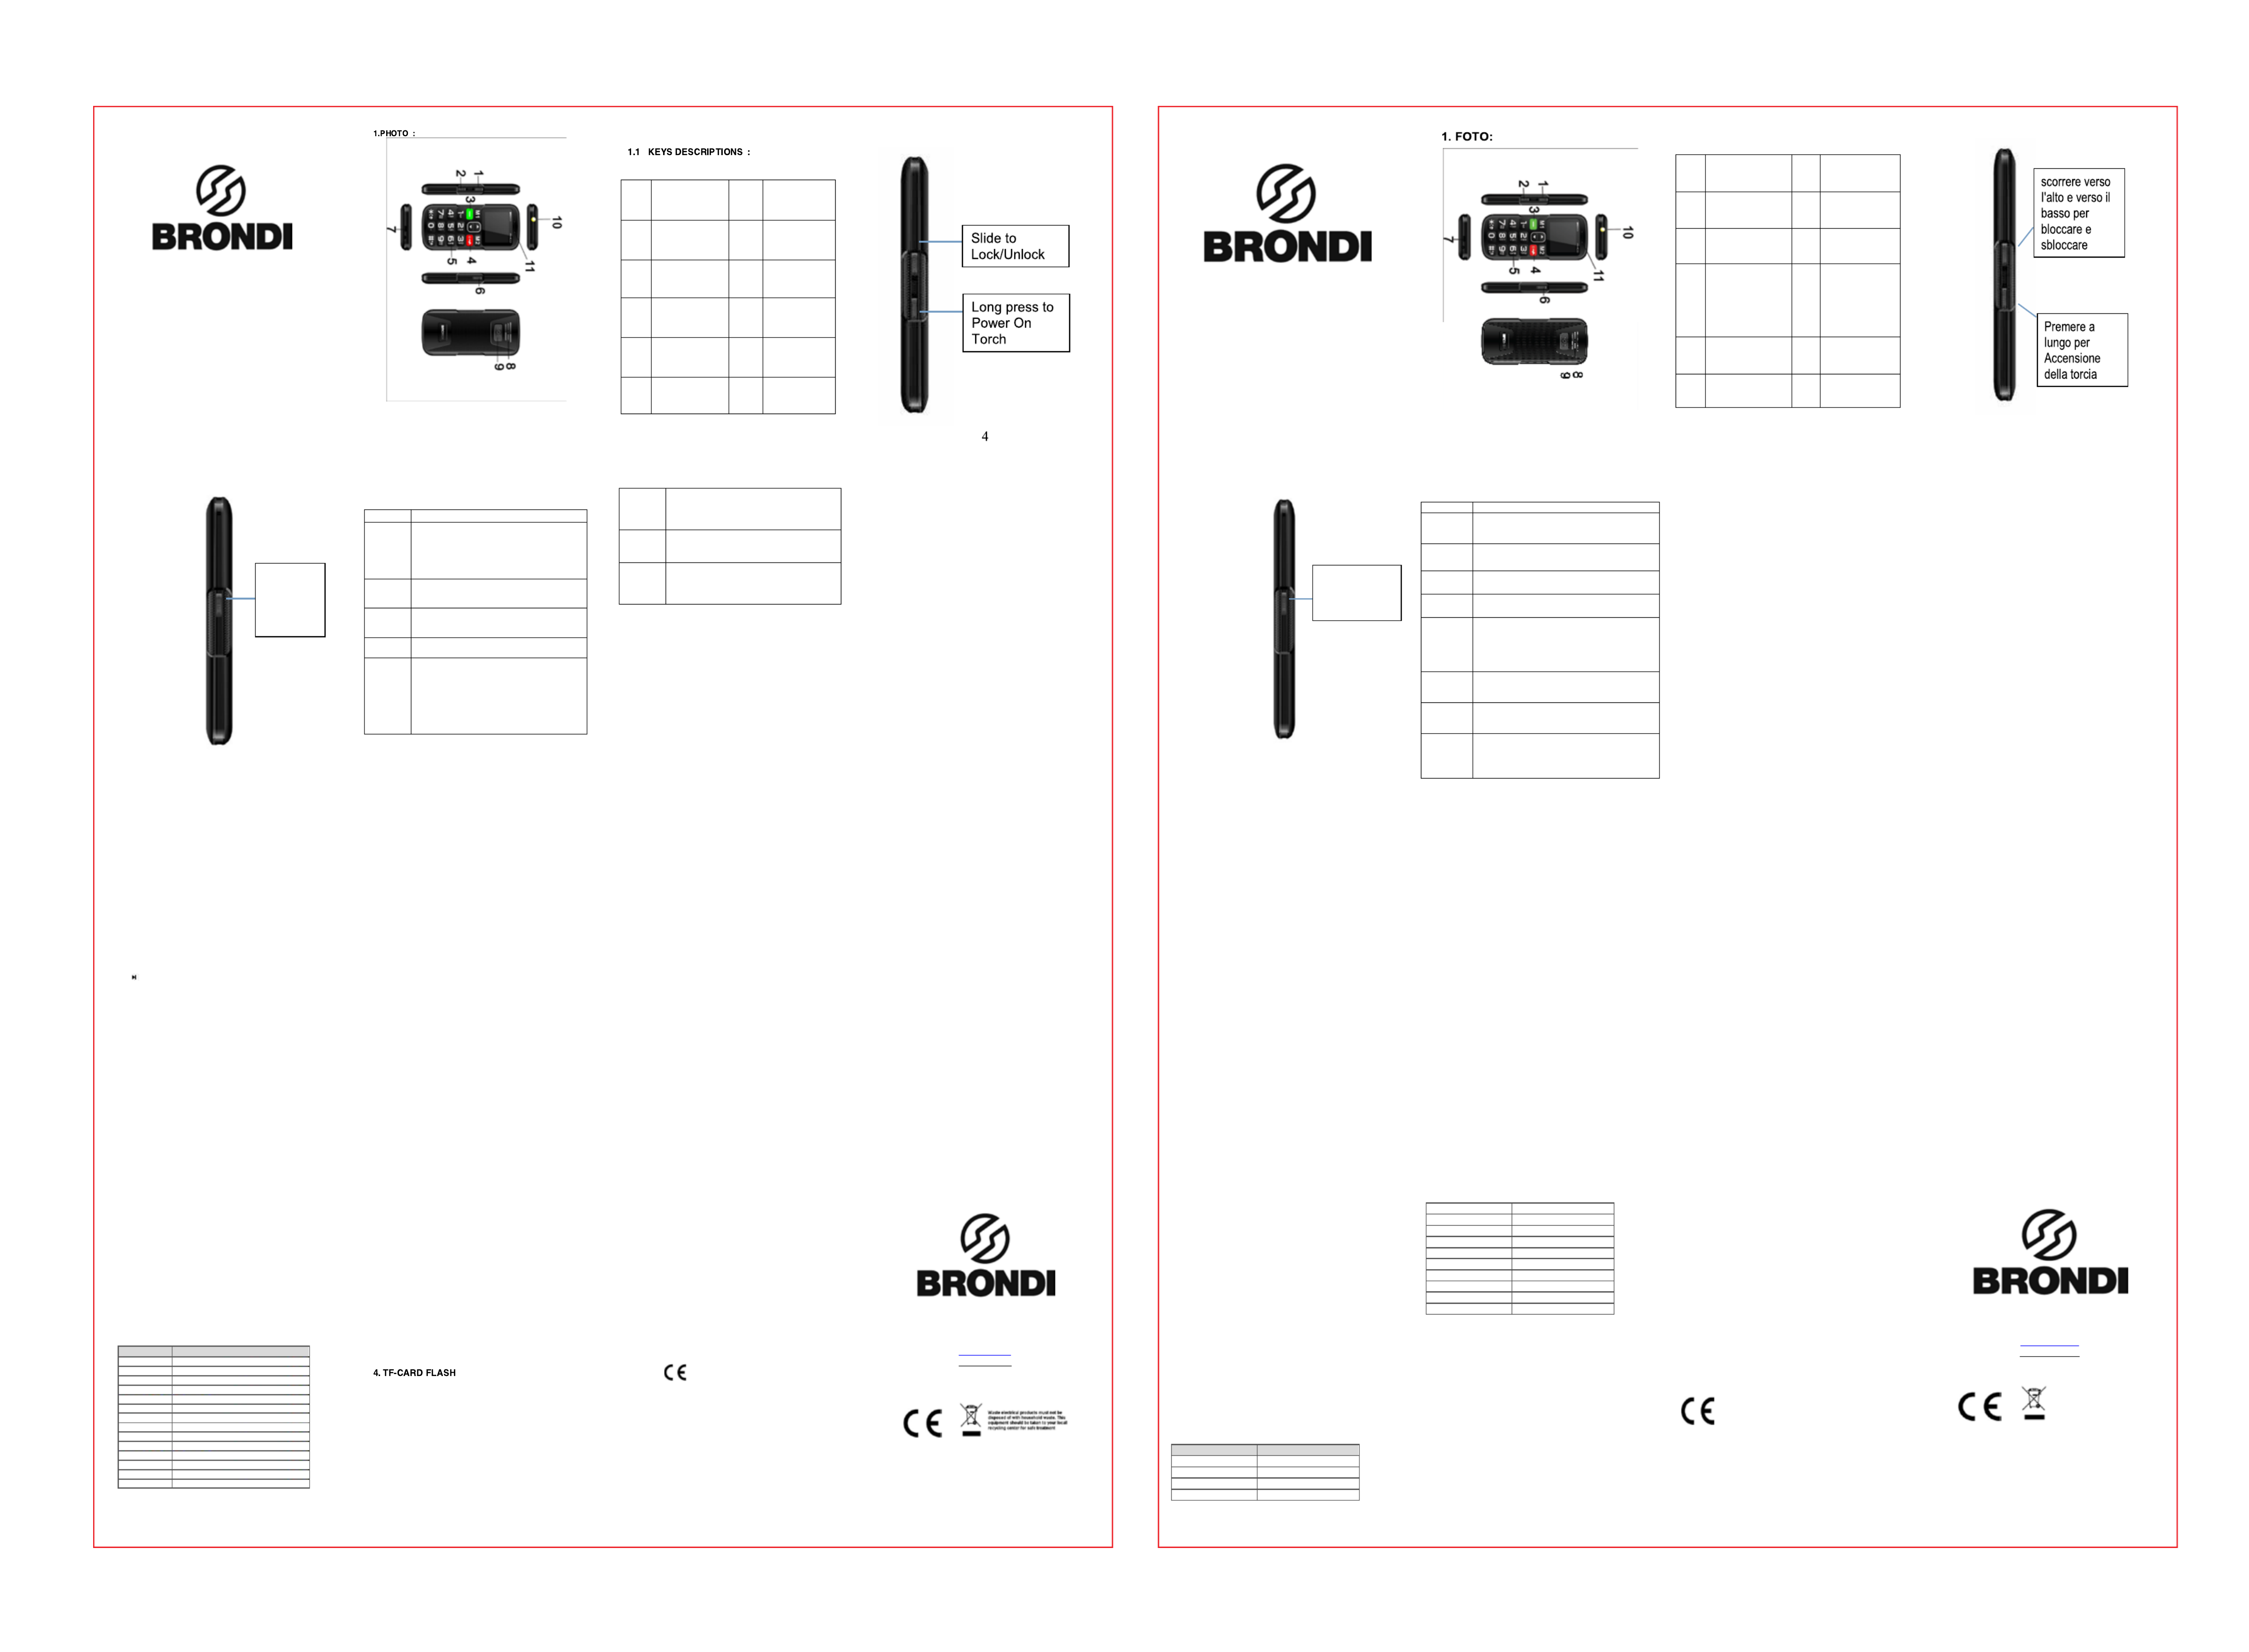
1.1 DESCRIZIONI DEI TASTI :
1 Tasto di Blocco
/ Sblocco 7 Tasto SOS
2 Torcia 8 Buco Speaker
3 Tasto di
Chiamata 9 T asto SOS
4
Tasto Fine /
Accensione
chiave /
Spegnimento
Tasto
10
Torcia
5 Numero Chiave
11
Ricevitore
6 T asto FM
Far scorrere di
Accensione
radio FM
Funzioni dei tasti
TastiDescrizioni
Tasto di
selezione Dx
In Standby:
1) Premere per entrare nella Rubrica telefonica.
2) Premere nel per tornare indietro quando si è menu, o in qualche
opzione.
Tasto SOS
Premere a lungo il asto SOS per chiamate di Tinviare le
emergenza. Se viene premuto per errore, premere il tasto di
selezione Dx per terminare.
ta
sto
laterale della
serratura
Scorrere verso l'alto e verso il basso per bloccare e sbloccare
Tasto di
navigazione
UP
Interfaccia di standby, premere brevemente per accedere ai profili
utente.
tasto di
chiamata
1) Quando l'ingresso di un numero o selezion
are un numero nel
numero rubrica o parenti, premere questo tasto per effettuare una
chiamata.
2) Fare clic sul pulsante nell'interfaccia di standby direttamente in
un elenco che vi mostrerà le ultime registrazioni delle chiamate.
3) Al posto della funzione del tasto funzione sinistro in alcuni menu,
ad esempio OK, opzioni e così via.
Tasto
ON/OFF
Fine
Chiamata
1) Premere a lungo per Accendere o Spegnere il telefono.
2) . Premere per chiudere una chiamata
3) Premere per uscire dal menu e tornare sulla videata principale.
Tasto FM /
torcia
1)
Interfaccia standby, scorrere per accendere / spegnere la radio
FM. Quando FM un gioco da fondo, premere il tasto in principali è
interfacce FM.
2)
Far scorrere fondamentali per una rapida on o off.
Tastiera
Numerica
1) In standby, comporre in numero di telefono da chiamare e
confermare con il tasto di chiamata.
2) In standby, se la funzione Comp. Veloce è accesa ed è stata
impostata, tenere premuto a lungo un numero dal 2 al 9 per inviare
le chiamate.
IMPOSTAZIONI DELLA FUNZIONE “VEDI E CHIAMA” :
VEDI E CHIAMA è una funzione che permette di visualizzare la foto
dei tuoi contatti preferiti e chiamarli semplicemente premendo un tasto.
1. ENTRARE IN RUBRICA
2. SELEZIONARE LA FUNZIONE “VEDI E CHIAMA”
a. Tu puoi vedere (8) otto foto dei tuoi contatti preferiti per impostarli,
modificarli e salvarli.
b. Inserire il nome, il numero di cellulare, la suoneria da abbinare e la
foto da associare (tu puoi utilizzare la fotocamera per abbinare una
foto al contatto o selezionare da file una già presente nel dispositivo).
c. Dopo aver impostato tutto, premere SALVA.
3. UTILIZZARE LA FUNZIONE “VEDI E CHIAMA”
a. Dei due tasti centrali di navigazione premere il tasto “giù” per
visualizzare tutte le 8 foto abbinate ai contatti.
b. Se si desidera chiamare la foto 1, basta premere il tasto “1" sulla
tastiera e il contatto verrà chiamato automaticamente.
4. MODIFICARE LA FUNZIONE “VEDI E CHIAMA”
a. Ripetere la procedura dal punto 1 entrando in RUBRICA e
selezionando la funzione “VEDI E CHIAMA”.
b. Selezionando opzioni, è possibile modificare o eliminare i dati
precedentemente inseriti.
2. MENU DELLE FUNZIONI
2.1 MENU DI USO
In standby, premere il tasto di selezione Sx per entrare nelmenu
principale; in tutti i menu e sottomenu, è possibile entrare o uscire dal
menu premendo il tasto di selezione Sx o il tasto di selezione Dx.
Uscita: Generalmente, premere il tasto di selezione Dx per tornare al
menu precedente; premere il Tasto ON/OFF per tornare in standby.
2.2 Rubrica
M5emoria della Rubrica: 00 numeri di telefono
Nei contatti si possono creare, modificare, cercare, eliminare, copiare i
contatti telefonicigestire i contatti il menu.; tramite
2.3 O rganizer
2..1 3Impostazioni SOS
1- > Stato SOS: è possibile attivare o disattivare l’SOS
E’ possibile inserire 5 numeri SOS.
È possibile attivare le impostazioni on / come SOS STATO ALLARME
off, numeri SOS, SOS editing messaggio.
Premendo il tasto SOS, è possibile ascoltare un TONO ALLARME e
indicatore LCD che attiva le unzioni SOS.F
2.3.2 Composizione veloce (selezione rapida)
È necessario impostare lo stato ACCESO, e quindi impostare i numeri
preferiti selezionandoli dalla rubrica dal M1,M2 1 al 9. In totale 11
selezioni rapide.
Qè uando il telefono nello stato Standby, premere e tenere premuto
uno dei numeri di selezione rapidail telefono effettuerà la chiamata.:
2.3.4 File manager
Premere il tasto sinistro per entrare nel File manager. Il modo default
per la memorizzazione è di usare la Micro SD. Dopo aver inserito la
carta T-Flash, ci sono due opzioni da Cscegliere: Telefono e arta di
M emoria. Selezionare uno di loro per vedere i file memorizzati.
2.4 Multimedia
2.4.1 Video Player
Entrare e selezionarevideo che ti serve, e poi premere il tasto di
selezione per selezionare Opzioni: è possibile visualizzare i sottomenu:
Inizia, Invia, Rinomina, Elimina, Elimina tutti i file, Ordina e
Archiviazione.
P remere il tasto 5per mettere in Play o in pausa.
Premere ilper cambiare da tutto schermo tastoUP“” a “parziale” e
v iceversa.
2.4.3 r Audio Playe
Scegliere il lettore audio per entrare nell'interfaccia. Lo schermo del
lettore musicale mostra le opzioni: Lista, Indietro. Entrando nella lista ti
mostrerà il nome della musica che haielezionare scaricato. Suna di
loro, è possibile in un elencentrare o: Inizia, Dettagli, Aggiungi a
suonerie, Aggiorna lista Ie le mpostazioni scegliendo "opzioni", che è
sotto la lista dettagliata. Se la listaè vuota, si può vedere dettagliata
solo Aggiorna listampostazioni. Ie
Premere il asto centrale alto perT aprire o chiudere il lettore musicale,
o fermarsi per breve tempo.
Premere il Tasto centrale basso per stoppare la musica.
E premere il tasto numerico 4 o 6per ritornare alla canzone
precedente o andare alla successiva.
2.Registratore 4.2 Audio
Si seleziona pinterfaccia di registrazioneaudio. In er entrare nell’-
Opzioni si possono effettuare: Nuova , selezionare lista Registrazione
Riproduci, Allega, rinomina, elimina, elimina tutti i file etc. Seleziona
Registrazione per avviare la registrazione. Se non c’è alcun file, ci
sare ano solo Registrazione Impostazioni nelle Opzioni.
2.4.3 FM radio
Fornisce la funzione di radio FM, e non ha bisogno di inserire un
auricolare del telefono prima di utilizzare questa funzione.
Attivare Radio FM:
Opzione 1: Blocca cellulare / sblocco, Slide buttom FM sul lato,
Opzione 2: Sbloccare telefono, Menu> Multimedia--> Radio FM.
Interfaccia Radio FM:: Canale Opzioni> ingresso 2.Manual (Per -
inserire il canale.)
Articolo 3 Ricerca automatica -> Sì. (Dopo la ricerca, è possibile
trovare nella lista dei canali).
Regolazione canale Swift / canale
Nell'interfaccia di radio FM, premendo il tasto Su può aprire o chiudere
la funzione di ricerca automatica. Dopo aver aperto questa funzione,
premendo il tasto numerico 4 o 6 possono portareavanti la ricerca in
avanti o all'indietro la ricerca automatica, fino a quando la ricerca di un
canale.
Quando si chiude la funzione di ricerca automatica, è possibile
continuare a cercare da soli.
Premere il tasto numerico UP o DOWN aumenterà o ridurrà 0,1 HZ.
Selezionare il tasto 5 e avviare o chiudere la riproduzione radio FM;
premere il tasto * # per regolare il volume. Prendi nell'interfaccia della
radio, selezionare [opzioni] e portare avanti le seguenti operazioni:
Elenco canali: Entrare in questo menu, mostrerà tutto l'elenco
dettagliato di 90 canali che sono stati modificati e conservati nel
telefono. È inoltre possibile riprodurre direttamente il canale esistito.
Per eliminare o modificare il canale esistito è permesso.
Inserimento manuale: È possibile inserire la frequenza di trasmissione
a mano che si desidera ascoltare, e poi sarà trasmesso
automaticamente dopo aver premuto il tasto di garanzia.
Ricerca automatica: scegliere questo menu e cercare canali di
trasmissione automatica.
Impostazioni: Impostare la funzione di gioco di sfondo o come
altoparlante On o Off.
2.5 Impostazioni
2..1 5Impostazioni doppia SIM
Puoi selezionare: Doppia SIM attivato, solo SIM1 attivata, solo SIM 2
attivata o modalità aereo.
2.2 5. Impostazioni di protezione
Utilizzare questa funzione per impostare le opzioni di sicurezza per
evitare che il vostro telefono siano utilizzatio la carte SIM illegalmente.
Protezione della SIM:
Blocco PIN: Codice PIN evita che la tua carta SIM sia usata
illegalmente. Si può variareo disabilitare.
Se il codice PIN è disattivato, scegliere Attiva e si può iniziare la
protezione del codice PIN. i chiederà di inserire il codice PIN la V
prossima volta quando si accende il telefono
Se il codice PIN è , selezionare Disattiva e attivatoquindi si può uscire
dalla protezione del codice PIN.
Nota: Se si digita il codice PIN non valido per tre volte
consecutive, la carta SIM viene bloccata e sarà necessario il
codice PUK per sbloccare la carta SIM. Il codice PIN e il codice
PUK possono essere forniti insieme con la carta SIM. Si prega di
contattare l'operatore di rete in questi casi.
Cambia PIN2
Modalità: Attivare o disattivare la funzione di chiamate fisse.
(necessario inserire il codice PIN2).
Lista chiamte fisse: Entrare nei numeri delle chiamate fisse.
Nota: è necessario inserire il codice PIN2 per attivare o disattivare
la funzione il proprio chiamate fisse. Si prega di contattare con
operatore di rete per ottenere il codice PIN2. I numeri che sono
memorizzati continueranno la funzione chiamate fisse se la
funzione FDN è stata attivata.
C: omporre sbaratoE ' differente con la funzione chiamate fisse edè
possibile disattivarlo componendo dei numeri determinati.
Cambiare codice segreta: Cambiare la codice segreta, incluso codice
Pin e codice Pin2.
Protezione del telefono:
Il blocco del telefono può evitare le operazioni illegali per il tuo telefono.
È possibile attivare/disattivare la funzione e modificare il codice
segreto del telefono.
Impostando il blocco telefono su ACCESO, il codice verrà richiesto
all’accensione per un’ulteriore sicurezza oltre al PIN della SIM.
Nota: la password di blocco del telefono iniziale è 1122. Si prega
di cambiarla il più presto possibile.
2.Connettività 5.3
1. Bluetooth: possibilità di accendere, spegnere e impostare il nome
del dispositivo utile al trasferimento di file con altro telefono o
all’utilizzo di auricolari senza filo.
2.5.4 Ripristinare
impostazioni di fabbrica
Il codice segreto di questa funzione e’ 1122.
MenuImpostazioni->-> voce 8.Ripristinare impostazioni di fabbrica,
inserire “1122”, > confermare con OK, terminare con SI.-
3. METODI DI SCRITTURA
Questo cellulare supporta i vari metodi di input: ABC / abc, ABC / abc,
Numerico, simbolo e così via.
3.1 Definizioni del Tasto
Tasto sinistro: P. remere per confermare
Tasto destro: PI remere per eliminare caratteri
Tasto *: Per digitare i simboli
Tasto #: Cambiare il metodo di scrittura.
Tastiera numerico (1-9): per digitare i numeri
3.2 Scrittura del testo
3.2.1 Metodi di scrittura e numeri
La definizione specifica di Tastiera italiana + numeri:
Tasti Caratteri e funzioni
Tasto numerico1Input simboli
Tasto numerico 2 ABCabc2
Tasto numerico 3 DEFdef3
Tasto numerico 4 GHIghi4
Tasto numerico 5 JKkl5 Lj
Tasto numerico 6 MNOmno6
Tasto numerico 7 PQRSpqrs7
Tasto numerico 8 TUVtuv8
Tasto numerico 9 WZwxyz9 XY
Tasto numerico 0 0 e spazio
Tasto * Inpusimbi. t li
Tasto # Cambiare metodo input di
Tasto sinistro cferma on
Tasto destro imina el
Scrittura lettere:
Oi tasto cste di rivere più di un caratterePremere asto gnonensc. il t
ripetutamte e ramente fo a visualizzare il carattere che si enapidin
desera. Scrivere il carattere successivo ao il cursore si idqund
sposta.
Premere il tasto per camare metodo di rittura e passare da #bi ilsc
in uittivo a staard. nd
Premere il tasto “0” per aorre uno spaziora a parola e l’tra. pp tunal
Premere il tasto di selezione DX per cceare. anll
4. Micro SD (n inclusa)on
Questo cellare supporta la Micro SD per esteere lo spazio ulnddi
memoria. Le operazii sono le seti: onguen
AMICO Sempce+: è necsario utare lusivamente'adaatore liesilizzesc ltt
originale fornito in cfezie per evitare alsii rihio identale. ononquasscacc
Uta adaatore originalea conformità EN950-1 verrà ilizzndounttnon l60
compromsa e arozie e garanzia suproo sarà esogni ppvaonl odtt
indata. vali
Conformità CE DICHIARAZIONE
La società Brondi Telefonia S.p.A., con sede legale in Via Cesare
Pavese No:43500144 Roma e unità operativa in Via Guido Rossa 3- -
10024 Moncalieri (TO), dichiara che l’apparecchio AMICO +Semplice
soddisfa i requisiti della Direttiva Europea 1999/5/EC riguardante le
apparecchiature radio e le apparecchiature terminali di
t elecomunicazioni, ed è conforme alle seguenti norme
EN 301 489-1 V1.9.2
EN 301 4897 V1.-3.1
EN 301 489-17 V2.2.1
EN 300 328 V1.8.1
EN 301 511 V9.0.2 (2003-03)
EN 60950.1:2006+A11:2009+A1:2010+A12:2011
EN622092:2010, -1:2006, EN62209-
EN50360:2001, EN50360:A1:2012
EN50566:2013, EN62479:2010
La conformità ai suddetti requisiti essenziali vieneespressa tramite la marcatura
Prodotto è conforme alla direttiva 2004/108/EC relativa alla la conformità
elettromagnetica e con il 2006/95/EC (LVD) riguardante le norme di sicurezza.
Prodotto è conforme ai ROHS 2011/65 / standard UE.
AMICO + SEMPLICE
Istruzione Manuale – Italiano
BRONDI S.p.A.
www.brondi.it
info@brondi.it
Versione: 08 L 6 uglio201
Rifiuti dei prodotti elettrici non
devono essere smaltiti insieme ai
rifiuti domestici. Questa
apparecchiatura deve essere
assunta al vostro centro di
riciclaggio locale per un
trattamento sicuro.
1 1234
5678
9101112
13141516
Specyfikacje produktu
| Marka: | Brondi |
| Kategoria: | smartfon |
| Model: | Amico Semplice+ |
Potrzebujesz pomocy?
Jeśli potrzebujesz pomocy z Brondi Amico Semplice+, zadaj pytanie poniżej, a inni użytkownicy Ci odpowiedzą
Instrukcje smartfon Brondi

28 Czerwca 2024
28 Czerwca 2024
28 Czerwca 2024
28 Czerwca 2024
28 Czerwca 2024
28 Czerwca 2024
28 Czerwca 2024
Instrukcje smartfon
Najnowsze instrukcje dla smartfon
2 Kwietnia 2025
30 Marca 2025
10 Marca 2025
7 Marca 2025
5 Marca 2025
5 Marca 2025
3 Marca 2025
2 Marca 2025
26 Lutego 2025
26 Lutego 2025