Instrukcja obsługi Canon LM-V1
Canon
nieskategoryzowany
LM-V1
Przeczytaj poniżej 📖 instrukcję obsługi w języku polskim dla Canon LM-V1 (4 stron) w kategorii nieskategoryzowany. Ta instrukcja była pomocna dla 28 osób i została oceniona przez 14.5 użytkowników na średnio 5.0 gwiazdek
Strona 1/4

MONITORING
10 EN
Monitoring
LM-V1 / LM-V2 LCD Monitor
Connect the LCD monitor to the camera to add a large monitoring screen with touch screen operations
(touch to focus), menu operation buttons and joystick and two assignable buttons.
For details on how to attach and use the LCD monitor, see the instruction manual of the camera being
used.
An optional attachment unit is also required to attach the monitor to the camera.
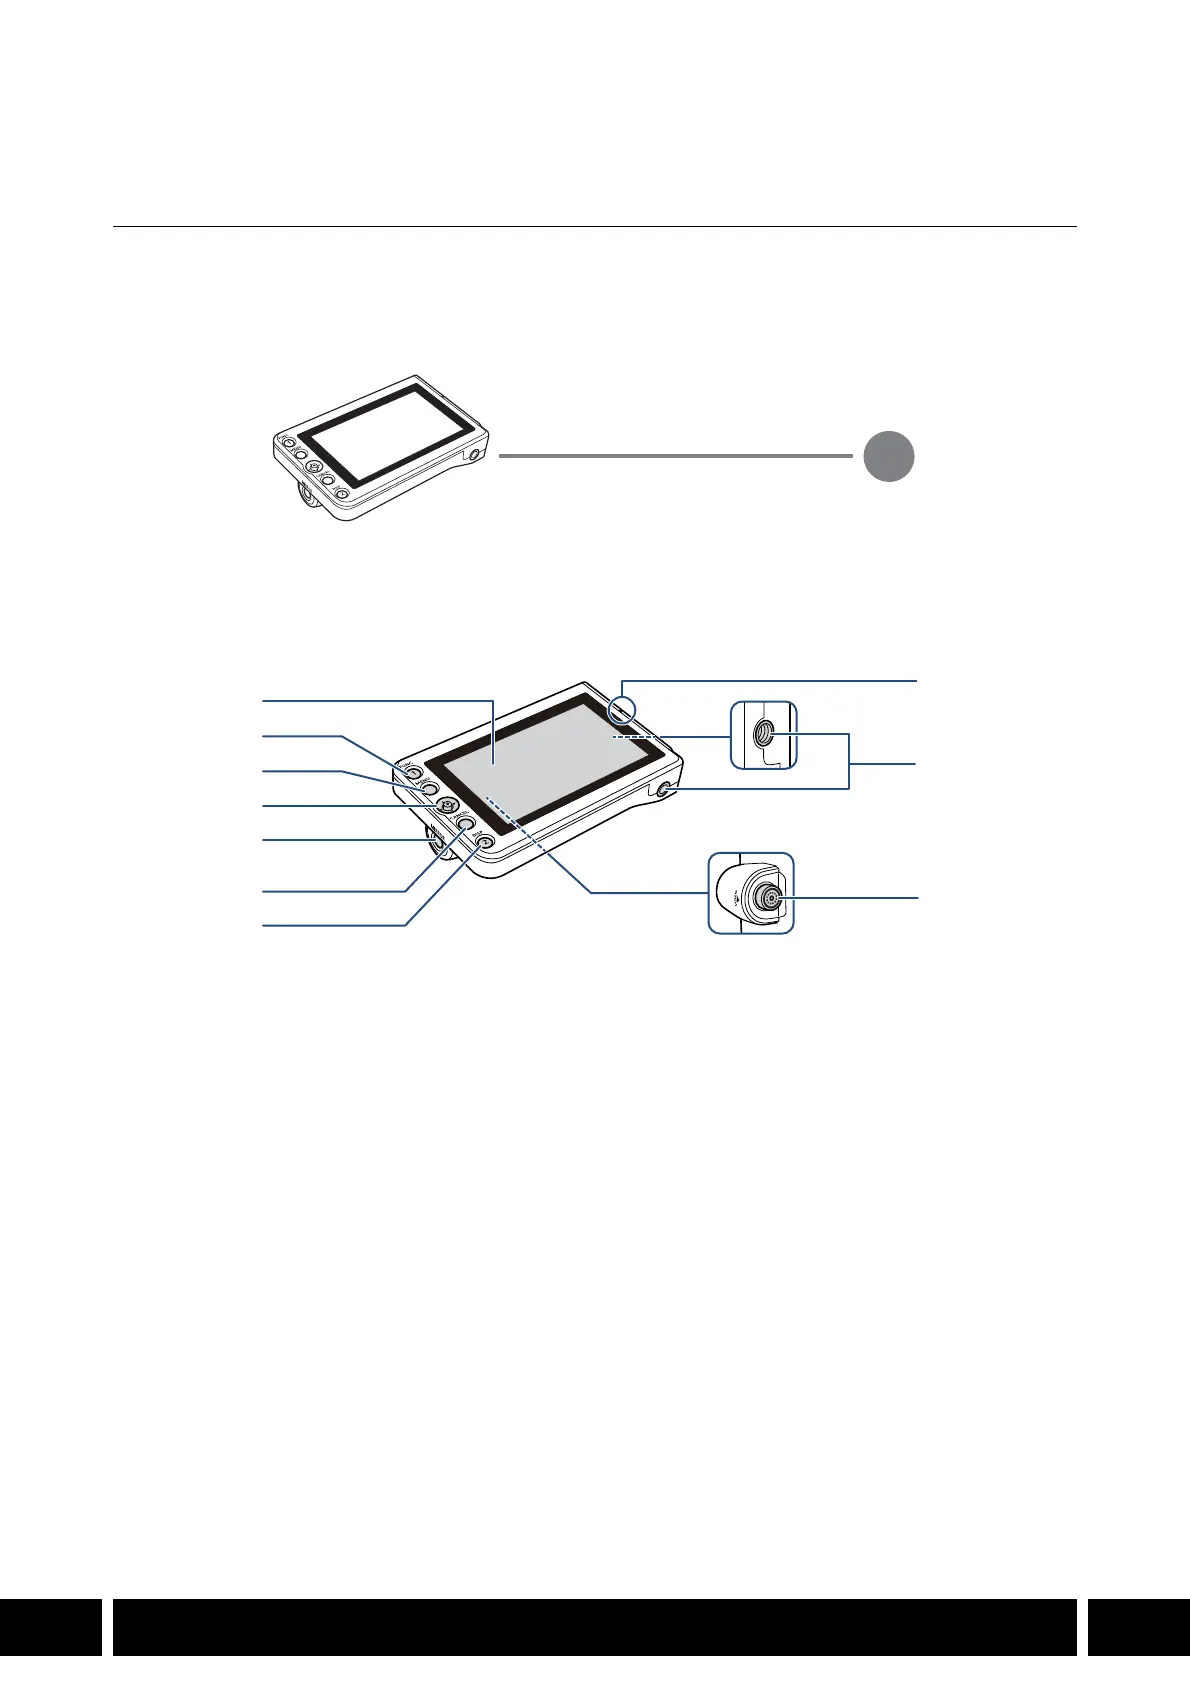
Names of Parts
1 LCD panel with touch screen
2 FUNC (main functions) button / Assignable
button LCD LM-V1/V2 1
3 MENU button
4 Joystick
5 MIRROR (invert the displayed image) button
6 CANCEL button
7 DISP (display) button / Assignable button LCD
LM-V1/V2 2
8 LCD monitor’s position alignment mark Í
9 Screw holes for 1/4"-20 screws (11.2 mm
(0.44 in.) deep, x2)
10 VIDEO terminal
VIDEO terminal
UN-5 / UN-10 Unit Cable (optional)
1
2
3
4
5
6
7
8
9
10

MONITORING
11 EN
Attaching the LCD Monitor
About the LCD Attachment Unit
Use the optional LA-V1 or D monitor to the handle unit or to LA-V2 LCD Attachment Unit to attach the LC
the camera’s body itself. For details see the instruction manual of the camera being used.
Attaching the LCD Monitor to the Handle Unit
1. Turn off the camera.
2. On the LCD attachment unit, rotate the LCD
monitor mount in the direction of the locking knob
to make the LCD monitor fixation bolt accessible.
3. Attach the LCD monitor to the LCD monitor mount.
•Align the Í marks on the monitor and monitor
mount. If necessary, you can also mount the LCD
monitor facing the other way around.
•Tighten the LCD monitor fixation bolt using the hex
wrench for 0.64 cm, 1/4" screws.
4. Attach the LCD attachment unit to the handle unit.
•Align the attachment mount on the LCD attachment
unit to the handle unit’s front accessory mount.
•Tighten the locking knob firmly.
5. Rotate the LCD monitor 90 degrees toward the
handle unit.
6. Connect the LCD monitor to the camera’s VIDEO
terminal using the UN-5 Unit Cable.
•Align the Í marks on the cable’s plugs and
terminals.
7. Put the cable though the LCD attachment unit’s
cable clamp.
•If necessary, adjust the position of the cable so that
it does not get in the picture or obstruct the view.
LCD Monitor
LM-V1 LM-V2
LCD Attachment Unit LA-V1 N—
LA-V2 —N
햴햳
햶
햵
햸
햷
햷

MONITORING
12 EN
Specifications
* All dimensions and weights are approximate.
•Depending on the situation, the screws may become loose. If necessary, use the hex wrench
for 0.64 cm, 1/4" screws to tighten them.
•Maintenance of the LCD screen
– Clean the LCD screen using a clean, soft lens-cleaning cloth and commercially available
cleaning fluid for eyeglasses.
– Condensation may form on the surface of the screen when the temperature changes
suddenly. Wipe it with a soft dry cloth.
LCD Monitor
LM-V1 LM-V2
Screen
Type Color LCD
Size 10.1 cm (4.0 in.) 10.9 cm (4.3 in.)
Approximate dot count 1,230,000 2,760,000
Aspect ratio 16:9
Coverage 100%
Touch screen Capacitive touch screen operation
VIDEO terminal Exclusively for connecting the camera
Operating temperature 0 °C – 40 °C (32 °F – 104 °F)
Dimensions* (W x H x D) 120 x 75 x 37 mm
(4.7 x 3.0 x 1.5 in.)
133 x 87 x 38 mm
(5.2 x 3.4 x 1.5 in.)
Weight* 185 g (6.5 oz.) 204 g (7.2 oz.)
Specyfikacje produktu
Marka: | Canon |
Kategoria: | nieskategoryzowany |
Model: | LM-V1 |
Kolor produktu: | Czarny |
Wysokość produktu: | 75 mm |
Szerokość produktu: | 120 mm |
Głębokość produktu: | 37 mm |
Waga produktu: | 185 g |
Długość przekątnej ekranu: | 4 " |
Rozdzielczość: | - px |
Ekran dotykowy: | Nie |
Technologia wyświetlacza: | LCD |
Typ zasilacza: | Bateria |
Obsługiwane produkty: | Canon C200 / C300 Mk II |
Potrzebujesz pomocy?
Jeśli potrzebujesz pomocy z Canon LM-V1, zadaj pytanie poniżej, a inni użytkownicy Ci odpowiedzą
Instrukcje nieskategoryzowany Canon
23 Sierpnia 2024
28 Maja 2024
26 Maja 2024
24 Maja 2024
18 Maja 2024
14 Maja 2024
10 Maja 2024
10 Maja 2024
9 Maja 2024
8 Maja 2024
Instrukcje nieskategoryzowany
- nieskategoryzowany Carlo Gavazzi
- nieskategoryzowany Ring
- nieskategoryzowany Wimberley
- nieskategoryzowany Marantz
- nieskategoryzowany Amazfit
- nieskategoryzowany Greisinger
- nieskategoryzowany Kärcher
- nieskategoryzowany Focusrite
- nieskategoryzowany FED
- nieskategoryzowany Traxxas
- nieskategoryzowany Hawke
- nieskategoryzowany Auriol
- nieskategoryzowany Powerfix
- nieskategoryzowany Eden
- nieskategoryzowany ECG
Najnowsze instrukcje dla nieskategoryzowany
28 Października 2024
27 Października 2024