Instrukcja obsługi Cherry DW 9000 SLIM
Cherry klawiatura DW 9000 SLIM
Przeczytaj poniżej 📖 instrukcję obsługi w języku polskim dla Cherry DW 9000 SLIM (2 stron) w kategorii klawiatura. Ta instrukcja była pomocna dla 18 osób i została oceniona przez 5 użytkowników na średnio 4.0 gwiazdek
Strona 1/2
1
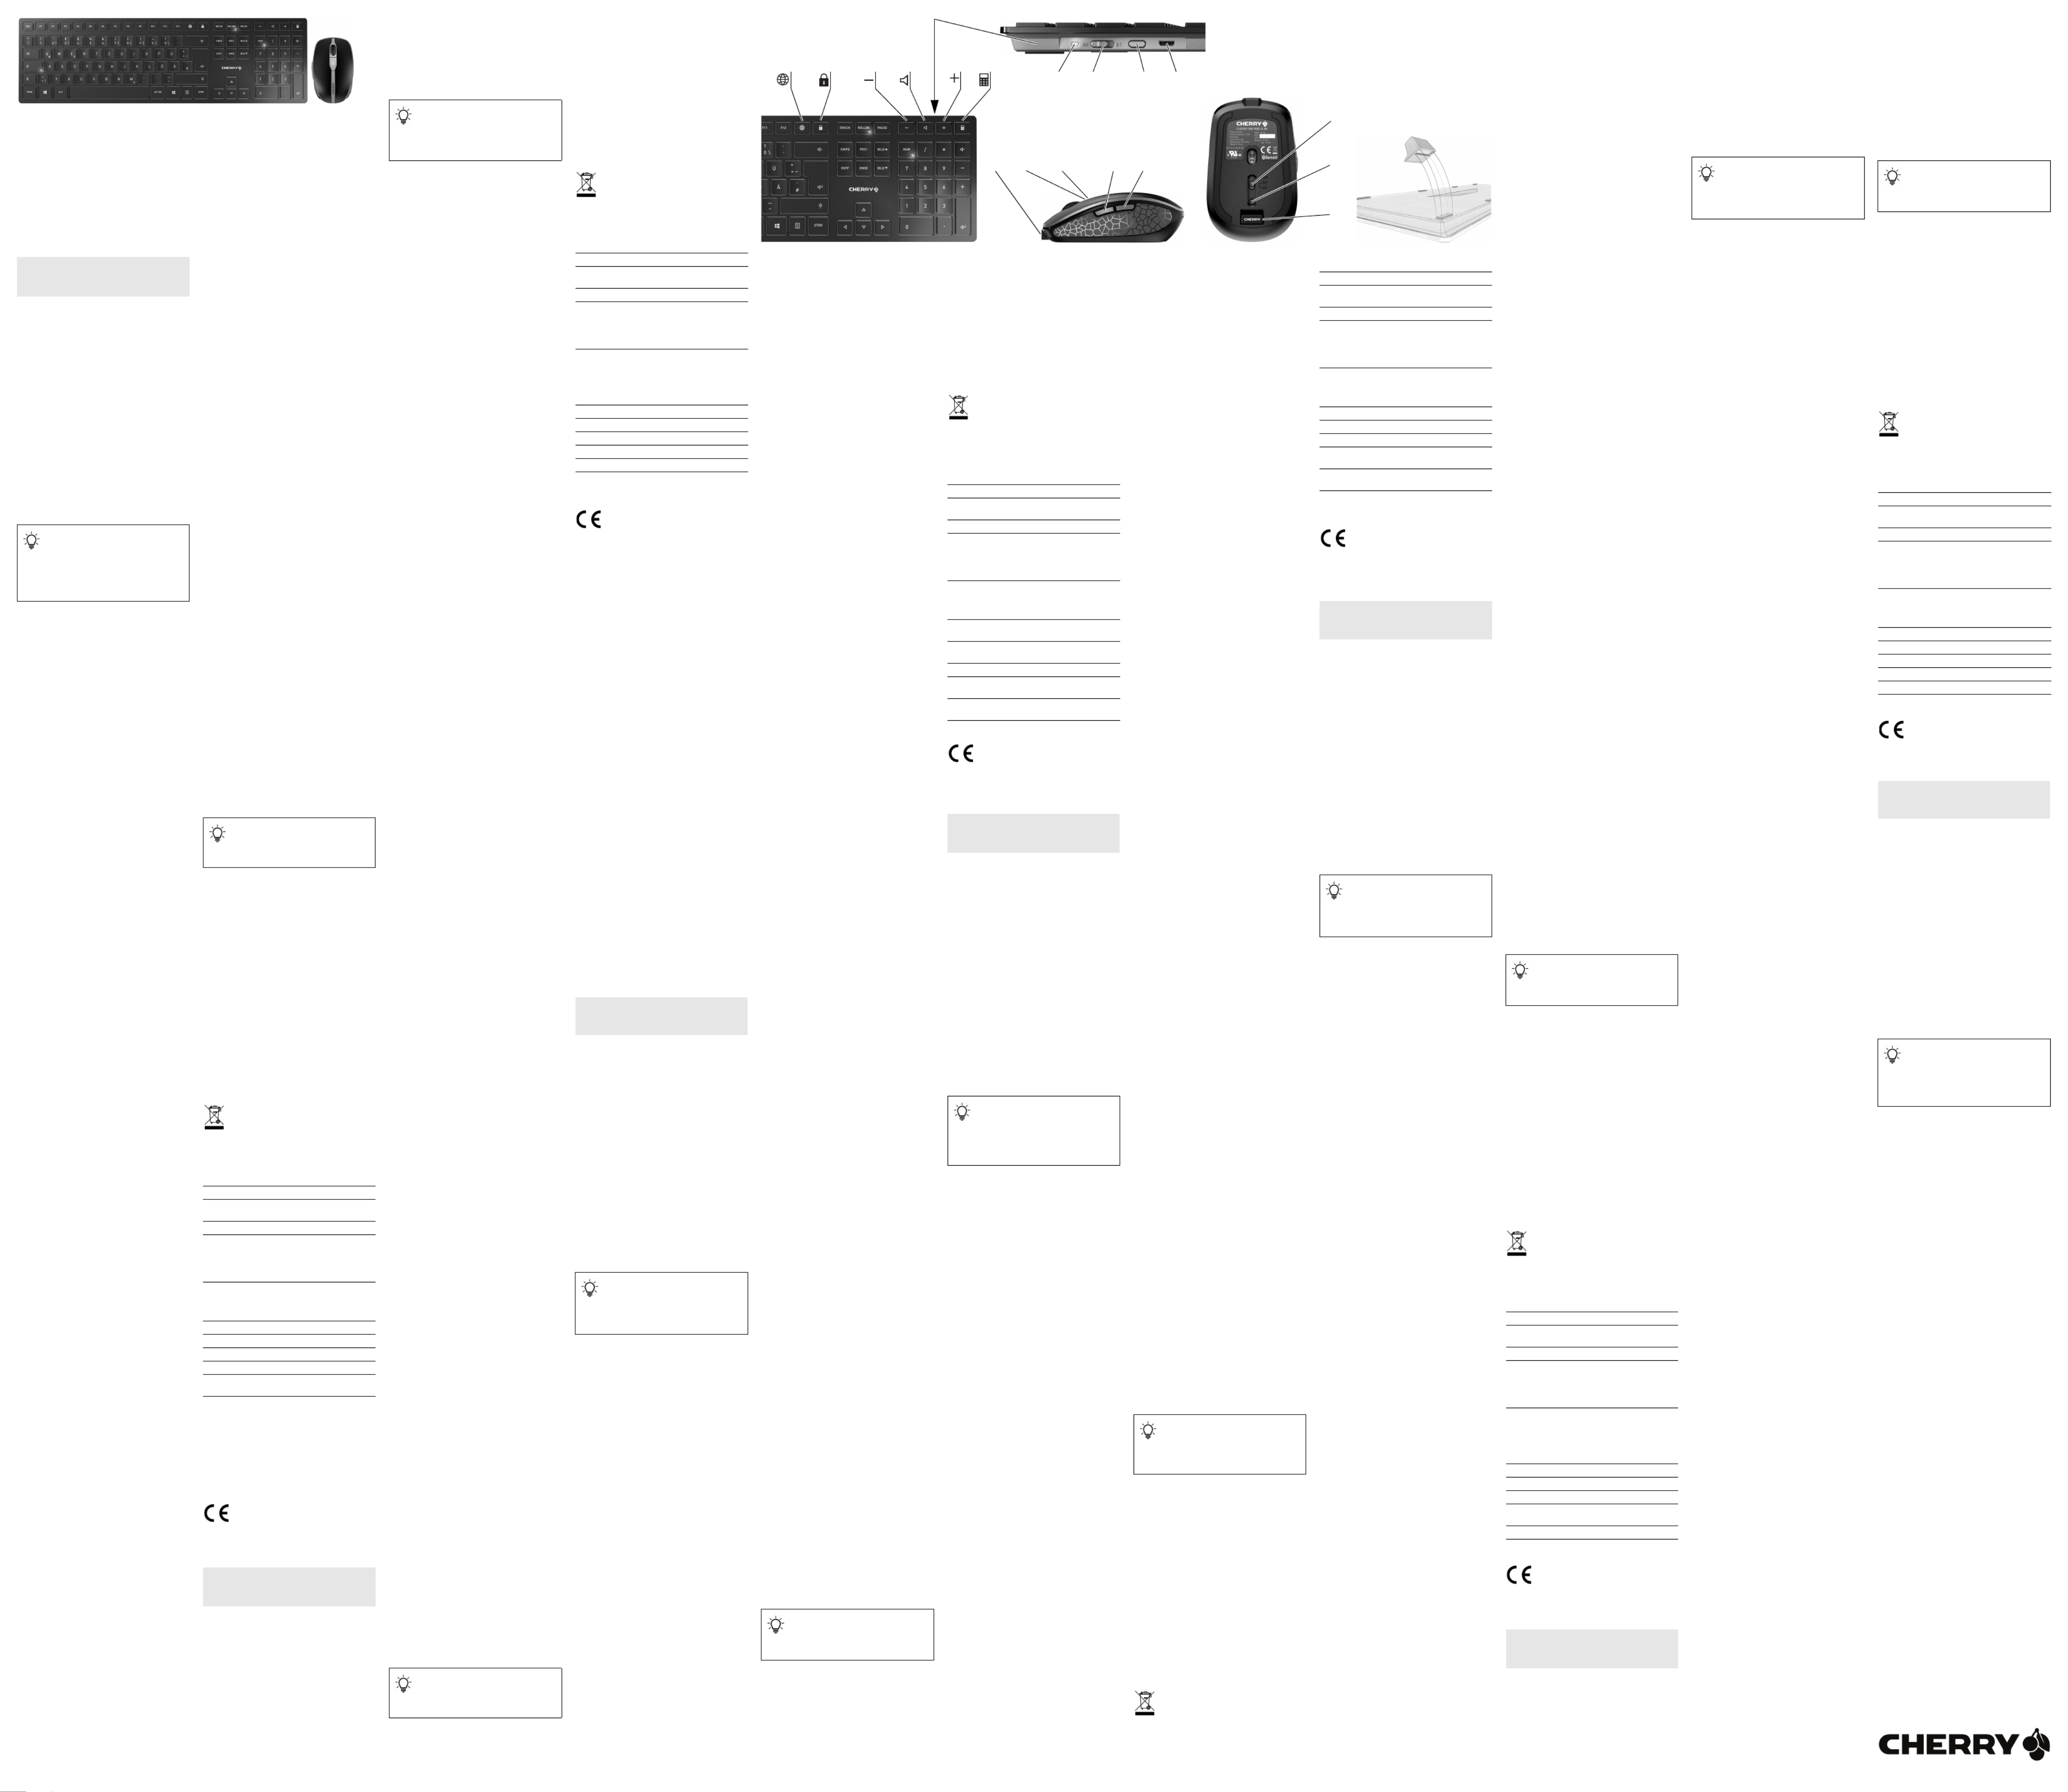
①Browser, Startseite
②PC sperren
③Ton leiser
④Ton an/aus
⑤Ton lauter
⑥Rechner
⑦Status-LED für Ladezustand der Batterie,
Bluetooth- oder Funkverbindung
⑧Schalter Funk (RF)/Aus (Mittelstellung)/Bluetooth
(BT)
⑨Taste für Bluetooth-Verbindung
⑩Buchse für Ladekabel
⑪Buchse für Ladekabel
⑫DPI-Umschaltung
⑬Status-LED für Ladezustand der Batterie,
Auflösung, Bluetooth- oder Funkverbindung
⑭Browser vor
⑮Browser zurück
⑯Schalter Aus (off)/Funk (RF)/Bluetooth (BT)
⑰Taste für Bluetooth-Verbindung
⑱Empfänger für Funkverbindung
Bevor Sie beginnen ...
Die CHERRY DW 9000 SLIM ist eine Kombination aus
kabelloser Tastatur und Maus zur Bedienung von
PCs/Notebooks.
Für Informationen zu weiteren Produkten, Downloads
und vielem mehr, besuchen Sie bitte www.cherry.de.
1Zu Ihrer Sicherheit
Erstickungsgefahr durch Verschlucken von
Kleinteilen
•Bewahren Sie das Gerät außerhalb der Reichweite
von Kindern unter 3 Jahren auf.
"Repetitive Strain Injury" = "Verletzung durch
wiederholte Beanspruchung"
RSI entsteht durch kleine, sich ständig
wiederholende Bewegungen.
•Richten Sie Ihren Arbeitsplatz ergonomisch ein.
•Positionieren Sie Tastatur und Maus so, dass sich
Ihre Oberarme und Handgelenke seitlich vom
Körper befinden und ausgestreckt sind.
•Machen Sie mehrere kleine Pausen, ggf. mit
Dehnübungen.
•Ändern Sie oft Ihre Körperhaltung.
2Beschädigungen vermeiden
Löschen von Speichermedien und Beschädigung von
mechanischen Uhren durch Magnet in der Maus
•Bringen Sie keine Speichermedien, wie
Magnetkarten oder externe Festplatten, und keine
mechanischen Uhren näher als 10 cm zur Maus.
3Geräte mit dem PC/Notebook
verbinden
Sie können die Geräte über Bluetooth oder mit dem
Empfänger über eine 2,4 GHz-Funkverbindung mit
dem PC/Notebook verbinden.
Die Verbindung über Bluetooth ist bequem, wenn Sie
die Geräte an mehreren PCs/Notebooks verwenden
möchten: Sie müssen die Verbindung nur einmal
herstellen und benötigen den Empfänger nicht.
3.1Geräte über Bluetooth verbinden
1Öffnen Sie an Ihrem PC/Notebook die Suche nach
Bluetooth-Geräten (zum Beispiel über Start >
Einstellungen > Geräte > Bluetooth).
2Folgen Sie den Anweisungen der Software.
3Schieben Sie auf der Rückseite der Tastatur oder
der Unterseite der Maus den Schalter auf "BT".
4Aktivieren Sie die Bluetooth-Verbindung der
Tastatur/Maus, indem Sie den Knopf neben dem
BT-Schalter drücken.
Die LED blinkt blau.
Falls die LED nicht blau blinkt:
•Es besteht bereits eine Verbindung der
Tastatur/Maus mit einem anderen PC/
Notebook. Schalten Sie diesen aus oder
deaktivieren Sie diese Verbindung.
5Folgen Sie den Anweisungen der Software.
Die LED erlischt und das Gerät ist mit Ihrem PC/
Notebook verbunden.
Falls die LED schnell rot blinkt, ist die Verbindung
fehlgeschlagen.
•Versuchen Sie es erneut.
3.2Geräte über Empfänger verbinden
Der Empfänger befindet sich in dem Fach an der
Unterseite der Maus und wird durch einen Magneten
gehalten.
1Ziehen Sie den Empfänger aus dem Gehäuse der
Maus.
2Schließen Sie den Empfänger möglichst an einer
USB 2.0-Buchse des PCs/Notebooks an (diese hat
meist eine weiße oder schwarze Führung).
3Schieben Sie auf der Rückseite der Tastatur oder
der Unterseite der Maus den Schalter auf "RF".
Die LED an der Rückseite der Tastatur oder die LED
auf der Maus leuchten zur Bestätigung kurz rot. Die
Tastatur/Maus ist mit Ihrem PC/Notebook verbunden.
3.3Empfänger in der Maus verstauen
Der Empfänger ist so klein, dass er auch beim
Transport eines Notebooks in der USB-Buchse
bleiben kann. Zum Schutz vor Verschmutzung und
Verlust ziehen Sie den Empfänger ab und deponieren
ihn in der Maus.
4Neigung der Tastatur erhöhen
Sie können die Neigung der Tastatur erhöhen, indem
Sie die 4 beiliegenden Gummifüße über die
Rutschsicherungen an der Unterseite der Tastatur
kleben.
1Schalten Sie den PC/Notebook aus oder trennen
Sie die Verbindung.
2Reinigen Sie den Bereich um die hinteren
Rutschsicherungen.
3Ziehen Sie die Schutzfolie von den Gummifüßen
und kleben Sie sie so über die Rutschsicherungen,
dass diese in der Aussparung der Gummifüße
verschwinden.
5DPI-Zahl der Maus einstellen
Mit der Höhe der DPI-Zahl steigt die Geschwindigkeit
des Mauszeigers.
•Drücken Sie die DPI-Taste auf der Mausoberseite.
Die LED blinkt je nach Einstellung:
1x = 600 dpi, 2x = 1000 dpi, 3x = 1600 dpi,
4x = 3200 dpi
Die Einstellung wird in der Maus gespeichert und
bleibt auch beim Ausschalten erhalten.
6Geräte laden
Laden Sie die Tastatur, wenn die LEDs in der
Feststell-, Rollen- und Num-Taste blinken. Laden Sie
die Maus, wenn die LED rot blinkt. Je schneller die
LEDs blinken, um so geringer ist der Ladestand der
Batterie.
•Verbinden Sie das Ladekabel mit der Tastatur/
Maus und einer USB-Buchse am PC/Notebook.
Solange die Tastatur geladen wird, leuchtet die LED
an der Rückseite der Tastatur rot.
Solange die Maus geladen wird, leuchtet die LED rot.
Wenn die Geräte voll geladen sind, erlöschen die
LEDs.
Solange der PC/das Notebook eingeschaltet ist, wird
die Batterie des Geräts geladen. Sie können während
des Ladevorgangs weiterarbeiten.
DE BEDIENUNGS-
ANLEITUNG
Jedes Gerät ist anders!
In der Bedienungsanleitung erhalten Sie
Hinweise zur effektiven und zuverlässigen
Verwendung.
•Lesen Sie die Bedienungsanleitung
aufmerksam durch.
•Bewahren Sie die Bedienungsanleitung auf und
geben Sie sie an andere Benutzer weiter.
7Geräte ein-/ausschalten
Die Geräte schalten bei Nichtbenutzung in einen
Schlaf-Modus, in dem sie nur wenig Energie
benötigen. Beim ersten Tastendruck schalten sie sich
automatisch wieder ein.
Weil sie im Energiesparmodus trotzdem Energie
verbrauchen, sollten Sie sie bei längerer
Nichtbenutzung und zum Transport manuell
ausschalten.
•Schieben Sie auf der Rückseite der Tastatur oder
der Unterseite der Maus den Schalter in die
entsprechende Position:
Aus = Tastatur in Mittelstellung/Maus "off"
Ein (Funk) = RF
Ein (Bluetooth) = BT
8Geräte reinigen
1Schalten Sie die Geräte aus.
HINWEIS! Aggressive Reinigungsmittel und
Flüssigkeiten können die Geräte beschädigen
•Verwenden Sie zur Reinigung keine Lösungsmittel
wie Benzin oder Alkohol und keine Scheuermittel
oder Scheuerschwämme.
•Verhindern Sie, dass Flüssigkeit in die Geräte
gelangt.
•Entfernen Sie nicht die Tastkappen der Tastatur.
2Reinigen Sie die Geräte mit einem leicht feuchten
Tuch und etwas mildem Reinigungsmittel (z. B.
Geschirrspülmittel).
3Trocknen Sie die Geräte mit einem fusselfreien,
weichen Tuch.
9Falls die Geräte nicht funktionieren
•Schalten Sie die Geräte aus und wieder ein.
•Laden Sie die Geräte über das Ladekabel (siehe 6
"Geräte laden").
•Entfernen Sie störende Gegenstände zwischen
den Geräten und dem PC/Notebook. Störend sind
vor allem metallische oder elektrische
Gegenstände, wie Kabel, Lautsprecher oder USB-
Hubs.
•Verringern Sie den Abstand zwischen den Geräten
und dem PC/Notebook.
•Falls es bei der Nutzung von USB 3.0-Geräten in
der direkten Umgebung des Empfängers zu
Störungen kommt: Verwenden Sie für den
Empfänger oder das USB 3.0-Gerät einen
entfernteren Anschluss, ein zusätzliches Kabel
oder einen USB-Hub.
9.1Störung der Bluetooth-Verbindung
beseitigen
•Wenn sich Ihr PC/Notebook im Standby-Modus
befindet, ist ein Aufwecken über Bluetooth-Geräte
nicht möglich. Schalten Sie den PC/Notebook
manuell ein.
•Falls die Geräte bereits mit einem anderen PC/
Notebook verbunden sind, können Sie keine
parallele Verbindung herstellen. Schalten Sie den
ersten PC/Notebook aus oder deaktivieren Sie die
Verbindung.
•Schalten Sie unbenötigte Bluetooth-Geräte aus.
•Entfernen Sie die Tastatur/Maus in der Bluetooth-
Software und fügen Sie sie als neues Gerät wieder
hinzu.
•Verwenden Sie einen externen Bluetooth-
Empfänger.
•Schließen Sie die Geräte über den Empfänger an.
9.2Störung der Verbindung über den
Empfänger beseitigen
•Schließen Sie den Empfänger an einer USB 2.0-
Buchse des PCs/Notebooks an (diese hat meist
eine weiße oder schwarze Führung). An USB 3.0-
Buchsen (blaue Führung) kommt es manchmal zu
Fehlfunktionen.
•Schließen Sie den Empfänger an einer anderen
USB 2.0-Buchse am PC/Notebook an.
•Verringern Sie den Abstand zwischen dem
Empfänger und den Geräten, indem Sie den
Empfänger an einer USB-Buchse anschließen, die
sich nah an den Geräten befindet.
•Verwenden Sie ein USB-Verlängerungskabel, um
den Empfänger möglichst nah an den Geräten zu
platzieren.
10 Entsorgung
Die Geräte enthalten Lithium-Ionen-
Batterien. Diese lassen sich nicht wechseln.
Elektrische Geräte und Batterien enthalten
Stoffe, die der Gesundheit und der Umwelt
schaden können.
•Entsorgen Sie die Geräte mit den Batterien
entsprechend den gesetzlichen Vorschriften.
11Technische Daten
12 Kontakt
Cherry GmbH
Cherrystraße
91275 Auerbach/OPf.
Internet: www.cherry.de
Telefon: +49 (0) 9643 2061-100*
*zum Ortstarif aus dem deutschen Festnetz, abweichende
Preise für Anrufe aus Mobilfunknetzen möglich
13 EU-Konformitätserklärung
Hiermit erklärt die Cherry GmbH, Auerbach/
OPf., Deutschland, dass dieser
Funkanlagentyp der Richtlinie 2014/53/EU
entspricht. Den vollständigen Text der EU-
Konformitätserklärung finden Sie unter folgender
Internet-Adresse: www.cherry.de/compliance.
①Browser, home
②Blocking the PC
③Volume down
④Sound on/off
⑤Volume up
⑥Calculator
⑦Status LED for battery charge status, Bluetooth
or wireless connection
⑧Switch for wireless (RF)/off (middle position)/
Bluetooth (BT)
⑨Button for Bluetooth connection
⑩Socket for charging cable
⑪Socket for charging cable
⑫DPI switch
Betrieb mehrerer Bluetooth-Geräte an
einem PC/Notebook
Wenn zu viele Bluetooth-Geräte ange-
schlossen sind, können die im PC/Notebook integ-
rierten Bluetooth-Empfänger überfordert sein.
Bezeichnung Wert
Versorgungs-
spannung Empfänger:
5,0 V/DC ±5 %
LadespannungTyp. 5,0 V/DC
StromaufnahmeTastatur: Typ. 4,5 mA
(Standby: Typ. 0,05 mA)
Maus: Typ. 10 mA
(Standby: Typ. 0,3 mA)
Empfänger: Typ. 26 mA
BatterieTastatur: Aufladbare Lithium-
Ionen-Batterie, 650 mAh
Maus: Aufladbare Lithium-
Ionen-Batterie, 550 mAh
Sendefrequenz2400,0 ... 2483,5 MHz
SendeleistungMax. 10 mW (EIRP)
Bluetooth 4.0
Lagertemperatur-15 °C ... +60 °C
Betriebs-
temperatur 0 °C ... +40 °C
EN OPERATING
MANUAL
⑬Status LED for battery charge status, resolution,
Bluetooth or wireless connection
⑭Browser forward
⑮Browser back
⑯Off switch/wireless (RF)/Bluetooth (BT)
⑰Button for Bluetooth connection
⑱Receiver for wireless connection
Before you begin ...
The CHERRY DW 9000 SLIM is a combination of a
wireless keyboard and mouse for operating PCs and
laptops.
For information on other products, downloads and
much more, visit us at www.cherry.de.
1For your safety
Risk of choking from swallowing small parts
•Keep the device out of the reach of children under
3 years.
RSI stands for "Repetitive Strain Injury".
RSI arises due to small movements continuously
repeated over a long period of time.
•Set up your workspace ergonomically.
•Position the keyboard and mouse in such a
manner that your upper arms and wrists are
outstretched and to the sides of your body.
•Take several short breaks, with stretching
exercises if necessary.
•Change your posture often.
2Avoiding damage
The magnet in the mouse can wipe storage media
and damage mechanical watches.
•Do not place any storage media such as magnetic
cards or external hard drives, or mechanical
watches within 10 cm of the mouse.
3Connecting devices to the PC/laptop
You can connect the devices to the PC/laptop via
Bluetooth or via a 2.4 GHz wireless connection using
the receiver.
A Bluetooth connection is convenient if you want to
use the devices on several PCs or laptops: You only
need to connect once and do not need the receiver.
3.1Connecting the devices via Bluetooth
1Open the search for Bluetooth devices on your
PC/laptop (for example via Start> Settings>
Devices> Bluetooth).
2Follow the software instructions.
3Slide the switch on the back of the keyboard or the
bottom of the mouse to "BT”.
4Activate the keyboard/mouse Bluetooth
connection by pressing the button next to the BT
switch.
The LED flashes blue.
If the LED does not flash blue:
•The keyboard/mouse is already connected to
another PC/laptop. Switch it off or deactivate
that connection.
5Follow the software instructions.
The LED goes out and the device is connected to
your PC/laptop.
If the LED rapidly flashes red, the connection has
failed.
•Try again.
3.2Connecting devices via the receiver
The receiver is in the compartment on the bottom of
the mouse and is held by a magnet.
1Pull the receiver out of the housing of the mouse.
2Connect the receiver to a USB 2.0 port on your
PC/laptop if possible (this usually has a white or
black guide).
3Slide the switch on the back of the keyboard or the
bottom of the mouse to “RF”.
The LED on the back of the keyboard or the LED on
the mouse will briefly flash red to confirm. The
keyboard/mouse is connected to your PC/laptop.
3.3Storing the receiver in the mouse
The receiver is so small that it can stay in the USB
socket of a laptop while being transported. To avoid
any damage, you can also pull out the receiver and
deposit it in the mouse to protect it from dirt and
loss.
4Raising the angle of the keyboard
You can raise the angle of the keyboard by sticking
the four enclosed rubber feet over the anti-slip pads
on the bottom of the keyboard.
1Turn off the PC/laptop or deactivate the
connection.
2Clean the area around the rear anti-slip pads.
3Peel off the protective foil from the rubber feet
and stick them over the anti-slip pads so that they
go completely into the recess on the rubber feet.
5Setting the DPI rate of the mouse
The speed of the mouse pointer increases with the
level of the DPI rate.
•Press the DPI button on the top of the mouse.
The LED flashes according to the setting:
1x = 600 dpi, 2x = 1000 dpi, 3x = 1600 dpi,
4x = 3200 dpi
The setting is saved in the mouse and is retained
even when the mouse is switched off.
6Charging the devices
Charge the keyboard when the LEDs in the Caps
Lock, Scroll and Num Lock buttons flash. Charge the
mouse when the LED flashes red. The faster the
LEDs flash, the lower the charge level of the battery.
•Connect the charging cable to the keyboard/
mouse and a USB port on the PC/laptop.
The LED on the back of the keyboard lights up red
while the keyboard is charging.
The LED lights up red while the mouse is charging.
When the devices are fully charged, the LEDs go out.
The battery of the device is charged as long as the
PC/laptop is switched on. You can continue working
while charging.
7Switching the devices on and off
When not in use, the devices switch to sleep mode,
which requires much less power. They switch on
again automatically as soon as you press a button.
Because they still consume some power in energy-
saving mode, you should switch them off manually for
extended periods of non-use or for transporting.
•Slide the switch on the back of the keyboard or the
bottom of the mouse to the appropriate position:
Off = keyboard switch in middle position/mouse off
On (wireless) = RF
On (Bluetooth) = BT
8Cleaning the devices
1Switch the devices off.
NOTE! Aggressive cleaning agents and liquids can
damage the devices.
•Do not use solvents such as benzene, alcohol,
scouring agents or abrasive scourers for cleaning
the devices.
•Prevent liquid from getting inside the device.
•Do not remove the key caps of the keyboard.
2Clean the devices with a slightly damp cloth and
some mild detergent (such as washing-up liquid).
3Dry the devices with a soft, lint-free cloth.
9If the devices do not work:
•Switch the devices off and on again.
•Charge the devices via the charging cable (see 6
"Charging the devices").
•Remove any objects causing interference between
the devices and the PC/laptop. Interference is
caused in particular by metallic or electrical
objects such as cables, loudspeakers or USB
hubs.
•Reduce the distance between the devices and the
PC/laptop.
•Should any interference be encountered when
using USB 3.0 devices right near the receiver: Use
a port that is further away, an additional cable, or
a USB hub for the receiver or USB 3.0 device.
9.1Rectifying a Bluetooth connection fault
•If your PC/laptop is in standby mode, it cannot be
woken up using Bluetooth devices. Switch on the
PC/laptop manually.
•If the devices are already connected to another
PC/laptop, you cannot establish a parallel
connection. Turn off the first PC/laptop or
deactivate the connections.
•Turn off any unnecessary Bluetooth devices.
•Remove the connection to the keyboard/mouse in
the Bluetooth software and add it again as a new
device.
Every device is different!
The operating instructions contain
information on effective and reliable use.
•Read the operating instructions carefully.
•Keep the operating instructions and pass them
on to other users.
Operation of several Bluetooth devices on
a PC/notebook
When too many Bluetooth devices are
connected, it may be too much for the Bluetooth
receivers in the PC/notebook.
•Use an external Bluetooth receiver.
•Connect the devices using the receiver.
9.2Rectifying a connection fault using the
receiver
•Connect the receiver to a USB 2.0 port on your
PC/laptop (this usually has a white or black guide).
Malfunctions occasionally occur on USB 3.0 ports
(blue guide).
•Connect the receiver to another USB 2.0 port on
the PC/laptop.
•Reduce the distance between the receiver and the
devices by connecting the receiver to a USB port
that is close to the devices.
•Use a USB extension cable to place the receiver
as close to the devices as possible.
10 Disposal
The devices contain lithium-ion batteries.
These cannot be replaced.
Electrical devices and batteries contain
substances that can be harmful to health
and the environment.
•Dispose of the devices and the batteries in
accordance with the legal regulations.
11Technical data
12 Certifications
12.1EU Declaration of conformity
The company Cherry GmbH, Auerbach/OPf.,
Germany hereby declares that this radio
system model conforms to the European
guideline 2014/53/EU. The full text of the EU
declaration of conformity can be found under the
following Internet address:
www.cherry.de/compliance.
12.2Federal Communications Commission
(FCC) Radio Frequency Interference
Statement
This device complies with part 15 of the FCC Rules.
Operation is subject to the following two conditions:
(1) This device may not cause harmful interference,
and (2) this device must accept any interference
received, including interference that may cause
undesired operation.
Note: This equipment has been tested and found to
comply with the limits for a Class B digital device,
pursuant to part 15 of the FCC Rules. These limits
are designed to provide reasonable protection against
harmful interference in a residential installation. This
equipment generates, uses and can radiate radio
frequency energy and, if not installed and used in
accordance with the instructions, may cause harmful
interference to radio communications. However,
there is no guarantee that interference will not occur
in a particular installation. If this equipment does
cause harmful interference to radio or television
reception, which can be determined by turning the
equipment off and on, the user is encouraged to try to
correct the interference by one or more of the
following measures:
•Reorient or relocate the receiving antenna.
•Increase the separation between the equipment
and receiver.
•Connect the equipment into an outlet on a circuit
different from that to which the receiver is
connected.
•Consult the dealer or an experienced radio/TV
technician for help.
Caution: Any changes or modifications not expressly
approved by the party responsible for compliance
could void the user's authority to operate the
equipment.
12.3RF exposure statement
This device complies with the RF exposure
requirements for mobile and fixed devices. However,
the device shall be used in such a manner that the
potential for human contact during normal operation
is minimized.
12.4For UL
For use with Listed Personal Computers only!
①Navigateur, démarrage
②Blocage du PC
③Volume plus bas
④Activer/désactiver le son
⑤Volume plus fort
⑥Calculatrice
⑦LED d’état pour le niveau de charge de la
batterie, connexion Bluetooth ou radio
⑧Commutateur radio (RF)/arrêt (position centrale)/
Bluetooth (BT)
⑨Touche pour la connexion Bluetooth
⑩Prise pour le câble de recharge
⑪Prise pour le câble de recharge
⑫Commutateur de DPI
⑬LED d’état pour le niveau de charge de la
batterie, résolution, connexion Bluetooth ou radio
⑭Navigation avant
⑮Navigation arrière
⑯Commutateur arrêt (off) / radio (RF) / Bluetooth
(BT)
⑰Touche pour la connexion Bluetooth
⑱Récepteur pour la connexion radio
Avant de commencer ...
CHERRY DW 9000 SLIM est une combinaison de
clavier et de souris sans fil pour l’utilisation des
PC / ordinateurs portables.
Pour obtenir des informations sur d'autres produits,
sur les téléchargements et bien d'autres choses,
consultez le site www.cherry.de.
1Pour votre sécurité
Risque d’étouffement en cas d’ingestion de petites
pièces
•Conserver l’appareil hors de portée des enfants
de moins de 3 ans.
LMR signifie "Lésion due aux mouvements
répétitifs"
Le syndrome LMR apparaît suite à de petits
mouvements se répétant en permanence.
•Organisez votre poste de travail de manière
ergonomique.
•Positionnez le clavier et la souris de telle façon
que vos bras et vos poignets se trouvent
latéralement par rapport au corps et soient
étendus.
•Faites plusieurs petites pauses, le cas échéant
accompagnées d’exercices d’étirement.
•Modifiez souvent votre attitude corporelle.
2Éviter les dommages
Effacement des supports de données et
endommagement des montres mécaniques en
raison des aimants dans la souris
•Ne placez ni supports de données tels que des
cartes magnétiques ou des disques durs externes
ni montres mécaniques à plus de 10 cm de la
souris.
3Relier les appareils au PC /
à l’ordinateur portable
Vous pouvez relier les appareils au PC / à l’ordinateur
portable par Bluetooth ou avec le récepteur via la
connexion radio 2,4 GHz.
La connexion par Bluetooth est confortable si vous
souhaitez utiliser les appareils sur plusieurs PC /
ordinateurs portables : Vous ne devez établir la
connexion qu’une seule fois et n’avez pas besoin du
récepteur.
Designation Value
Supply voltageReceiver:
5.0 V/DC ±5%
Charging voltageTyp. 5.0 V/DC
Current consumptionKeyboard: typ. 4.5 mA
(Standby: typ. 0.05 mA)
Mouse: typ. 10 mA
(Standby: typ. 0.3 mA)
Receiver: typ. 26 mA
BatteryKeyboard: Rechargeable
lithium ion battery,
650 mAh
Mouse: Rechargeable
lithium ion battery,
550 mAh
Operating frequency2400.0 ... 2483.5 MHz
Effective radiated powerMax. 10 mW (EIRP)
Bluetooth 4.0
Storage temperature-15 °C ... +60 °C
Operating temperature0 °C ... +40 °C
FR MODE D’EMPLOI
Chaque appareil est différent !
Le mode d’emploi contient des consignes
pour une utilisation efficace et fiable.
•Lisez attentivement le mode d’emploi.
•Conservez le mode d’emploi et transmettez-le
aux autres utilisateurs.
3.1Connexion des appareils par Bluetooth
1Depuis votre PC / ordinateur portable, ouvrez la
recherche des périphériques Bluetooth (par
exemple via Démarrage > Paramètres >
Appareils > Bluetooth).
2Suivez les instructions du logiciel.
3À l’arrière du clavier ou sous la souris, amenez le
commutateur en position "BT".
4Activez la connexion Bluetooth du clavier / de la
souris en appuyant sur le bouton à côté du
commutateur BT.
La LED clignote en bleu.
Si la LED ne clignote pas en bleu :
•Le clavier / la souris est déjà connecté(e) à un
autre PC / ordinateur portable. Coupez le ou
désactivez cette connexion.
5Suivez les instructions du logiciel.
La LED s’éteint et l’appareil est connecté à votre
PC / ordinateur portable.
Si la LED clignote rapidement en rouge, la connexion
a échoué.
•Essayez à nouveau.
3.2Connexion des appareils par
l’intermédiaire du récepteur
Le récepteur se trouve dans le compartiment sous la
souris et est maintenu par un aimant.
1Tirez le récepteur en-dehors du boîtier de la
souris.
2Raccordez si possible le récepteur à un port USB
2.0 du PC / de l’ordinateur portable (languette
généralement blanche ou noire).
3À l’arrière du clavier ou sous la souris, amenez le
commutateur en position "RF".
La LED à l'arrière du clavier ou la LED de la souris
clignote brièvement en rouge pour confirmer. Le
clavier / la souris est connecté(e) à votre PC /
ordinateur portable.
3.3Logement du récepteur dans la souris
Le récepteur est si petit qu’il peut rester dans le port
USB pendant le transport d’un ordinateur portable.
Vous pouvez retirer le récepteur et le placer dans la
souris afin de le protéger de l’endommagement et de
l’encrassement.
4Augmenter l’inclinaison du clavier
Vous pouvez augmenter l’inclinaison du clavier en
collant les 4 pieds en caoutchouc fournis sur les
bandes anti-dérapantes sous le clavier.
1Désactivez le PC / l’ordinateur portable ou coupez
la connexion.
2Nettoyez la zone autour des bandes anti-
dérapantes arrière.
3Retirez le film de protection des pieds en
caoutchouc et collez-les sur les bandes anti-
dérapantes de manière à ce que celles-ci
disparaissent dans l’évidement des pieds en
caoutchouc.
5Réglage du numéro DPI de la souris
La vitesse du pointeur de la souris augmente avec la
hauteur du numéro DPI.
•Appuyez sur la touche DPI située sur la souris.
La LED clignotera en fonction du réglage :
1x = 600 dpi, 2x = 1000 dpi, 3x = 1600 dpi,
4x = 3200 dpi
Le réglage est enregistré dans la souris et est
conservé lorsqu’elle est mise à l’arrêt.
6Chargement des appareils
Chargez le clavier lorsque les LED sur les touches
Caps Lock, Arrêt défil. et Verr num clignotent.
Chargez la souris lorsque la LED clignote en rouge.
Plus les LED clignotent rapidement, plus le niveau de
charge de la batterie est faible.
•Branchez le câble de charge sur le clavier / la
souris et sur un port USB du PC / de l’ordinateur
portable.
Tant que le clavier est en charge, la LED à l’arrière
du clavier est allumée en rouge.
Tant que la souris est en charge, la LED est allumée
en rouge.
Lorsque les appareils sont entièrement chargées, les
LED s’éteignent.
Tant que le PC / l’ordinateur portable est allumé, la
batterie de l’appareil est chargée. Vous pouvez
continuer de travailler pendant le chargement.
7Activation / désactivation des
appareils
Lorsqu’ils ne sont pas utilisés, les appareils se
mettent en mode veille et consomment très peu
d’énergie. Lors de la première pression sur la
touche, ils s’enclenchent à nouveau
automatiquement.
Veillez à éteindre l’appareil manuellement si vous ne
l’utilisez plus sur une longue durée ou pour le
transporter car il continue de consommer de
l’énergie, même en mode d’économie.
•À l’arrière du clavier ou sous la souris, amenez le
commutateur dans la position correspondante :
Arrêt = clavier en position centrale / souris "off"
Marche (radio) = RF
Marche (Bluetooth) = BT
8Nettoyage des appareils
1Désactivez les appareils.
REMARQUE ! Les détergents et liquides agressifs
peuvent endommager les appareils
•Les solvants (essence, alcool etc.), les éponges ou
les produits abrasifs sont à proscrire.
•Prévenez toute pénétration de liquide dans les
appareils.
•Ne retirez pas les cabochons du clavier.
2Nettoyez les appareils avec un chiffon légèrement
humidifié de nettoyant doux (du produit pour la
vaisselle, par exemple).
3Séchez les appareils avec un chiffon doux non
pelucheux.
9Si les appareils ne fonctionnent pas
•Éteignez et rallumez les appareils.
•Chargez les appareils par l’intermédiaire du câble
de charge (voir 6 "Chargement des appareils").
•Éloignez tout objet pouvant faire obstacle entre
les appareils et le PC / l’ordinateur portable. Sont
particulièrement gênants les objets métalliques
ou électriques tels que les câbles, les enceintes
ou les concentrateurs USB.
•Réduisez la distance entre les appareils et le PC /
l’ordinateur portable.
•En cas d’interférences lors de l’utilisation de
périphériques USB 3.0 à proximité immédiate du
récepteur : utilisez pour le récepteur ou le
périphérique USB 3.0 un port plus distant, un
câble supplémentaire ou un concentrateur USB.
9.1Élimination des défauts de connexion
Bluetooth
•Lorsque votre PC / ordinateur portable se trouve
en mode veille, la sortie du mode veille via les
appareils Bluetooth n’est pas possible. Allumez
manuellement le PC / l’ordinateur portable.
•Si les appareils sont déjà reliés à un autre PC /
ordinateur portable, vous ne pouvez pas effectuer
de connexion parallèle. Coupez le premier PC /
ordinateur portable ou désactivez la connexion.
•Désactivez les appareils Bluetooth non
indispensables.
•Supprimez le clavier / la souris dans le logiciel
Bluetooth et ajoutez-la à nouveau comme
nouveau périphérique.
•Utilisez un récepteur Bluetooth externe.
•Connectez les appareils via le récepteur.
Utilisation de plusieurs appareils
Bluetooth sur un PC / ordinateur portable
Lorsque trop d’appareils Bluetooth sont
connectés, les récepteurs Bluetooth intégrés au
PC / à l’ordinateur portables peuvent être saturés.
9.2Élimination des défauts de connexion à
l’aide du récepteur
•Raccordez le récepteur à un port USB 2.0 du PC /
de l’ordinateur portable (languette généralement
blanche ou noire). Les ports USB 3.0 (languette
bleue) produisent parfois des dysfonctionnements.
•Raccordez le récepteur à un autre port USB 2.0 du
PC / de l’ordinateur portable.
•Réduisez la distance entre le récepteur et les
appareils en raccordant le récepteur à un port USB
se trouvant à proximité des appareils.
•Utilisez une rallonge USB afin de placer le
récepteur le plus près possible des appareils.
10 Élimination
Les appareils contiennent des batteries aux
ions Lithium. Elles ne peuvent pas être
remplacées.
Les appareils électriques et les piles
contiennent des substances qui peuvent être nocives
pour la santé et l'environnement.
•Jetez les appareils avec les piles conformément
aux dispositions légales en vigueur.
11Caractéristiques techniques
12Déclaration de conformité UE
La société Cherry GmbH, Auerbach/OPf.,
Allemagne, déclare par la présente que ce
type d’équipement radioélectrique est
conforme à la directive européenne 2014/53/UE. Vous
trouverez l’intégralité de la déclaration de conformité
UE sur Internet, à l'adresse suivante :
www.cherry.de/compliance.
①Navegador, página de inicio
②Bloqueo del PC
③Bajar volumen
④Activar/desactivar el sonido
⑤Subir volumen
⑥Calculadora
⑦Indicador LED del nivel de carga de la batería y
conexiones Bluetooth o de radiofrecuencia
⑧Conmutador radiofrecuencia (RF)/apagado
(posición central)/Bluetooth (BT)
⑨Tecla para conexión Bluetooth
⑩Hembrilla para cable de carga
⑪Hembrilla para cable de carga
⑫Conmutación DPI
⑬Indicador LED del nivel de carga de la batería,
resolución y conexiones Bluetooth o
radiofrecuencia
⑭Navegador adelante
⑮Navegador atrás
⑯Interruptor apagado (off)/Radio (RF)/Bluetooth (BT)
⑰Tecla para conexión Bluetooth
⑱Receptor de conexión inalámbrica por
radiofrecuencia
Antes de empezar ...
CHERRY DW 9000 SLIM es una combinación de
teclado y ratón inalámbricos para PC y ordenadores
portátiles.
En la dirección www.cherry.de podrá, entre otros,
encontrar y descargar información sobre los
productos.
1Para su seguridad
Peligro de asfixia debido al atragantamiento con
piezas pequeñas
•Mantenga el aparato fuera del alcance de los niños
menores de 3 años.
"Repetitive Strain Injury" = "Síndrome del túnel
carpiano"
El RSI se origina por movimientos pequeños, repetidos
continuamente.
•Organice su puesto de trabajo de forma
ergonómica.
•Coloque el teclado y el ratón de modo que los
brazos y las muñecas se encuentren a los lados del
cuerpo y estirados.
•Haga varias pausas cortas, cuando sea necesario
con ejercicios de estiramiento.
•Cambie con frecuencia la postura corporal.
2Evitar daños
El imán del ratón puede borrar el contenido de
soportes de memoria y dañar relojes mecánicos
•No sitúe soportes de memoria (tarjetas
magnéticas, discos duros externos) ni relojes
mecánicos a menos de 10 cm del ratón.
3Conectar los aparatos al PC u
ordenador portátil
Puede conectar los aparatos al PC u ordenador
portátil a través de Bluetooth o con el receptor
mediante conexión de radiofrecuencia de 2,4 GHz.
La conexión a través de Bluetooth resulta muy
cómoda si desea utilizar los aparatos en varios PC u
ordenadores portátiles: solo tendrá que establecer la
conexión una vez y no necesitará el receptor.
3.1Conexión de los aparatos a través de
Bluetooth
1En su PC u ordenador portátil, abra la búsqueda de
dispositivos Bluetooth (p. ej., con los comandos
Inicio > Configuración > Dispositivos > Bluetooth).
2Siga las indicaciones del software.
3En la parte trasera del teclado o la parte inferior
del ratón, ponga el conmutador en la posición
“BT”.
4Active la conexión de Bluetooth del teclado o ratón
pulsando el botón situado junto al conmutador de
BT.
El LED parpadea en azul.
Si el LED no parpadea en azul:
•Ya existe una conexión del teclado o ratón a otro
PC u ordenador portátil. Apáguelo o desactive
esta conexión.
5Siga las indicaciones del software.
El LED se apaga; el aparato está conectado a su PC
u ordenador portátil.
Si el LED parpadea rápidamente en color rojo, significa
que la conexión p1-ha fallado.
•Inténtelo de nuevo.
Désignation Valeur
AlimentationRécepteur :
5,0 V/CC ±5 %
Tension de chargeTyp. 5,0 V/CC
Consommation de
courant Clavier : typ. 4,5 mA
(Veille : typ. 0,05 mA)
Souris : typ. 10 mA
(Veille : typ. 0,3 mA)
Récepteur : typ. 26 mA
BatterieClavier : Batterie aux ions
Lithium rechargeable, 650 mAh
Souris : Batterie aux ions
Lithium rechargeable, 550 mAh
Fréquence d’émis-
sion 2 400,0 ... 2 483,5 MHz
Puissance d’émis-
sion Max. 10 mW (PIRE)
Bluetooth 4.0
Température de
stockage
-15 °C ... +60 °C
Température de
fonctionnement
0 °C ... +40 °C
ES MANUAL DE
INSTRUCCIONES
¡Cada aparato es distinto!
En las instrucciones de uso encontrará
explicaciones sobre la utilización efectiva y
segura del aparato.
•Lea las instrucciones detenidamente.
•Guarde las instrucciones de uso y transmítalas
a otros usuarios.
3.2Conexión de los aparatos a través del
receptor
El receptor se encuentra en un compartimento
situado en la parte inferior del ratón y se sujeta
mediante un imán.
1Extraiga el receptor de la carcasa del ratón.
2Conecte el receptor preferentemente a un puerto
USB 2.0 del PC u ordenador portátil (este tiene
por lo general una guía negra o blanca).
3En la parte trasera del teclado o la parte inferior
del ratón, ponga el conmutador en la posición
“RF”.
El LED de la parte posterior del teclado o el LED del
ratón parpadearán en rojo a modo de confirmación.
El ratón o teclado está ahora conectado con su PC u
ordenador portátil.
3.3Guardar el receptor en el ratón
El receptor es tan pequeño que puede permanecer
enchufado en el puerto USB incluso al transportar un
ordenador portátil. No obstante, si se desea excluir la
posibilidad de que sufra cualquier tipo de
desperfecto, puede extraer el receptor y guardarlo en
el ratón para evitar que se pierda o que acumule
polvo.
4Aumentar la inclinación del teclado
Puede aumentar la inclinación del teclado pegando
los 4 pies de goma adjuntos sobre los seguros
antideslizantes situados en la parte inferior del
aparato.
1Apague el PC u ordenador portátil o desactive la
conexión.
2Limpie la zona alrededor de los seguros de
antideslizantes traseros.
3Separe el plástico protector de los pies de goma y
péguelos sobre los seguros antideslizantes de
manera que estos queden dentro de la ranura de
los pies.
5Ajustar el número de DPI del ratón
Al aumentar el número de DPI, aumenta la velocidad
del puntero del ratón.
•Pulse el botón DPI de la parte superior del ratón.
El LED parpadea en función del ajuste:
1x = 600 dpi, 2x = 1000 dpi, 3x = 1600 dpi,
4x = 3200 dpi
El ajuste se guarda en el ratón y se mantiene aún
después de apagarlo.
6Cargar los aparatos
Cargue el teclado cuando parpadeen los LED de las
teclas de bloqueo de mayúsculas, bloqueo de
desplazamiento y bloqueo numérico. Cargue el ratón
cuando el LED parpadee en rojo. Cuando más rápido
parpadean los LED, menor es el nivel de carga de la
batería.
•Conecte el cable de carga al teclado o ratón y a un
puerto USB del PC u ordenador portátil.
Mientras se carga el teclado, se iluminará el LED de
la parte trasera en color rojo.
Mientras se carga el ratón, se iluminará el LED en
color rojo.
Cuando los aparatos estén cargados, los LED se
apagarán.
La batería del aparato se carga mientras el PC u
ordenador portátil esté encendido. Usted puede
seguir trabajando mientras se carga el aparato.
7Encender y apagar los aparatos
Cuando no se utilizan, los aparatos pasan al modo
stand-by para consumir menos energía. Se volverán
a encender automáticamente al pulsar cualquier
tecla.
Como en el modo de ahorro de energía también se
consume energía, apague los aparatos manualmente
cuando no vaya a utilizarlos durante un período
prolongado o para transportarlos.
•En la parte trasera del teclado o la parte inferior
del ratón, ponga el conmutador en la posición
deseada:
Apagado = teclado: en posición central, ratón: off
Encendido (con radiofrecuencia) = RF
Encendido (con Bluetooth) = BT
8Limpiar los aparatos
1Apague los aparatos.
NOTA: Los detergentes y líquidos agresivos pueden
dañar los aparatos
•Para la limpieza, no utilice ningún disolvente,
como gasolina o alcohol, ni ningún producto de
limpieza abrasivo ni esponjas abrasivas.
•Evite que penetre líquido en los aparatos.
•No retire las caperuzas de las teclas del teclado.
2Limpie los aparatos con un paño ligeramente
humedecido y un poco de agente de limpieza
suave (por ejemplo: detergente para vajillas).
3Seque los aparatos con un paño suave que no deje
pelusa.
9Si los aparatos no funcionan
•Apáguelos y vuelva a encenderlos.
•Cargue los aparatos con el cable de carga (véase
6 "Cargar los aparatos").
•Retire cualquier objeto que pueda provocar
interferencias entre los dispositivos y el PC o
portátil. Las interferencias son provocadas ante
todo por objetos metálicos o eléctricos como
cables, altavoces o concentradores USB.
•Reduzca la distancia entre los aparatos y el PC u
ordenador portátil.
•Si se producen interferencias al utilizar
dispositivos USB 3.0 en las inmediaciones del
receptor: utilice un puerto más alejado, un cable
adicional o un concentrador USB para el receptor
o el dispositivo USB 3.0.
9.1Resolución de errores en la conexión
Bluetooth
•Cuando su PC u ordenador portátil se encuentra
en modo stand-by, no se puede activar a través de
aparatos Bluetooth. Encienda el PC u ordenador
portátil manualmente.
•Si los aparatos p1-ya están conectados a otro PC u
ordenador portátil, no podrá establecer ninguna
conexión paralela. Apague el primer PC u
ordenador portátil o desactive la conexión.
•Desconecte los dispositivos Bluetooth que no sean
necesarios.
•Elimine el teclado o ratón en el software de
Bluetooth y vuelva a añadirlo como nuevo
dispositivo.
•Utilice un receptor Bluetooth externo.
•Conecte los dispositivos a través del receptor.
9.2Resolución de errores de conexión a
través del receptor
•Conecte el receptor a un puerto USB 2.0 del PC u
ordenador portátil (este tiene por lo general una
guía negra o blanca). En los puertos USB 3.0 (guía
azul) se producen a veces fallos de
funcionamiento.
•Conecte el receptor a otro puerto USB 2.0 del PC
u ordenador portátil.
•Reduzca la distancia entre el receptor y los
dispositivos conectando el receptor a un puerto
USB que se encuentre cerca de los dispositivos.
•Utilice un cable de extensión USB para situar el
receptor lo más cerca posible de los dispositivos.
10Gestión de residuos
Los dispositivos contienen baterías de iones
de litio que no pueden cambiarse.
Los aparatos eléctricos y las baterías
contienen sustancias que pueden ser
perjudiciales para la salud y el medio ambiente.
•Deseche los aparatos con las baterías conforme a
las disposiciones legales.
Funcionamiento de varios dispositivos
Bluetooth en un PC u ordenador portátil
Si hay demasiados dispositivos Bluetooth
conectados, los receptores Bluetooth integrados
en el PC u ordenador portátil pueden
sobrecargarse.
11Datos técnicos
12Declaración de conformidad
de la UE
Por la presente, Cherry GmbH, Auerbach/
OPf., Alemania, declara que este tipo de
equipo inalámbrico cumple la directiva
2014/53/UE. El texto completo de la declaración de
conformidad de la UE se puede consultar en la
siguiente dirección de Internet:
www.cherry.de/compliance.
①Browser, pagina iniziale
②Bloccare il PC
③Diminuzione volume
④Attivazione/disattivazione dell'audio
⑤Aumento volume
⑥Calcolatrice
⑦LED di stato per livello di carica della batteria,
collegamento Bluetooth o wireless
⑧Interruttore radio (RF)/Off (posizione centrale)/
Bluetooth (BT)
⑨Tasto per collegamento Bluetooth
⑩Presa per cavo di ricarica
⑪Presa per cavo di ricarica
⑫Cambiamento DPI
⑬LED di stato per livello di carica della batteria,
risoluzione, collegamento Bluetooth o wireless
⑭Browser avanti
⑮Browser indietro
⑯Interruttore di spegnimento (off)/radio (RF)/
Bluetooth (BT)
⑰Tasto per collegamento Bluetooth
⑱Ricevitore per collegamento wireless
Prima di cominciare ...
CHERRY DW 9000 SLIM è una combinazione di
tastiera e mouse wireless per il comando di PC/
notebook.
Per informazioni su ulteriori prodotti, download e
molto altro ancora, visitate la pagina web
www.cherry.de.
1Per la vostra sicurezza
Pericolo di asfissia dovuto all’ingerimento di piccoli
pezzi
•Conservare l’apparecchio fuori dalla portata dei
bambini al di sotto dei 3 anni.
RSI è l'acronimo di "Repetitive Strain Injury", ovvero
sindrome da tensione ripetuta
La sindrome RSI è causata da piccoli e continui
movimenti ripetuti.
•Allestire la postazione di lavoro in modo
ergonomico.
•Posizionare la tastiera e il mouse in modo tale che
l'avambraccio e l'articolazione del polso si trovino
ai lati del corpo e siano distesi.
•Fare piccole pause, eventualmente praticando
esercizi di allungamento.
•Cambiare spesso posizione.
2Come evitare danni
Cancellazione di supporti di memoria e
danneggiamento di orologi meccanici a causa del
magnete presente nel mouse
•Non portare supporti di memoria, come schede
magnetiche o dischi rigidi esterni, e orologi
meccanici a una distanza inferiore a 10 cm dal
mouse.
3Collegamento degli apparecchi con
il PC/notebook
È possibile collegare gli apparecchi con il PC/
notebook via Bluetooth o con il ricevitore mediante un
collegamento wireless da 2,4 GHz.
Il collegamento via Bluetooth è comodo quando si
desidera utilizzare gli apparecchi su più PC/notebook:
il collegamento deve essere stabilito solo una volta e
non occorre utilizzare il ricevitore.
3.1Collegamento degli apparecchi via
Bluetooth
1Aprire sul PC/notebook la ricerca di dispositivi
Bluetooth (ad esempio con Avvio > Impostazioni >
Dispositivi > Bluetooth).
2Seguire le istruzioni del software.
3Spingere l’interruttore sul retro della tastiera o
sul lato inferiore del mouse su “BT”.
4Attivare il collegamento Bluetooth della tastiera/
del mouse premendo il pulsante accanto
all’interruttore BT.
Il LED blu lampeggia.
Se il LED blu non lampeggia:
•Esiste già un collegamento della tastiera/del
mouse con un altro PC/notebook. Spegnere
questo apparecchio o disattivare questo
collegamento.
5Seguire le istruzioni del software.
Il LED si spegne e l’apparecchio è collegato con il
PC/notebook.
Se il LED rosso lampeggia velocemente, significa che
il collegamento non è riuscito.
• Riprovare.
3.2Collegamento degli apparecchi tramite
ricevitore
Il ricevitore si trova nello scomparto sul lato inferiore
del mouse e viene tenuto da un magnete.
1Estrarre il ricevitore dall’alloggiamento del
mouse.
2Collegare possibilmente il ricevitore a una porta
USB 2.0 del PC/notebook (normalmente dotata di
una piastra bianca o nera).
3Spingere l’interruttore sul retro della tastiera o
sul lato inferiore del mouse su “RF”.
Il LED sul retro della tastiera o il LED del mouse
lampeggiano brevemente con luce rossa in segno di
conferma. La tastiera/il mouse sono collegati con il
PC/notebook.
3.3Sistemazione del ricevitore nel mouse
Il ricevitore è talmente piccolo che può restare nella
presa USB anche durante il trasporto di un laptop.
Per escludere danneggiamenti, è possibile comunque
estrarre il ricevitore e metterlo nel mouse, per
proteggerlo dallo sporco e prevenirne lo
smarrimento.
Denominación Valor
Suministro de tensiónReceptor:
5,0 V/CC ±5 %
Tensión de cargaTipo. 5,0 V/CC
Consumo de corrienteTeclado: tipo. 4,5 mA
(En stand-by: tipo. 0,05 mA)
Ratón: tipo. 10 mA
(En stand-by: tipo. 0,3 mA)
Receptor: tipo. 26 mA
PilaTeclado: Pila recargable de
iones de litio, 650 mAh
Ratón: Pila recargable de
iones de litio, 550 mAh
Frecuencia de emisión2400,0 ... 2483,5 MHz
Potencia de emisiónMáx. 10 mW (EIRP)
Bluetooth 4.0
Temperatura de
almacenamiento
-15 °C ... +60 °C
Temperatura de
funcionamiento
0 °C ... +40 °C
IT ISTRUZIONE D'USO
Ogni apparecchio è diverso!
Il presente manuale d’uso contiene
istruzioni per un uso efficiente e affidabile.
•Leggere il manuale d’uso con attenzione.
•Conservare il manuale d’uso e consegnarlo ad
altri utenti.
4Aumento dell’inclinazione della
tastiera
È possibile aumentare l’inclinazione della tastiera
incollando i 4 piedini in gomma in dotazione sulle
protezioni antiscivolo del lato inferiore della tastiera.
1Spegnere il PC/notebook o staccare il
collegamento.
2Pulire la zona intorno alle protezioni antiscivolo
posteriori.
3Staccare la pellicola protettiva dai piedini in
gomma e incollare i piedini sopra le protezioni
antiscivolo in modo da farle scomparire nella
scanalatura dei piedini in gomma.
5Impostazione del numero DPI del
mouse
La velocità del puntatore del mouse aumenta in base
al valore del numero DPI.
•Premere il tasto DPI sul lato superiore del mouse.
Il LED lampeggia in base all’impostazione:
1x = 600 dpi, 2x = 1000 dpi, 3x = 1600 dpi,
4x = 3200 dpi
L’impostazione viene salvata nel mouse e resta
memorizzata anche dopo lo spegnimento.
6Caricamento degli apparecchi
Caricare la tastiera se lampeggiano i LED nei tasti
Blocco maiuscole, Blocco scorrimento e NUM.
Caricare il mouse se il LED rosso lampeggia. Più
velocemente lampeggiano i LED, più basso è il livello
di carica della batteria.
•Collegare il cavo di ricarica con la tastiera/il
mouse e con una presa USB del PC/notebook.
Finché la tastiera viene caricata, il LED rosso sul
retro della tastiera è acceso.
Finché il mouse viene caricato, il LED rosso è acceso.
Se gli apparecchi sono completamente carichi, i LED
sono spenti.
Finché il PC/notebook è acceso, la batteria
dell’apparecchio viene caricata. È possibile
continuare a lavorare durante l’operazione di carica.
7Accensione/spegnimento degli
apparecchi
Gli apparecchi, se non utilizzati, commutano in una
modalità di riposo a basso consumo. Non appena si
preme un tasto, si riattivano automaticamente.
Dal momento che consumano energia anche nella
modalità di risparmio energetico, si consiglia di
spegnerli manualmente in caso di inutilizzo
prolungato o durante trasporto.
•Spingere l’interruttore sul retro della tastiera o
sul lato inferiore del mouse nella posizione
corrispondente:
Off = tastiera nella posizione intermedia/mouse
"off"
Acceso (radio) = RF
Acceso (Bluetooth) = BT
8Pulizia degli apparecchi
1Spegnere gli apparecchi.
NOTA! Detergenti e liquidi aggressivi possono
danneggiare gli apparecchi
•Per la pulizia non ricorrere a solventi quali
benzina o alcool o a prodotti abrasivi o spugnette
abrasive.
•Evitare che i liquidi penetrino negli apparecchi.
•Non rimuovere le coperture dei tasti della
tastiera.
2Pulire gli apparecchi con un panno appena
inumidito e una piccola dose di detergente
delicato (ad es. detersivo per i piatti).
3Asciugare gli apparecchi utilizzando un panno
morbido che non rilascia pelucchi.
9Se gli apparecchi non funzionano
•Spegnere e riaccendere gli apparecchi.
•Caricare gli apparecchi utilizzando il cavo di
ricarica (vedi 6 "Caricamento degli apparecchi").
•Allontanare gli oggetti che possono disturbare la
connessione tra gli apparecchi e il PC/notebook.
Possono arrecare disturbo soprattutto gli oggetti
metallici o elettrici come cavi, altoparlanti o hub
USB.
•Ridurre la distanza tra gli apparecchi e il PC/
notebook.
•Se durante l’utilizzo di apparecchi USB 3.0 si
verificano interferenze nelle immediate vicinanze
del ricevitore: utilizzare per il ricevitore o per
l’apparecchio USB 3.0 una connessione più
remota, un cavo aggiuntivo o un hub USB.
9.1Come eliminare i problemi con la
connessione Bluetooth
•Se il PC/notebook si trova in modalità stand-by, la
funzione di riattivazione non è possibile attraverso
gli apparecchi Bluetooth. Accendere
manualmente il PC/notebook.
•Se gli apparecchi sono già collegati con un altro
PC/notebook, non sarà possibile stabilire un
collegamento parallelo. Spegnere il primo PC/
notebook o disattivare il collegamento.
•Disattivare gli apparecchi Bluetooth che non si
usano.
•Rimuovere la tastiera/il mouse nel software del
Bluetooth e aggiungerlo nuovamente come nuovo
dispositivo.
•Impiegare un ricevitore Bluetooth esterno.
•Collegare gli apparecchi attraverso questo
ricevitore.
9.2Come eliminare i problemi di
connessione attraverso il ricevitore
•Collegare il ricevitore a una porta USB 2.0 del PC/
notebook (normalmente dotata di una piastra
bianca o nera). Le porte USB 3.0 (piastra blu) sono
talvolta soggette a malfunzionamenti.
•Collegare il ricevitore a un’altra porta USB 2.0 del
PC/notebook.
•Ridurre la distanza tra il ricevitore e gli
apparecchi collegando il ricevitore a una porta
USB in prossimità degli apparecchi.
•Impiegare un cavo di prolunga USB per
posizionare il ricevitore il più vicino possibile agli
apparecchi.
10 Smaltimento
Gli apparecchi contengono batterie agli ioni
di litio che non possono essere sostituite.
Gli apparecchi elettrici e le batterie
contengono sostanze che possono essere
dannose per la salute e l’ambiente.
•Smaltire gli apparecchi con le batterie in
conformità alle disposizioni di legge.
11Dati tecnici
12Dichiarazione di conformità UE
Cherry GmbH, Auerbach/OPf., Germania,
con la presente dichiara che questo modello
di impianto radio corrisponde alla Direttiva
2014/53/UE. Il testo completo della Dichiarazione di
conformità UE è disponibile su Internet al seguente
indirizzo: www.cherry.de/compliance.
①Browser, startpagina
②Pc blokkeren
③Geluid zachter
④Geluid in-/uitschakelen
⑤Geluid harder
⑥Rekenmachine
⑦Status-LED voor laadtoestand van de accu,
Bluetooth- of radioverbinding
Funzionamento di diversi apparecchi
Bluetooth su un PC/notebook
Quando sono collegati molti apparecchi
Bluetooth, i ricevitori Bluetooth integrati nel PC/
notebook possono essere sovraccarichi.
Denominazione Valore
Tensione di alimentazioneRicevitore:
5,0 V/DC ±5%
Tensione di caricaTip. 5,0 V/DC
Corrente assorbitaTastiera: tip. 4,5 mA
(Standby: tip 0,05 mA)
Mouse: tip. 10 mA
(Standby: tip 0,3 mA)
Ricevitore: tip. 26 mA
BatteriaTastiera: Batteria cari-
cabile agli ioni di litio,
650 mAh
Mouse: Batteria carica-
bile agli ioni di litio,
550 mAh
Frequenza di trasmissione2400,0 ... 2483,5 MHz
Potenza di trasmissioneMax. 10 mW (EIRP)
Bluetooth 4.0
Temperatura di
magazzinaggio -15 °C ... +60 °C
Temperatura d'esercizio0 °C ... +40 °C
NL GEBRUIKS-
HANDLEIDING
⑧Schakelaar radio (RF)/uit (middenstand)/
Bluetooth (BT)
⑨Toets voor Bluetooth-verbinding
⑩Bus voor laadkabel
⑪Bus voor laadkabel
⑫DPI-schakelaar
⑬Status-LED voor laadtoestand van de accu,
resolutie, Bluetooth- of radioverbinding
⑭Browser vooruit
⑮Browser achteruit
⑯Schakelaar uit (off)/snoerloos (RF)/Bluetooth (BT)
⑰Toets voor Bluetooth-verbinding
⑱Ontvanger voor snoerloze verbinding
Voordat u begint ...
De CHERRY DW 9000 SLIM is een combinatie van
draadloos toetsenbord en muis voor de bediening van
pc/notebooks.
Informatie over verdere producten, downloads, etc,
vindt u op www.cherry.de.
1Voor uw veiligheid
Verstikkingsgevaar door inslikken van kleine
onderdelen
•Bewaar het apparaat buiten bereik van kinderen
jonger dan 3 jaar.
RSI staat voor "Repetitive Strain Injury" =
"Pijnklachten door herhaaldelijke overbelasting"
RSI ontstaat door kleine, zich voortdurend
herhalende bewegingen.
•Richt uw werkplek ergonomisch in.
•Plaats het toetsenbord en de muis op zo'n manier
dat uw bovenarmen en polsen zich aan de zijkant
van het lichaam bevinden en zijn gestrekt.
•Las meerdere kleine pauzes in en doe eventueel
een aantal rekoefeningen.
•Wijzig uw lichaamshouding zeer regelmatig.
2Beschadigingen vermijden
Wissen van geheugenmedia en beschadiging van
mechanische klokken door magneet in de muis
•Breng geen geheugenmedia zoals
magneetkaarten of externe harde schijven dichter
dan 10 cm bij de muis.
3Apparaten met de pc/notebook
verbinden
U kunt de apparaten via Bluetooth of met de
ontvanger via een 2,4 GHz-radioverbinding met de pc/
notebook verbinden.
De verbinding via Bluetooth is comfortabel, als u de
apparaten met meerdere pc’s/notebooks wilt
gebruiken: U brengt de verbinding slechts een keer
tot stand, en heeft de ontvanger niet nodig.
3.1Apparaten via Bluetooth verbinden
1Open op uw pc/notebook de zoekfunctie voor
Bluetooth-apparaten (bijvoorbeeld via Start >
Instellingen > Apparaten > Bluetooth).
2Volg de aanwijzingen van de software.
3Schuif aan de achterzijde van het toetsenbord of
de onderzijde van de muis de schakelaar op "BT".
4Activeer de Bluetooth-verbinding van toetsenbord/
muis door de knop naast de BT-schakelaar in te
drukken.
De LED knippert blauw.
Als de LED niet blauw knippert:
•er bestaat al een verbinding van toetsenbord/
muis met een andere pc/notebook. Schakel
deze uit, of deactiveer de verbinding.
5Volg de aanwijzingen van de software.
De LED gaat uit en het apparaat is met uw pc/
notebook verbonden.
Als de LED van de muis snel rood knippert, is de
verbinding mislukt.
•Probeer het opnieuw.
3.2Apparaten via ontvanger verbinden
De ontvanger bevindt zich in het vak aan de
onderzijde van de muis en wordt door een magneet
gefixeerd.
1Neem de ontvanger uit de behuizing van de muis.
2Sluit de ontvanger indien mogelijk aan op een USB
2.0-bus van de pc/notebook (deze heeft meestal
een witte of zwarte geleiding).
3Schuif aan de achterzijde van het toetsenbord of
de onderzijde van de muis de schakelaar op "RF".
De LED aan de achterzijde van het toetsenbord of de
LED op de muis branden ter bevestiging kort rood.
Het toetsenbord/de muis is met uw pc/notebook
verbonden.
3.3Ontvanger in de muis opbergen
De ontvanger is zo klein dat hij ook bij transport van
een laptop in de USB-bus kan blijven. Om
beschadigingen uit te sluiten, kunt u de ontvanger er
ook uittrekken en ter bescherming tegen vuil en
verlies in de muis opbergen.
4Helling van het toetsenbord
vergroten
U kunt de helling van het toetsenbord verhogen door
de 4 bijgeleverde rubbervoeten over de
glijbeveiligingen aan de onderzijde van het
toetsenbord te plakken.
1Schakel de eerste pc/notebook uit, of scheidt de
verbinding.
2Reinig het bereik rond de achterste
glijbeveiligingen.
3Trek de folie van de rubbervoeten en plak ze
zodanig over de glijbeveiligingen dat deze in de
uitsparing van de rubbervoeten verdwijnen.
5DPI-getal van de muis instellen
Met de hoogte van het DPI-getal stijgt de snelheid van
de muisaanwijzer.
•Druk op de DPI-schakelaar aan de
muisbovenzijde.
De LED knippert afhankelijk van de instelling:
1x = 600 dpi, 2x = 1000 dpi, 3x = 1600 dpi,
4x = 3200 dpi
De instelling wordt in de muis opgeslagen en blijft
ook na het uitschakelen behouden.
6Apparaat laden
Laad het toetsenbord, als de LEDs in de vergrendel-,
rol- en num-toetsen knipperen. Laad de muis, als de
LED rood knippert. Hoe sneller de LEDs knipperen,
hoe geringer de laadtoestand van de accu.
•Verbind de laadkabel met het toetsenbord/de
muis en een USB-bus van de pc/notebook.
Zolang het toetsenbord wordt geladen, brandt de LED
aan de achterzijde van het toetsenbord rood.
Zolang de muis wordt geladen, brandt de LED rood.
Als de apparaten vol geladen zijn, gaan de LEDs uit.
Zolang de pc/notebook is ingeschakeld, wordt de
accu van het apparaat geladen. Tijdens het laden
kunt u gewoon verder werken.
7Apparaten in-/uitschakelen
De apparaten schakelen bij niet-gebruik in een
slaapmodus waarin slechts weinig energie wordt
verbruikt. Door een keer op de knop te drukken,
worden ze weer ingeschakeld.
In deze energiebesparingsmodus wordt toch nog
energie – bij langer niet-gebruik en voor transport
kan het apparaat handmatig ook volledig worden
uitgeschakeld.
•Schuif de schakelaar aan de achterzijde van het
toetsenbord of aan de onderzijde van de muis in
de desbetreffende stand:
Uit = toetsenbord in middenstand/muis "off"
Aan (snoerloos) = RF
Aan (Bluetooth) = BT
8Apparaten reinigen
1Schakel de apparaten uit.
AANWIJZING! Agressieve reinigingsmiddelen en
vloeistoffen kunnen de apparaten beschadigen.
•Gebruik voor de reiniging geen oplosmiddelen
zoals benzine of alcohol en geen schuurmiddelen
of schuursponzen.
•Voorkom dat vloeistof de apparaten binnendringt.
•Verwijder de toetskappen van het toetsenbord
niet.
2Reinig de apparaten met een licht vochtige doek
en weinig reinigingsmiddel (bijvoorbeeld
afwasmiddel).
3Droog de apparaten met een pluisvrije, zachte
doek.
9Als de apparaten niet functioneren
•Schakel de apparaten uit en weer aan.
•Laad de apparaten via de laadkabel (zie 6
"Apparaat laden").
•Verwijder storende voorwerpen tussen de
apparaten en de pc/notebook. Storend zijn vooral
metalen of elektrische voorwerpen zoals kabels,
luidsprekers of USB-hubs.
•Reduceer de afstand tussen de apparaten en de
pc/notebook.
Elk apparaat is anders!
De handleiding bevat aanwijzingen over
effectief en betrouwbaar gebruik.
•Lees de handleiding nauwkeurig door.
•Bewaar de handleiding en stel deze ter beschik-
king voor andere gebruikers.
•Als er bij gebruik van USB 3.0-apparaten in de
directe omgeving van de ontvanger storingen
optreden: Gebruik voor de ontvanger of het USB
3.0-apparaat een verder gelegen aansluiting, een
extra kabel of een USB-hub.
9.1Storing van de Bluetooth-verbinding
verhelpen
•Als uw pc/notebook in de standby-modus is, is het
niet mogelijk om via Bluetooth-apparaten te
worden gewekt. Schakel de pc/notebook
handmatig in.
•Als de apparaten al met een andere pc/notebook
zijn verbonden, kunt u geen parallelle verbinding
maken. Schakel de eerste pc/notebook uit, of
deactiveer de verbinding.
•Schakel niet-benodigde Bluetoothapparaten uit.
•Verwijder het toetsenbord/de muis in de
Bluetooth-software en voeg deze weer toe als
nieuw apparaat.
•Gebruik een externe Bluetooth-ontvanger.
•Sluit de apparaten aan via de ontvanger.
9.2Storing van de verbinding via de
ontvanger verhelpen
•Sluit de ontvanger aan op een USB 2.0-bus van de
pc/notebook (deze heeft meestal een witte of
zwarte geleiding). Bij USB 3.0-bussen (blauwe
geleiding) kunnen soms storingen optreden.
•Sluit de ontvanger aan op een andere USB 2.0-bus
van de pc/notebook.
•Reduceer de afstand tussen de ontvanger en de
apparaten door de ontvanger op een USB-bus aan
te sluiten die zich dichter bij de apparaten bevindt.
•Gebruik een USB-verlengkabel om de ontvanger
zo dicht mogelijk bij de apparaten te positioneren.
10 Afvoer
De apparaten bevatten lithium-ionenaccu's.
Deze kunnen niet worden vervangen.
Elektrische apparaten en batterijen bevatten
stoffen die de gezondheid en het milieu
kunnen beschadigen.
•Voer de apparaten met de batterijen af volgens de
wettelijke voorschriften.
11Technische gegevens
12 EU-conformiteitsverklaring
Hierbij verklaart Cherry GmbH, Auerbach/
OPf., Duitsland, dat dit type radio-installatie
aan Richtlijn 2014/53/EU voldoet. De
volledige tekst van de EU-conformiteitsverklaring is
te vinden op het volgende internetadres:
www.cherry.de/compliance.
①Webbläsare, startsida
②Låsa datorn
③Lägre volym
④Volym på/av
⑤Högre volym
⑥Kalkylator
⑦Statuslysdiod för batteriets laddningsnivå,
Bluetooth- eller radioförbindelse
⑧Radiobrytare (RF)/Av (mellanläge)/Bluetooth (BT)
⑨Knapp för Bluetooth-förbindelse
⑩Uttag för laddningskabel
⑪Uttag för laddningskabel
⑫DPI-omkoppling
⑬Statuslysdiod för batteriets laddningsnivå,
upplösning, Bluetooth- eller radioförbindelse
⑭Webbläsare framåt
⑮Webbläsare bakåt
⑯Brytare Av (off)/radio (RF)/Bluetooth (BT)
⑰Knapp för Bluetooth-förbindelse
⑱Receiver för radioförbindelse
Innan du börjar ...
CHERRY DW 9000 SLIM är en kombination av ett
trådlöst tangentbord och en mus för användning av
datorer/notebook-enheter.
Besök www.cherry.de för information om övriga
produkter, nedladdningar och mycket mer.
1För din säkerhets skull
Kvävningsrisk på grund av smådelar
•Förvara enheten utom räckhåll för barn under
3 år.
Repetitive Strain Injury" = "belastningsskador p.g.a.
repetitiva arbeten"
RSI uppstår p.g.a. upprepade rörelser.
•Anpassa din arbetsplats så att den är ergonomisk.
•Placera tangentbordet och musen så att dina
överarmar och handleder befinner sig på sidan av
kroppen och är utsträckta
•Ta flera små pauser och gör
utsträckningsövningar.
•Ändra din kroppsposition ofta.
2Förhindra skador
Lagringsmedier raderas och mekaniska klockor
skadas på grund av magneten i musen
•Placera inte lagringsmedier, som magnetkort
eller externa hårddiskar eller några mekaniska
klockor, närmare än 10 cm från musen.
3Ansluta enheter till datorn/
notebook-enheten
Det är möjligt att ansluta enheterna via Bluetooth
eller med hjälp av en mottagare via en 2,4 GHz-
radioförbindelse till datorn/notebook-enheten.
Om du tänker använda enheterna för flera datorer/
notebook-enheter är det smidigt att upprätta en
förbindelse via Bluetooth: Du behöver endast
upprätta förbindelsen en gång och behöver inte
använda mottagaren.
3.1Ansluta enheter via Bluetooth
1Öppna sökfunktionen efter Bluetooth-enheter på
datorn/notebook-enheten (till exempel via Start >
Inställningar > Enheter > Bluetooth).
2Följ programanvisningarna.
3Flytta brytaren på tangentbordets baksida eller på
musens undersida till ”BT”.
4Aktivera tangentbordets/musens Bluetooth-
förbindelse genom att trycka på knappen intill BT-
brytaren.
Lysdioden blinkar blått.
Om lysdioden inte blinkar blått:
•Det finns redan en förbindelse mellan
tangentbordet/musen och en annan dator/
notebook. Stäng av datorn/notebook-enheten
eller inaktivera förbindelsen.
5Följ programanvisningarna.
Lysdioden slocknar och enheten är förbunden med
din dator/notebook.
Om lysdioden blinkar snabbt rött har förbindelsen inte
kunnat upprättas.
•Försök igen.
Gebruik van meerdere
Bluetoothapparaten op een pc/notebook
Als te veel Bluetoothapparaten zijn
aangesloten, kunnen de in de pc/notebook
geïntegreerde Bluetoothontvangers overbelast zijn.
Aanduiding Waarde
VoedingsspanningOntvanger:
5,0 V/DC ±5 %
LaadspanningType. 5,0 V/DC
StroomverbruikToetsenbord: type. 4,5 mA
(Standby: type. 0,05 mA)
Muis: type. 10 mA
(Standby: type. 0,3 mA)
Ontvanger: type. 26 mA
AccuToetsenbord: Oplaadbare
lithium-ion-accu, 650 mAh
Muis: Oplaadbare lithium-
ion-accu, 550 mAh
Zendfrequentie2400,0 ... 2483,5 MHz
ZendvermogenMax. 10 mW (EIRP)
Bluetooth 4.0
Opslagtemperatuur-15°C ... +60 °C
Bedrijfstemperatuur0 °C ... +40 °C
SV BRUKSANVISNING
Alla enheter är olika!
I bruksanvisningen finns det information
om hur man använder enheten på ett
effektivt och tillförlitligt sätt.
•Läs noga igenom bruksanvisningen.
•Spara bruksanvisningen och överlämna den till
andra användare.
64410032-03, DE, EN, FR, ES, IT, NL, SV, NO, DK, FI, PL, CS, SK, © Mär 2020 (JD-9000 = Mod. JF-90, JG-90, JR-90)
CHERRY DW 9000 SLIM
Wireless Desktop with Bluetooth®
and RF Transmission
③①⑥②④ ⑤⑦⑩⑧⑨
⑫⑮⑬ ⑭⑪
⑱
⑰
⑯
Specyfikacje produktu
| Marka: | Cherry |
| Kategoria: | klawiatura |
| Model: | DW 9000 SLIM |
Potrzebujesz pomocy?
Jeśli potrzebujesz pomocy z Cherry DW 9000 SLIM, zadaj pytanie poniżej, a inni użytkownicy Ci odpowiedzą
Instrukcje klawiatura Cherry

5 Lutego 2025
5 Lutego 2025
4 Lutego 2025
4 Lutego 2025
3 Stycznia 2025
25 Grudnia 2024
29 Września 2024
22 Września 2024
22 Września 2024
21 Września 2024
Instrukcje klawiatura
Najnowsze instrukcje dla klawiatura
5 Kwietnia 2025
5 Kwietnia 2025
5 Kwietnia 2025
4 Kwietnia 2025
4 Kwietnia 2025
4 Kwietnia 2025
30 Marca 2025
30 Marca 2025
30 Marca 2025
30 Marca 2025