Instrukcja obsługi CRUX RVCCH-75D
CRUX
Niesklasyfikowane
RVCCH-75D
Przeczytaj poniżej 📖 instrukcję obsługi w języku polskim dla CRUX RVCCH-75D (3 stron) w kategorii Niesklasyfikowane. Ta instrukcja była pomocna dla 12 osób i została oceniona przez 6.5 użytkowników na średnio 4.5 gwiazdek
Strona 1/3

Crux Interfacing Solutions • Chatsworth, CA 91311
phone: (818) 609-9299 • fax: (818) 996-8188 • www.cruxinterfacing.com
RVCCH-75D
Rear View Integration Interface with VIM
for DODGE RAM Trucks
R
INTERFACING SOLUTIONS
Sightline
Multi View Integration
rev.09222021
1 of 3
• Acvates Uconnect Touchscreen Radio for enabling Video features
• Aermarket Rear-view Camera included
• Automacally switches to Rear-view when car is in Reverse mode
• Forced reverse camera view feature
• VIM funcon
• Plug & Play Installaon
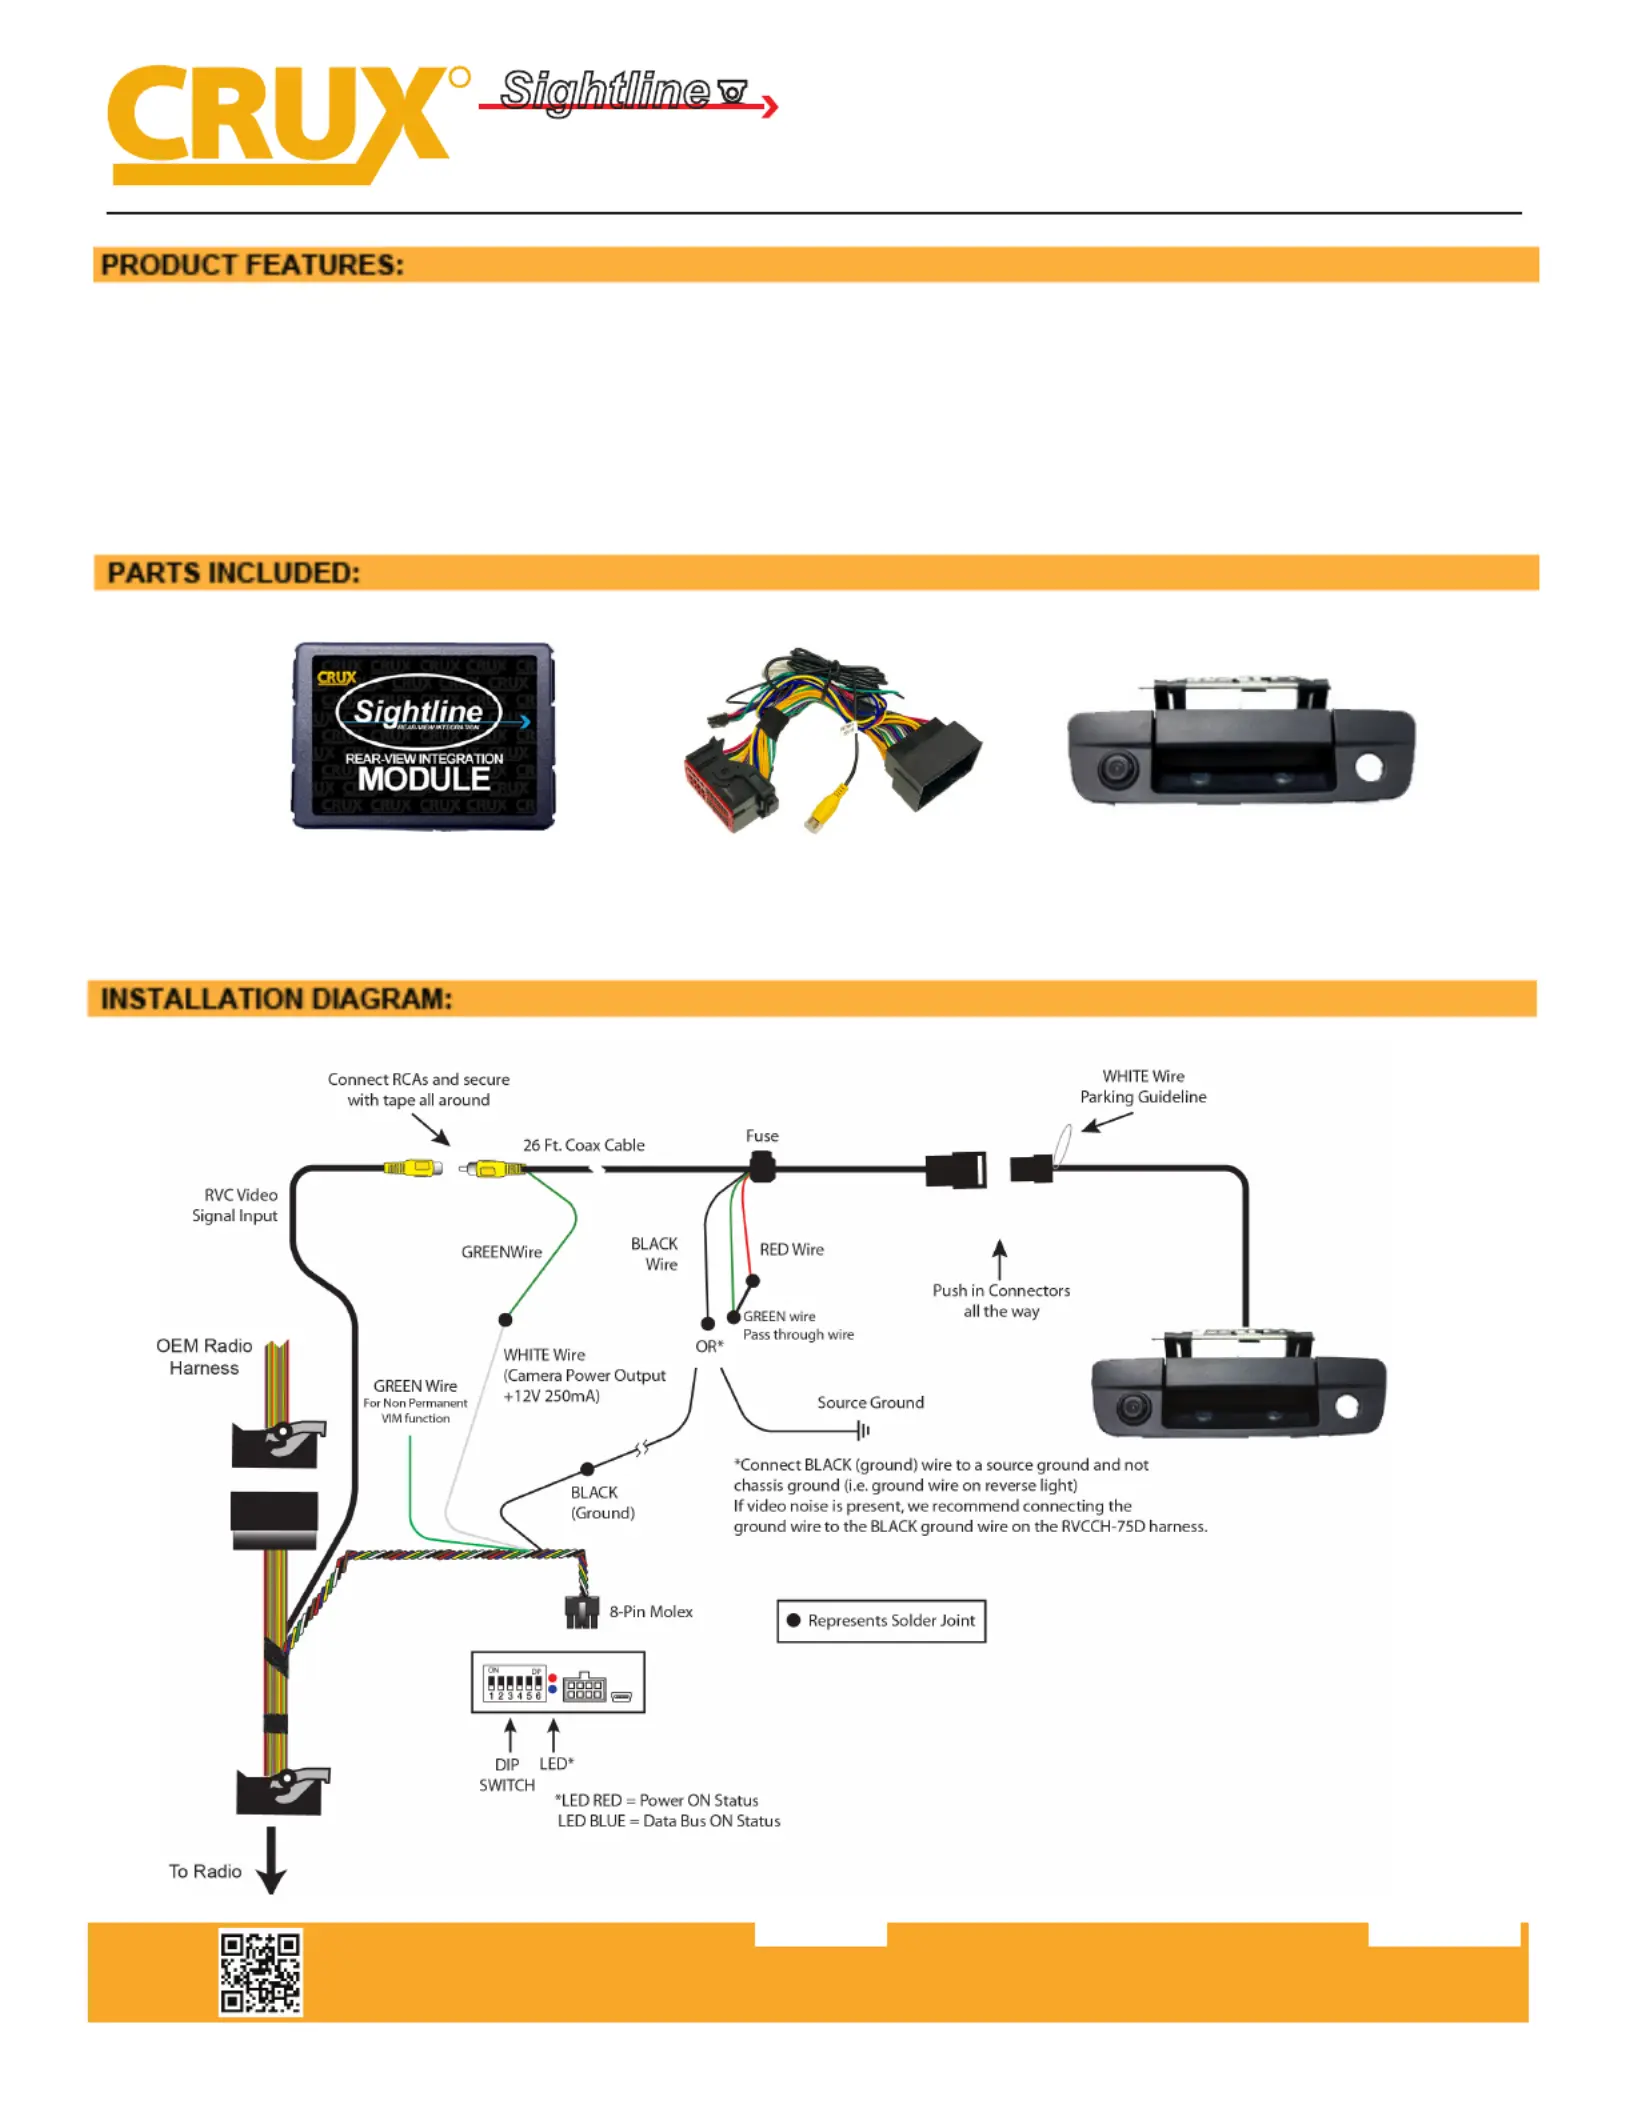
RVCCH-75D Module RVCCH-75D Harness CDR-02 Camera

Crux Interfacing Solutions • Chatsworth, CA 91311
phone: (818) 609-9299 • fax: (818) 996-8188 • www.cruxinterfacing.com
2 of 3
R
INTERFACING SOLUTIONS
Sightline
Multi View Integration
INSTALLATION INSTRUCTIONS:
INSTALLING THE CDR-02 CAMERA AND CABLE
1. Remove the OE tailgate handle.
2. Remove the OE lock cylinder and install in the CDR-02 camera housing.
3. Install the new tailgate handle and run the cables to the radio.
4. Remove the factory radio to gain access to the factory connectors.
5. Route the wires towards the radio and make the power and video connecons. For powering up the camera, use the 12V
OUTPUT (White Wire). (See Wiring Diagram on page 1)
6. Connect the camera ground wire to chassis ground. If video noise is present, we recommend grounding the camera
directly to the BLACK wire on the RVCCH-75D T-harness.
7. The CDR-02 has a built-in parking guide lines opon and is defaulted to ON from the factory. To turn OFF the parking guide
lines, cut the thin WHITE wire located on the camera cable 4 feet from the camera. Unplug the barrel connectors on the
cable for 10 seconds. Align the arrows on the barrel connectors and rmly plug them together.
8. Test the camera before re-installing the radio.
CODING THE RADIO FOR A REAR VIEW CAMERA
The radio has to be coded to accept a reverse camera. Please follow the coding procedure below:
1) Turn key o and remove the key from ignion.
2) Open the driver door then close it (make sure all doors, li gate and hood are also closed).
3) Look at the module and wait for LEDs to turn o then disconnect the module.
4) Before plugging back the module, turn all DIP switches to ON then OFF.
5) Set DIP switches 1 (if permanent VIM is desired), 2 and 6 to the ON posion.
6) Reconnect module and wait for the LEDs to turn o.
7) Start up engine and the coding operaon is complete.
8) Put the gear in reverse to test the camera.
FORCED VIEW OF REVERSE CAMERA
The Force RVC is used to view the back-up camera when the vehicle is
not in reverse gear. Allows you to view what is in the back while driving.
To acvate this feature, make sure that DIP 4 is set to ON. Press the center
buon once on the le hand side steering wheel control (located behind the steering wheel).
NOTE: The camera is defaulted to power down aer 10 seconds.
DIP SWITCH FUNCTIONS:
DIP 1 = Video in Moon Acvaon ON / OFF
DIP 2 = Rear View Camera ON / OFF
DIP 3 = Not Used
DIP 4 = Forced RVC ON / OFF
DIP 5 = Defaulted to OFF*
DIP 6 = Defaulted to ON*
RVCCH-75D
Rear View Integration Interface with VIM
for DODGE RAM Trucks
*DIP 5 & 6
If the radio is having turn-on issues, please try the following:
Aempt 1: Set 5 & 6 to ON
Aempt 2: Set 5 to ON and 6 to OFF
Aempt 3: Set 5 to OFF and 6 to ON
1 2 3 4 5 6
ON
rev.09222021

Crux Interfacing Solutions • Chatsworth, CA 91311
phone: (818) 609-9299 • fax: (818) 996-8188 • www.cruxinterfacing.com
3 of 3
R
INTERFACING SOLUTIONS
Sightline
Multi View Integration
RVCCH-75D
Rear View Integration Interface with VIM
for DODGE RAM Trucks
RAM
2013 - 2017 1500
2013 - 2017 2500
2013 - 2017 3500
NOTES:
1. Not compable with diesel powered trucks.
2. Not compable with RAM trucks with factory installed cargo camera.
COMPATIBLE RADIOS:
8.4” Screen with Separate Knobs 5” Screen with 6 Buons &
Separate Knobs
4.3” Screen with 6 Buons &
2 Knobs
4.3” Screen with 4 Buons & 2 Knobs
Not compable radio
rev.09222021
Specyfikacje produktu
Marka: | CRUX |
Kategoria: | Niesklasyfikowane |
Model: | RVCCH-75D |
Potrzebujesz pomocy?
Jeśli potrzebujesz pomocy z CRUX RVCCH-75D, zadaj pytanie poniżej, a inni użytkownicy Ci odpowiedzą
Instrukcje Niesklasyfikowane CRUX
3 Stycznia 2025
1 Stycznia 2025
1 Stycznia 2025
1 Stycznia 2025
1 Stycznia 2025
1 Stycznia 2025
1 Stycznia 2025
1 Stycznia 2025
1 Stycznia 2025
1 Stycznia 2025
Instrukcje Niesklasyfikowane
- Niesklasyfikowane NComputing
- Niesklasyfikowane Lervia
- Niesklasyfikowane Iadea
- Niesklasyfikowane National Geographic
- Niesklasyfikowane Roline
- Niesklasyfikowane Nexibo
- Niesklasyfikowane Old Blood Noise
- Niesklasyfikowane Karibu
- Niesklasyfikowane Extron
- Niesklasyfikowane Ltech
- Niesklasyfikowane Maze
- Niesklasyfikowane Gravity
- Niesklasyfikowane Trasman
- Niesklasyfikowane Croozer
- Niesklasyfikowane Mitsubishi
Najnowsze instrukcje dla Niesklasyfikowane
29 Stycznia 2025
29 Stycznia 2025
29 Stycznia 2025
29 Stycznia 2025
29 Stycznia 2025
29 Stycznia 2025
29 Stycznia 2025
29 Stycznia 2025
29 Stycznia 2025
29 Stycznia 2025