Instrukcja obsługi Festo EHAM-E20-40-Z
Festo Niesklasyfikowane EHAM-E20-40-Z
Przeczytaj poniżej 📖 instrukcję obsługi w języku polskim dla Festo EHAM-E20-40-Z (2 stron) w kategorii Niesklasyfikowane. Ta instrukcja była pomocna dla 18 osób i została oceniona przez 4 użytkowników na średnio 4.8 gwiazdek
Strona 1/2
Translation of the original instructions
1Further applicable documents
All available documents for the product www.festo.com/pk.è
Observe further applicable documents:
–Instruction manual for adapter kit EHAM-E20-40-E...
–Instruction manual for rotary gripper module EHMD-40
2Safety
2.1Safety instructions
–Before starting mounting work: Switch off power supply.
–Secure screw fittings using an adhesive locking agent.
–Observe tightening torques.
Tightening torques 5 Screw sizes and tightening torques.è
2.2Intended use
Mounting the rotary gripper module EHMD-40 on one of the following Zaxes: ‑7
Adapter kitZ-axis67
EHAM-E20-40-E9EGSK-20
EGSK-26
EHAM-E20-40-E8EGSL-BS-35
EGSL-BS-45
EHAM-E20-40-E19EGSC-BS-…-25
EGSC-BS-…-32
Tab. 1 Intended use
3Product overview
3.1Product range overview
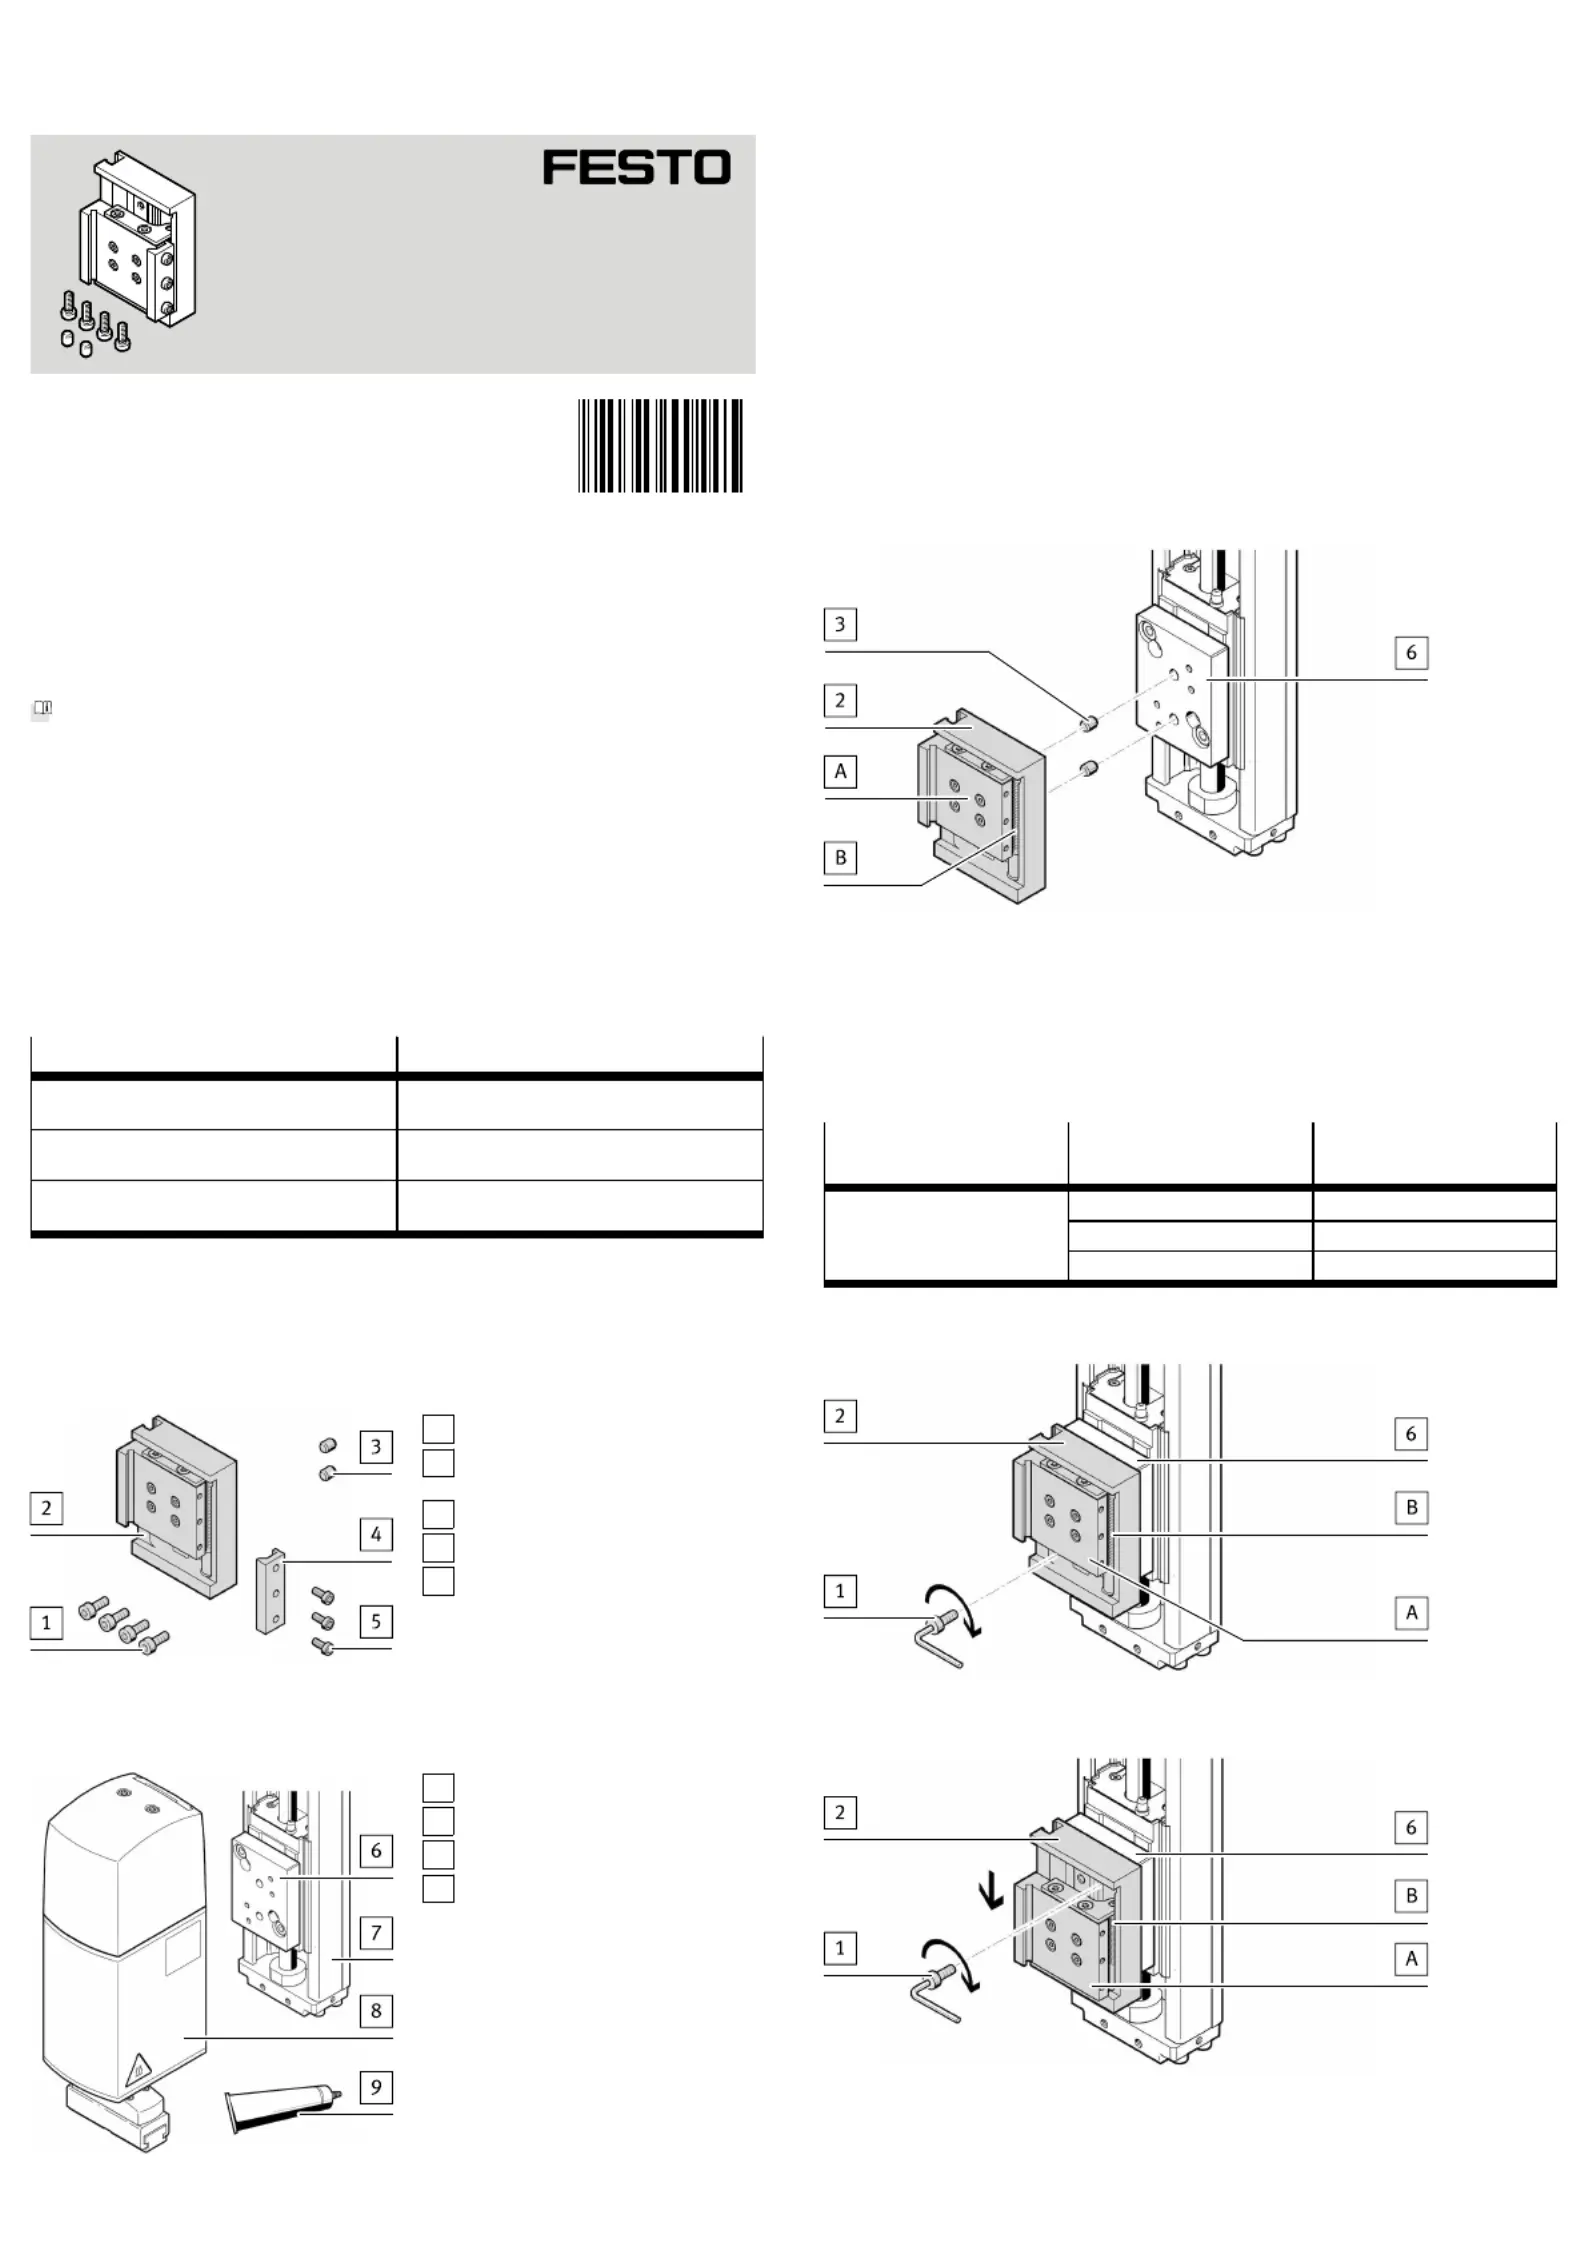
3.1.1Included in delivery
1
Socket head screw (4x)
2
Base plate (1x) with slide and
compression spring
3
Centring pin (2x)
4
Rail (1x)
5
Socket head screw (3x)
Fig. 1
3.1.2Not included in the delivery
6
Adapter kit
7
Z-axis
8
Rotary gripper module EHMD-40
9
Adhesive for medium-strength
screw locking
Fig. 2
3.2Function
The mounting is positioned between the rotary gripper module and the8
adapter kit. The rotary gripper module is mounted by means of a dovetail68
clamp. This enables additional adjustment of the rotary gripper module in the8
Zdirection.
Without the rotary gripper module in place, the slide(A) is pressed into the upper
end position by a preloaded compression spring(B). With the rotary gripper mod-
ule in place, the slide(A) occupies the lower end position. The slide(A) thus per-
mits a Z compensation stroke of max. 12mm. This makes it possible to com-
pensate relatively small movements (e.g. the thread pitch of a cover) without
needing to move the Zaxis.‑
4Mounting
4.1Preparation
•Mount the appropriate adapter kit on the Zaxis6‑7
è 1 Further applicable documents.
4.2Installation
Positioning the mounting on the adapter kit
Fig. 3
1.Align the base plate in such a way that the slide(A) is located in the upper2
end position.
2.Position the base plate on the adapter kit with the centring pins.263
Mounting the base plate on the adapter kit
The number of socket head screws required to mount the base plate varies12
depending on the adapter kit:6
Mounting Adapter kitNumber of socket head6
screws1
EHAM-E20-40-E84
EHAM-E20-40-E92
EHAM-E20-40-Z
EHAM-E20-40-E192
Tab. 2 Number of socket head screws
Fig. 4
Fig. 5
1.The slide(A) is in its natural upper end position.
Ä
Holes for the socket head screws are accessible in the lower region of1
the base plate.2
8080697
Mounting
EHAM-E20-40-Z
8080697
2017-12
[8080699]
Instructions|Assembly
Festo SE & Co. KG
Ruiter Straße 82
73734 Esslingen
Germany
+49 711 347-0
www.festo.com
Specyfikacje produktu
| Marka: | Festo |
| Kategoria: | Niesklasyfikowane |
| Model: | EHAM-E20-40-Z |
Potrzebujesz pomocy?
Jeśli potrzebujesz pomocy z Festo EHAM-E20-40-Z, zadaj pytanie poniżej, a inni użytkownicy Ci odpowiedzą
Instrukcje Niesklasyfikowane Festo

10 Stycznia 2025
10 Stycznia 2025
7 Stycznia 2025
7 Stycznia 2025
7 Stycznia 2025
7 Stycznia 2025
7 Stycznia 2025
7 Stycznia 2025
7 Stycznia 2025
7 Stycznia 2025
Instrukcje Niesklasyfikowane
Najnowsze instrukcje dla Niesklasyfikowane
29 Stycznia 2025
29 Stycznia 2025
29 Stycznia 2025
29 Stycznia 2025
29 Stycznia 2025
29 Stycznia 2025
29 Stycznia 2025
29 Stycznia 2025
29 Stycznia 2025
29 Stycznia 2025