Instrukcja obsługi Festo SL-DSM-63-B
Festo Niesklasyfikowane SL-DSM-63-B
Przeczytaj poniżej 📖 instrukcję obsługi w języku polskim dla Festo SL-DSM-63-B (2 stron) w kategorii Niesklasyfikowane. Ta instrukcja była pomocna dla 20 osób i została oceniona przez 7 użytkowników na średnio 4.2 gwiazdek
Strona 1/2
Montageanleitung (de)
737 671 / 2008-09NH
†‡
Sensorhalte
r
SL-DSM-63-B
Postfach
D-73726 Esslingen
++49/(0)711/347-0
www.festo.com
1.Teileliste
13104d_1
1Sensorhalter (2x)
SL-DSM-63-B
2Senkschraube (2x)
M3x4
13104d_2
Nicht im Lieferumfang:
3Näherungsschalter (2x)
SME/SMT-8…
Hinweis
Bei Zugbelastungen können die Leitungen brechen.
•Fixieren Sie die Leitungen der Näherungsschalter 3.
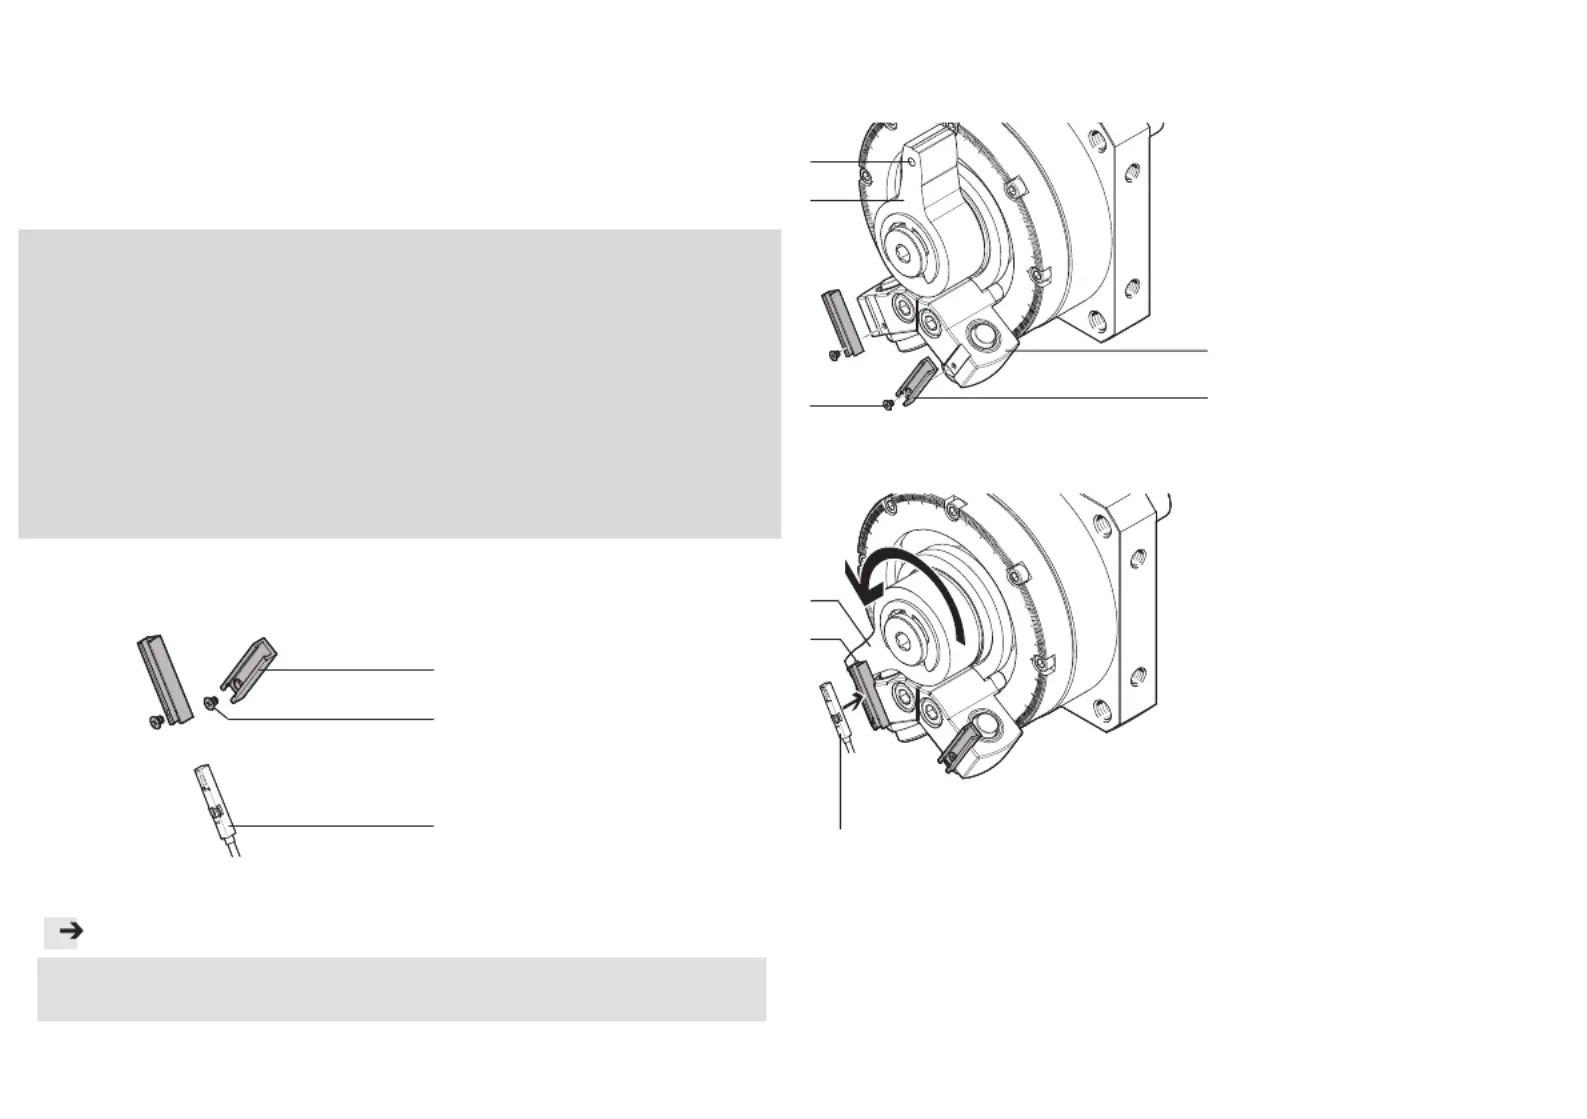
2.Montage
13104d_3
•Befestigen Sie die Sensor-
halter 1 in der Nut des
Dämpferhalters (A) mit den
Schrauben 2. Halten Sie
das zulässige Anziehdreh-
moment ein.
Im Anschlaghebel (C) befindet
sich der Magnet (B) der zur Po-
sitionserkennung dient.
13104d_4
•Schwenken Sie den An-
schlaghebel (C) in die ge-
wünschte Endlage.
•Platzieren Sie den Nähe-
rungsschalter 3 in der Nut
des Sensorhalters 1.
•Positionieren Sie den Nähe-
rungsschalter 3 in der Nut
so, dass er in der Endlage
des Anschlaghebels (C)
schaltet.
•Befestigen Sie den Nähe-
rungsschalter 3 gemäß sei-
ner Bedienungsanleitung.
2
1
A
1
2
B
3
C
0,8 Nm _ 30%
C
B
3
Festo SE & Co. KG
Specyfikacje produktu
| Marka: | Festo |
| Kategoria: | Niesklasyfikowane |
| Model: | SL-DSM-63-B |
Potrzebujesz pomocy?
Jeśli potrzebujesz pomocy z Festo SL-DSM-63-B, zadaj pytanie poniżej, a inni użytkownicy Ci odpowiedzą
Instrukcje Niesklasyfikowane Festo

10 Stycznia 2025
10 Stycznia 2025
7 Stycznia 2025
7 Stycznia 2025
7 Stycznia 2025
7 Stycznia 2025
7 Stycznia 2025
7 Stycznia 2025
7 Stycznia 2025
7 Stycznia 2025
Instrukcje Niesklasyfikowane
Najnowsze instrukcje dla Niesklasyfikowane
29 Stycznia 2025
29 Stycznia 2025
29 Stycznia 2025
29 Stycznia 2025
29 Stycznia 2025
29 Stycznia 2025
29 Stycznia 2025
29 Stycznia 2025
29 Stycznia 2025
29 Stycznia 2025