Instrukcja obsługi Hinkley Lighting Bolla 4660BN
Hinkley Lighting
Ulga
Bolla 4660BN
Przeczytaj poniżej 📖 instrukcję obsługi w języku polskim dla Hinkley Lighting Bolla 4660BN (2 stron) w kategorii Ulga. Ta instrukcja była pomocna dla 27 osób i została oceniona przez 14 użytkowników na średnio 5.0 gwiazdek
Strona 1/2
assembly instructions
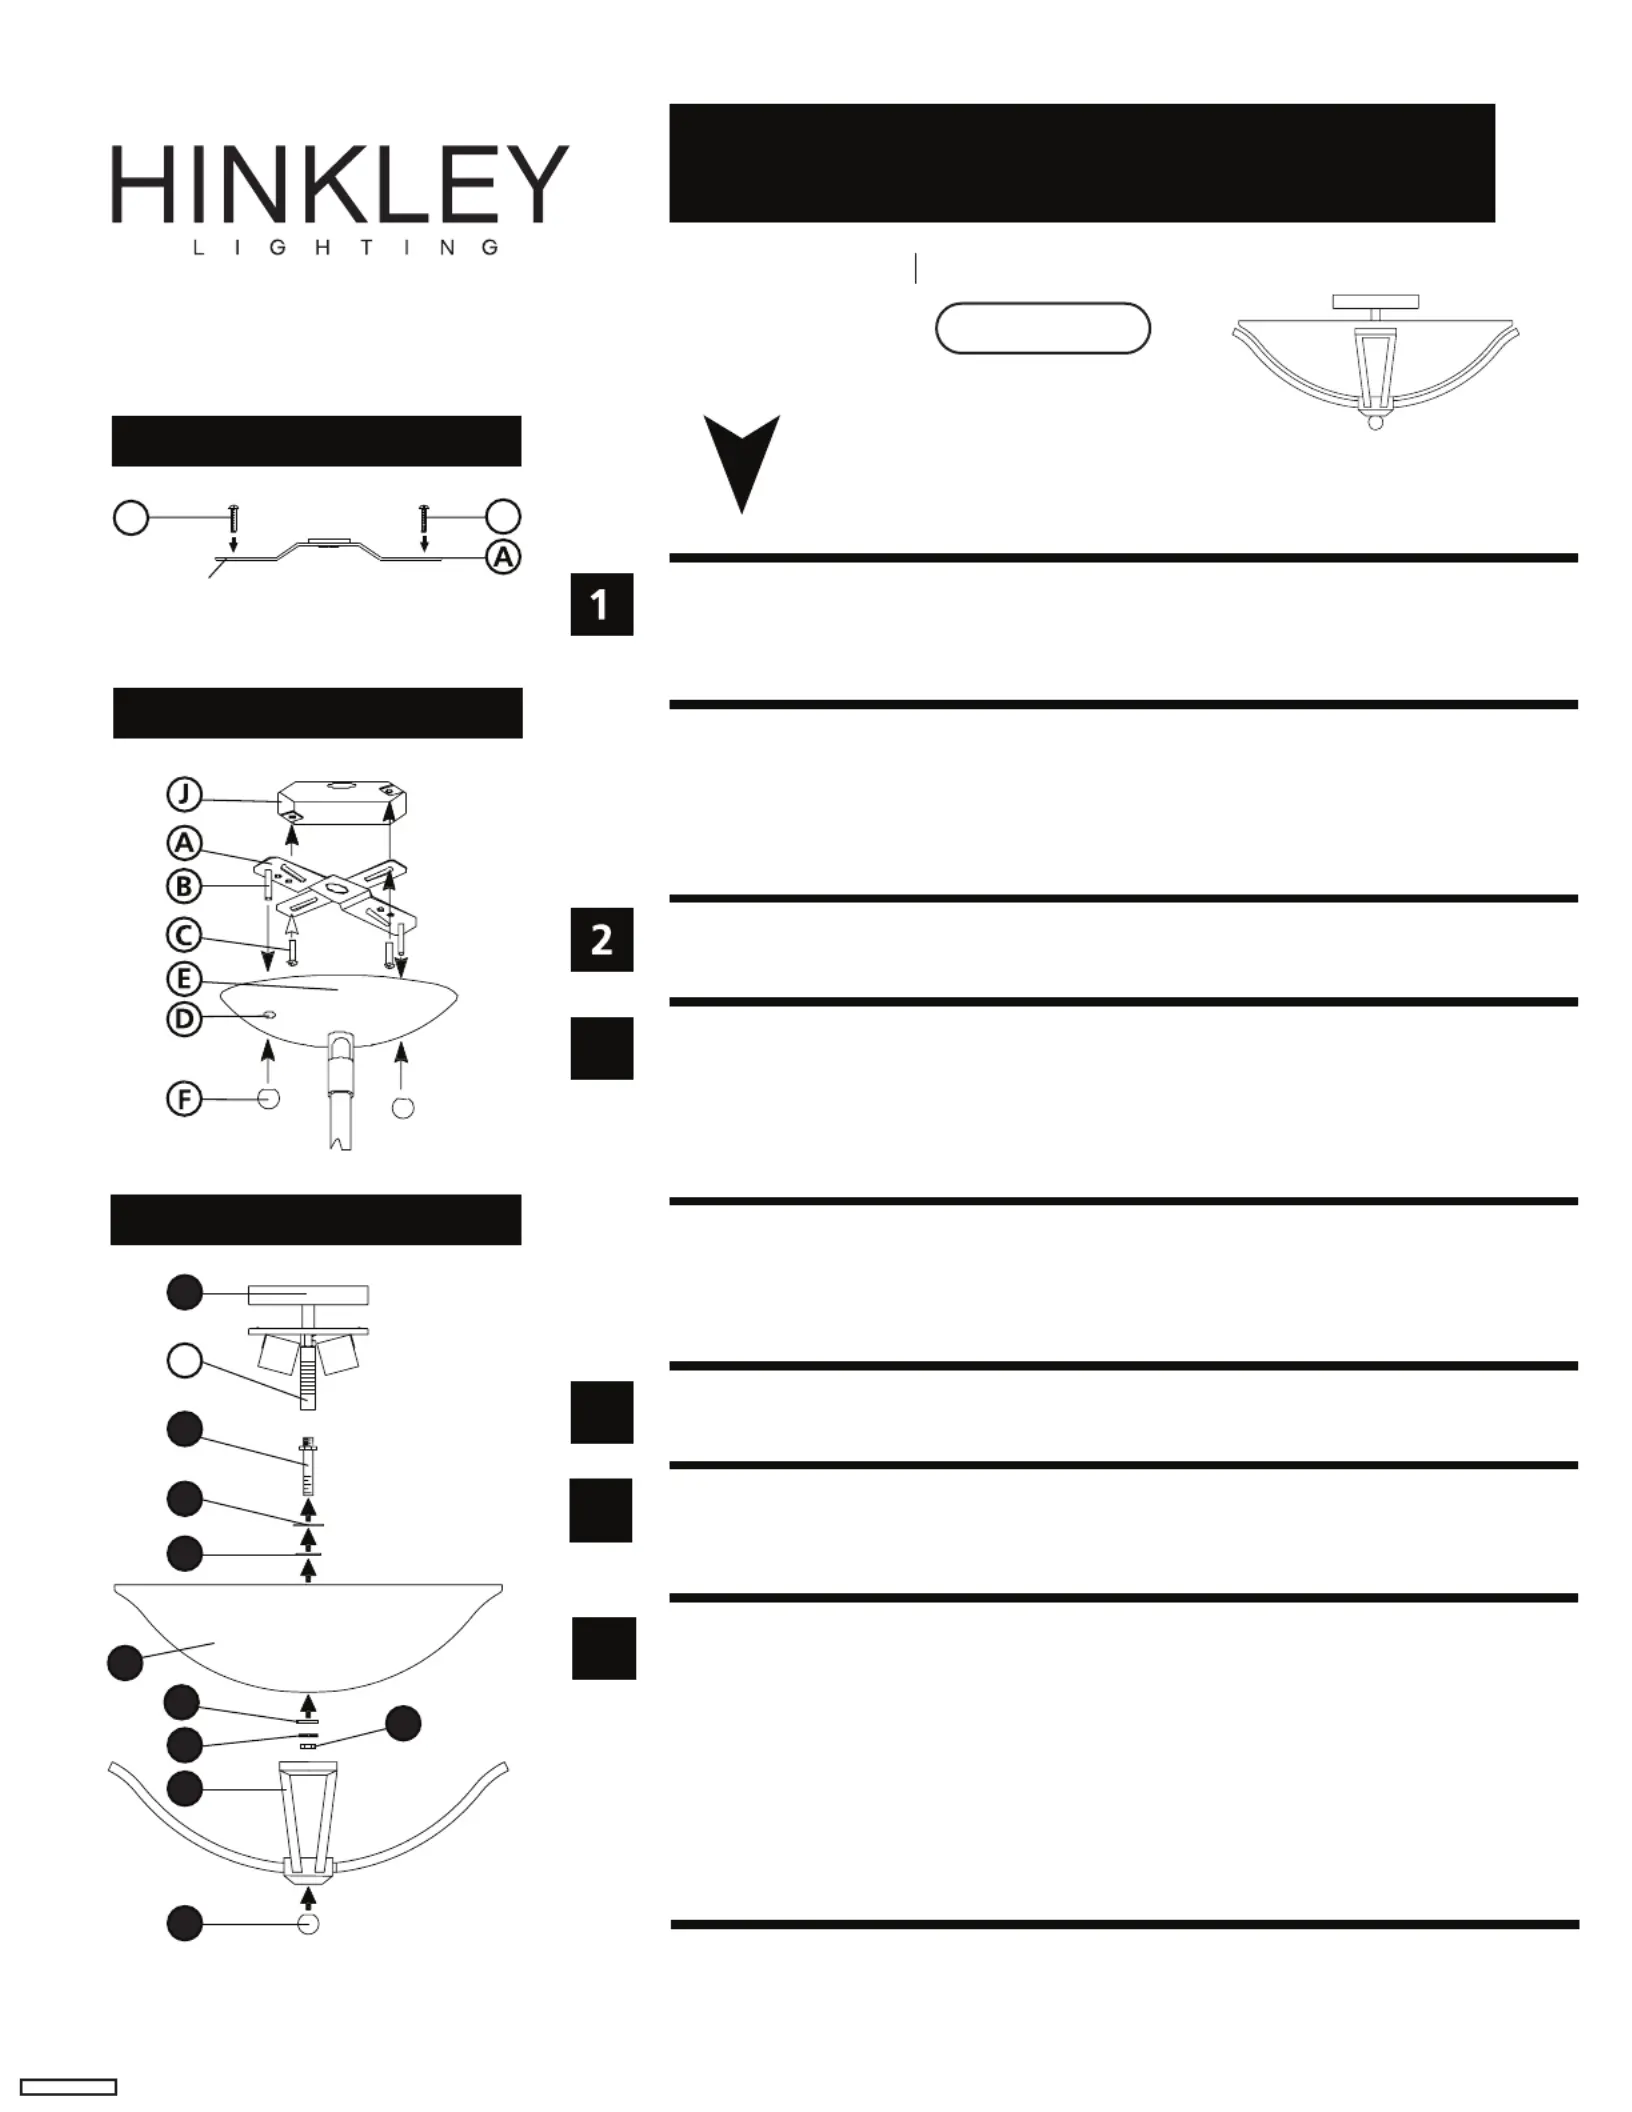
Family: Bolla Item No. 4660
1. Find a clear area in which you can work.
2. Unpack fixture and glass from carton.
3. Carefully review instructions prior to assembly.
*** The construction of this fixture will be accomplished by first assembling the
main body of the fixture, making all necessary electrical connections, hanging
the fixture from the ceiling, and then installing the glass.
start here
4660
1. To assemble main body, take stem and thread one end into coupler - see (2) (A)
Drawing 3.
Drawing 3 - Fixture Assembly
1
2
3
4
5
7
10
9
A
Drawing 2 - Fixture Mounting
Drawing 1 - Strap Detail
B
(side view)
gull wing
bracket
B
8.10.10
1. Prepare gem strap for mounting by threading two screws provided into (A) (B)
back of gull wing bracket of gem strap - see .(A) Drawing 1
• Be sure the holes into which the screws are threaded match the spacing of holes (D)
in the canopy - see .(E) Drawings 1 and 2
3. Mount gem strap to junction box , using the two 1” screws not provided.(A) (J) (C)
Make electrical connections from supply wire to fixture lead wires. Refer to instruction
sheet and follow all instructions to make all necessary wiring connections.(I.S. 18)
1. Hang the fixture by slipping the holes in the canopy over the screws in(D) (E) (B)
the mounting strap - see .(A) Drawing 2
2. Thread on ball knobs to secure fixture to the ceiling.(F)
SAFETY WARNING: READ WIRING AND GROUNDING INSTRUCTIONS (I.S. 18)
AND ANY ADDITIONAL DIRECTIONS. TURN POWER SUPPLY OFF DURING
INSTALLATION. IF NEW WIRING IS REQUIRED, CONSULT A QUALIFIED
ELECTRICIAN OR LOCAL AUTHORITIES FOR CODE REQUIREMENTS.
3
4
5
6
6
8
031813
1. Prior to installing glass, fixture can be lamped accordingly.
2. (2) (A) To begin glass installation first thread threaded tubing into swivel mount
approximately 3/8”, and then tighten hex nut up against swivel mount to secure (H) (A)
threaded tube - see .(2) Drawing 3
3. (4) Next slide metal washer followed by plastic washer (3) onto threaded tube .(2)
4. While holding them in place, slip glass onto threaded tube .(5) (2)
5. While holding glass in place slip plastic washer followed by flat washer (5) (6) (7)
onto threaded tube , then thread hex nut onto threaded tube and tighten to (2) (8) (2)
secure glass.
6. Slip spider assembly onto end of threaded tube .(9) (2)
7. While holding in place, thread on finial to secure spider assembly . (10) (9)
revised 10.14.15
T24 JA8-2016
H I N K L E Y L I G H T I N G 33000 Pin Oak Parkway Avon Lake, OH 44012 800.446.5539 / 440.653.5500 hinkleylighting.com
Specyfikacje produktu
| Marka: | Hinkley Lighting |
| Kategoria: | Ulga |
| Model: | Bolla 4660BN |
Potrzebujesz pomocy?
Jeśli potrzebujesz pomocy z Hinkley Lighting Bolla 4660BN, zadaj pytanie poniżej, a inni użytkownicy Ci odpowiedzą
Instrukcje Ulga Hinkley Lighting

4 Stycznia 2025

4 Stycznia 2025

4 Stycznia 2025

4 Stycznia 2025

4 Stycznia 2025

4 Stycznia 2025

4 Stycznia 2025

4 Stycznia 2025

4 Stycznia 2025

4 Stycznia 2025
Instrukcje Ulga
- Dydell
- Florabest
- Brennenstuhl
- Busch + Müller
- Steinel
- Ledar
- Hortensus
- Blizzard
- Excello
- Fun Generation
- CIVILIGHT
- Eheim
- Porter-Cable
- Knog
- DeWalt
Najnowsze instrukcje dla Ulga

9 Kwietnia 2025

8 Kwietnia 2025

8 Kwietnia 2025

8 Kwietnia 2025

8 Kwietnia 2025

7 Kwietnia 2025

5 Kwietnia 2025

5 Kwietnia 2025

5 Kwietnia 2025

5 Kwietnia 2025