Instrukcja obsługi Hinkley Lighting Hollis 39674BK
Hinkley Lighting
Ulga
Hollis 39674BK
Przeczytaj poniżej 📖 instrukcję obsługi w języku polskim dla Hinkley Lighting Hollis 39674BK (2 stron) w kategorii Ulga. Ta instrukcja była pomocna dla 17 osób i została oceniona przez 9 użytkowników na średnio 3.5 gwiazdek
Strona 1/2
start here
commencez iciempezar aquí
Mounting Instructions
Les Instructions D’assemblage
Instrucciones De Montaje
English Spanish
French
B
C
D
A
H
E
J
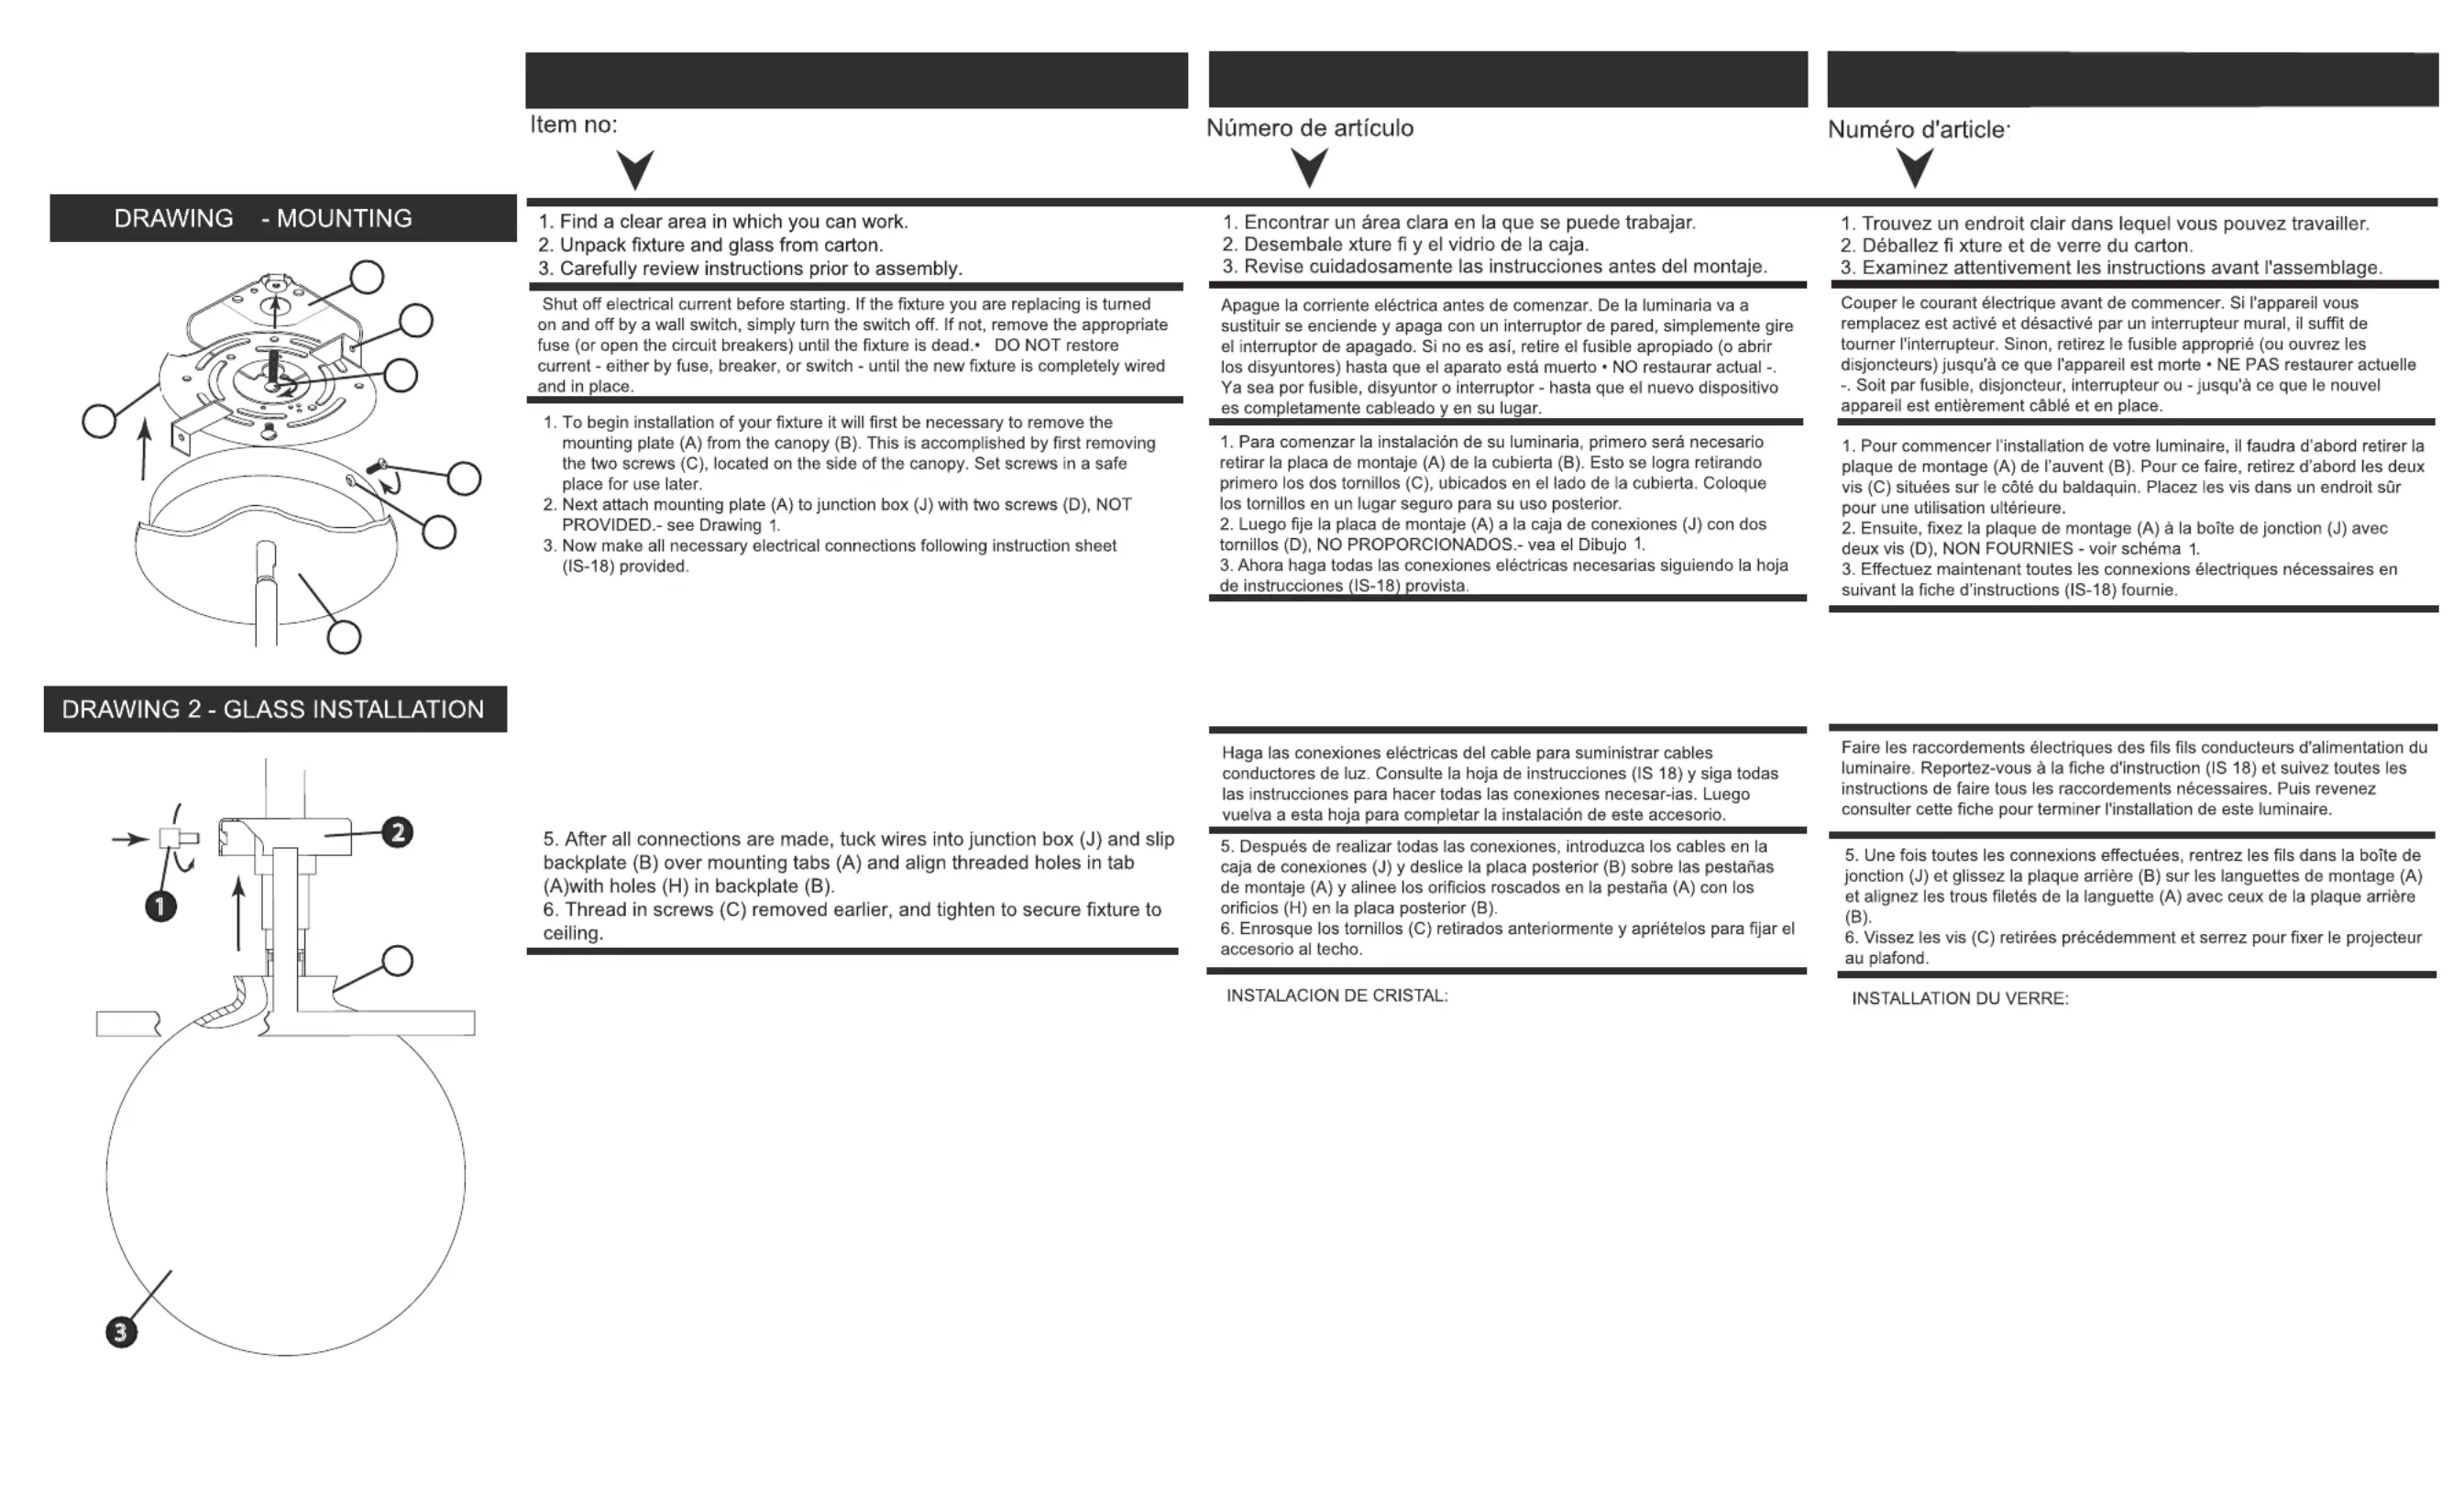
SAFETY WARNING: READ WIRING AND GROUNDING INSTRUCTIONS (I.S. 18)
AND ANY ADDITIONAL DIRECTIONS. TURN POWER SUPPLY OFF DURING
INSTALLATION. IF NEW WIRING IS REQUIRED, CONSULT A QUALIFIED
ELECTRICIAN OR LOCAL AUTHORITIES FOR CODE REQUIREMENTS.
Make electrical connections from supply wire to fixture lead wires. Refer to
instruction sheet and follow all instructions to make all necessary (I.S. 18)
wiring connections. Then refer back to this sheet to complete installation of
this fixture.
ADVERTENCIA DE SEGURIDAD: CABLEADO DE LEER Y INSTRUC-
CIONES DE CONEXIÓN A TIERRA (SI 18), E INSTRUCCIONES
ADICIONALES. VUELTA DE ALIMENTACIÓN DURANTE LA INSTA-
LACIÓN. SI SE REQUIERE UN NUEVO CABLEADO, CONSULTE A UN
ELECTRICISTA O AUTORI-DADES LOCALES PARA REQUISITOS DEL
CÓDIGO.
AVERTISSEMENT DE SÉCURITÉ: CÂBLAGE LIRE ET MISE A LA TERRE
(IS 18) ET TOUTE AUTRE INSTRUCTION. COUPER L'ALIMENTATION
PENDANT L'INSTALLATION. SI DE NOUVELLES CÂBLAGE NE EST
NÉCESSAIRE, CONSULTER UN ÉLECTRICIEN QUALIFIÉ OU LES
AUTORITÉS LOCALES LES EXIGENCES DES CODES.
H
I
N
K
L
E
Y
NOTE: FIXTURE SHOULD BE HUNG FROM THE CIELING BEFORE
INSTALLING THE GLASS.
1
2
3
N
1. To install glass, first remove the barrel knobs (1), with studs, (1) from
the glass fitter (2) - see Drawing 2.
2. Next slip small neck (N) of glass (3) over lamp and up into glass
fitter (2).
3. Now thread in removed barrel knobs with studs (1) back into threaded
holes. NOTE: tighten knob evenly to center the glass and only until snug
to prevent glass damage.
NOTA: COLGAR EL APARATO DEL TECHO ANTES
INSTALACIÓN DEL VIDRIO.
REMARQUE: ACCROCHEZ LA FIXTURE AU PLAFOND AVANT
INSTALLATION DU VERRE.
1. Para instalar vidrio, primero retire las perillas del cilindro (1),
con pernos, (1) del montador de vidrio (2) - vea el dibujo 2.
2. A continuación, deslice un cuello pequeño (N) de vidrio (3)
sobre la lámpara y hacia arriba en el montador de vidrio (2).
3. A continuación, vuelva a enroscar las perillas del cilindro que
quitó con los espárragos (1) en los orificios roscados. NOTA:
apriete la perilla de manera uniforme para centrar el vidrio y solo
hasta que esté ajustado para evitar daños en el vidrio.
1. Pour installer le verre, retirez d'abord les boutons cylindriques
(1), avec les goujons, (1) du monteur de verre (2) - voir Dessin 2.
2. Glissez ensuite le petit col (N) du verre (3) sur la lampe et vers
le haut dans le monteur de verre (2).
3. Maintenant, vissez les boutons de canon retirés avec les
goujons (1) dans les trous filetés. REMARQUE: serrez le bouton
uniformément pour centrer le verre et seulement jusqu'à ce qu'il
soit bien serré pour éviter d'endommager le verre.
39674
39674
39674
1
Specyfikacje produktu
| Marka: | Hinkley Lighting |
| Kategoria: | Ulga |
| Model: | Hollis 39674BK |
Potrzebujesz pomocy?
Jeśli potrzebujesz pomocy z Hinkley Lighting Hollis 39674BK, zadaj pytanie poniżej, a inni użytkownicy Ci odpowiedzą
Instrukcje Ulga Hinkley Lighting

4 Stycznia 2025

4 Stycznia 2025

4 Stycznia 2025

4 Stycznia 2025

4 Stycznia 2025

4 Stycznia 2025

4 Stycznia 2025

4 Stycznia 2025

4 Stycznia 2025

4 Stycznia 2025
Instrukcje Ulga
- SIIG
- Stairville
- Infinity
- Vintec
- AD Trend
- Luxli
- Integral LED
- Duronic
- Blumfeldt
- Ecomed
- Retlux
- HiKOKI
- Geemarc
- Valerie Objects
- Miomare
Najnowsze instrukcje dla Ulga

9 Kwietnia 2025

8 Kwietnia 2025

8 Kwietnia 2025

8 Kwietnia 2025

8 Kwietnia 2025

7 Kwietnia 2025

5 Kwietnia 2025

5 Kwietnia 2025

5 Kwietnia 2025

5 Kwietnia 2025