Instrukcja obsługi MaxCom MM129
Przeczytaj poniżej 📖 instrukcję obsługi w języku polskim dla MaxCom MM129 (2 stron) w kategorii smartfon. Ta instrukcja była pomocna dla 46 osób i została oceniona przez 3 użytkowników na średnio 4.0 gwiazdek
Strona 1/2
Short User Manual
GSM Mobile Telephone
Note: The telephone works in the GSM 850/900/1800/1900MHz network.
Prior to switching on the phone, a SIM Card should be properly installed.
1 I NTRODUCTION
This Manual has been published by the Manufacturer. The Manufacturer
reserves the right to make any updates and modifications arising from
errors and inaccuracies in current information or from any upgrades in the
telephone and software without prior notification; such updates, however,
will be reflected in newer versions of the Manual. For more information or
for any form of assistance go to the website at . The entire www.maxcom.pl
content of this Manual is copyright by the Manufacturer.
The full copy of the User Manual is available online at
http://www.maxcom.pl/
Copyright and trademarks as mentioned in this Manual remain the
property of their owner. Reproduction, transmission, storing, or
dissemination of any material, in whole or in part, covered by copyright,
without prior written consent, are strictly prohibited.
2 TS ECHNICAL PECIFICATIONS
Color LCD: 1,77" 176 x 220 pix
Camera 0,08 Mpix
Two SIM Cards
Contacts: up to 300 entries
Text Message Memory: up to messages 100
Loud ringtone
Bluetooth
Torch
Radio FM
Audio & video file player
MicroSD cards up to 16 GB
Battery: 600 mAh
Idle time up to hrs 100.*
Conversation time up to 4,5.* hrs
Weight: 60 g
Dimensions: 111 × 47 × 15 mm
*depending on conditions and the GSM signal strength
3 W HAT THE SET INCLUDES
The Set includes:
Telephone GSM
Charger
Battery
Short User Manual
Headset
Note: Keeping the package is highly recommended as it might be used for
transport.
Keep the receipt as it is necessary for warranty.
4 A CCESSORIES
Use only batteries, chargers, and accessories recommended by the
phone’s Manufacturer. Check with your seller what accessories are
available in your area.
5 ISP MPORTANT AFETY RECAUTIONS
Note: Reading these guidelines presented below will minimize the risk of
misusing the phone.
USING: The telephone emits electromagnetic field that might
negatively interfere with other electronic devices including medical
equipment.
Never use the phone in any area where the use of mobile phones is
prohibited such as hospitals, airplanes, refueling points or in proximity
to flammable materials. Using mobile phones in such places might
expose others to danger.
Never use the phone without hands-free accessories while driving.
The device and its accessories might contain small parts. Keep the
phone and all parts out of reach of children.
SERVICING - Never repair or modify the phone by your own. Only
qualified service is authorized to repair the phone.
CLEANING Never use any chemicals or corrosives to clean the –
phone.
TORCH Never look directly into the stream of light. –
HEARING DEVICE If the user has a hearing device, phone volume –
and hearing aid sensitivity should be carefully adjusted.
ECTRONIC MEDICAL DEVICES the phone is a radio transmitter EL–
that might interfere with electronic medical devices or implants such as
hearing aid, heart pacemakers or insulin pumps, etc. A minimum
distance of 15 cm is recommended to be kept between a telephone
and an implanted medical device. For more information, consult your
physician or manufacturers of such medical devices.
ELECTRONIC EQUIPMENT To minimize the risk of degaussing, –
never let electrical devices stay close to the phone for longer time.
WATERPROOF The phone is not waterproof. Keep it dry at all times. –
DUSTPROOF The phone is not dustproof, never use the phone in –
areas with high concentration of dust.
LCD DISPLAY: Never press the LCD display too hard and do not use
sharp tools as it might damage the phone.
Never press battery contacts with metal objects as it may explode.
Never expose the phone to low or high temperatures, direct sunlight or
high humidityNever place the phone next to heating devices such as .
radiators, heaters, ovens, furnaces, camp fires, barbeque, etc.
Protect your hearing!
Prolonged exposure to loud sounds might damage
your hearing. Listen to music at a moderate level, and
do not hold the phone too close to an ear while using
a speakerphone. Set the volume to a safe level prior
to connecting a set.head
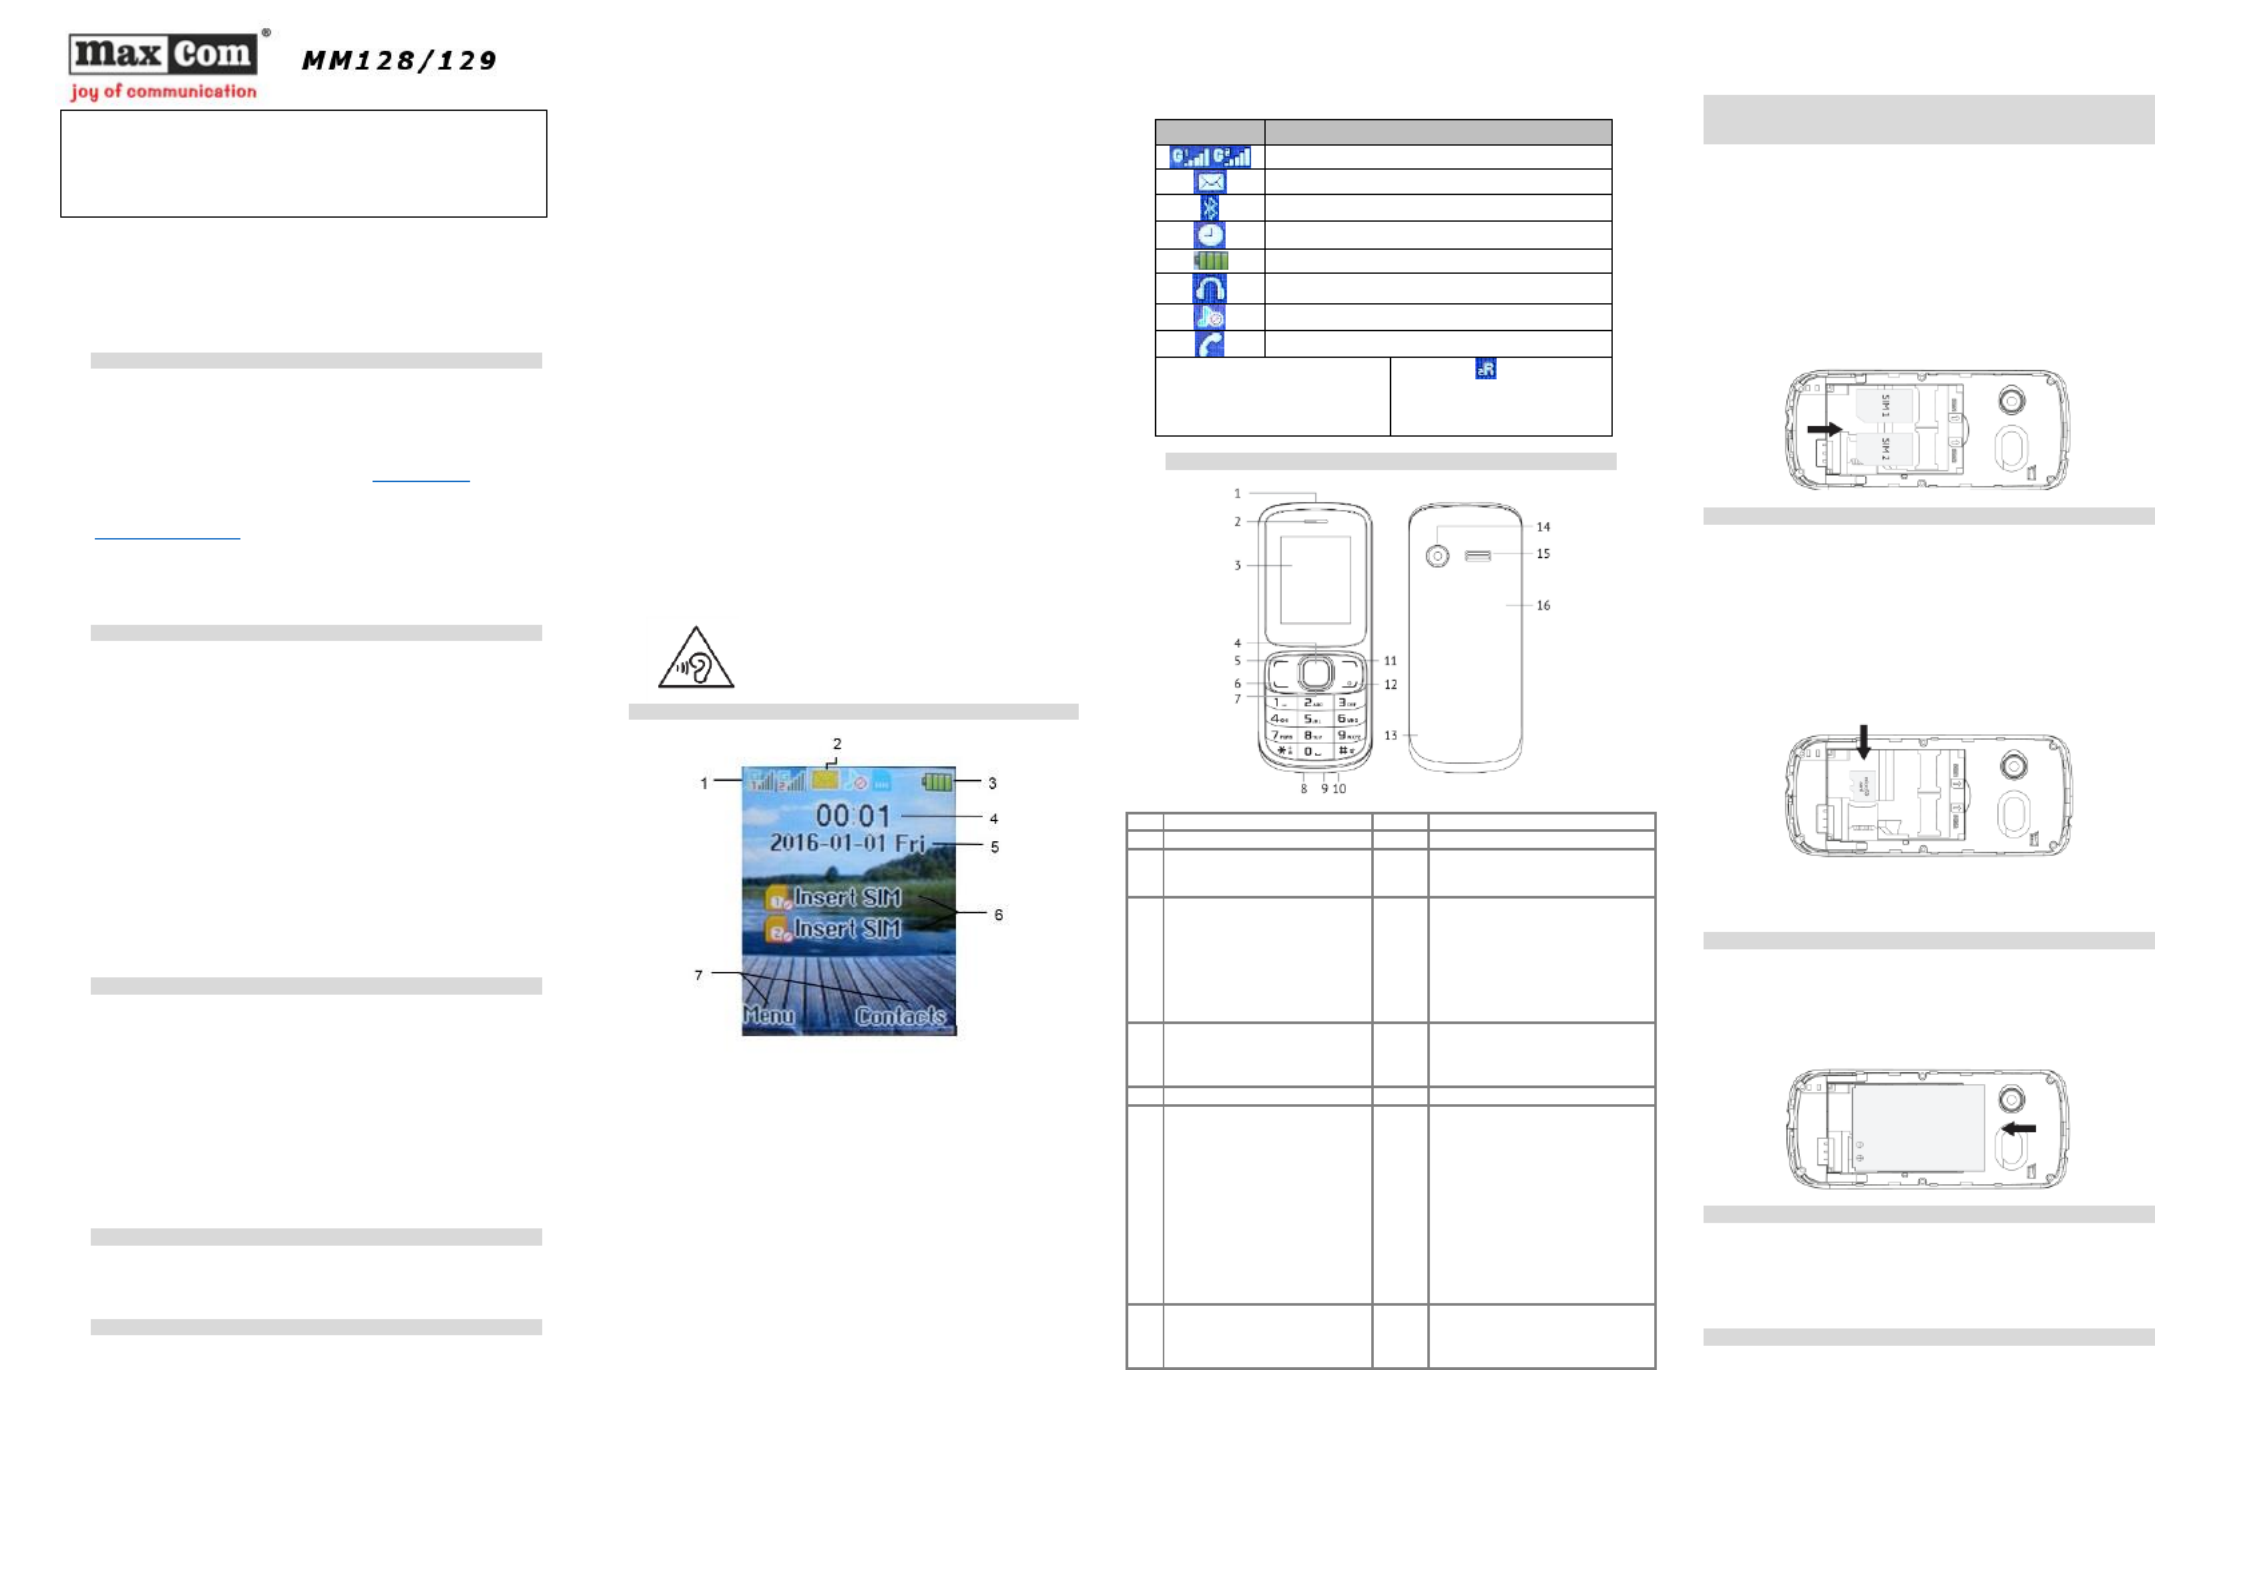
6 L CD DESCRIPTION
1. Signal strength for SIM1 & SIM2 Cards
2. Icons showing functions (please see the chart below)
3. Battery level
4. Time
5. Date
6. Service provider’s name
7. Description of function keys.
Icon
Meaning
Signal strength for SIM1 & SIM2
New/Unread Text Message
Bluetooth Enabled
Alarm Clock On
Battery Level
Headset On
Profile Currently Used
Missed Phone Call
Icons might vary depending on the
version of software.
* The icon also appears in
case of domestic roaming when
the subscriber uses the other
service provider’s network
7 P HONE DESCRIPTION
1
Torch
9
Headset slot
2
Speaker
10
Microphone
3
LCD Display.
11
Right Function Key (RFK) lets
you use functions as displayed at
the bottom right corner
4
OK Key (middle function key):
in Idle mode, press this key to
directly enter the main Menu.
Functions of this key and of
the Left Function Key are
almost identical.
12
End Call KeyIt serves to switch .
on/off the phone, End
Call/Ignore, it lets you end phone
call or reject an incoming phone
callIt switches the phone ON or .
OFF the phoneThe key restores .
Idle mode when the phone is in
other options.
5
Left Function Key (LFK) – lets
you use the function
displayed at the bottom left
corner of the LCD
13
An opening to help you to
remove the back cover
6
Make Call/Answer Call key.
14
Camera Lens
7
Navigation key lets you move
the cursor left, right, up and
down or navigate in menu. In
Idle mode, press Up/Down,
Left/Right to directly display a
certain menu (depending on
definition [Settings >Phone
Settings >Shortcut Settings]).
15
Ringtone Volume
8
USB port lets you charge the
phone and connect the phone
to a computer in order to
transfer data
16
Back Cover
Note: In order to save energy, after certain time, the LCD automatically
goes to sleep modePress any key to enable the LCD backlightIf the . .
LCD backlight turns off while the keypad is locked, press the Left Function
Key, and then „*” to unlock.
8 G ETTING STARTED
8.1 SIM C ARD INSTALLATION
The telephone can hold two SIM cards. Insert at least one SIM Card into
the phone prior to using it. You will receive the SIM Card from your service
provider. Keep the SIM Card away from children.
Any scratching or bending might easily damage a SIM Card. Therefore,
pay close attention not to damage the SIM Card while inserting, removing,
and storing it.
Note: Neveinsert or remove SIM Cards while the phone is connected to r
the charger. Prior to removing the battery, make sure the phone is
switched off.
Enter the SIM Card into the SIM card slot so that its gold contacts will face
down into the phone as shown in the illustration below.
8.2 M EMORY CARD INSTALLATION
A Micro SD memory card with 16GB might be installed in the phone.
Never bend or scratch the memory card, do not expose the card to static
electricity, do not immerse the card into water.
1. First, switch off the phone and remove the battery.
2. Insert the memory card so that gold contacts will face down, see the
illustration below.
While using the memory card, be very careful specially while inserting and
removing the cardSome memory cards require to be formatted on the .
computer prior to using it for the first time.
Note: If you use SD cards, on the regular basis make backup copies of
any data stored on cards in other devices. Misuse of the card or other
factors might cause damage or loss of entire data stored on the card.
8.3 B ATTERY INSTALLATION
1. Place your fingernail in the little opening on the side of the phone, and
open the back cover.
2. Insert the battery so that its metal contacts will face down into the
phone, see the illustration below.
3. Place the battery cover in position (back of the phone).
8.4 R EMOVING BATTERY
Switch off the phone, lever up the back cover from the lower endand then ,
lift the back cover and remove the battery.
Removing the battery might cause loss of any settings and data saved on
the card and in the phone. Remove the battery only when the phone is
switched off. Otherwise, some problems might occur.
8.5 C HARGING THE BATTERY
1. Plug the charger into a power outlet.
2. Plug the charger cable into a slot at the bottom of the phone. A battery
icon will start blinking on the LCD after the charger is properly connected.
After charging is completed, and the battery icon stops blinking, plug the
charger out.
If there are any problems with the phone, contact the Maxcom
technical assistance, or return the item to the seller.
For assistance, please call the hotline:
+ 49 32 325 07 00
Specyfikacje produktu
| Marka: | MaxCom |
| Kategoria: | smartfon |
| Model: | MM129 |
Potrzebujesz pomocy?
Jeśli potrzebujesz pomocy z MaxCom MM129, zadaj pytanie poniżej, a inni użytkownicy Ci odpowiedzą
Instrukcje smartfon MaxCom

16 Września 2024
14 Września 2024
14 Września 2024
14 Września 2024
13 Września 2024
12 Września 2024
11 Września 2024
9 Września 2024
8 Września 2024
7 Września 2024
Instrukcje smartfon
Najnowsze instrukcje dla smartfon
2 Kwietnia 2025
30 Marca 2025
10 Marca 2025
7 Marca 2025
5 Marca 2025
5 Marca 2025
3 Marca 2025
2 Marca 2025
26 Lutego 2025
26 Lutego 2025