Instrukcja obsługi Nedis DTCTBR10
Nedis Niesklasyfikowane DTCTBR10
Przeczytaj poniżej 📖 instrukcję obsługi w języku polskim dla Nedis DTCTBR10 (4 stron) w kategorii Niesklasyfikowane. Ta instrukcja była pomocna dla 33 osób i została oceniona przez 5 użytkowników na średnio 4.9 gwiazdek
Strona 1/4
%5$5#3
MANUAL (p. 3)
ANLEITUNG (S. 4)
MODE D’EMPLOI (p. 5)
GEBRUIKSAANWIJZING (p. 6)
MANUALE (p. 7)
MANUAL DE USO (p. 8)
MANUAL (p. 9)
HASZNÁLATI ÚTMUTATÓ (o. 10)
KÄYTTÖOHJE (s. 11)
BRUKSANVISNING (s. 12)
~AȋǤȌ
MANUAL DE UTILIZARE (p. 14)
ȠȞȱȠȤȬȤȟȤȪȭȭȋɐɂɉǤȌ
BRUGERVEJLEDNING (s. 16)
VEILEDNING (s. 17)
OȋǤȌ
ʗʜʠʡʟʢʙʥʗʮȋ˔˕˓ǤȌ
KILAVUZ (s. )
23
&/(-*4)&/(-*4)
4
5
678
'3"/±"*4/&%&3-"/%4*5"-*"/0&41"º0-
%&654$)
Introducción:
No más agujeros taladrados en el techo. Con estas placas magnéticas podrá montar su
detector fácilmente en solo un minuto.
tRecomendamos que lea este manual antes de instalar/usar este producto
tGuarde este manual en lugar seguro para futuras consultas
Recomendaciones:
Por favor, cerciórese de que la supercie esté sea lisa e impermeable y esté seca, limpia
y sin grasa.
Especicaciones:
Diámetro: 7 cm
Cinta adhesiva: 3 m
Peso máximo soportado: 00 g
Instrucciones de montaje:
1.Quite el papel protector.
2.Coloque la placa con el lado del adhesivo contra el techo.
3.Presione la placa contra la pared o el techo durante unos 10segundos para
asegurar que se ja correctamente.
4.Quite el papel protector de la otra placa y colóquela con el lado del adhesivo sobre
el detector.
5.Coloque el detector en el techo o en la pared.
Introduction:
No more drilling of holes into the ceiling. With these magnetic plates you mount your
detector very easily in just one minute.
tWe recommend that you read this manual before installing/using this product
tKeep this manual in a safe place for future reference
Recommendations:
For the best result it’s recommend that the surface is dry, clean, greaseproof, smooth
and not porous.
Specications:
Diameter: 7 cm
Adhesive tape: 3 m
Maximum carrying weight: 00 g
Mounting instructions:
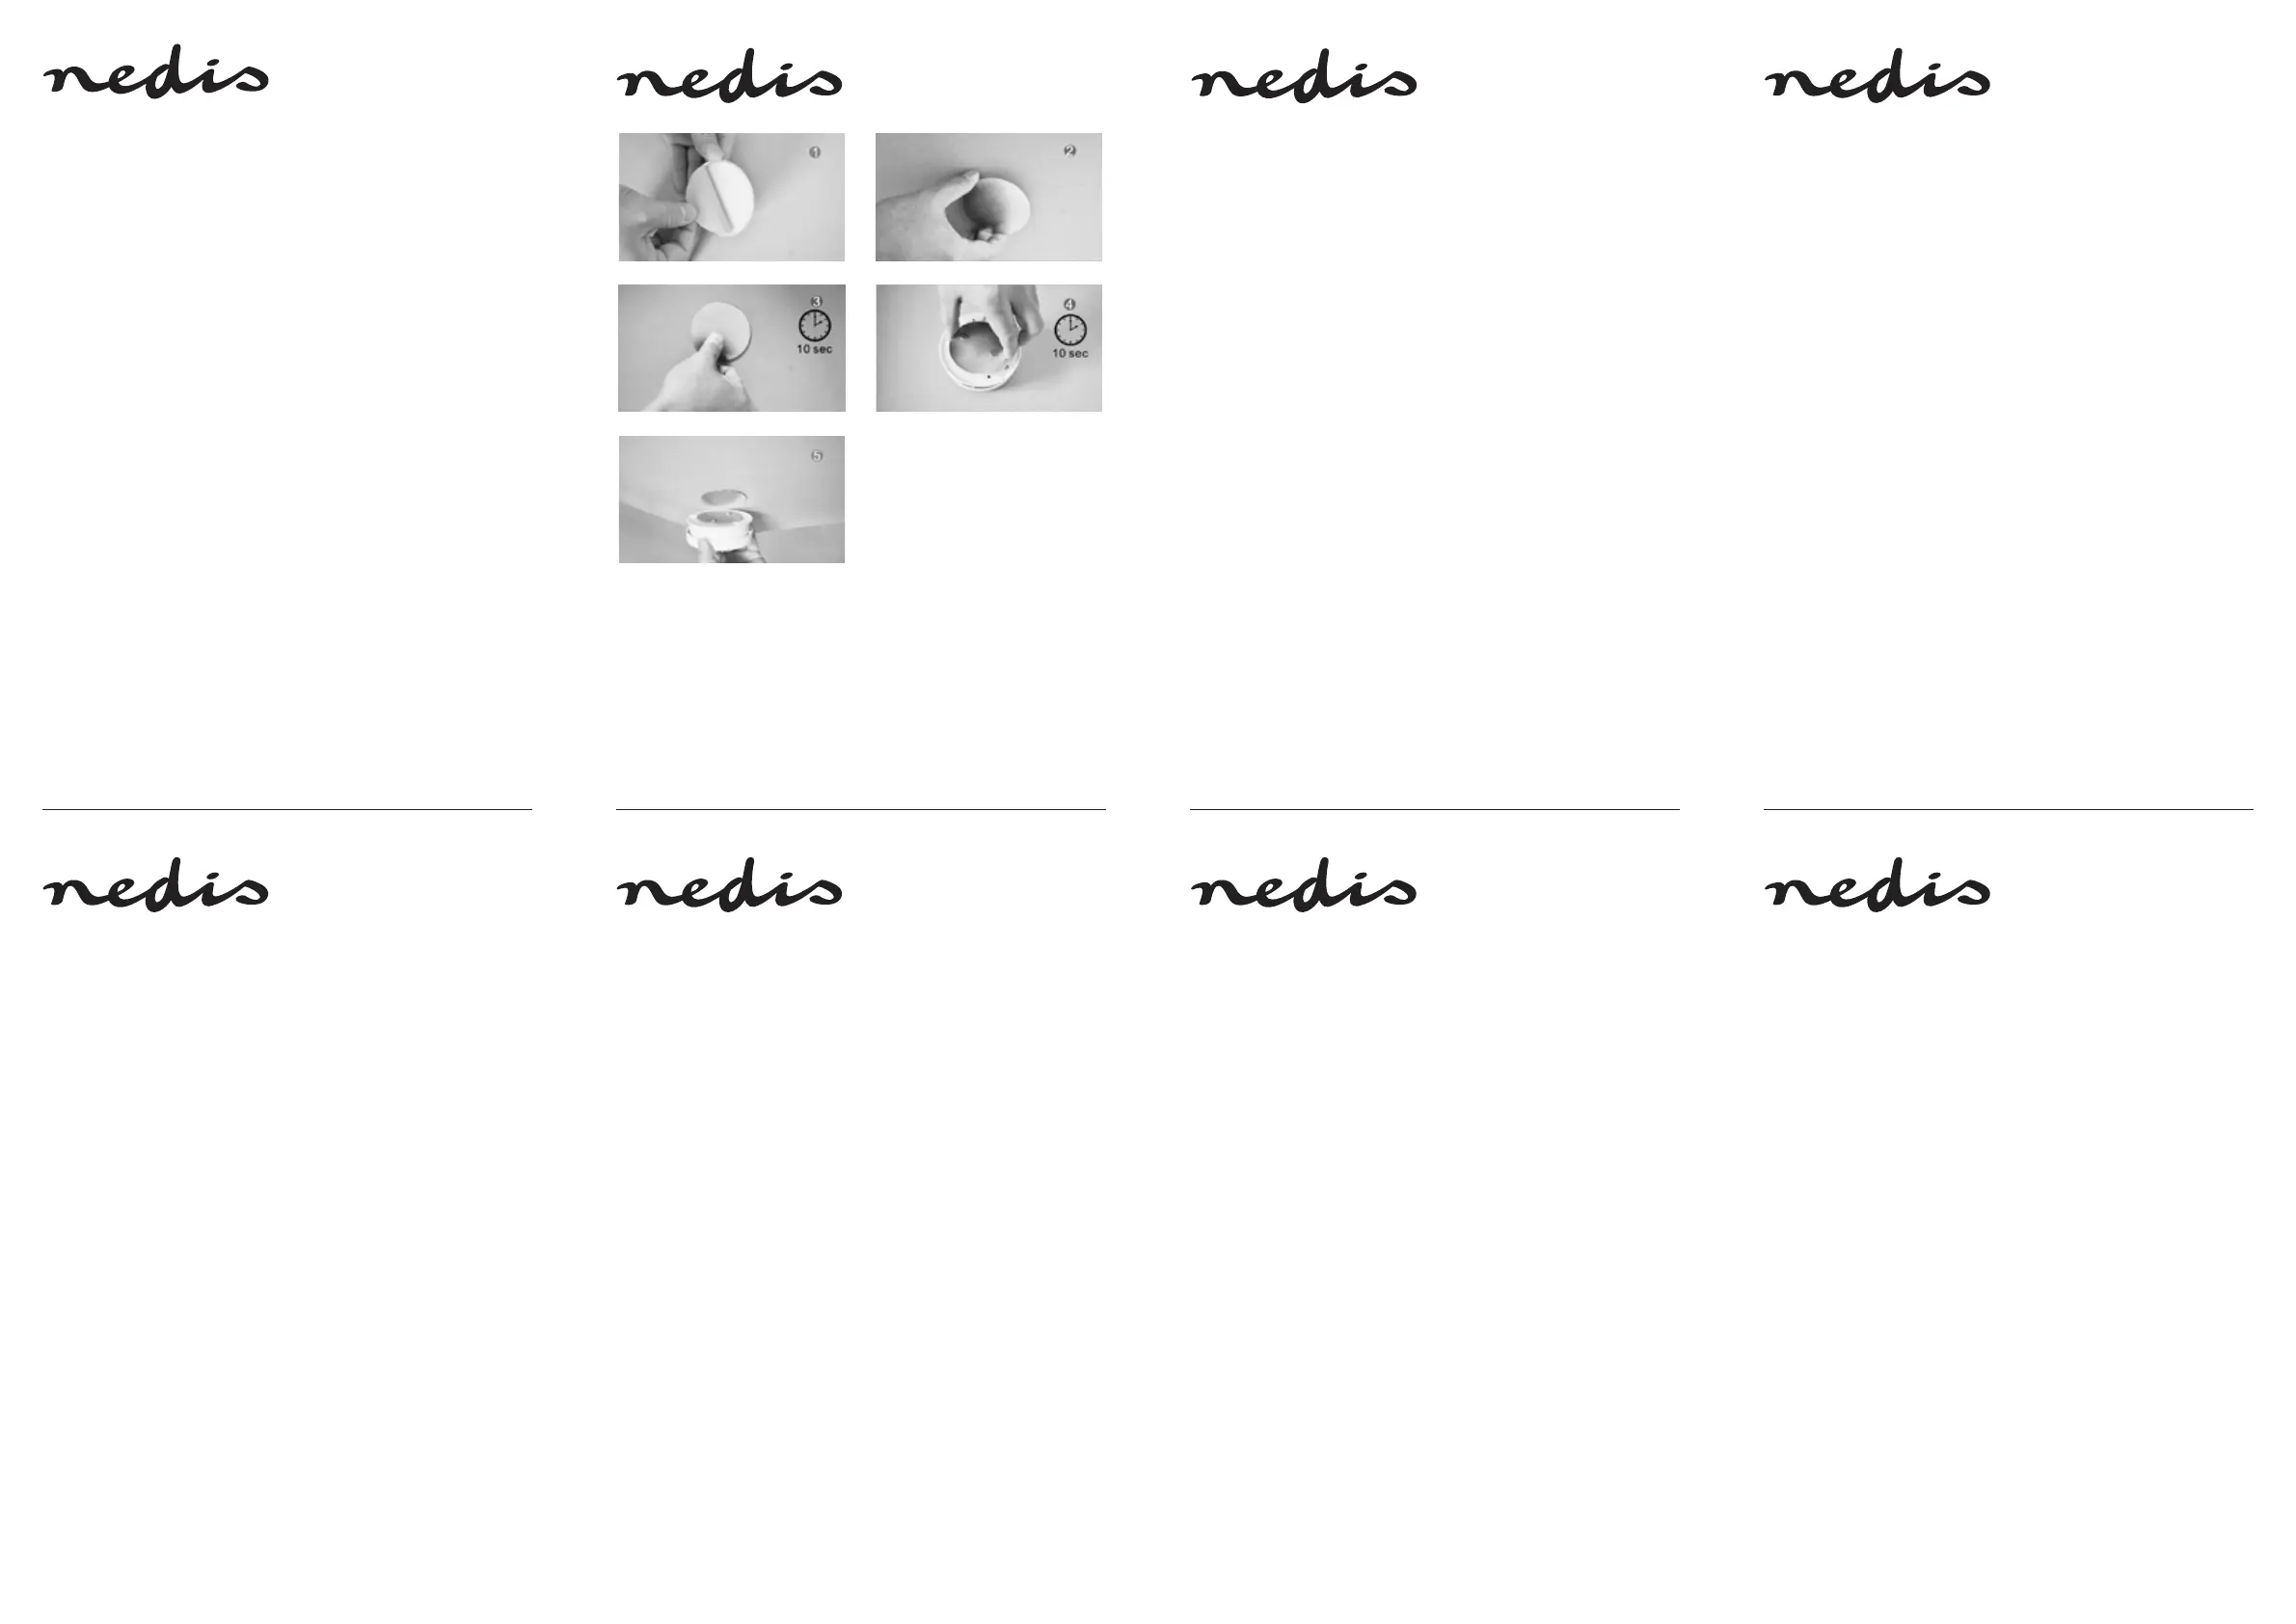
1. Remove the protective foil.
2. Place the plate with the adhesive side against the ceiling.
3. Press the plate against the wall or ceiling for about 10 seconds to be sure it’s xed
properly.
4. Remove the protective foil from the other plate and place it with the adhesive side
to the detector.
5. Place the detector to the ceiling or wall.
Einführung:
Schluss mit dem Löcherbohren in Ihrer Decke. Mit diesen Magnetplatten montieren Sie
Ihren Rauchmelder sehr einfach, in nur einer Minute.
tBitte lesen Sie diese Anleitung vor der Installation/dem Gebrauch des Geräts
tBewahren Sie diese Bedienungsanleitung für späteres Nachschlagen auf
Empfehlungen:
Die Oberäche muss trocken, sauber, fettfrei, glatt und wassergeschützt sein.
Technische Daten:
Durchmesser: 7 cm
Klebeband: 3 m
Maximale Tragkraft: 00 g
Montageanweisungen:
1.Ziehen Sie die Schutzfolie ab.
2.Halten Sie die Platte mit der Klebeseite gegen die Decke.
3.Drücken Sie die Platte gegen die Wand oder die Decke für etwa 10Sekunden, um
einen sicheren Halt sicherzustellen.
4.Entfernen Sie die Schutzfolie von der anderen Platte und setzen Sie es mit der
Klebeseite an den Rauchmelder.
5.Bringen Sie den Rauchmelder an der Decke oder der Wand an.
Introduction:
Plus de trous de perçage sur vos plafonds. Grâce à ces plaques magnétiques, vous
pouvez monter votre détecteur très facilement en une minute seulement.
tNous vous conseillons de lire ce manuel avant d’installer/utiliser ce produit
tConservez ce manuel dans un endroit sûr, pour pouvoir le consulter ultérieurement
Recommandations:
Assurez-vous que la surface est sèche, propre, non graisseuse, lisse et étanche.
Spécications :
Diamètre: 7 cm
Ruban adhésif: 3 m
Poids de charge maximum: 00 g
Instructions de montage:
1.Retirez la feuille de protection.
2.Placez la plaque avec la partie adhésive contre le plafond.
3.Appuyez sur la plaque contre le mur ou le plafond pendant environ 10secondes
pour garantir une xation correcte.
4.Retirez la feuille de protection de l’autre plaque et placez-la sur le détecteur du côté
adhésif.
5.Placez le détecteur au plafond ou sur le mur.
Inleiding:
Niet langer meer gaten boren in het plafond. Met deze magnetische platen monteert u
uw detector in een handomdraai.
tWe adviseren u deze handleiding te lezen voordat u dit product installeert/gebruikt
tBewaar deze handleiding op een veilige plek voor toekomstig gebruik
Aanbevelingen:
Gebruik voor het beste resultaat een oppervlak dat droog, schoon, vetvrij, glad en
waterbestendig is.
Specicaties:
Diameter: 7 cm
Kleefband: 3 m
Maximaal draaggewicht: 00 g
Bevestigingsinstructies:
1. Verwijder de beschermende folie.
2. Plaats de plaat met de plakzijde tegen het plafond.
3. Druk de plaat tegen de muur of het plafond voor ongeveer 10seconden om er
zeker van te zijn dat de plaat juist bevestigd is.
4. Verwijder de beschermende folie van de andere plaat en plaats deze met de
plakzijde op de detector.
5. Plaats de detector tegen het plafond of de muur.
Introduzione:
Niente più fori nel sotto. Con questi piatti magnetici è possibile montare il rivelatore
molto facilmente in un solo minuto.
tSi consiglia di leggere questo manuale prima di installare/utilizzare questo prodotto
tTenete questo manuale in un posto sicuro per un futuro riferimento
Raccomandazioni:
Si prega di assicurarsi che la supercie sia asciutta, pulita, priva di oli e grassi, liscia ed
impermeabile.
Speciche:
Diametro: 7 cm
Nastro adesivo: 3 mMassimo
carico di peso: 00 g
Istruzioni di montaggio:
1. Rimuovere la pellicola protettiva.
2. Posizionare la piastra con il lato adesivo contro il sotto.
3. Premere la piastra contro la parete o il sotto per circa 10secondi per essere sicuri
che sia ssata correttamente.
4. Rimuovere la pellicola protettiva dall’altra piastra e posizionarla con il lato adesivo
sul rivelatore.
5. Posizionare il rilevatore sul sotto o sulla parete.
Warranty:
Any changes and/or modications to the product will void the warranty. We cannot accept any
liability for damage caused by incorrect use of this product.
Disclaimer:
Designs and specications are subject to change without notice. All logos, brands and product names
are trademarks or registered trademarks of their respective holders and are hereby recognized as
such.
Garantie:
Alle Änderungen und/oder Modizierungen an dem Produkt haben ein Erlöschen der Garantie
zur Folge. Wir übernehmen keine Haftung für Schäden durch unsachgemäße Verwendung dieses
Produkts.
Haftungsausschluss:
Design und technische Daten unterliegen unangekündigten Änderungen. Alle Logos, Marken und
Produktnamen sind Marken oder eingetragene Marken ihrer jeweiligen Eigentümer und werden
hiermit als solche anerkannt.
Garantie:
Toutes altérations et/ou modications du produit annuleront la garantie. Nous ne serons tenus
responsables d’aucune responsabilité pour les dommages dus à une utilisation incorrecte du produit.
Avertissement:
Le design et les caractéristiques techniques sont sujets à modication sans notication préalable.
Tous les logos de marques et noms de produits sont des marques déposées ou immatriculées dont
leurs détenteurs sont les propriétaires et sont donc reconnues comme telles dans ce document.
Garantie:
Eventuele wijzigingen en/of aanpassingen aan het product zullen de garantie ongeldig maken. Wij
aanvaarden geen aansprakelijkheid voor schade veroorzaakt door onjuist gebruik van dit product.
Disclaimer:
Ontwerpen en specicaties kunnen zonder kennisgeving worden gewijzigd. Alle logo’s, merken
en productnamen zijn handelsmerken of geregistreerde handelsmerken van de respectievelijke
eigenaren en worden hierbij als zodanig erkend.
Garanzia:
Qualsiasi modica e/o manomissione al prodotto annullerà la garanzia. Non si accettano
responsabilità per danni causati da un uso non corretto di questo prodotto.
Dichiarazione di non responsabilità:
Il design e le caratteristiche tecniche sono soggetti a modica senza necessità di preavviso. Tutti i
marchi, loghi e nomi dei prodotti sono marchi commerciali o registrati dei rispettivi titolari e sono
riconosciuti come tali in questo documento.
Garantía:
Cualquier cambio y/o modicación del producto anulará la garantía. No podemos asumir ninguna
responsabilidad por ningún daño debido a un uso incorrecto de este producto.
Exención de responsabilidad:
Las ilustraciones y las especicaciones podrán sufrir cambios sin previo aviso. Todas las marcas de
logotipos y nombres de productos constituyen patentes o marcas registradas a nombre de sus
titulares correspondientes, reconocidos como tal.
Specyfikacje produktu
| Marka: | Nedis |
| Kategoria: | Niesklasyfikowane |
| Model: | DTCTBR10 |
Potrzebujesz pomocy?
Jeśli potrzebujesz pomocy z Nedis DTCTBR10, zadaj pytanie poniżej, a inni użytkownicy Ci odpowiedzą
Instrukcje Niesklasyfikowane Nedis

15 Stycznia 2025
14 Stycznia 2025
14 Stycznia 2025
30 Grudnia 2025
17 Grudnia 2024
17 Grudnia 2024
8 Października 2024
5 Października 2024
5 Października 2024
5 Października 2024
Instrukcje Niesklasyfikowane
Najnowsze instrukcje dla Niesklasyfikowane
29 Stycznia 2025
29 Stycznia 2025
29 Stycznia 2025
29 Stycznia 2025
29 Stycznia 2025
29 Stycznia 2025
29 Stycznia 2025
29 Stycznia 2025
29 Stycznia 2025
29 Stycznia 2025