Instrukcja obsługi Nexxt NCR-N301
Przeczytaj poniżej 📖 instrukcję obsługi w języku polskim dla Nexxt NCR-N301 (2 stron) w kategorii router. Ta instrukcja była pomocna dla 18 osób i została oceniona przez 9 użytkowników na średnio 4.6 gwiazdek
Strona 1/2
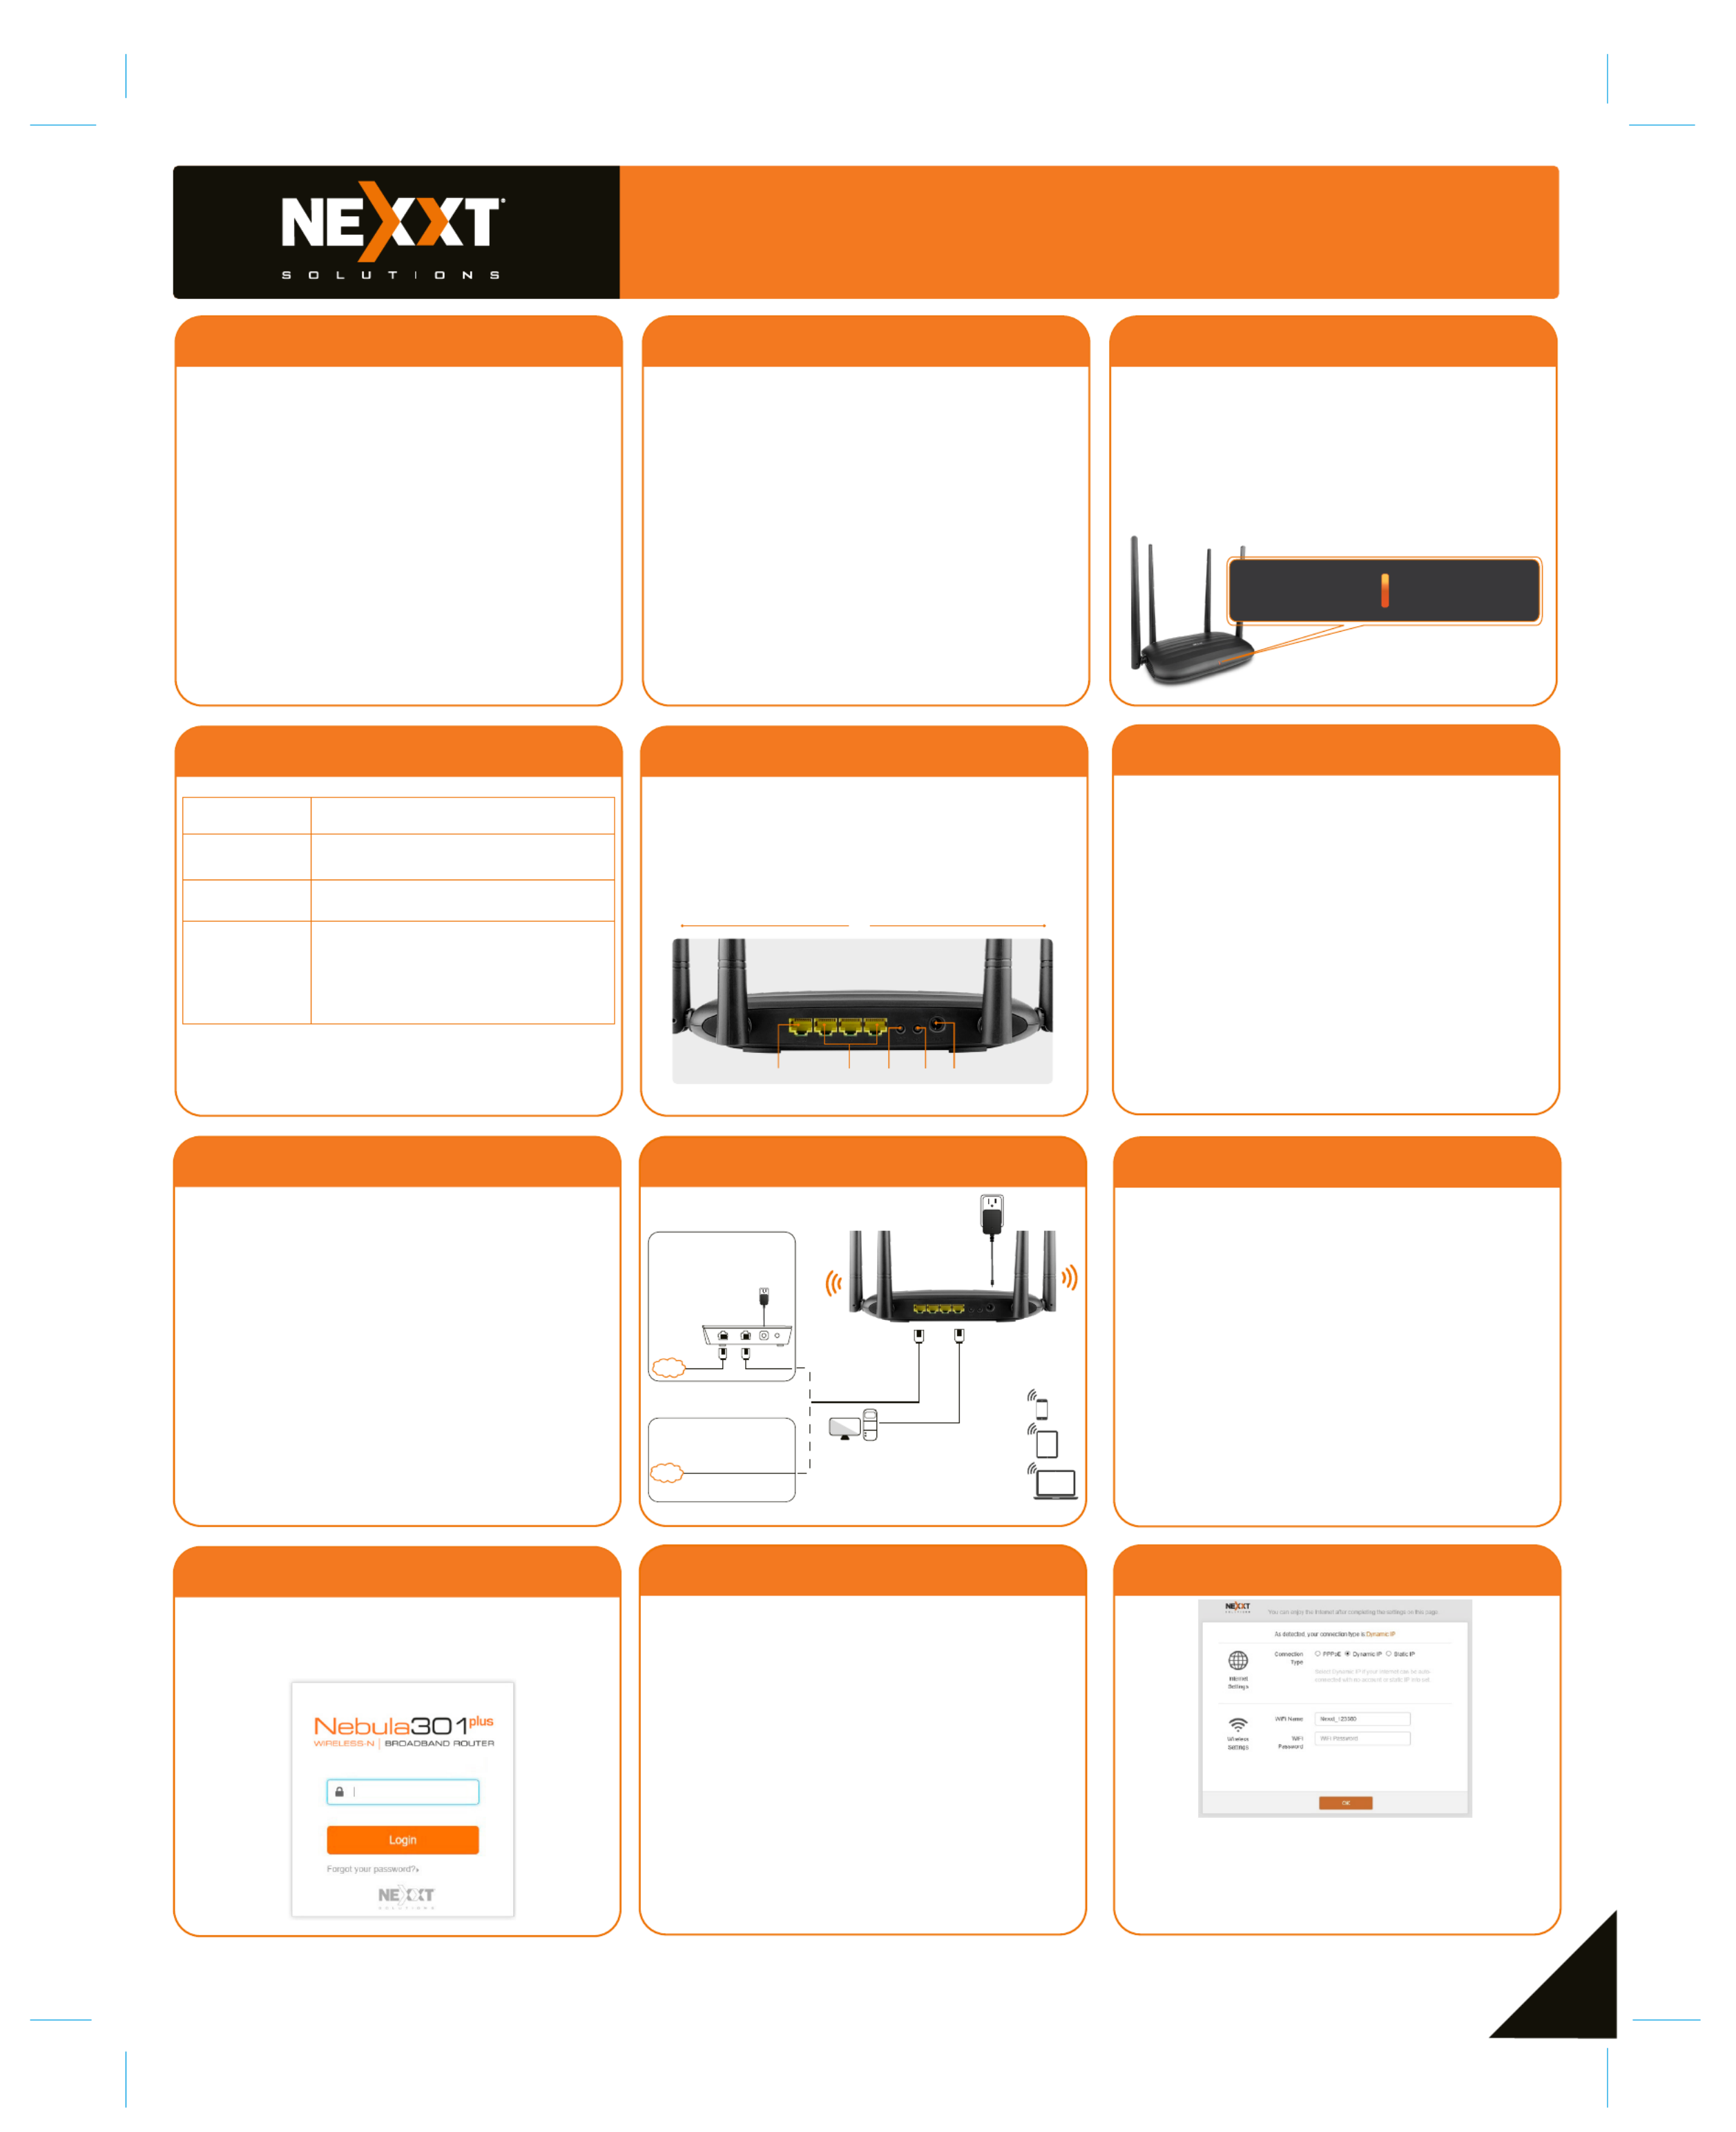
B.Ethernet Access
Modem
Internet
Internet Ethernet Cable
A.Telephone Line/FTTH
(Fiber To The Home)/
Cable Access
Or
The default WiFi name is
Nexxt XXXXXX
There is no default WiFi password.
*Images herein are for references only. The actual product may differ.
Ethernet Cable
12
Quick installation guide
12 3
1
Preliminary steps
Product layout
This advanced network device works as a router,
wireless AP, WISP client and universal repeater.
Before setting up the router, you must verify that
you have high-speed internet access available. The
most widely used connection nowadays is broad-
band DSL or cable. The description used in this
guide is based on that type of connection.
1.Power off your PC, modem and the router.
2.Find the optimum location for the router. The best place is
usually at the center of your wireless network with the
antennas in the upright position.
3.Connect one end of the supplied power adapter to the AC
input jack located on the rear panel of the router, before
plugging the other end to a standard electrical wall outlet.
4.Connect your network devices to the LAN ports of the router.
Then using an ethernet cable, connect your modem to the
WAN port in order to gain internet access.
5.Finally, power on the router, your PC and modem.
Thank you for purchasing the new Nebula 301+
wireless-N router from Nexxt Solutions
®. If any of
the following items are mismatched, missing or
damaged, please contact the merchant from
whom you purchased the unit for immediate
replacement.
• Wireless-N router
• 100/240V power adapter
• Network cable
• Quick setup guide
4
1. Antennas: Four high-gain 5dBi omnidirectional
antennas.
2. WAN port: This RJ45 port is where you will connect the
fiber/cable/DSL modem, or ethernet line from your ISP.
3. LAN ports (1/2/3): Connect 10/100Mbps ethernet
devices such as computers, switches, and hubs to any of
these RJ45 ports.
4. Wi-Fi button: Push it for 1 to 3 seconds to enable or
disable the wireless network of the router.
5. WPS/Reset:
・Press this button for about one second to enable WPS
encryption. Within two seconds, enable the WPS feature
on the client device to establish a connection.
・Press this button for about eight seconds to restore
the device to its factory default settings. The LED
indicator will blink quickly.
6. Power: Connect the supplied power adapter to this jack.
6
7
10 11
8
Router configuration
9
1.Log into the router by accessing the web base
utility. To do so, in the browser’s address field enter
the default address or http://192.168.0.1
http://www.nexxtwifi.local
Note: To access the router wirelessly, look for the
SSID, (whereby represents the Nexxt_XXXXXX X
last 6 numbers of the MAC address).
2. In this stage, the wireless router web interface will
come up. The system will then prompt you to enter the
default password. Type and click to admin Login
continue.
3. Next, the Basic settings page will be displayed. In this
window, you will be prompted to select the Internet
Connection Type, which will depend on the type of
connection offered by your existing Internet Service
Provider (ISP): PPPoE, for dial-up or DHCP for other
broadband connections. You can also set it up to use
a Static IP configuration. By default, the router will
auto-detect the connection type and set it to the
corresponding configuration. You can also setup the
wireless password and SSID under the Wireless
Settingsblank area (by default, this is ). For security
purposes, we recommend using a security key at this
stage. It must contain at least 8 characters. Click
to complete the initial set up of the router. OK
Front panel
Hardware installation
4. Once complete, you will get a successful setup
message. If the SSID and password were changed in
the previous step, you will need to access the router
using the newly assigned parameters.
5
Back panel
The rear panel provides the physical connectors for power
and the client network devices.
23 4 5
1
6
The LED indicator on the front panel provides information
about network activity, the connection and link status of
the ports in real time. They also facilitate activity monito-
ring and troubleshooting the performance of the device.
LED
indicator
Solid The router is starting up or is already
successfully connected to the internet
Blinks slowlyThe router fails to connect to the internet
Blinks quicklyWhen clients are either connected or
disconnected to any of the LAN ports, the
LED will blink quickly for 3 seconds before
changing to solid
Description
WAN
Specyfikacje produktu
| Marka: | Nexxt |
| Kategoria: | router |
| Model: | NCR-N301 |
Potrzebujesz pomocy?
Jeśli potrzebujesz pomocy z Nexxt NCR-N301, zadaj pytanie poniżej, a inni użytkownicy Ci odpowiedzą
Instrukcje router Nexxt

11 Września 2024
3 Września 2024
2 Września 2024
26 Sierpnia 2024
26 Sierpnia 2024
16 Sierpnia 2024
6 Sierpnia 2024
Instrukcje router
Najnowsze instrukcje dla router
9 Kwietnia 2025
9 Kwietnia 2025
8 Kwietnia 2025
3 Kwietnia 2025
2 Kwietnia 2025
1 Kwietnia 2025
30 Marca 2025
30 Marca 2025
30 Marca 2025
30 Marca 2025