Instrukcja obsługi NightStick TSM-12G
NightStick Niesklasyfikowane TSM-12G
Przeczytaj poniżej 📖 instrukcję obsługi w języku polskim dla NightStick TSM-12G (3 stron) w kategorii Niesklasyfikowane. Ta instrukcja była pomocna dla 16 osób i została oceniona przez 5 użytkowników na średnio 4.7 gwiazdek
Strona 1/3
Bayco Products, Inc. • 640 South Sanden Blvd. • Wylie, TX 75098 • 1-800-233-2155 • 1-469-326-9400 • www.nightstick.com
INS-TSM-Series_DL-20
Bayco Products, Inc. • 640 South Sanden Blvd. • Wylie, TX 75098 • 1-800-233-2155 • 1-469-326-9400 • www.nightstick.com
INS-TSM-Series_DL-20
Instruction Manual
TSM Series Weapon-Mounted
Light with Green Laser
US PATENT 9,713,217
WEAPON SAFETY
FAILURE TO FOLLOW SAFETY AND OPERATING
MEASURES WHEN HANDLING A FIREARM OR THE
NIGHTSTICK WEAPON LIGHT WHEN MOUNTED ON A
FIREARM IS DANGEROUS AND CAN RESULT IN SERIOUS
INJURY, DAMAGE TO PROPERTY, OR DEATH.
Use of a fi rearm under any circumstance is inherently
dangerous. SERIOUS INJURY OR EVEN DEATH may
result without proper training in the safe handling of fi rearms.
Proper training should be obtained from an accredited
fi rearms safety program conducted by a qualifi ed instructor.
Read, understand and follow all of the safety instructions
that come with your fi rearm before attaching your new TSM.
Always assume every fi rearm is loaded and treat that
fi rearm as such.
Never point a fi rearm at anything that you are not willing
to destroy.
Never service your fi rearm or your weapon light when
mounted on a fi rearm without fi rst activating the weapon’s
safety (if applicable), removing the magazine, opening the
action and physically and visually inspecting to make sure
that no ammunition is installed in the fi rearm.
BEFORE ATTACHING, INSPECTING OR
SERVICING THE LIGHT
WARNING: IT IS IMPERATIVE THAT SAFETY
MEASURES BE EMPLOYED AT ALL TIMES WHILE
HANDLING A FIREARM.
Engage the safety on the fi rearm (if applicable).
Remove the magazine from the fi rearm (if applicable).
Open the action and visually and physically inspect the
chamber to be sure it is empty.
Keep the barrel pointed in a safe direction at all times and
never place your hand in front of the muzzle.
Use only the supplied Nightstick rechargeable battery
and MAGMATE™ cable.
Connect the cable to a power source with a USB
connector. Attach the magnetic end to the charging port
located on the light.
The USB end of the cable includes an LED charge status
indicator that remains red until the battery is fully charged.
At full charge, the LED turns green.
Total time to fully charge the light depends on the
remaining charge in the battery.
WEAPON MOUNTED LIGHT SAFETY
Nightstick recommends that the TSM should only be
activated with the non-trigger hand (support hand) while
employing a two-handed grip on the handgun and with the
trigger fi nger fully outside the trigger guard when applicable.
Thoroughly practice (employing safe training
conditions) with the TSM installed on an unloaded
handgun before using the weapon.
OPERATION
The left and right side switches operate independently.
Depending on the user-selected programmed mode,
activation of the switch will operate either 1) white light only,
2) green laser only, or 3) white light and green laser.
Turn on/off: Press down for 1/2 second or less and
release.
Momentary on: Press and hold for 1/2 second or longer,
release to turn off.
PROGRAM THE USER-SELECTABLE
SETTINGS
While holding down either the left or right side switch,
press and release the opposite side switch to cycle between
the modes: 1) white light only, 2) green laser only, or 3)
white light and green laser.
Cycle through each mode by continuing to hold one side
while pressing and releasing the opposite side.
When the desired mode is selected, release the
switches.
The setting will remain in the selected mode until
changed by the user.
ADJUST WINDAGE AND ELEVATION OF
LASER
ROUGH ADJUSTMENT
Determine the distance where you want the laser and
bullet to intersect (Zero distance). We recommend 5 to
20 yards.
Hold the handgun and align the front and rear sights
properly for this distance.
Use the tool included to turn the windage (side) and
elevation (bottom) screws to adjust the laser until it is
aligned with the top of the front sight post.
FINE ADJUSTMENT
At the fi ring range, refi ne the point of aim to match the
point of impact at your desired distance.
Use the included tool and the directional arrows to further
refi ne windage and elevation by moving the point of impact.
GENERAL SAFETY WARNINGS
NOT FOR USE ABOVE HAZARDOUS LOCATIONS
DO NOT use in explosive atmospheres, near fl ammable
liquids, or where explosion proof lamps are required.
DO NOT use in the proximity of vehicles or equipment
when there is a risk of fl ammable liquids coming into
contact with the fl ashlight.
DO NOT expose the batteries to water or salt water, or
allow the batteries to get wet.
DO NOT store the batteries with metallic objects that
may cause a short circuit.
Immediately discontinue use of the batteries if they emit
an unusual smell, feel hot, change color, change shape or
appear abnormal in any way.
Keep out of the reach of children.
LASER RADIATION
CAUTION: Use of controls or adjustments or performance of
procedures other than those specifi ed herein may result in
hazardous radiation exposure.
WARNING: Laser Radiation maximum power measured at
3.33mW. Avoid direct eye exposure. Do not stare into beam.
Do not turn the light on while looking directly into the bezel.
The TSM is not intended to be serviced. Contact Bayco
Customer Service if product is not functioning properly.
See warranty section for more information.
Aperture warning and Class IIIa laser labels are located
on the bottom and back of the light as per illustrations above.
EXPORT CONTROLS
The export of this product is restricted by the U.S.
Department of Commerce as a controlled commodity ECCN
0A504.f. Subsequent resale and reexports of this product are
subject to US Export Administration Regulations (EAR).
WARRANTY
LIMITED LIFETIME WARRANTY
Bayco Products, Inc. warrants this product to be free
from defects in workmanship and materials for the original
purchaser’s lifetime. The Limited Lifetime Warranty includes the
LEDs, housing and lenses. Rechargeable batteries, chargers,
switches, electronics and included accessories are warranted
for a period of two years with proof of purchase. Normal wear
and failures which are caused by accidents, misuse, abuse,
faulty installation and lightning damage are excluded.
We will repair or replace this product should we determine
it to be defective. This is the only warranty, expressed or
implied, including any warranty of merchantability or fi tness
for a particular purpose.
For a complete copy of the warranty, go to www.
baycoproducts.com/nightstick-product-support/warranties.
Retain your receipt for proof of purchase.
INSTALL THE LIGHT ONTO YOUR FIREARM
WARNING: FOLLOW ALL SAFETY MEASURES WHILE
HANDLING FIREARMS.
Loosen the 3 screws on the outer housing of the light
using the included tool until the two halves separate. It is not
necessary to completely remove the screws.
Separate the two halves of the outer housing while
holding the inner module in place. It is best to retain the
inner module with the side that has the screws and hold it
so that the screws do not fall out.
While holding the gun in one hand, place the empty half
under the trigger guard, then place the side that contains
the module (with screws on top) over the trigger guard.
Hold the two sides fi rmly together while starting the screws.
Tighten all 3 screws while keeping pressure on both sides.
Inspect for gaps and continue to tighten until fully closed.
SCAN FOR MOUNTING
INSTRUCTION VIDEO
https://youtu.be/z96Xfcf0UEc
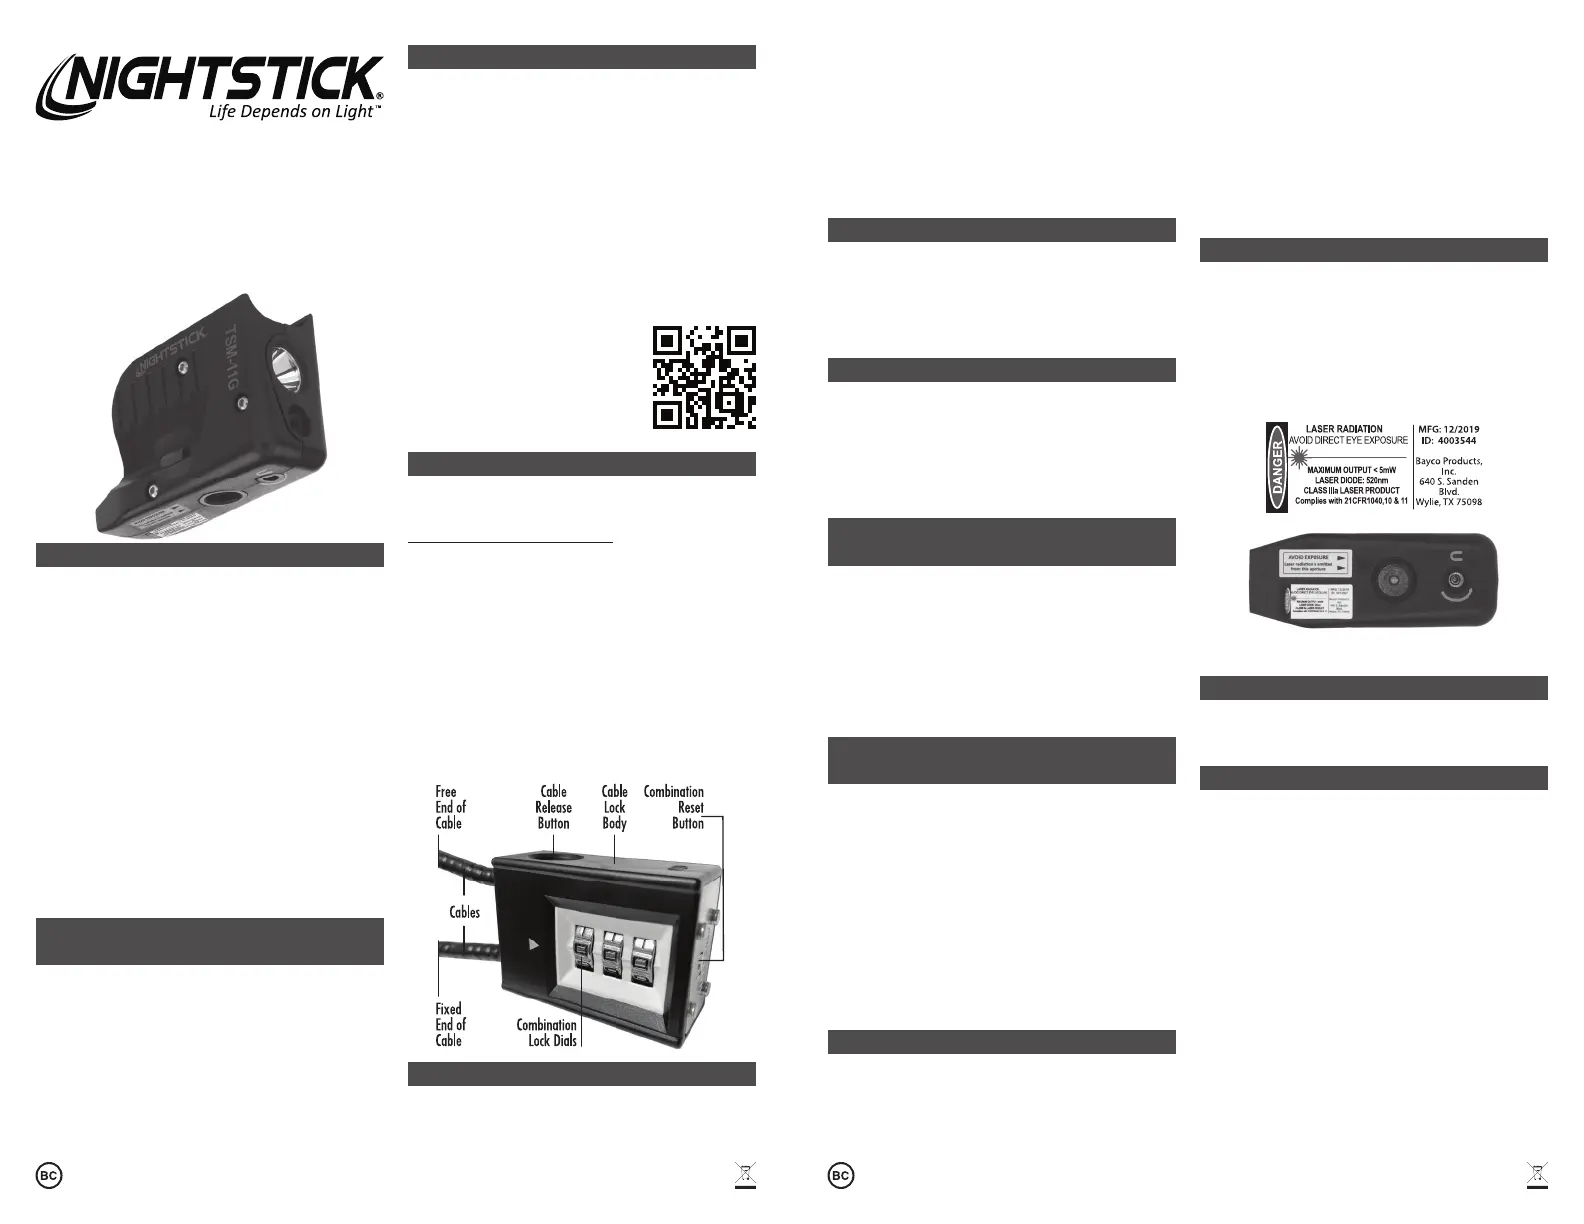
COMBINATION LOCK INSTRUCTIONS
Ensure the safety and security of your weapon before
charging the light by installing the gun lock included
with the purchase of this product.
Change the factory set combination
The factory set combination is 0-0-0. Begin by setting the
dials to 0-0-0 along the dash marks on the lock.
Insert the free end of the cable into the lock.
Use a ball-point pen or other pointed instrument to press
and hold the reset button located on the bottom of the lock.
While holding the reset button, rotate the dials to the new
3-digit combination of your choice.
Make a note of the 3-digit combination.
Release the reset button.
Test the lock by rotating the dials to the new combination.
Press the cable release button located on the side of the
lock to release the free end of the cable.
The new combination is correctly set if cable releases.
CHARGE THE BATTERY
Fully charge the light before the fi rst use or if it has been
unused for several months. For best performance, charge the
light when the fl ashlight beam starts to dim.
Specyfikacje produktu
| Marka: | NightStick |
| Kategoria: | Niesklasyfikowane |
| Model: | TSM-12G |
Potrzebujesz pomocy?
Jeśli potrzebujesz pomocy z NightStick TSM-12G, zadaj pytanie poniżej, a inni użytkownicy Ci odpowiedzą
Instrukcje Niesklasyfikowane NightStick

28 Stycznia 2025
4 Października 2024
4 Października 2024
2 Października 2024
2 Października 2024
2 Października 2024
2 Października 2024
2 Października 2024
2 Października 2024
2 Października 2024
Instrukcje Niesklasyfikowane
Najnowsze instrukcje dla Niesklasyfikowane
29 Stycznia 2025
29 Stycznia 2025
29 Stycznia 2025
29 Stycznia 2025
29 Stycznia 2025
29 Stycznia 2025
29 Stycznia 2025
29 Stycznia 2025
29 Stycznia 2025
29 Stycznia 2025