Instrukcja obsługi Noctua NH-C14S
Noctua Koeler procesora NH-C14S
Przeczytaj poniżej 📖 instrukcję obsługi w języku polskim dla Noctua NH-C14S (6 stron) w kategorii Koeler procesora. Ta instrukcja była pomocna dla 13 osób i została oceniona przez 9 użytkowników na średnio 4.6 gwiazdek
Strona 1/6
Required mounting parts:
Dear customer,
Congratulations on choosing the Noctua NH-C14S. Succeeding
the award-winning NH-C14, the NH-C14S is an elite class
top-flow CPU cooler that is extremely efficient, highly
compatible and remarkably adjustable – a top-flow solution for
the highest demands.
Enjoy your NH-C14S!
Yours sincerely,
Roland Mossig, Noctua CEO
This manual will guide you through the installation process of the
SecuFirm2™ mounting system step by step.
Prior to installing the cooler, please consult the compatibility list
on our website (www.noctua.at/compatibility) and verify that
the cooler is fully compatible with your motherboard.
Should you encounter any difficulties, please check the FAQs on
our website (www.noctua.at/faqs) and don’t hesitate to contact
our support team at support@noctua.at.
Noctua cannot be held responsible for any damage or losses
caused by compatibility issues.
Multilingual versions of this manual are available on our
website: www.noctua.at/manuals
Removing the mainboard
In case you want to use the cooler on an assembled system and
your case doesn’t have a cut-out at the rear side of the mainboard
tray, you first have to remove the mainboard from the case in
order to be able to install the supplied backplate.
Step 1
2x NM-IMB2 Mounting Bars1x NM-IBP2 Backplate
4x NM-ITS1 Thumbscrews4x NM-IPS1 Spacers
Place the backplate on the rear side of the mainboard so that the
bolts stick through the mounting holes.
Caution: Please make sure that the three cut-outs in the
supplied backplate align with the screws of the mainboard’s stock
backplate.
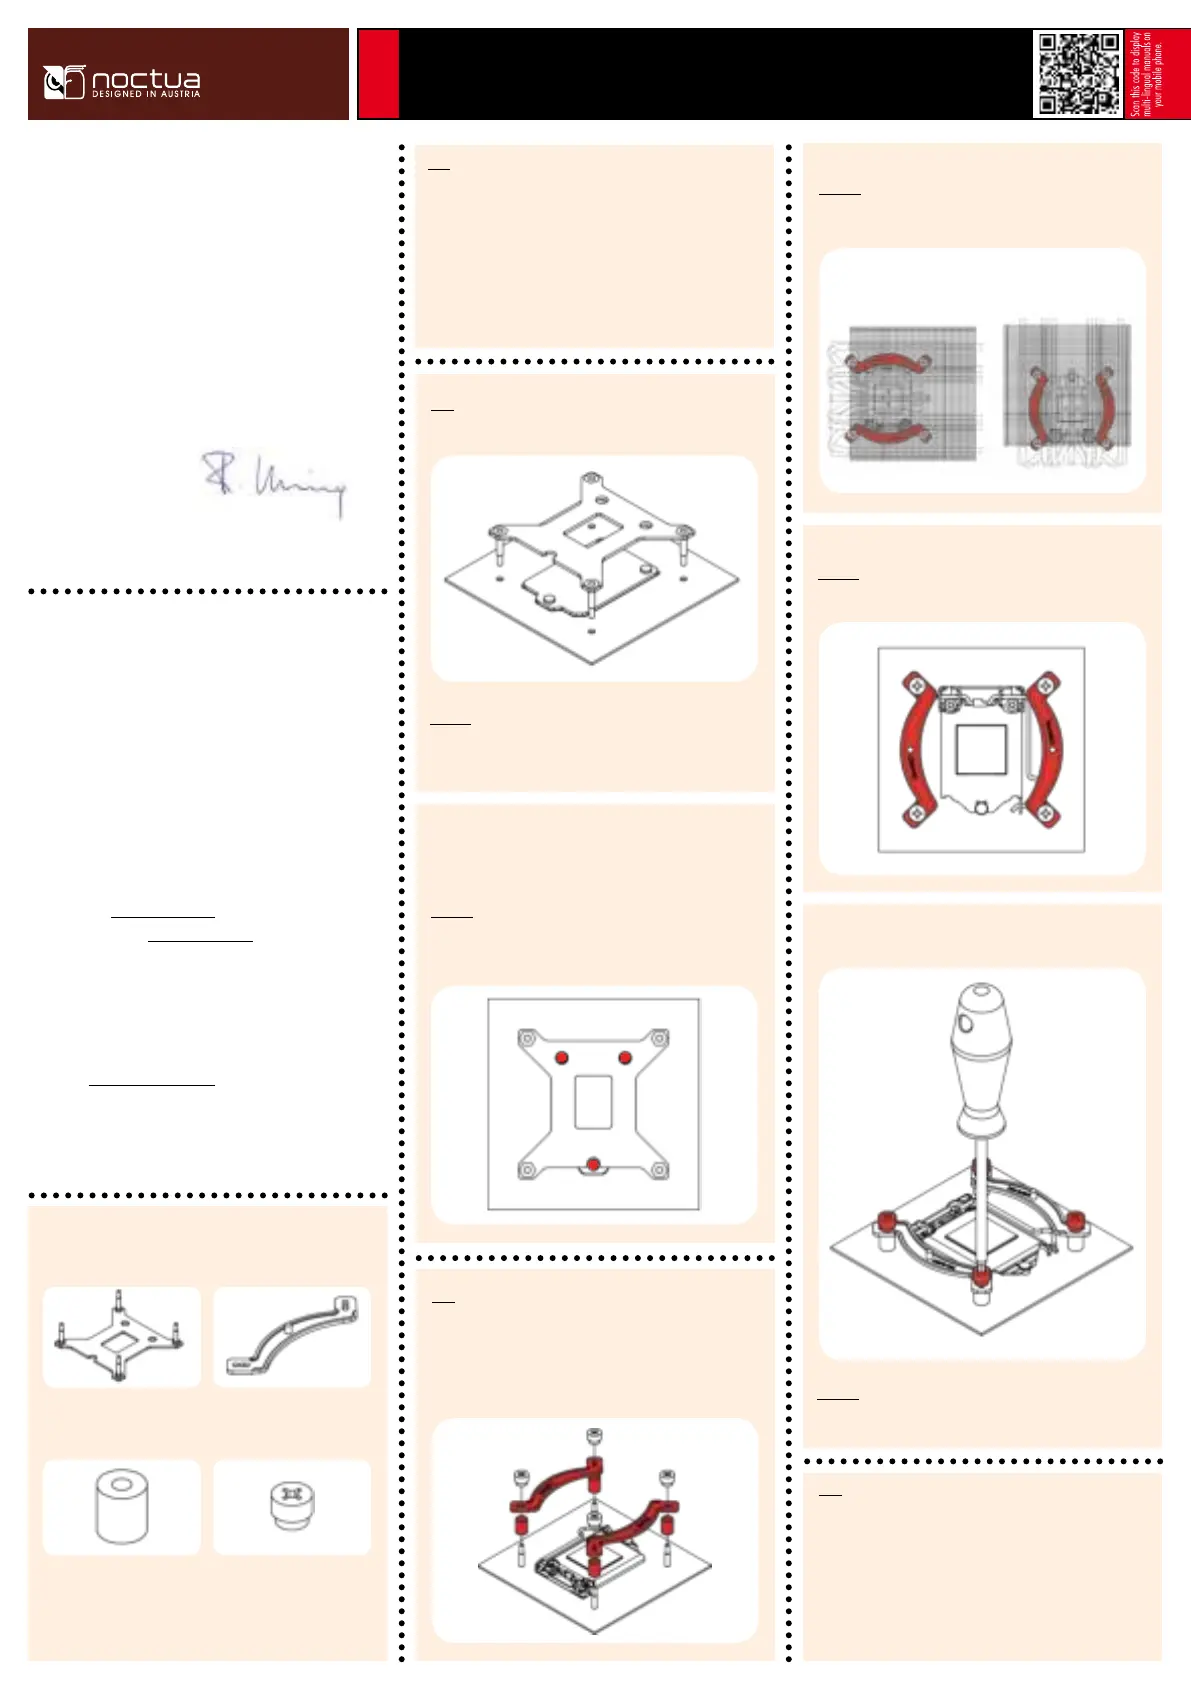
Installing the mounting bars
Caution: Choose the alignment of the mounting bars according to
the desired final orientation of the cooler:
Step 3
First put the plastic spacers onto the bolts of the backplate, then
add the mounting bars.
Attaching the backplate
Caution: The supplied backplate will install over the mainboard’s
stock backplate, so the mainboard’s stock backplate must not be
taken off.
Step 2
Orientation AOrientation B
Noctua NH-C14S | Installation Manual | LGA115x
LGA115x
Caution: Make sure that the curved sides of the mounting bars are
pointing outwards.
Fix the mounting bars using the 4 thumb screws.
Caution: Gently tighten the screws until they stop, but don’t use
excessive force.
Applying thermal paste
If there are residual traces of thermal paste or thermal pads on
your CPU, please clean them off first. Then press a small drop
(4-5mm diameter) of NT-H1 onto the centre of the heatspreader.
Step 4
Specyfikacje produktu
| Marka: | Noctua |
| Kategoria: | Koeler procesora |
| Model: | NH-C14S |
| Odpowiednia lokalizacja: | Procesor |
| Wysokość produktu: | 115 mm |
| Szerokość produktu: | 140 mm |
| Głębokość produktu: | 163 mm |
| Waga produktu: | 820 g |
| Poziom hałasu: | 19.2 dB |
| Kod zharmonizowanego systemu (HS): | 84733080 |
| Napięcie: | 12 V |
| Model: | Chlodnica/wentylator |
| Materiały: | Aluminium, Copper |
| Obsługiwane gniazda procesora: | Socket AM2, Socket AM2+, Socket AM3, Socket AM3+, Socket FM1, Socket FM2, Socket FM2+, LGA 1151 (Socket H4), LGA 2011-v3 (Socket R) |
| Średnica czaszy wentylatora: | 140 mm |
| Prędkość obrotowa (min): | 300 RPM |
| Prędkość obrotowa (max): | 1500 RPM |
| Wymiary wentylatora (szer. x głęb. x wys.): | 140 x 140 x 25 mm |
Potrzebujesz pomocy?
Jeśli potrzebujesz pomocy z Noctua NH-C14S, zadaj pytanie poniżej, a inni użytkownicy Ci odpowiedzą
Instrukcje Koeler procesora Noctua

2 Października 2024
2 Października 2024
2 Października 2024
1 Października 2024
1 Października 2024
1 Października 2024
1 Października 2024
1 Października 2024
1 Października 2024
1 Października 2024
Instrukcje Koeler procesora
Najnowsze instrukcje dla Koeler procesora
9 Kwietnia 2025
9 Kwietnia 2025
9 Kwietnia 2025
27 Marca 2025
5 Marca 2025
26 Lutego 2025
26 Lutego 2025
26 Lutego 2025
5 Lutego 2025
30 Grudnia 2025