Instrukcja obsługi Noctua NH-L9X65
Noctua Koeler procesora NH-L9X65
Przeczytaj poniżej 📖 instrukcję obsługi w języku polskim dla Noctua NH-L9X65 (6 stron) w kategorii Koeler procesora. Ta instrukcja była pomocna dla 29 osób i została oceniona przez 5 użytkowników na średnio 4.1 gwiazdek
Strona 1/6
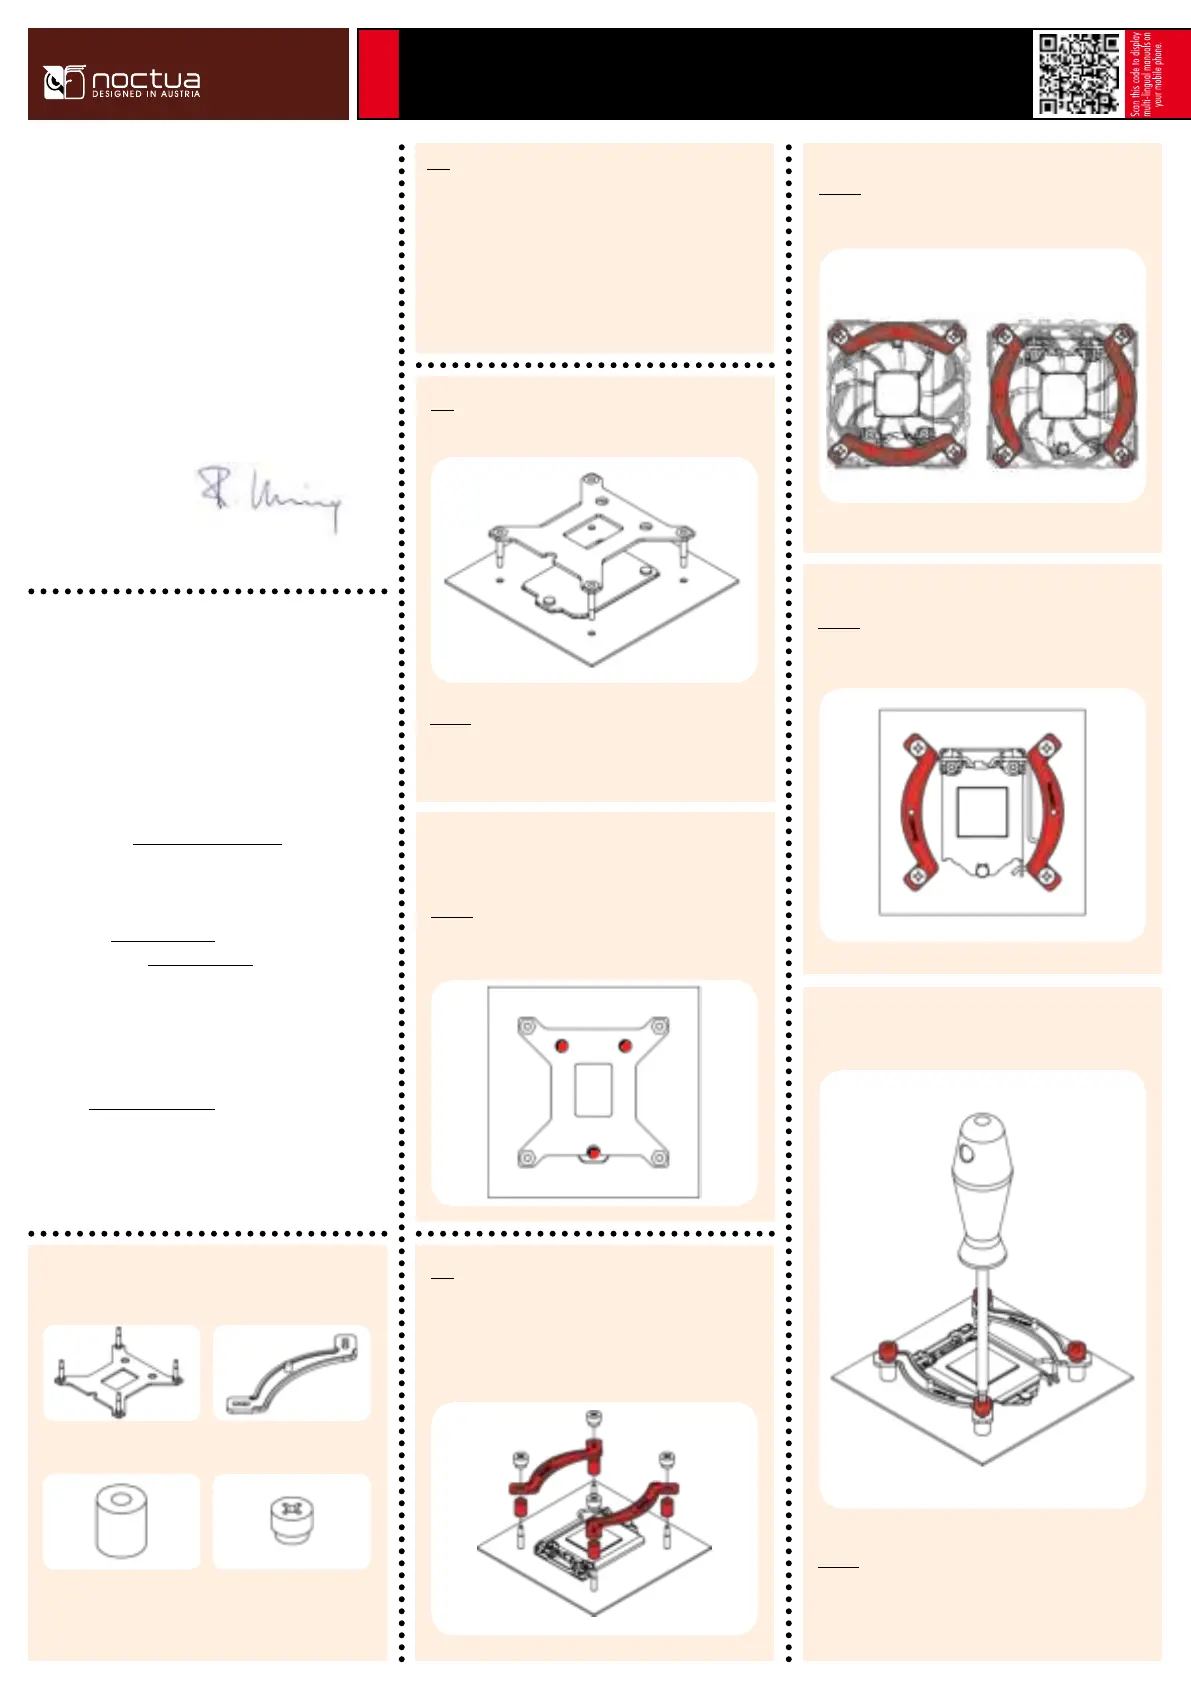
Required mounting parts:
Dear customer,
Congratulations on choosing the Noctua NH-L9x65. The NH-
L9x65 is a taller, performance-enhanced version of our award-
winning NH-L9 low-profile coolers. It fuses everything users
have come to expect from our larger coolers into a compact
premium package for space restricted systems.
Enjoy your NH-L9x65!
Yours sincerely,
Roland Mossig, Noctua CEO
This manual will guide you through the installation process of the
SecuFirm2™ mounting system step by step.
Prior to installing the cooler, please consult the compatibility list
on our website (www.noctua.at/compatibility) and verify that
the cooler is fully compatible with your motherboard.
Should you encounter any difficulties, please check the FAQs on
our website (www.noctua.at/faqs) and don’t hesitate to contact
our support team at support@noctua.at.
Noctua cannot be held responsible for any damage or losses
caused by compatibility issues.
Multilingual versions of this manual are available on our
website: www.noctua.at/manuals
Removing the mainboard
In case you want to use the cooler on an assembled system and
your case doesn’t have a cut-out at the rear side of the mainboard
tray, you first have to remove the mainboard from the case in
order to be able to install the supplied backplate.
Step 1
2x NM-IMB2 Mounting Bars1x NM-IBP2 Backplate
4x NM-ITS1 Thumbscrews4x NM-IPS1 Spacers
Place the backplate on the rear side of the mainboard so that the
bolts stick through the mounting holes.
Caution: Please make sure that the three cut-outs in the
supplied backplate align with the screws of the mainboard’s stock
backplate.
Installing the mounting bars
Caution: Choose the alignment of the mounting bars according to
the desired final orientation of the cooler:
Step 3
First put the plastic spacers onto the bolts of the backplate, then
add the mounting bars.
Attaching the backplate
Caution: The supplied backplate will install over the mainboard’s
stock backplate, so the mainboard’s stock backplate must not be
taken off.
Step 2
Noctua NH-L9x65 | Installation Manual | LGA115x
LGA115x
Orientation AOrientation B
Caution: Make sure that the curved sides of the mounting bars are
pointing outwards.
Fix the mounting bars using the 4 thumb screws.
Caution: Gently tighten the screws until they stop, but don’t use
excessive force.
Specyfikacje produktu
| Marka: | Noctua |
| Kategoria: | Koeler procesora |
| Model: | NH-L9X65 |
| Odpowiednia lokalizacja: | Procesor |
| Wysokość produktu: | 95 mm |
| Szerokość produktu: | 95 mm |
| Głębokość produktu: | 65 mm |
| Waga produktu: | 413 g |
| Kod zharmonizowanego systemu (HS): | 84733080 |
| Napięcie: | 12 V |
| Model: | Chlodnica/wentylator |
| Obsługiwane gniazda procesora: | Socket AM2, Socket AM2+, Socket AM3, Socket AM3+, Socket FM1, Socket FM2, Socket FM2+ |
| Poziom hałasu (niska prędkość): | 14.8 dB |
| MTBF (Średni okres międzyawaryjny): | 150000 h |
| Poziom hałasu (wysoka prędkość): | 23.6 dB |
| Średnica czaszy wentylatora: | 92 mm |
| Prędkość obrotowa (min): | 600 RPM |
| Prędkość obrotowa (max): | 2500 RPM |
| Przepływ powietrza: | 57.5 m³/h |
| Wymiary wentylatora (szer. x głęb. x wys.): | 92 x 14 x 92 mm |
| Minimalne ciśnienie powietrza: | 1.06 mmH2O |
| Maksymalne ciśnienie powietrza: | 2.11 mmH2O |
| Wymiary radiatora (S x G x W): | 95 x 51 x 95 mm |
| Waga radiatora: | 340 g |
Potrzebujesz pomocy?
Jeśli potrzebujesz pomocy z Noctua NH-L9X65, zadaj pytanie poniżej, a inni użytkownicy Ci odpowiedzą
Instrukcje Koeler procesora Noctua

2 Października 2024
2 Października 2024
2 Października 2024
1 Października 2024
1 Października 2024
1 Października 2024
1 Października 2024
1 Października 2024
1 Października 2024
1 Października 2024
Instrukcje Koeler procesora
Najnowsze instrukcje dla Koeler procesora
9 Kwietnia 2025
9 Kwietnia 2025
9 Kwietnia 2025
27 Marca 2025
5 Marca 2025
26 Lutego 2025
26 Lutego 2025
26 Lutego 2025
5 Lutego 2025
30 Grudnia 2025