Instrukcja obsługi Planet IGS-1820TF
Planet Niesklasyfikowane IGS-1820TF
Przeczytaj poniżej 📖 instrukcję obsługi w języku polskim dla Planet IGS-1820TF (2 stron) w kategorii Niesklasyfikowane. Ta instrukcja była pomocna dla 30 osób i została oceniona przez 6 użytkowników na średnio 4.3 gwiazdek
Strona 1/2
- 1 -
- 2 -
- 3 -
- 4 -
- 5 -
- 6 -
- 7 -
- 8 -
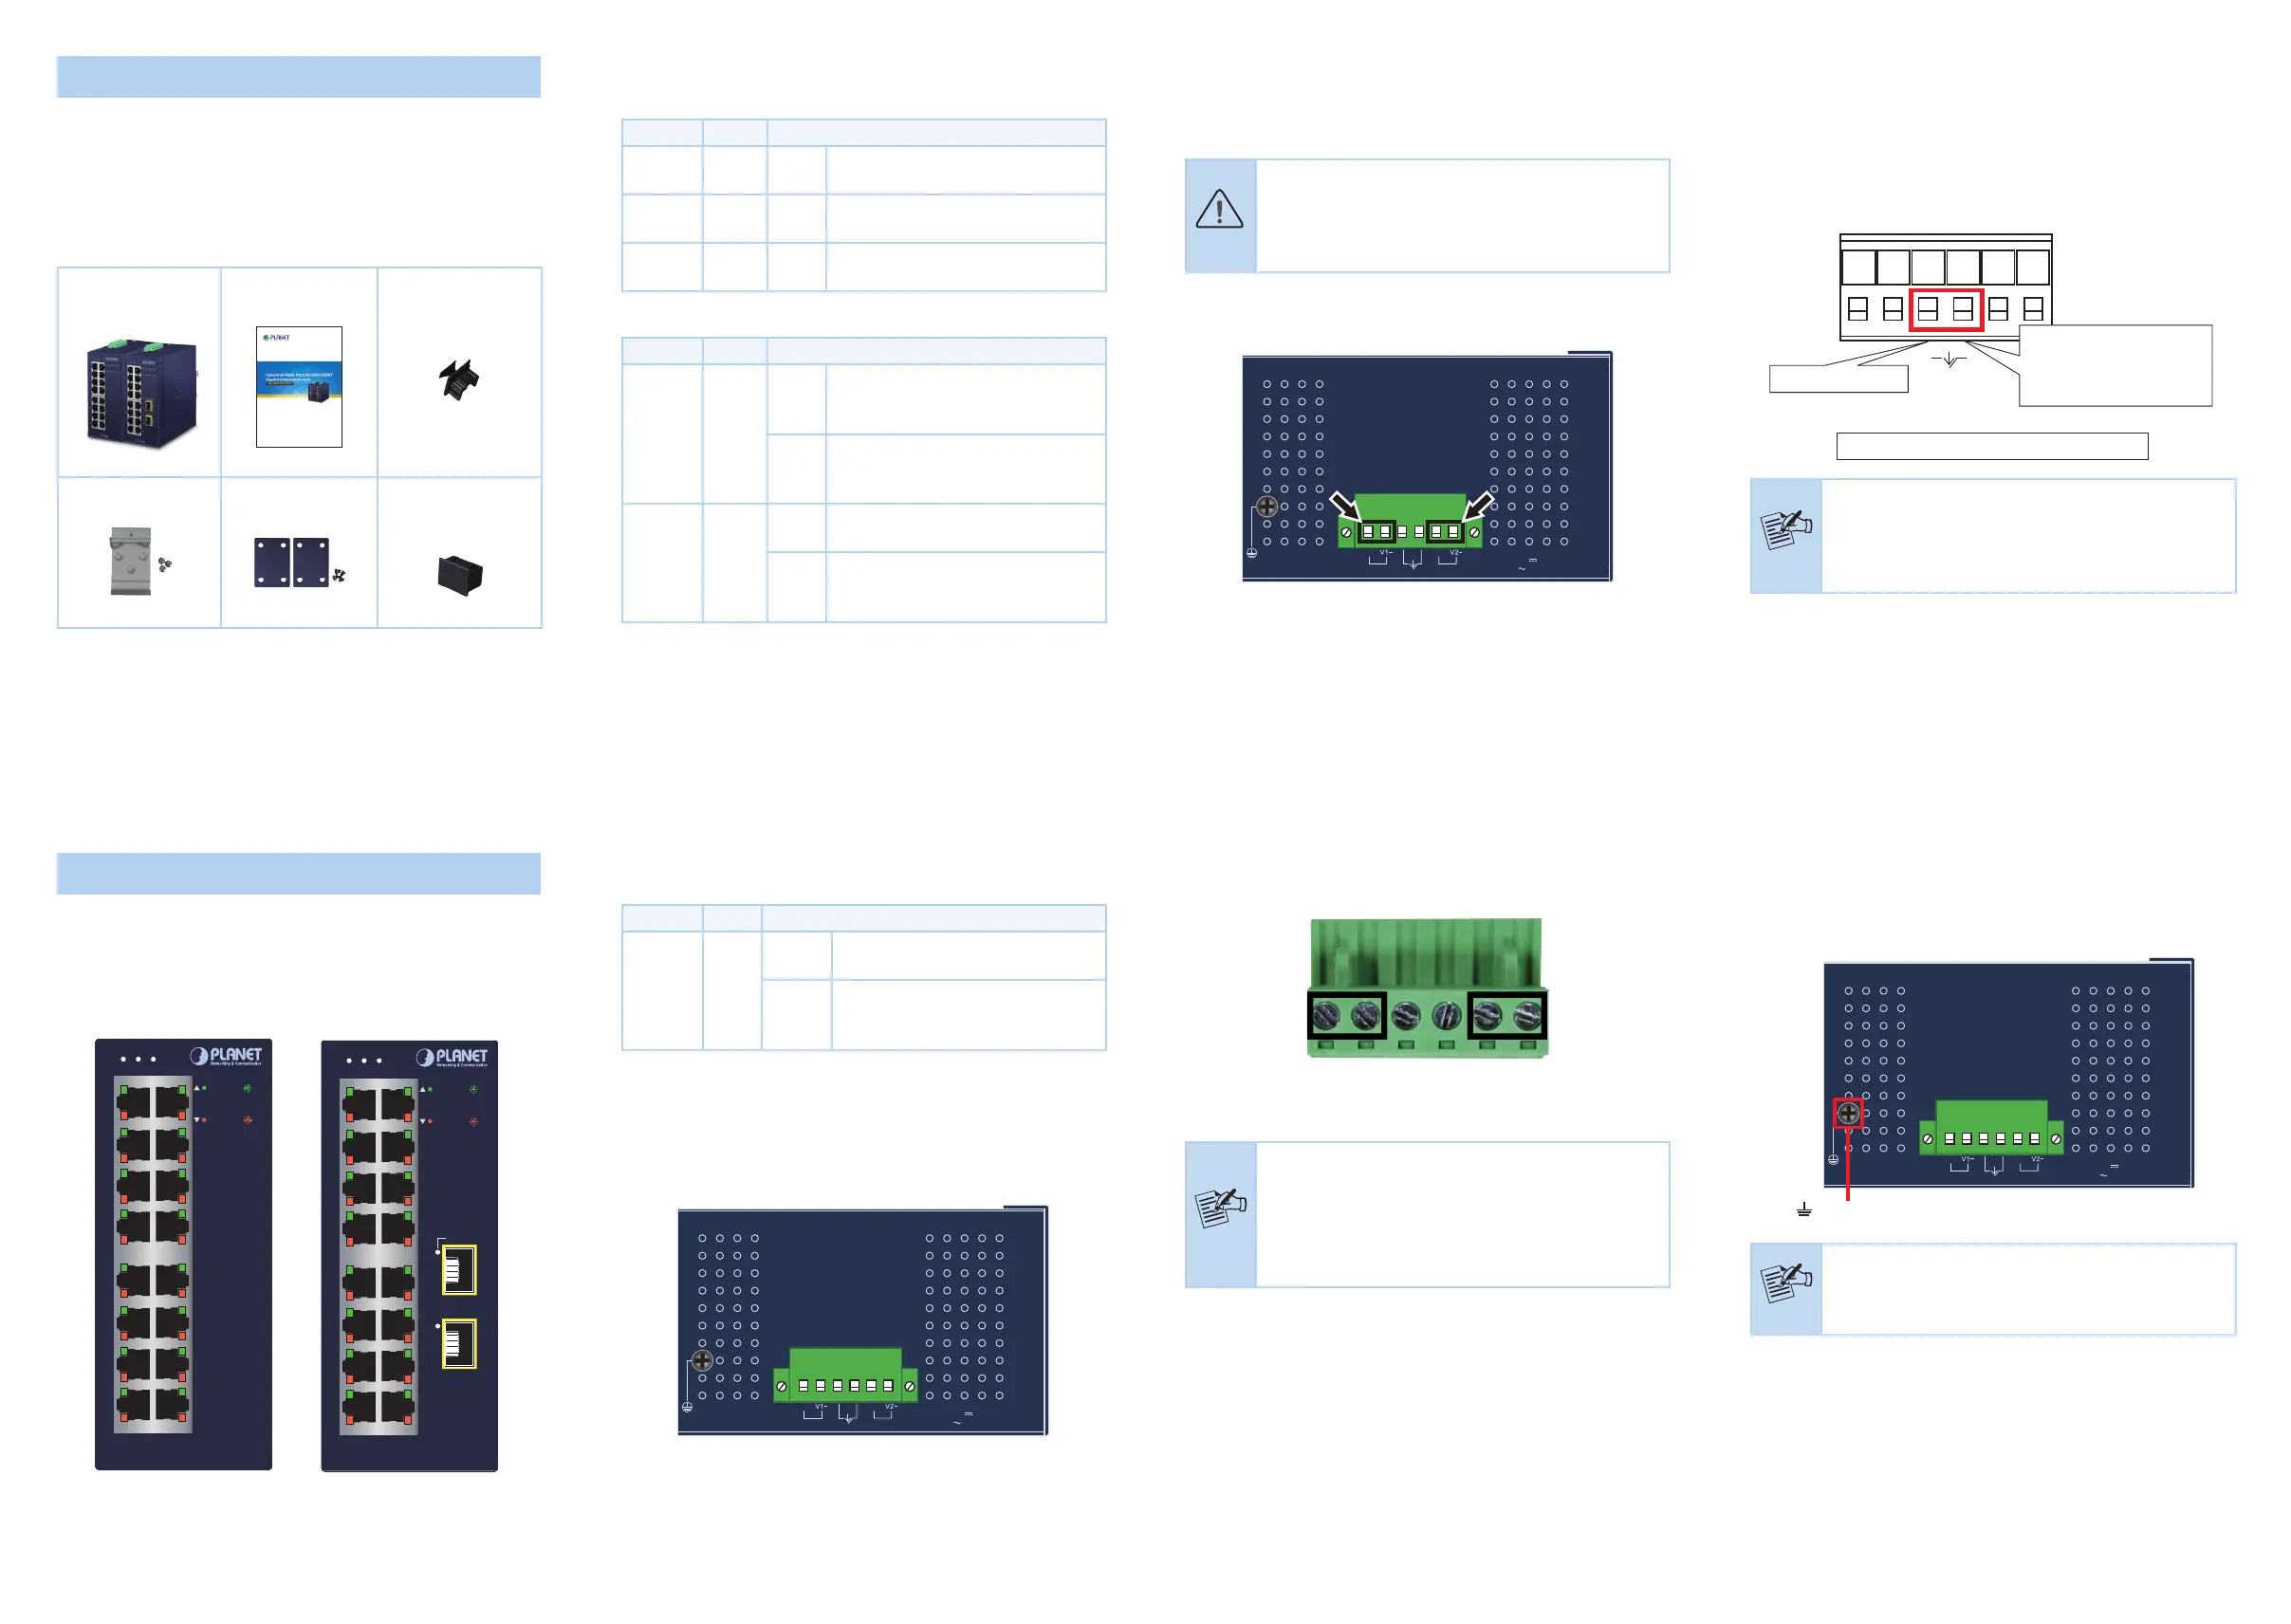
1. Package Contents
Thank you for purchasing PLANET Industrial Multi-port
10/100/1000T Gigabit Ethernet Switch, IGS-1600T/IGS-1820TF.
In the following sections, the term “Industrial Ethernet
Switch” means the IGS-1600T or IGS-1820TF.
Open the box of the Industrial Ethernet Switch and carefully
unpack it. The box should contain the following items:
Industrial Ethernet
Switch x 1
User’s Manual x 1RJ45 Dust Cap x 16
DIN-rail KitWall-mount KitSFP Dust Cap x 2
(IGS-1820TF only)
If any of these are missing or damaged, please contact your
dealer immediately; if possible, retain the carton including the
original packing material, and use them again to repack the
product in case there is a need to return it to us for repair.
2.2LEDDenition:
System
LEDColorFunction
P1GreenLights
Lights to indicate power input 1
has power.
P2GreenLights
Lights to indicate power input 2
has power.
FaultRedLights
Lights to indicate that AC or DC
power has failed.
Per 10/100/1000BASE-T Port
LEDColorFunction
1000
LNK/ACT
Green
Lights
To indicate the link through that
port is successfully established at
1000Mbps.
Blinks
To indicate that the switch is
actively sending or receiving data
over that port.
10/100
LNK/ACT
Amber
Lights
To indicate the port is successfully
established at 10/100Mbps.
Blinks
To indicate that the Switch is
actively sending or receiving data
over that port.
2.5WiringtheFaultAlarmContact
The fault alarm contacts are in the middle of the terminal block
connector as the picture shows below. Inserting the wires, the
Industrial Ethernet Switch will detect the fault status of the
power failure, and then forms an open circuit. The following
illustration shows an application example for wiring the fault
alarm contacts.
Fault Alarm Contacts
The Fault Alarm Contacts are
energized (CLOSE) for normal
operation and will OPEN when
failure occurs
Fault
Insert the wires into the fault alarm contacts
Note
1. The wire gauge for the terminal block should be
in the range between 12 and 24 AWG.
2. Alarm relay circuit accepts up to 24V, max. 1A
currents.
2.4WiringthePowerInputs
The 6-contact terminal block connector on the top panel of
Industrial Ethernet Switch is used for two redundant power
inputs. Please follow the steps below to insert the power wire.
Caution
When performing any of the procedures like
inserting the wires or tightening the wire-clamp
screws, make sure the power is OFF to prevent
from getting an electric shock.
Insert positive and negative DC power wires into contacts 1
and 2 for POWER 1, or contacts 5 and 6 for POWER 2.
Fault
V1+V2+
PWR2PWR1
Max. fault loading: 24V, 1A
DC Input: 12-48V , 1.5A max.
AC
Input: 24V , 1A max.
1 2 3 4 5 6
2.HardwareIntroduction
2.1SwitchFrontPanel
The front panel of the Industrial Ethernet Switch consists of
Ethernet interfaces and LED indicators.
Front View
IGS-1600T
FaultP2P1
1
3
5
7
2
4
6
8
9
11
13
15
10
12
14
16
ACT
1000 LNK
ACT
10/100LNK
IGS-1820TF
FaultP2P1
1
3
5
7
2
4
6
8
9
11
13
15
10
17
12
14
16
ACT
1000 LNK
ACT
10/100LNK
1000 LNK/ACT
18
Figure1:
IGS-1600T Front View
Figure2:
IGS-1820TF Front View
Per1000BASE-XSFPPort
(Port-17andPort-18ofIGS-1820TF)
LEDColorFunction
LNK/ACTGreen
Lights
To indicate the port is successfully
established at 1000Mbps.
Blinks
To indicate that the Switch is
actively sending or receiving data
over that port.
2.3SwitchUpperPanel
The upper panel of the Industrial Ethernet Switch consists of
one terminal block connector within two power input and one
relay output.
Fault
V1+V2+
PWR2PWR1
Max. fault loading: 24V, 1A
DC Input: 12-48V , 1.5A max.
AC
Input: 24V , 1A max.
1 2 3 4 5 6
Figure3:IGS-1600T and IGS-1820TF Top View
Tighten the wire-clamp screws for preventing the wires from
loosening.
123456
Power 1FaultPower 2
+-+-
Note
1. The wire gauge for the terminal block should be
in the range between 12 and 24 AWG.
2. The power input range is DC 12V ~ 48V and
supports AC 24V.
3. Use one power input when using AC 24V.
2.6GroundingtheDevice
Users MUST complete grounding wired with the device;
otherwise, a sudden lightning could cause fatal damage to the
device.
Fault
V1+V2+
PWR2PWR1
Max. fault loading: 24V, 1A
DC Input: 12-48V , 1.5A max.
AC
Input: 24V , 1A max.
1 2 3 4 5 6
Earth Ground
Note
EMD (Lightning) DAMAGE IS NOT CONVERED UNDER
WARRANTY.
Specyfikacje produktu
| Marka: | Planet |
| Kategoria: | Niesklasyfikowane |
| Model: | IGS-1820TF |
Potrzebujesz pomocy?
Jeśli potrzebujesz pomocy z Planet IGS-1820TF, zadaj pytanie poniżej, a inni użytkownicy Ci odpowiedzą
Instrukcje Niesklasyfikowane Planet

8 Stycznia 2025
8 Stycznia 2025
8 Stycznia 2025
3 Stycznia 2025
3 Stycznia 2025
3 Stycznia 2025
3 Stycznia 2025
3 Stycznia 2025
7 Grudnia 2024
7 Grudnia 2024
Instrukcje Niesklasyfikowane
Najnowsze instrukcje dla Niesklasyfikowane
29 Stycznia 2025
29 Stycznia 2025
29 Stycznia 2025
29 Stycznia 2025
29 Stycznia 2025
29 Stycznia 2025
29 Stycznia 2025
29 Stycznia 2025
29 Stycznia 2025
29 Stycznia 2025