Instrukcja obsługi RYOBI STM503K
RYOBI Niesklasyfikowane STM503K
Przeczytaj poniżej 📖 instrukcję obsługi w języku polskim dla RYOBI STM503K (2 stron) w kategorii Niesklasyfikowane. Ta instrukcja była pomocna dla 17 osób i została oceniona przez 2 użytkowników na średnio 4.7 gwiazdek
Strona 1/2
FEATURES
PRODUCT SPECIFICATIONS
Maximum Weight Capacity*
Wall rail206 lbs. (75 lbs. per linear foot) .............................................................................
Powertool Hook50 lbs. each .......................................................................................
Large Powertool Hook50 lbs. each .............................................................................
Utility Hook50 lbs. each ..............................................................................................
* Wall rails must be secured to the wall according to the instructions in this operator’s
manual to achieve maximum weight capacity.
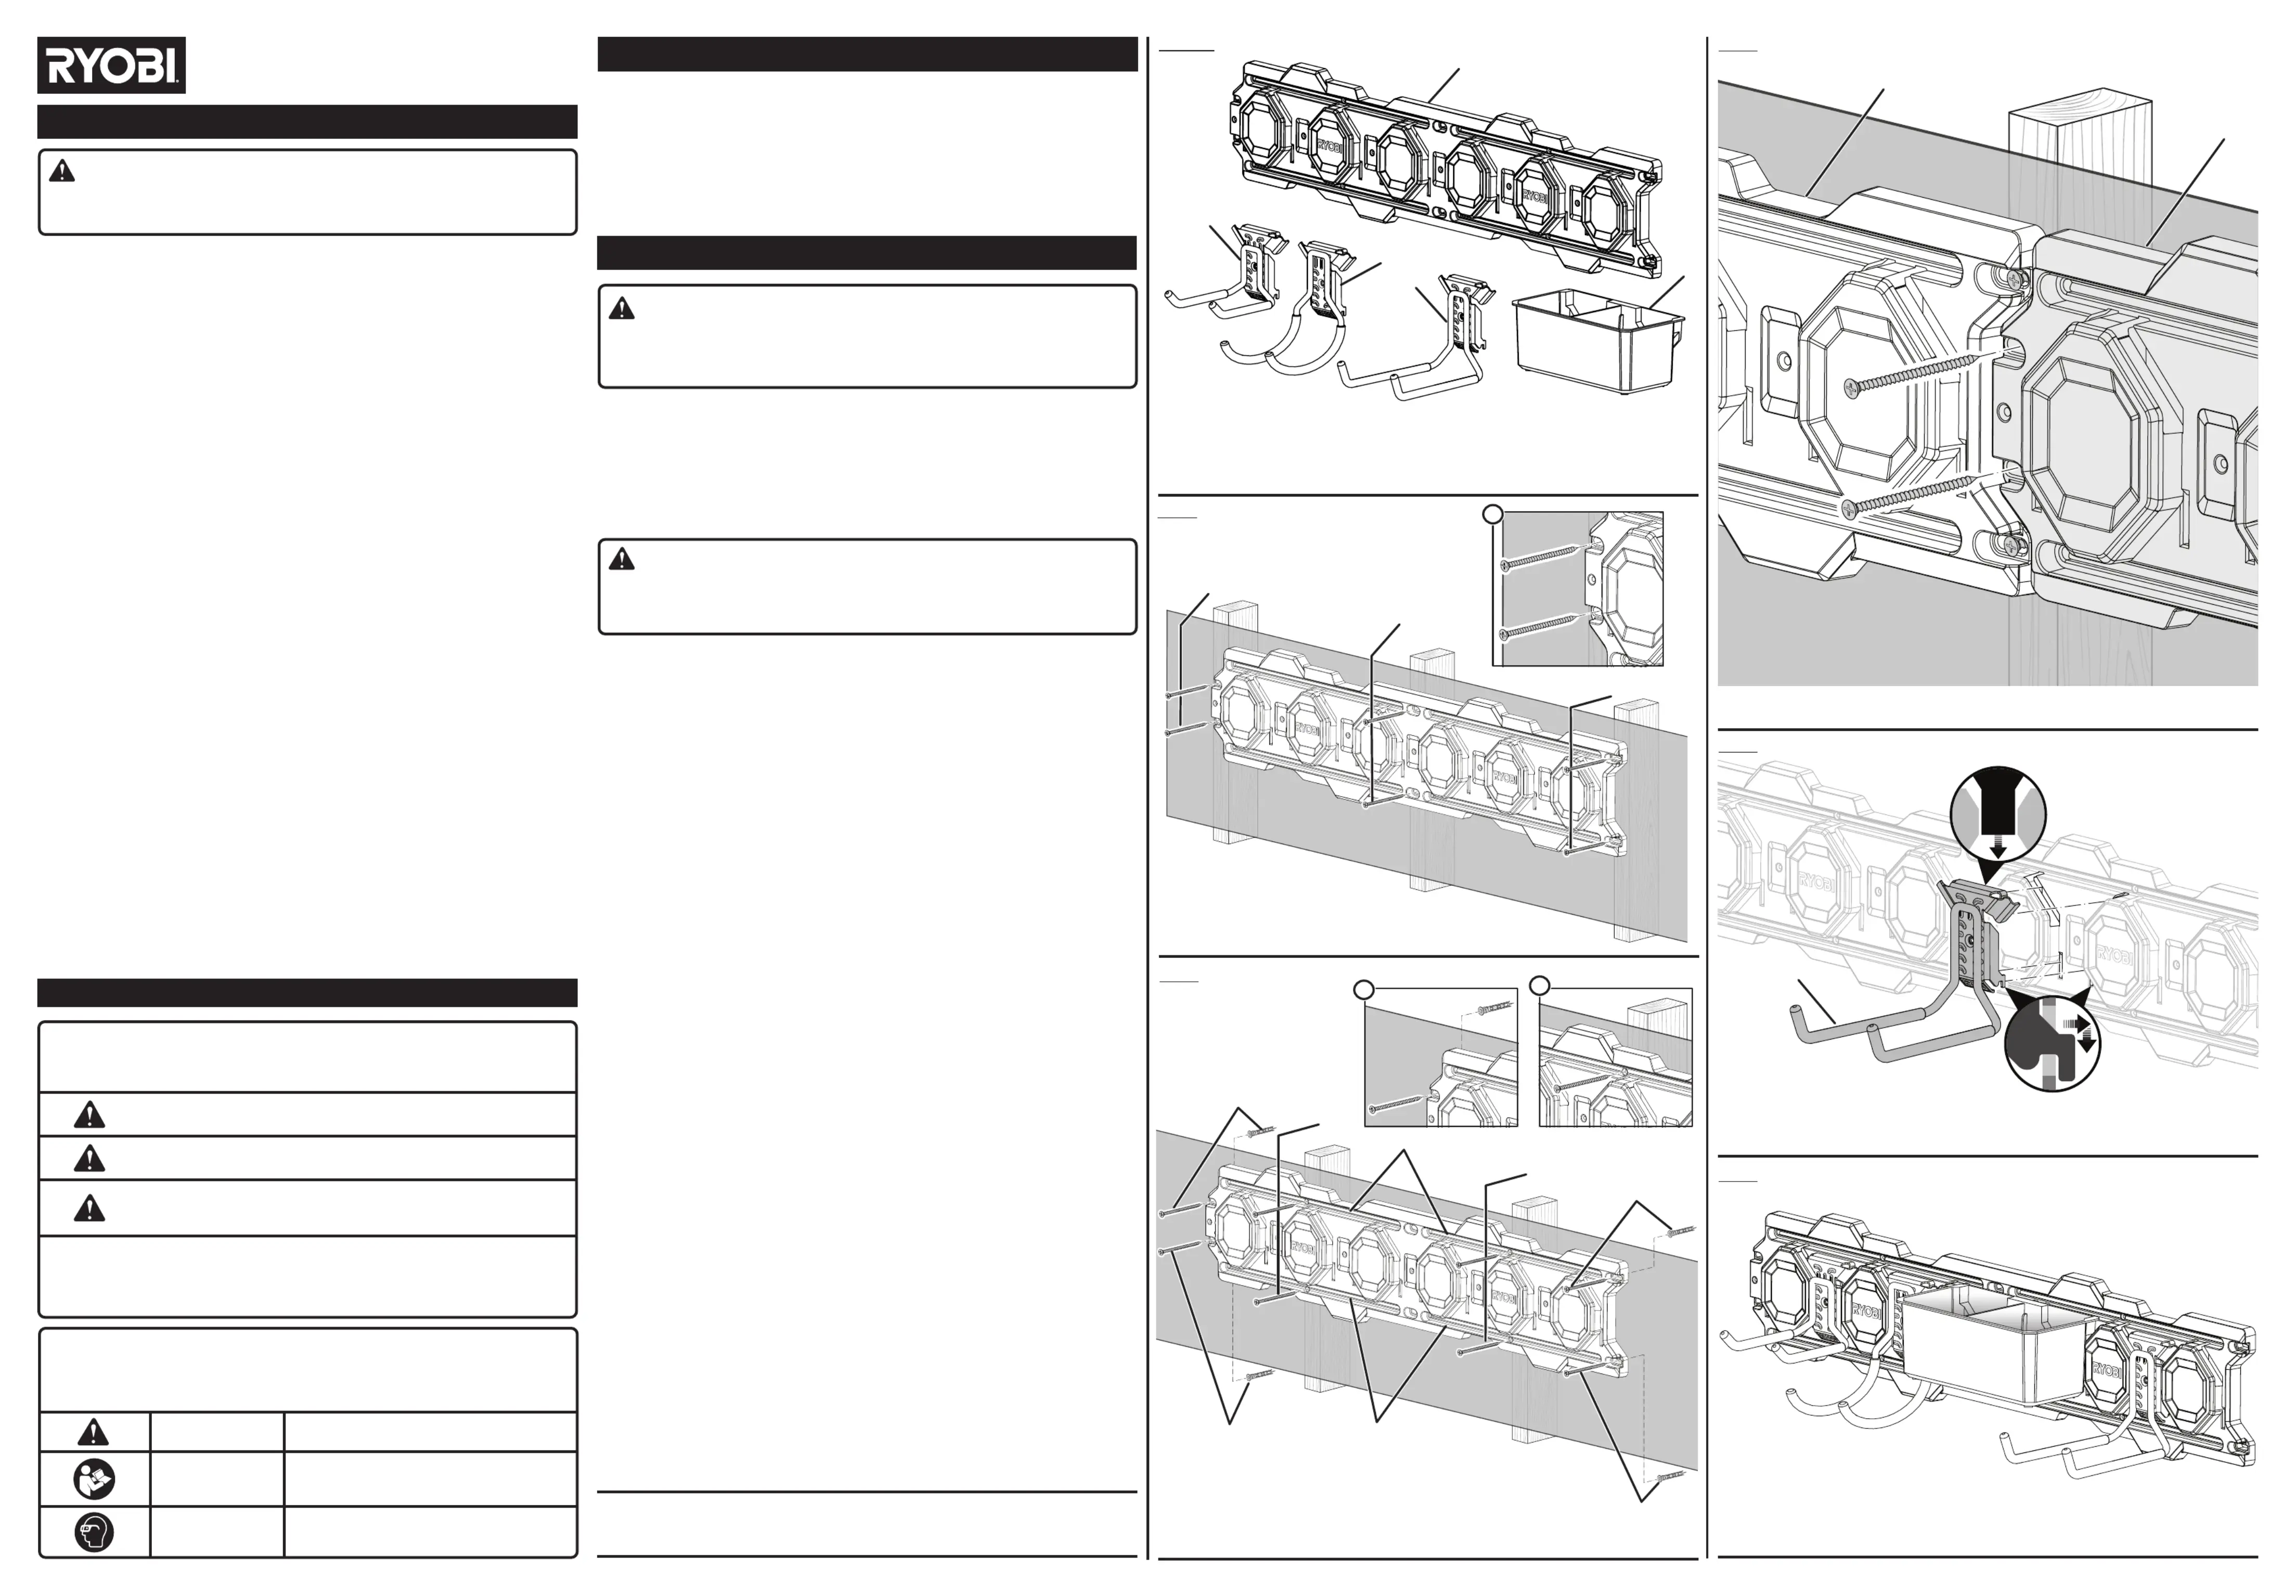
A - Wall rail (rail mural, riel de pared)
B- Powertool hook (crochet pour outils électriques, gancho para herramienta eléctrica)
C - Large powertool hook (grand crochet pour outils électriques, gancho para herramienta eléctrica grande)
D - Utility hook (crochet utilitaire, gancho de uso general)
E - Double organizer bin (bac d’organisation double, contenedor organizador doble)
A - Wall rail (rail mural, riel de pared)
A - Large powertool hook (grand crochet pour outils électriques, gancho para herramienta eléctrica grande)
STM504
Fig. 3
Fig. 4
Fig. 5
A
B
C
E
D
A
A
A
SAFETY RULES
WARNING:
Read all safety warnings and all instructions. Failure to follow the warnings and
instructions may result in electric shock, fire and/or serious injury.
READ ALL INSTRUCTIONS
Know your product. Read operator’s manual carefully. Learn its applications and
limitations, as well as the specific potential hazards related to this product. Following
this rule will reduce the risk of serious personal injury.
The maximum weight of all the items placed on each wall rail must not exceed
206 lbs.
Do not exceed the maximum weight capacity for the wall rails or accessories.
Secure the wall rail to the wall following the instructions in this operator’s manual.
Failure to properly secure each wall rail will reduce the wall rail’s maximum weight
capacity.
To reduce risk of injury, do not use accessories which are not specifically designed
and recommended by the manufacturer.
These are hanging wall rails. Do not use for any other purpose than supporting
tools or products.
Keep the area around the wall rails clean and well lit.Cluttered or dark areas invite
accidents.
Mount the wall rails in a dry, indoor place protected from wet conditions.
Keep wall rails dry, clean, and free from oil and grease.
Do not use the wall rail if it is damaged or broken. A damaged or broken wall rails
may not mount securely and/or it might not provide adequate support for the items
stored on it.
When servicing this product, use only identical replacement parts.Use of
unauthorized parts may create a risk of injury.
Mount the wall rails to sound structural supports. NEVER mount the wall rails to
drywall or plaster without the mounting fastener going into a structural support.
Failure to properly mount the wall rails could result in a falling hazard that can cause
death or serious personal injury.
Mount the wall rails on smooth and flat surfaces capable of bearing the weight
of wall rails and the items stored on it.
Use extra care when mounting the wall rails. Keep proper footing and balance
at all times.
Ensure the wall rails are securely mounted.Make sure they do not rock, slide, or
move before storing products or tools.
Always wear eye protection with side shields marked to comply with ANSI Z87.1
during installation. Following this rule will reduce the risk of serious personal injury.
Do not allow children or untrained individuals to use these wall rails.
Store idle power tools out of the reach of children
SAVE THESE INSTRUCTIONS.Refer to them frequently and use them to instruct
other users. If you loan someone this product, also loan these instructions.
The following signal words and meanings are intended to explain the levels of risk
associated with this product.
SYMBOLSIGNALMEANING
DANGER:
Indicates a hazardous situation, which, if not
avoided, will result in death or serious injury.
WARNING:
Indicates a hazardous situation, which, if not
avoided, could result in death or serious injury.
CAUTION:
Indicates a hazardous situation, that, if not
avoided, may result in minor or moderate
injury.
NOTICE:
(Without Safety Alert Symbol) Indicates infor-
mation considered important, but not related
to a potential injury (e.g. messages relating to
property damage).
SYMBOLS
Some of the following symbols may be used on this product. Please study them and
learn their meaning. Proper interpretation of these symbols will allow you to operate
the product better and safer.
SYMBOLNAMEDESIGNATION/EXPLANATION
Safety AlertIndicates a potential personal injury hazard.
Read Operator’s
Manual
To reduce the risk of injury, user must read
and understand operator’s manual before
using this product.
Eye Protection
Always wear eye protection with side
shields marked to comply with ANSI Z87.1.
OPERATOR’S MANUAL
STM503K - HANGING WALL RAILS
998000605
8-19-21 (REV:01)
INSTALLATION
ONE WORLD TECHNOLOGIES, INC.
P.O. Box 1288, Anderson, SC 29622
Phone 1-800-525-2579 • www.ryobitools.com
WARNING:
To reduce the risk of injury, do not attempt to use this product until you have read
thoroughly and understand completely this operator’s manual and the operator’s
manual for any power tools used.
PACKING LIST
Wall Rails (2), Powertool hook, Large Powertool Hook, Utility Hook (2), Double Organizer
Bin, Drywall Anchors (8), Screws (#10 x 2 in.) [16], and Operator’s Manual.
TOOLS NEEDED (NOT INCLUDED)
AC or DC Drill, Level, 1/8 in. and 11/32 in. Drill Bits, Pencil, Hammer, and Phillips Screwdriver
MOUNTING THE WALL RAILS
See Figures 1 - 3.
WARNING:
Only install screws into sound structural supports (such as studs) in areas where no
electrical wires, utility cables, pipes, or other obstructions are located. Failure to follow
these instructions can result in death, electrical shock, or other serious personal injury.
Locate three wooden studs behind your wall and mark them with a pencil.
Place the wall rail against the wall with the screw holes on the left side, middle and
right side of the wall rail over each stud.
Level the wall rail.
Mark the screw holes over each stud.
Remove the wall rail and, using an AC or DC drill, make 1/8 in. pilot holes through each
mark.
Place the wall rail back on the wall in the same location as before.
Secure the wall rail to the wall using the screws. Check installation by verifying that
the wall rail is level and secure to the wall.
Repeat steps to mount additional wall rails.
NOTE:If you are installing wall rails directly beside each other, it is recommended that
you align the wall rails as shown in figure 3 so that the holes on either end of the wall
rails are over studs.
To mount wall rails using two studs:
Locate two wooden studs behind your wall and mark them with a pencil.
Place the wall rail against the wall with the studs in between the left and right ends.
Mark the screw holes on the left and right ends of the wall rail.
Remove the wall rail and, using an AC or DC drill, make 11/32 in. pilot holes through
each mark.
Insert anchors in the pilot holes.
NOTE: Use your fingers to squeeze and press the anchor into the pilot hole. Tap the
head of the anchor lightly with a hammer until it is flush with the wall.
Place the wall rail back on the wall in the same location as before.
Secure the wall rail to the wall using the screws.
Place marks inside the wall rail’s upper channel over each stud.Then mark the lower
channel in approximately the same positions.
Using an AC or DC drill, make 1/8 in. pilot holes through each mark.
Secure the wall rail to the wall using the screws. Check installation by verifying that
the wall rail is level and secure to the wall.
Repeat steps to mount additional wall rails.
NOTE:If you are installing wall rails directly beside each other, it is recommended that
you align the wall rails as shown in figure 3 so that the holes on either end of the wall
rails are over studs.
ATTACHING/REMOVING ACCESSORIES
See Figures 4 - 5.
Mount the wall rails as described above.
Position the accessory between two of the raised octagonal patterns on the wall rail.
Insert the tabs on the accessory into the openings on the wall rail.
Push the accessory in and down to secure.
If desired, insert a screw through the center of the accessory for extra support.
To remove an accessory:
If applicable, remove the screw from the center of the accessory.
Slide the accessory up and away from the wall rail.
A - Channel (glissière, canal)
B - Screws over studs (vis au-dessus des montants, tornillos sobre montantes)
C - Screws and anchors (vis et ancrages, tornillos y tacos)
C
C
C
C
B
A
A
B
B
C
A
A
A
A - Screws over studs (vis au-dessus des montants, tornillos sobre montantes)
Fig. 2
Fig. 1
A
Specyfikacje produktu
| Marka: | RYOBI |
| Kategoria: | Niesklasyfikowane |
| Model: | STM503K |
Potrzebujesz pomocy?
Jeśli potrzebujesz pomocy z RYOBI STM503K, zadaj pytanie poniżej, a inni użytkownicy Ci odpowiedzą
Instrukcje Niesklasyfikowane RYOBI

4 Stycznia 2025
26 Grudnia 2024
8 Października 2024
8 Października 2024
8 Października 2024
8 Października 2024
8 Października 2024
8 Października 2024
8 Października 2024
8 Października 2024
Instrukcje Niesklasyfikowane
Najnowsze instrukcje dla Niesklasyfikowane
29 Stycznia 2025
29 Stycznia 2025
29 Stycznia 2025
29 Stycznia 2025
29 Stycznia 2025
29 Stycznia 2025
29 Stycznia 2025
29 Stycznia 2025
29 Stycznia 2025
29 Stycznia 2025