Instrukcja obsługi Scanstrut Flip Pro Plus SC-USB-F4
Scanstrut Niesklasyfikowane Flip Pro Plus SC-USB-F4
Przeczytaj poniżej 📖 instrukcję obsługi w języku polskim dla Scanstrut Flip Pro Plus SC-USB-F4 (9 stron) w kategorii Niesklasyfikowane. Ta instrukcja była pomocna dla 19 osób i została oceniona przez 5 użytkowników na średnio 4.9 gwiazdek
Strona 1/9
FLIP PRO PLUS - FAST CHARGE USB-A & USB-C SOCKET (SC-USB-F4)
(not illustrated)
SC-USB-F4-001 Deutsch Connector
SC-USB-F4-002 Flying Lead
17-011-2023 (Issue 1)
Installation Instructions
For further installation
and warranty information
please visit:
www.scanstrut.com
USA
+1 860 308 1416
usasales@scanstrut.com
UK & International
+44 (0)1392531280
sales@scanstrut.com
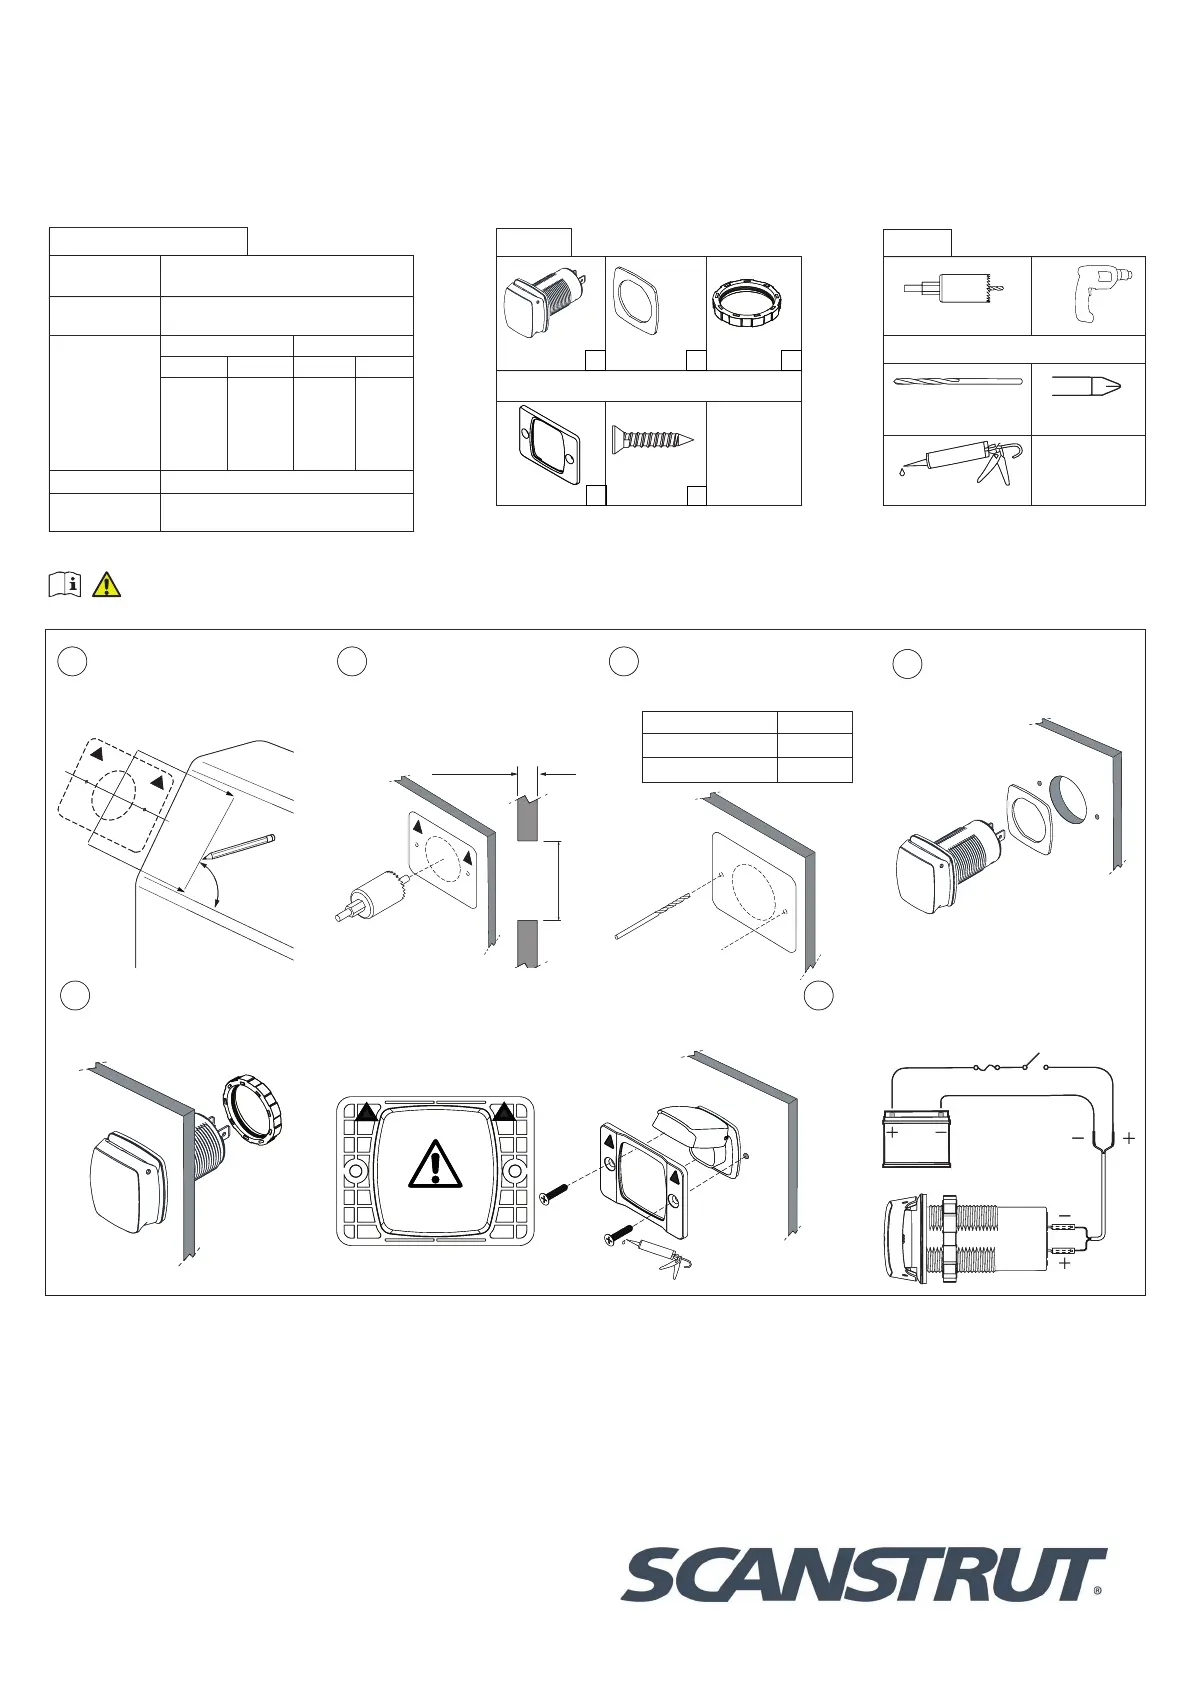
Feed barrel through the gasket and
hole.
Use drilling template to drill ø32mm
(1 1/4”) hole.
FRONT INSTALL ONLY
Draw a centre line to align template,
ensure line is square on surface and
correct orientation.
FRONT INSTALL ONLY
Drill 2 pilot holes for front t bezel.
Ø32mm
(1.25”)
3mm (0.11”) Min
25mm (1”) Max
90°
TOP
123
4
Pilot Hole Size
Material No. 6 Screw
Soft Material e.g Plywood2.5mm (3/32”)
Hard Material e.g Fiberglass3mm (1/8”)
Connect to 12/24V supply, ensuring a waterproof
connection. Fuse and select cable diameter according
to input voltage and current for your specic
installation.
TOP
6 5
FRONT INSTALL ONLY
Apply silicone seal on xings and pilot holes. Place the
front t bezel over charger and x bezel in place. Make
sure the bezel orientation is correct.
REAR INSTALL ONLY
Tighten lock ring onto product until
secure.
32mm (1 1/4”) Hole sawDrill
Front install only
Drill bit 2.5mm (3/32”) or
3mm (1/8”)Pozi Screwdriver
Silicone
Tool list:
USB chargerGasketLock ring
Front install only
Front t bezel
No.6x20mm
screws
Parts list:
x1x1
x1
x2
x1
For latest tech info visit: www.scanstrut.com/USB
READ IMPORTANT SAFETY INFORMATION BEFORE
INSTALLING.
Technical information:
Input voltage
12/24V system
10-32V DC
Input current
max
6A
Output type
(12V system) (24V system)
USB-A USB-CUSB-AUSB-C
5V⎓3A,
9V⎓3A,
12V⎓3A
MAX
5V⎓3A,
9V⎓3A,
12V⎓3A
MAX
5V⎓3A,
9V⎓3A,
12V⎓3A
MAX
5V⎓3A,
9V⎓3A,
12V⎓3A,
15V⎓3A,
20V⎓3A
MAX
Standby draw< 0.1W
Waterproof
rating
IPX4 front only lid closed
FLIP PRO PLUS - FAST CHARGE USB-A & USB-C SOCKET (SC-USB-F4)
(not illustrated)
SC-USB-F4-001 Deutsch Connector
SC-USB-F4-002 Flying Lead
17-011-2023 (Issue 1)
Installation Instructions
For further installation
and warranty information
please visit:
www.scanstrut.com
USA
+1 860 308 1416
usasales@scanstrut.com
UK & International
+44 (0)1392531280
sales@scanstrut.com
Feed barrel through the gasket and
hole.
Use drilling template to drill ø32mm
(1 1/4”) hole.
FRONT INSTALL ONLY
Draw a centre line to align template,
ensure line is square on surface and
correct orientation.
FRONT INSTALL ONLY
Drill 2 pilot holes for front t bezel.
Ø32mm
(1.25”)
3mm (0.11”) Min
25mm (1”) Max
90°
TOP
123
4
Pilot Hole Size
Material No. 6 Screw
Soft Material e.g Plywood2.5mm (3/32”)
Hard Material e.g Fiberglass3mm (1/8”)
Connect to 12/24V supply, ensuring a waterproof
connection. Fuse and select cable diameter according
to input voltage and current for your specic
installation.
TOP
6 5
FRONT INSTALL ONLY
Apply silicone seal on xings and pilot holes. Place the
front t bezel over charger and x bezel in place. Make
sure the bezel orientation is correct.
REAR INSTALL ONLY
Tighten lock ring onto product until
secure.
32mm (1 1/4”) Hole sawDrill
Front install only
Drill bit 2.5mm (3/32”) or
3mm (1/8”)Pozi Screwdriver
Silicone
Tool list:
USB chargerGasketLock ring
Front install only
Front t bezel
No.6x20mm
screws
Parts list:
x1x1
x1
x2
x1
For latest tech info visit: www.scanstrut.com/USB
READ IMPORTANT SAFETY INFORMATION BEFORE
INSTALLING.
Technical information:
Input voltage
12/24V system
10-32V DC
Input current
max
6A
Output type
(12V system) (24V system)
USB-A USB-CUSB-AUSB-C
5V⎓3A,
9V⎓3A,
12V⎓3A
MAX
5V⎓3A,
9V⎓3A,
12V⎓3A
MAX
5V⎓3A,
9V⎓3A,
12V⎓3A
MAX
5V⎓3A,
9V⎓3A,
12V⎓3A,
15V⎓3A,
20V⎓3A
MAX
Standby draw< 0.1W
Waterproof
rating
IPX4 front only lid closed
17-011-2023 (Issue 1)
FLIP PRO PLUS
-
FAST CHARGE USB-A
&
USB-C SOCKET (SC-USB-F4)
(not iustrate
Technical information:
I
Input voltage
Input current
max
Output type
M M M
Standby draw
Waterproof
rating
�
Installation Instructions
Specyfikacje produktu
| Marka: | Scanstrut |
| Kategoria: | Niesklasyfikowane |
| Model: | Flip Pro Plus SC-USB-F4 |
Potrzebujesz pomocy?
Jeśli potrzebujesz pomocy z Scanstrut Flip Pro Plus SC-USB-F4, zadaj pytanie poniżej, a inni użytkownicy Ci odpowiedzą
Instrukcje Niesklasyfikowane Scanstrut

28 Stycznia 2025
28 Stycznia 2025
28 Stycznia 2025
28 Stycznia 2025
28 Stycznia 2025
28 Stycznia 2025
28 Stycznia 2025
28 Stycznia 2025
28 Stycznia 2025
28 Stycznia 2025
Instrukcje Niesklasyfikowane
Najnowsze instrukcje dla Niesklasyfikowane
29 Stycznia 2025
29 Stycznia 2025
29 Stycznia 2025
29 Stycznia 2025
29 Stycznia 2025
29 Stycznia 2025
29 Stycznia 2025
29 Stycznia 2025
29 Stycznia 2025
29 Stycznia 2025