Instrukcja obsługi Silverline 857328
Silverline Nie skategoryzowane 857328
Przeczytaj poniżej 📖 instrukcję obsługi w języku polskim dla Silverline 857328 (3 stron) w kategorii Nie skategoryzowane. Ta instrukcja była pomocna dla 26 osób i została oceniona przez 5 użytkowników na średnio 4.3 gwiazdek
Strona 1/3
857328
EN
FR
DE
General Safety
IMPORTANT: Read these instructions in combination with the owner’s manuals of
both vehicles for jump starting information. Especially if the vehicle is tted with
start/stop engine technology.
IMPORTANT: Both vehicles must have the same voltage electrical system
(typically 12V) and have a negative earth.
•Always wear protective gloves and goggles when handling lead acid
batteries
• Be aware that lead-acid batteries emit ammable gases. Ensure there are
no heat sources, open ames or electrical sparks near to the battery. Do not
smoke. Ensure that batteries are well ventilated
•Do not attempt to jump start a vehicle with a battery that is leaking,
cracked, or otherwise damaged
•If battery acid contacts skin or clothing, wash thoroughly with soap and
water. If battery acid contacts eyes, wash thoroughly with clean water and seek
medical help
• Do not allow positive and negative lead clamps to touch. Short circuits can
create heat and re
•Do not allow the 2 vehicles to make contact
• Do not allow any metal items to come into contact with the battery terminals. Short
circuits can start res and cause explosions
•Always remove all metal jewellery before handling lead acid batteries
• Be aware that loose clothing / long hair etc could get caught in moving engine parts.
When using this product, tie up hair and secure loose clothing
•Only use these jump leads in dry conditions
•Do not attempt to jump start a vehicle with a frozen battery
•Unless the battery is of the ‘maintenance free’ type, always check that the electrolyte
level is correct before attempting to jump start
Jump Starting Instructions;
1. Ensure all vehicle accessory systems (headlights, radio etc) are switched off
2. Ensure the vehicle is in neutral and the parking brake is applied, or for automatic
cars ‘park’ mode is selected
!
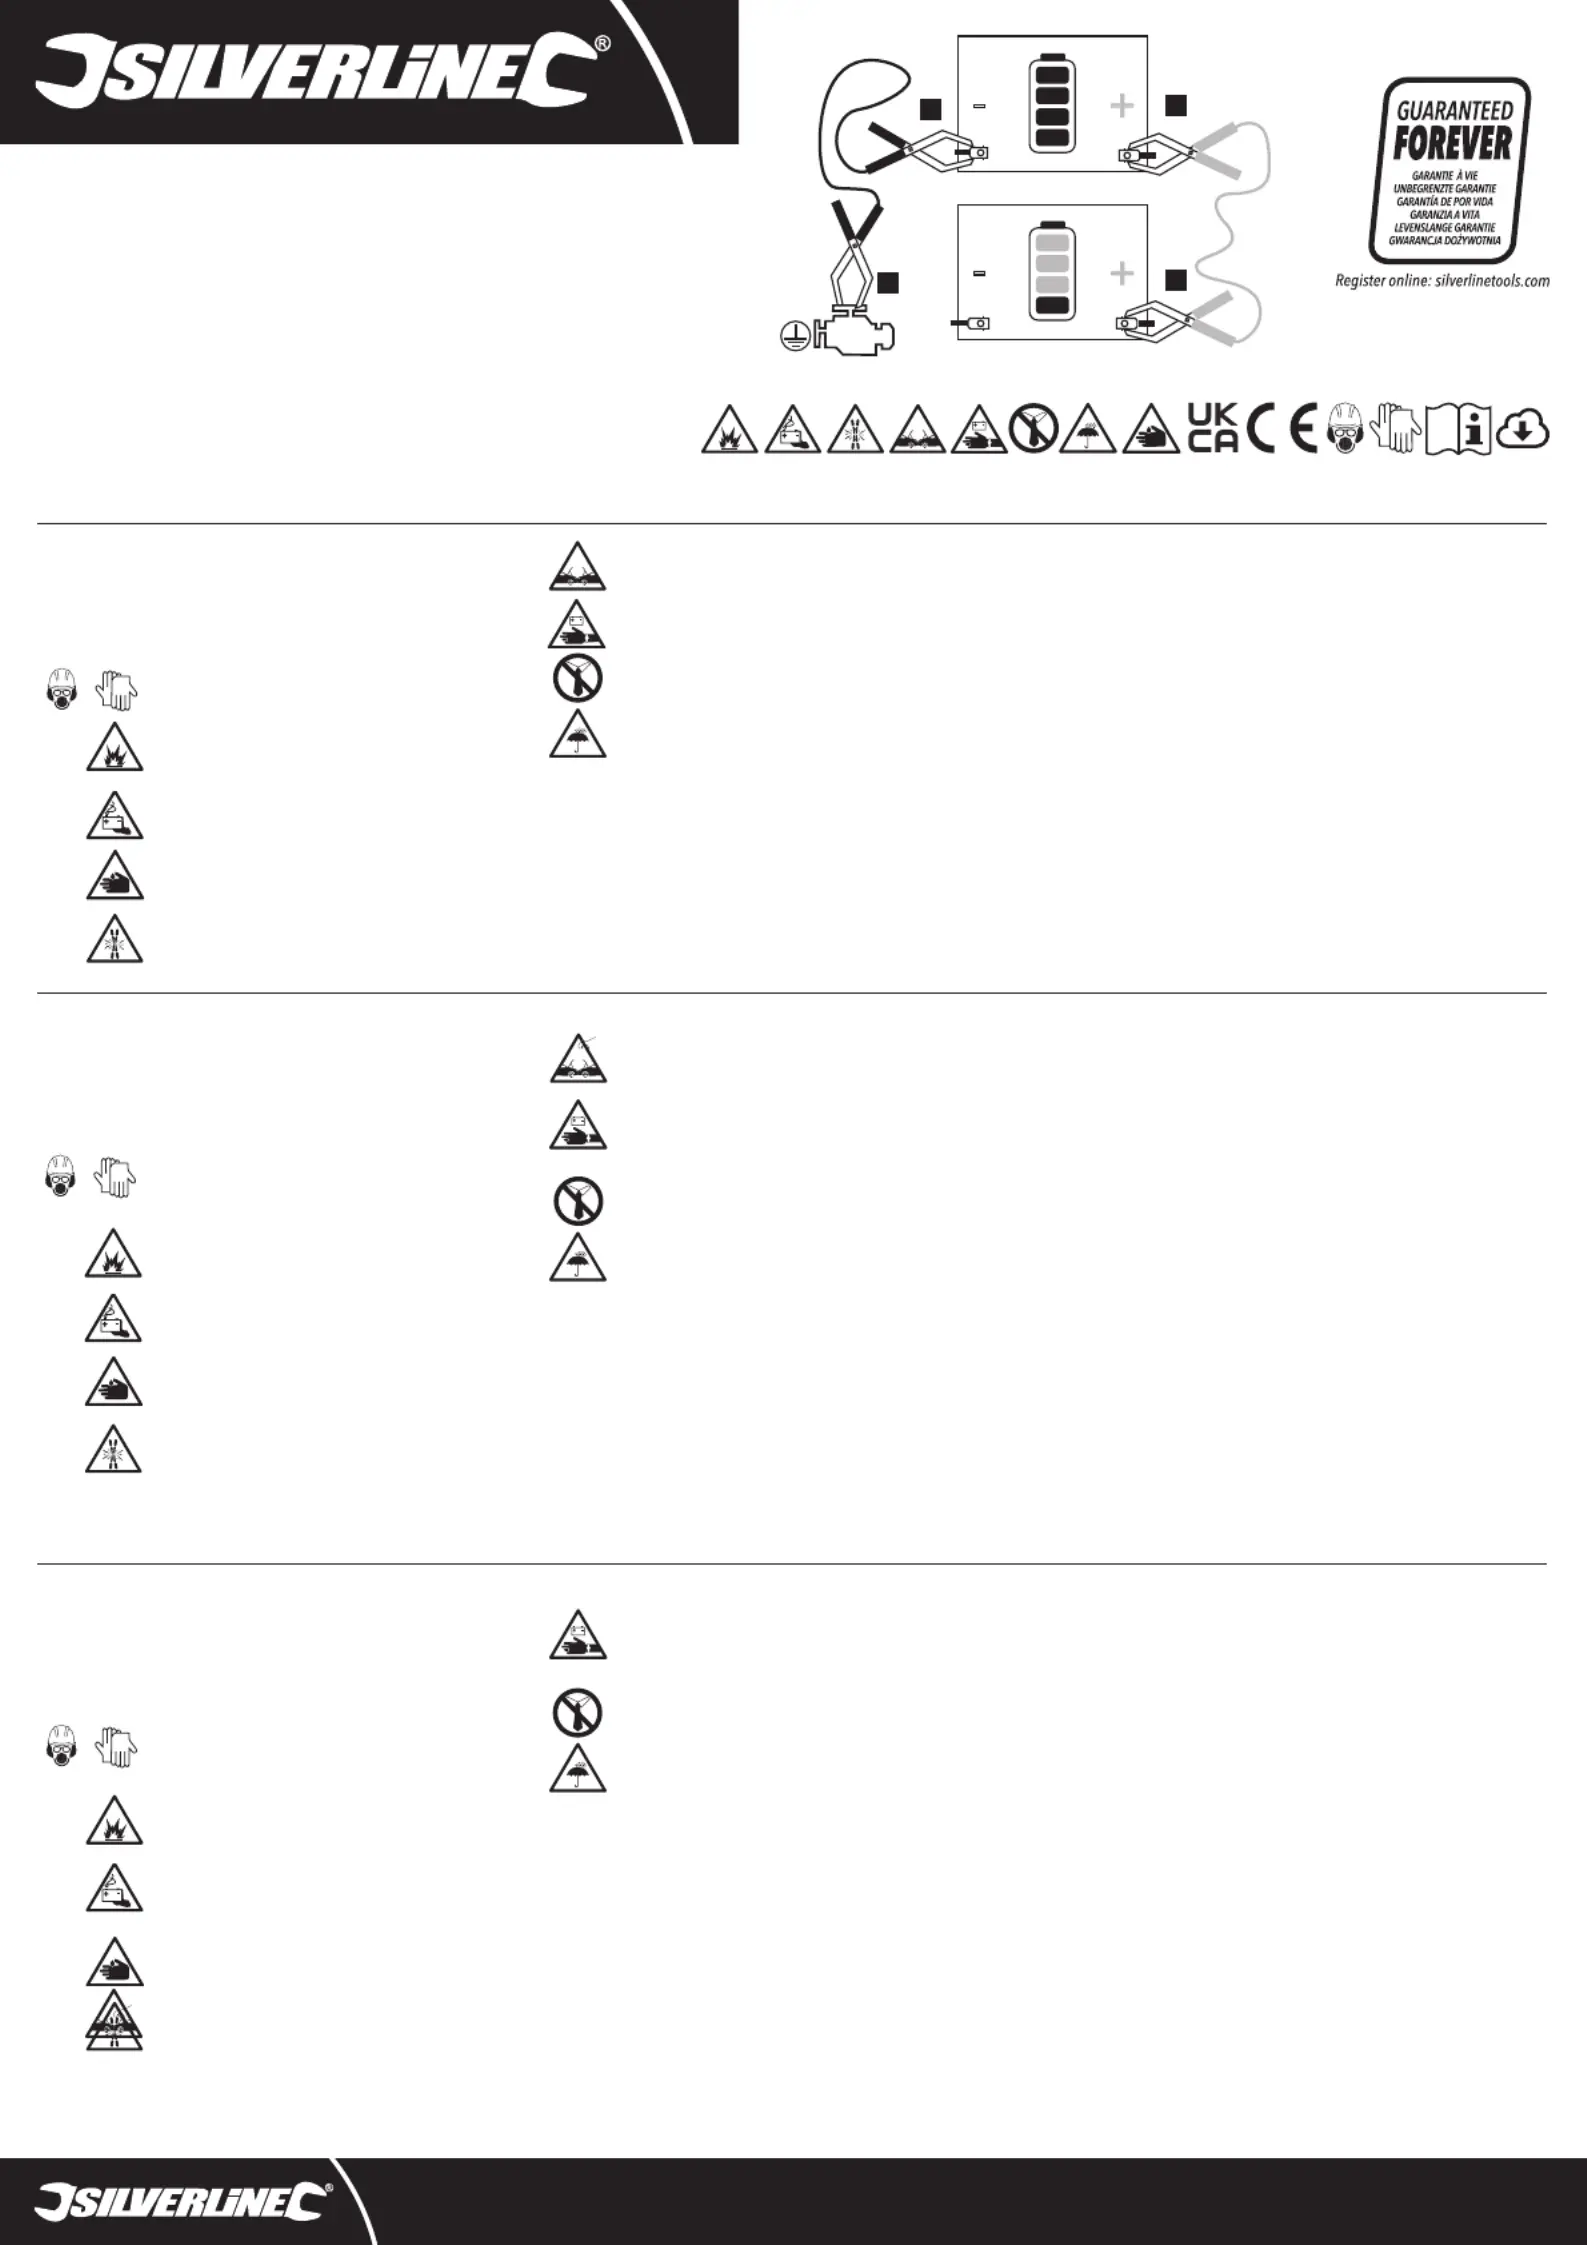
3. Connect a red cable clamp to the positive terminal of the booster battery (1). If the positive battery
terminal connector in the vehicle is corroded or dirty, clean it with a suitable wire brush to ensure good
contact with the jump lead clamp
4. Connect the other red clamp of the same cable to the positive terminal of the at battery (2).
Check the cable is secure and cannot short against any earthing point in the vehicle
5. Attach a negative clamp to the booster battery negative terminal (3).
6. Connect the other end of the same cable to an unpainted and unmoving part of the chassis or
engine block on the vehicle with the at battery (4) (not the negative terminal of the battery).
Ensure the earthing point is away from the battery and the fuel system
7. Check the clamps are securely attached and that they will not come loose when the vehicle is
started
8. Allow at least 3 minutes for the battery charge to stabilise between the batteries of the 2 vehicles
9. Start the engine of the vehicle with a good battery and let the engine run for at least 1 minute
10. Start the vehicle with the at battery
11. Stop the engine of the booster vehicle and detach the cables in reverse order of tting. Starting
with the negative clamp connected to an earthing point of the car with a at battery
Contact
For technical or repair service advice, please contact the helpline on (+44) 1935 382 222.
Web: www.silverlinetools.com
UK Address:Toolstream Ltd., Boundary Way, Lufton Trading Estate, Yeovil, Somerset, BA22 8HZ,
United Kingdom
EU Address:Toolstream B.V., Hogeweg 39, 5301 LJ Zaltbommel, The Netherlands
-
-
1
2
3
4
FRCâbles de démarrage, 200 A max.
DEStarthilfekabel, max. 200 A
ESCables de arranque para batería, 200 A
ITCavi di avviamento 200 A
NLStartkabels, max. 200 A
PLPrzewody rozruchowe maks 200 A
Jump Leads 200A max 2.2m
Sécurité Générale
IMPORTANT : Lisez ces consignes ainsi que celles relatives aux deux véhicules
pour lesquels ce câble de démarrage doit être utilisé. Cela est d’autant plus
important s’il s’agit d’un véhicule équipé d’un moteur doté du système
IMPORTANT : Les deux véhicules doivent disposer d’un système électrique de
même tension (généralement 12 V) et avec pôle négatif à la masse.
•Toujours porter des gants et des lunettes de protection lors de la
manipulation de batteries au plomb-acide.
•Gardez à l’esprit que des batteries au plomb-acide libèrent des gaz
inammables et explosifs.Veillez à ce qu’aucune source de chaleur, amme
nue ou étincelles électriques ne se trouvent à proximité de la batterie. Ne pas
fumer. Veillez à ce que les batteries soient bien ventilées en permanence.
•N’entreprenez jamais de faire démarrer un véhicule dont la batterie
présente fuites, ssures, ou tout autre signe de dommage.
•Si de l’acide de batterie entrait en contact avec la peau ou les vêtements,
rincez abondamment à l’eau et au savon. En cas de contact avec les yeux,
rincez abondamment à l’eau claire et consultez l’avis d’un médecin.
•Ne mettez jamais en contact les pinces crocodiles des câbles positif et
négatif.Tout court-circuit peut être à l’origine de la création de chaleur et donc
d’incendie.
• Ne laissez pas les 2 véhicules entrer en contact.
• Aucune pièce en métal ne doit être en contact avec les bornes de la batterie. Les
court-circuits peuvent provoquer des incendies ou des explosions.
• Pensez toujours à retirer vos bijoux en métal avant de manipuler des batteries au
plomb.
• Notez que des vêtements amples, des cheveux longs etc., peuvent être pris dans les
pièces du moteur lors de l’utilisation de ce produit.Attachez vos cheveux et ne laissez
aucun vêtement lâche.
• Ce câble de démarrage ne doit être utilisé que dans un environnement
complètement sec.
• N’entreprenez jamais de démarrer un véhicule dont la batterie est gelée.
•À moins que la batterie ne n’appartienne à un modèle ne nécessitant aucun
entretien, vériez toujours que le niveau d’électrolyte soit correct avant d’essayer de
démarrer un véhicule.
Instructions d’utilisation ;
1. Assurez-vous que tous les accessoires (phares, radio, etc.) soient éteints.
2. Veillez à ce que le véhicule soit au point mort et que le frein de stationnement soit
actionné, ou bien, pour les véhicules automatiques, que le mode « parking » soit
sélectionné.
!
3. Branchez la pince crocodile rouge à la borne positive de la batterie de secours (1). Si la borne
positive de la batterie est sale ou corrodée, nettoyez-la au-préalable à l’aide d’une brosse métallique
appropriée an de vous assurer que le contact avec la pince crocodile soit effectif.
4. Branchez l’autre pince crocodile du même câble rouge à la borne positive de la batterie déchargée
(2).Vériez que le câble soit bien en place et qu’il soit positionné de sorte à éviter d’occasionner tout
court-circuit au niveau d’un des points de mise à la terre du véhicule.
5. Raccordez l’une des pinces du câble de couleur noire à la borne négative de la batterie de secours
(3).
6. Raccordez l’autre pince crocodile du même câble à n’importe quelle partie du châssis ou du
bloc moteur du véhicule dont la batterie est déchargée (4) (choisissez une partie métallique
dépourvue de peinture et xe : en aucun cas le câble doit être connecté à la borne négative de la
batterie déchargée).Assurez-vous que le point de mise à la terre soit tenu à distance de la batterie et du
système de carburant.
7. Assurez-vous que toutes les pinces crocodiles soient bien xées et qu’elles ne risquent pas de se
débrancher une fois que le véhicule sera démarré.
8. Attendez au moins 3 minutes pour que la charge des batteries des deux véhicules se stabilise.
9. Démarrez le moteur du véhicule ayant une batterie en bon état et laissez le moteur tourner
pendant au moins une minute.
10. Démarrez à présent le moteur de la voiture avec la batterie à plat.
11. Vous pouvez alors arrêter le moteur du véhicule de secours et débrancher les câbles dans l’ordre
chronologique inverse par rapport à leur pose.Par conséquent, commencez par la pince crocodile
noire connectée à un point de mise à la terre du véhicule dont la batterie est déchargée.
Contact
Pour tout conseil technique ou réparation, veuillez nous contacter au (+44) 1935 382 222.
Site web : www.silverlinetools.com
Adresse (GB) :Toolstream Ltd., Boundary Way, Lufton Trading Estate, Yeovil, Somerset, BA22 8HZ,
Royaume-Uni.
Adresse (UE) :Toolstream B.V., Hogeweg 39, 5301 LJ Zaltbommel, Pays-Bas.
Generelle Sicherheit
ACHTUNG! Lesen Sie diese Anweisung zusammen mit den Abschnitten zur
Starthilfe in beiden Fahrzeughandbüchern. Dies gilt insbesondere bei mit
Stopp-Start-Technologie ausgerüsteten Fahrzeugen.
ACHTUNG! Beide Fahrzeuge müssen über das gleiche Bordnetz (i.d.R. 12 V)
verfügen und negative Masse haben.
•Tragen Sie beim Umgang mit Blei-Säure-Batterien stets
Schutzhandschuhe und eine Schutzbrille.
• Beachten Sie, dass Blei-Säure-Batterien entzündbare Gase abgeben.
Stellen Sie sicher, dass sich keine Wärmequellen, offene Flammen oder
elektrische Funken in der Nähe der Batterie benden. Nicht rauchen. Sorgen
Sie für ausreichende Belüftung der Batterie.
• Geben Sie Fahrzeugen, deren Batterie ausläuft oder zerbrochen bzw.
anderweitig beschädigt ist, keine Starthilfe.
• Falls Haut oder Kleidung mit Batteriesäure in Berührung kommen,
reinigen Sie sie gründlich mit Wasser und Seife.Falls Batteriesäure in
die Augen gelangt, waschen Sie sie gründlich mit sauberem Wasser aus und
suchen Sie ärztliche Hilfe auf.
• Achten Sie darauf, dass sich Plus- und Minusklemme nicht berühren.
Durch Kurzschlüsse können Hitze entstehen und Brände verursacht werden.
• Achten Sie darauf, dass sich die beiden Fahrzeuge nicht berühren.
!
•Achten Sie darauf, dass die Batterieklemmen nicht mit Metallgegenständen in
Berührung kommen. Kurzschlüsse können Brände und Explosionen auslösen.
•Legen Sie vor dem Umgang mit Blei-Säure-Batterien stets sämtlichen
Metallschmuck ab.
• Beachten Sie, dass sich weite Kleidung, offene Haare usw. in sich bewegenden
Motorteilen verfangen können.Binden Sie vor Gebrauch dieser Starthilfekabel lange
Haare zusammen und ziehen Sie ausreichend eng anliegende Kleidung an.
• Diese Starthilfekabel dürfen nur bei trockenen Bedingungen verwendet werden.
• Diese Starthilfekabel dürfen nicht für gefrorene Batterien verwendet werden.
• Prüfen Sie vor dem Überbrücken stets den Elektrolytstand, sofern es sich nicht um
eine wartungsfreie Batterie handelt.
Starthilfe-Anleitung;
1. Vergewissern Sie sich, dass alle Zubehöranlagen des Fahrzeugs (d.h. Scheinwerfer,
Radio usw.) abgeschaltet sind.
2. Stellen Sie die Schaltung auf Leerlauf und ziehen Sie die Handbremse an. Bringen
Sie Automatikgetriebe in Parkstellung.
3. Schließen Sie eines der roten Kabel mit der Klemme an den Pluspol der
Starthilfebatterie an (1).Falls die positive Anschlussklemme im Fahrzeug verschmutzt
oder korrodiert ist, säubern Sie sie mit einer entsprechend geeigneten Drahtbürste, damit
guter Kontakt zum Überbrückungskabel gewährleistet ist.
4. Schließen Sie das andere Ende dieses roten Kabels über die Klemme an den
Pluspol der entladenen Batterie an (2).Vergewissern Sie sich, dass das Kabel fest sitzt
und nicht mit einem Erdungspunkt im Fahrzeug einen Kurzschluss verursachen kann.
5. Schließen Sie eines der Minuskabel an den Minuspol der Starthilfebatterie an (3).
6. Schließen Sie das andere Ende dieses Minuskabels an eine unlackierte und bewegungslose
Stelle am Fahrwerk oder Motorblock des Fahrzeugs mit der entladenen Batterie (4) (nicht an
den Minuspol der Batterie) an.Achten Sie darauf, dass der Erdungspunkt von der Batterie und dem
Kraftstoffsystem entfernt ist.
7. Vergewissern Sie sich, dass die Klemmen fest sitzen und sich beim Anlassen des Fahrzeugs nicht
lösen können.
8. Warten Sie mindestens drei Minuten, damit sich der Batteriezustand zwischen den beiden
Fahrzeugbatterien stabilisieren kann.
9. Lassen Sie den Motor des Fahrzeugs mit der aufgeladenen Batterie an und lassen Sie den Motor
mindestens eine Minute laufen.
10. Lassen Sie dann den Motor des Fahrzeugs mit der entladenen Batterie an.
11. Schalten Sie den Motor des starthilfegebenden Fahrzeugs aus und nehmen Sie die Kabel in
umgekehrter Reihenfolge wieder ab.Beginnen Sie also mit dem Minuskabel am Erdungspunkt des
Fahrzeugs mit der entladenen Batterie.
Kontakt
Informationen zu Reparatur- und Kundendiensten erhalten Sie unter der Rufnummer (+44) 1935/382222.
Webseite: www.silverlinetools.com
GB-Postanschrift:Toolstream Ltd., Boundary Way, Lufton Trading Estate, Yeovil, Somerset, BA22 8HZ,
Großbritannien.
EU-Postanschrift:Toolstream B.V., Hogeweg 39, 5301 LJ Zaltbommel, Niederlande.
!
silverlinetools.com
Version date: 25.11.2024
Specyfikacje produktu
| Marka: | Silverline |
| Kategoria: | Nie skategoryzowane |
| Model: | 857328 |
Potrzebujesz pomocy?
Jeśli potrzebujesz pomocy z Silverline 857328, zadaj pytanie poniżej, a inni użytkownicy Ci odpowiedzą
Instrukcje Nie skategoryzowane Silverline

6 Lutego 2025
6 Lutego 2025
Instrukcje Nie skategoryzowane
Najnowsze instrukcje dla Nie skategoryzowane
9 Kwietnia 2025
9 Kwietnia 2025
9 Kwietnia 2025
9 Kwietnia 2025
9 Kwietnia 2025
9 Kwietnia 2025
9 Kwietnia 2025
9 Kwietnia 2025
9 Kwietnia 2025
9 Kwietnia 2025