Instrukcja obsługi Sony DAV-DZ650
Sony Dźwięk w wideo DAV-DZ650
Przeczytaj poniżej 📖 instrukcję obsługi w języku polskim dla Sony DAV-DZ650 (2 stron) w kategorii Dźwięk w wideo. Ta instrukcja była pomocna dla 23 osób i została oceniona przez 9 użytkowników na średnio 5.0 gwiazdek
Strona 1/2
DVD Home Theatre
System
4-461-526- (7)11
DAV-DZ350/DAV-DZ650/DAV-DZ950
Operating Instructions
©2013 Sony Corporation Printed in China
GB
WARNING
To reduce the risk of fire or electric shock, do
not expose this appliance to dripping or
splashing, and do not place objects filled with
liquids, such as vases, on the appliance.
To reduce the risk of fire, do not cover the
ventilation opening of the appliance with
newspapers, tablecloths, curtains, etc.
Do not expose the appliance to naked flame
sources (for example, lighted candles).
As the main plug is used to disconnect the
unit from the mains, connect the unit to an
easily accessible AC outlet. Should you notice
an abnormality in the unit, disconnect the
main plug from the AC outlet immediately.
Do not install the appliance in a confined
space, such as a bookcase or built-in cabinet.
Do not expose batteries or appliances with
battery-installed to excessive heat, such as
sunshine and fire.
The unit is not disconnected from the mains
as long as it is connected to the AC outlet,
even if the unit itself has been turned off.
CAUTION
The use of optical instruments with this
product will increase eye hazard.
For customers in India
Disposal of Old Electrical &
Electronic Equipment
(Applicable in the European
Union and other European
countries with separate
collection systems)
For customers in Singapore
For customers in UAE
This product is classified Class 1 Laser
product by IEC60825-1:2007 and IEC60825-
1:2014. This label is located on rear surface of
the product.
Trademarks
This system incorporates with Dolby* Digital
and Dolby Pro Logic adaptive matrix
surround decoders.
* Manufactured under license from Dolby
Laboratories.
Dolby, Pro Logic, and the double-D
symbol are trademarks of Dolby
Laboratories.
This system incorporates High-Definition
Multimedia Interface (HDMI™) technology.
The terms HDMI and HDMI High-
Definition Multimedia Interface, and the
HDMI Logo are trademarks or registered
trademarks of HDMI Licensing LLC in the
United States and other countries.
is a trademark of DVD Format/Logo
Licensing Corporation.
“PlayStation” and “PS3” are registered
trademarks of Sony Computer Entertainment
Inc.
“BRAVIA” is a trademark of Sony
Corporation.
MPEG Layer-3 audio coding technology and
patents licensed from Fraunhofer IIS and
Thomson.
Windows Media is either a registered
trademark or trademark of Microsoft
Corporation in the United States and/or other
234
7 8 96
12 13 1411
17 18 1916
countries. This product is protected by certain
intellectual property rights of Microsoft
Corporation. Use or distribution of such
technology outside of this product is
prohibited without a license from Microsoft
or an authorized Microsoft subsidiary.
ABOUT MPEG-4 VISUAL: THIS PRODUCT
IS LICENSED UNDER THE MPEG-4
VISUAL PATENT PORTFOLIO LICENSE
FOR THE PERSONAL AND
NONCOMMERCIAL USE OF A
CONSUMER FOR DECODING VIDEO IN
COMPLIANCE WITH THE MPEG-4
VISUAL STANDARD (“MPEG-4 VIDEO”)
THAT WAS ENCODED BY A CONSUMER
ENGAGED IN A PERSONAL AND
NONCOMMERCIAL ACTIVITY AND/OR
WAS OBTAINED FROM A VIDEO
PROVIDER LICENSED BY MPEG LA TO
PROVIDE MPEG-4 VIDEO.
NO LICENSE IS GRANTED OR SHALL BE
IMPLIED FOR ANY OTHER USE.
ADDITIONAL INFORMATION
INCLUDING THAT RELATING TO
PROMOTIONAL, INTERNAL AND
COMMERCIAL USES AND LICENSING
MAY BE OBTAINED FROM MPEG LA,
LLC. SEE http://www.mpegla.com/
The ® word mark and logos are Bluetooth
registered trademarks owned by Bluetooth
SIG, Inc. and any use of such marks by Sony
Corporation is under license. Other
trademarks and trade names are those of their
respective owners.
All other trademarks are trademarks of their
respective owners.
About these Operating
Instructions
“DVD” may be used as a general term for a
DVD VIDEO, DVD+RW/DVD+R, and
DVD-RW/DVD-R.
The system enters standby mode
automatically.
When the system is in pause, stop, open, or
no disc mode, the system will enter standby
mode automatically after 20 minutes.
Bluetooth wireless
technology
Bluetoothwireless technology is a short-range
wireless technology linking digital devices,
such as personal computers and digital
cameras. Using the wireless Bluetooth
technology, you can operate the units
involved within a range of about 10 meters.
The wireless technology is Bluetooth
commonly used between two devices, but a
single device can be connected to multiple
devices.
You do not need wires to get connected as you
do with a USB connection, and you do not
need to place the devices face to face as you
do with wireless infrared technology.
You can use the technology with one
Bluetoothdevice in your bag or pocket.
Bluetoothwireless technology is a global
standard supported by thousands of
companies. These companies produce
products that meet the global standard.
Supported version and Bluetooth
profiles
Profile refers to a standard set of capabilities
for various product capabilities. Bluetooth
This system supports the following Bluetooth
version and profiles.
Supported Bluetooth version:
BluetoothStandard version 2.1 + EDR
(Enhanced Data Rate)
Supported Bluetooth profiles:
A2DP (Advanced Audio Distribution Profile)
AVRCP (Audio Video Remote Control
Profile)
Note
For you to use the function, the Bluetooth
Bluetoothdevice to be connected must
support the same profile as this system.
Even if the device supports the same profile,
the functions may differ because of the
specifications of the device.Bluetooth
The audio playback on this system may be
delayed from that on the device Bluetooth
because of the characteristics of the
Bluetoothwireless technology.
Effective communication range
Bluetoothdevices should be used within
approximately 10 meters (unobstructed
distance) of each other. The effective
communication range may become shorter
under the following conditions.
When a person, metal object, wall or other
obstruction is between the devices with a
Bluetoothconnection
Locations where a wireless LAN is installed
Around microwave ovens that are in use
Locations where other electromagnetic
waves occur
Effects of other devices
Bluetoothdevices and wireless LAN (IEEE
802.11b/g) use the same frequency band (2.4
GHz). When using your device near Bluetooth
a device with wireless LAN capability,
electromagnetic interference may occur.
This could result in lower data transfer rates,
noise, or inability to connect. If this happens,
try the following remedies:
Try connecting this system and Bluetooth
mobile phone or device when you Bluetooth
are at least 10 meters away from the wireless
LAN equipment.
Turn off the power to the wireless LAN
equipment when using your Bluetooth
device within 10 meters.
Effects on other devices
The radio waves broadcast by this system may
interfere with the operation of some medical
devices. Since this interference may result in
malfunction, always turn off the power on
this system, Bluetooth mobile phone and
Bluetoothdevice in the following locations:
In hospitals, on trains, in airplanes, at gas
stations, and any place where flammable
gasses may be present
Near automatic doors or fire alarms
Note
This system supports security functions
that comply with the specification Bluetooth
as a means of ensuring security during
communication using technology. Bluetooth
However, this security may be insufficient
depending on the setting contents and other
factors, so always be careful when
performing communication using Bluetooth
technology.
Sony cannot be held liable in any way for
damages or other loss resulting from
information leaks during communication
using technology.Bluetooth
Bluetoothcommunication is not necessarily
guaranteed with all devices that Bluetooth
have the same profile as this system.
Bluetoothdevices connected with this
system must comply with the Bluetooth
specification prescribed by the Bluetooth
SIG, Inc., and must be certified to comply.
However, even when a device complies with
the Bluetooth specification, there may be
cases where the characteristics or
specifications of the device make Bluetooth
it impossible to connect, or may result in
different control methods, display or
operation.
Noise may occur or the audio may cut off
depending on the device Bluetooth
connected with this system, the
communications environment, or
surrounding conditions.
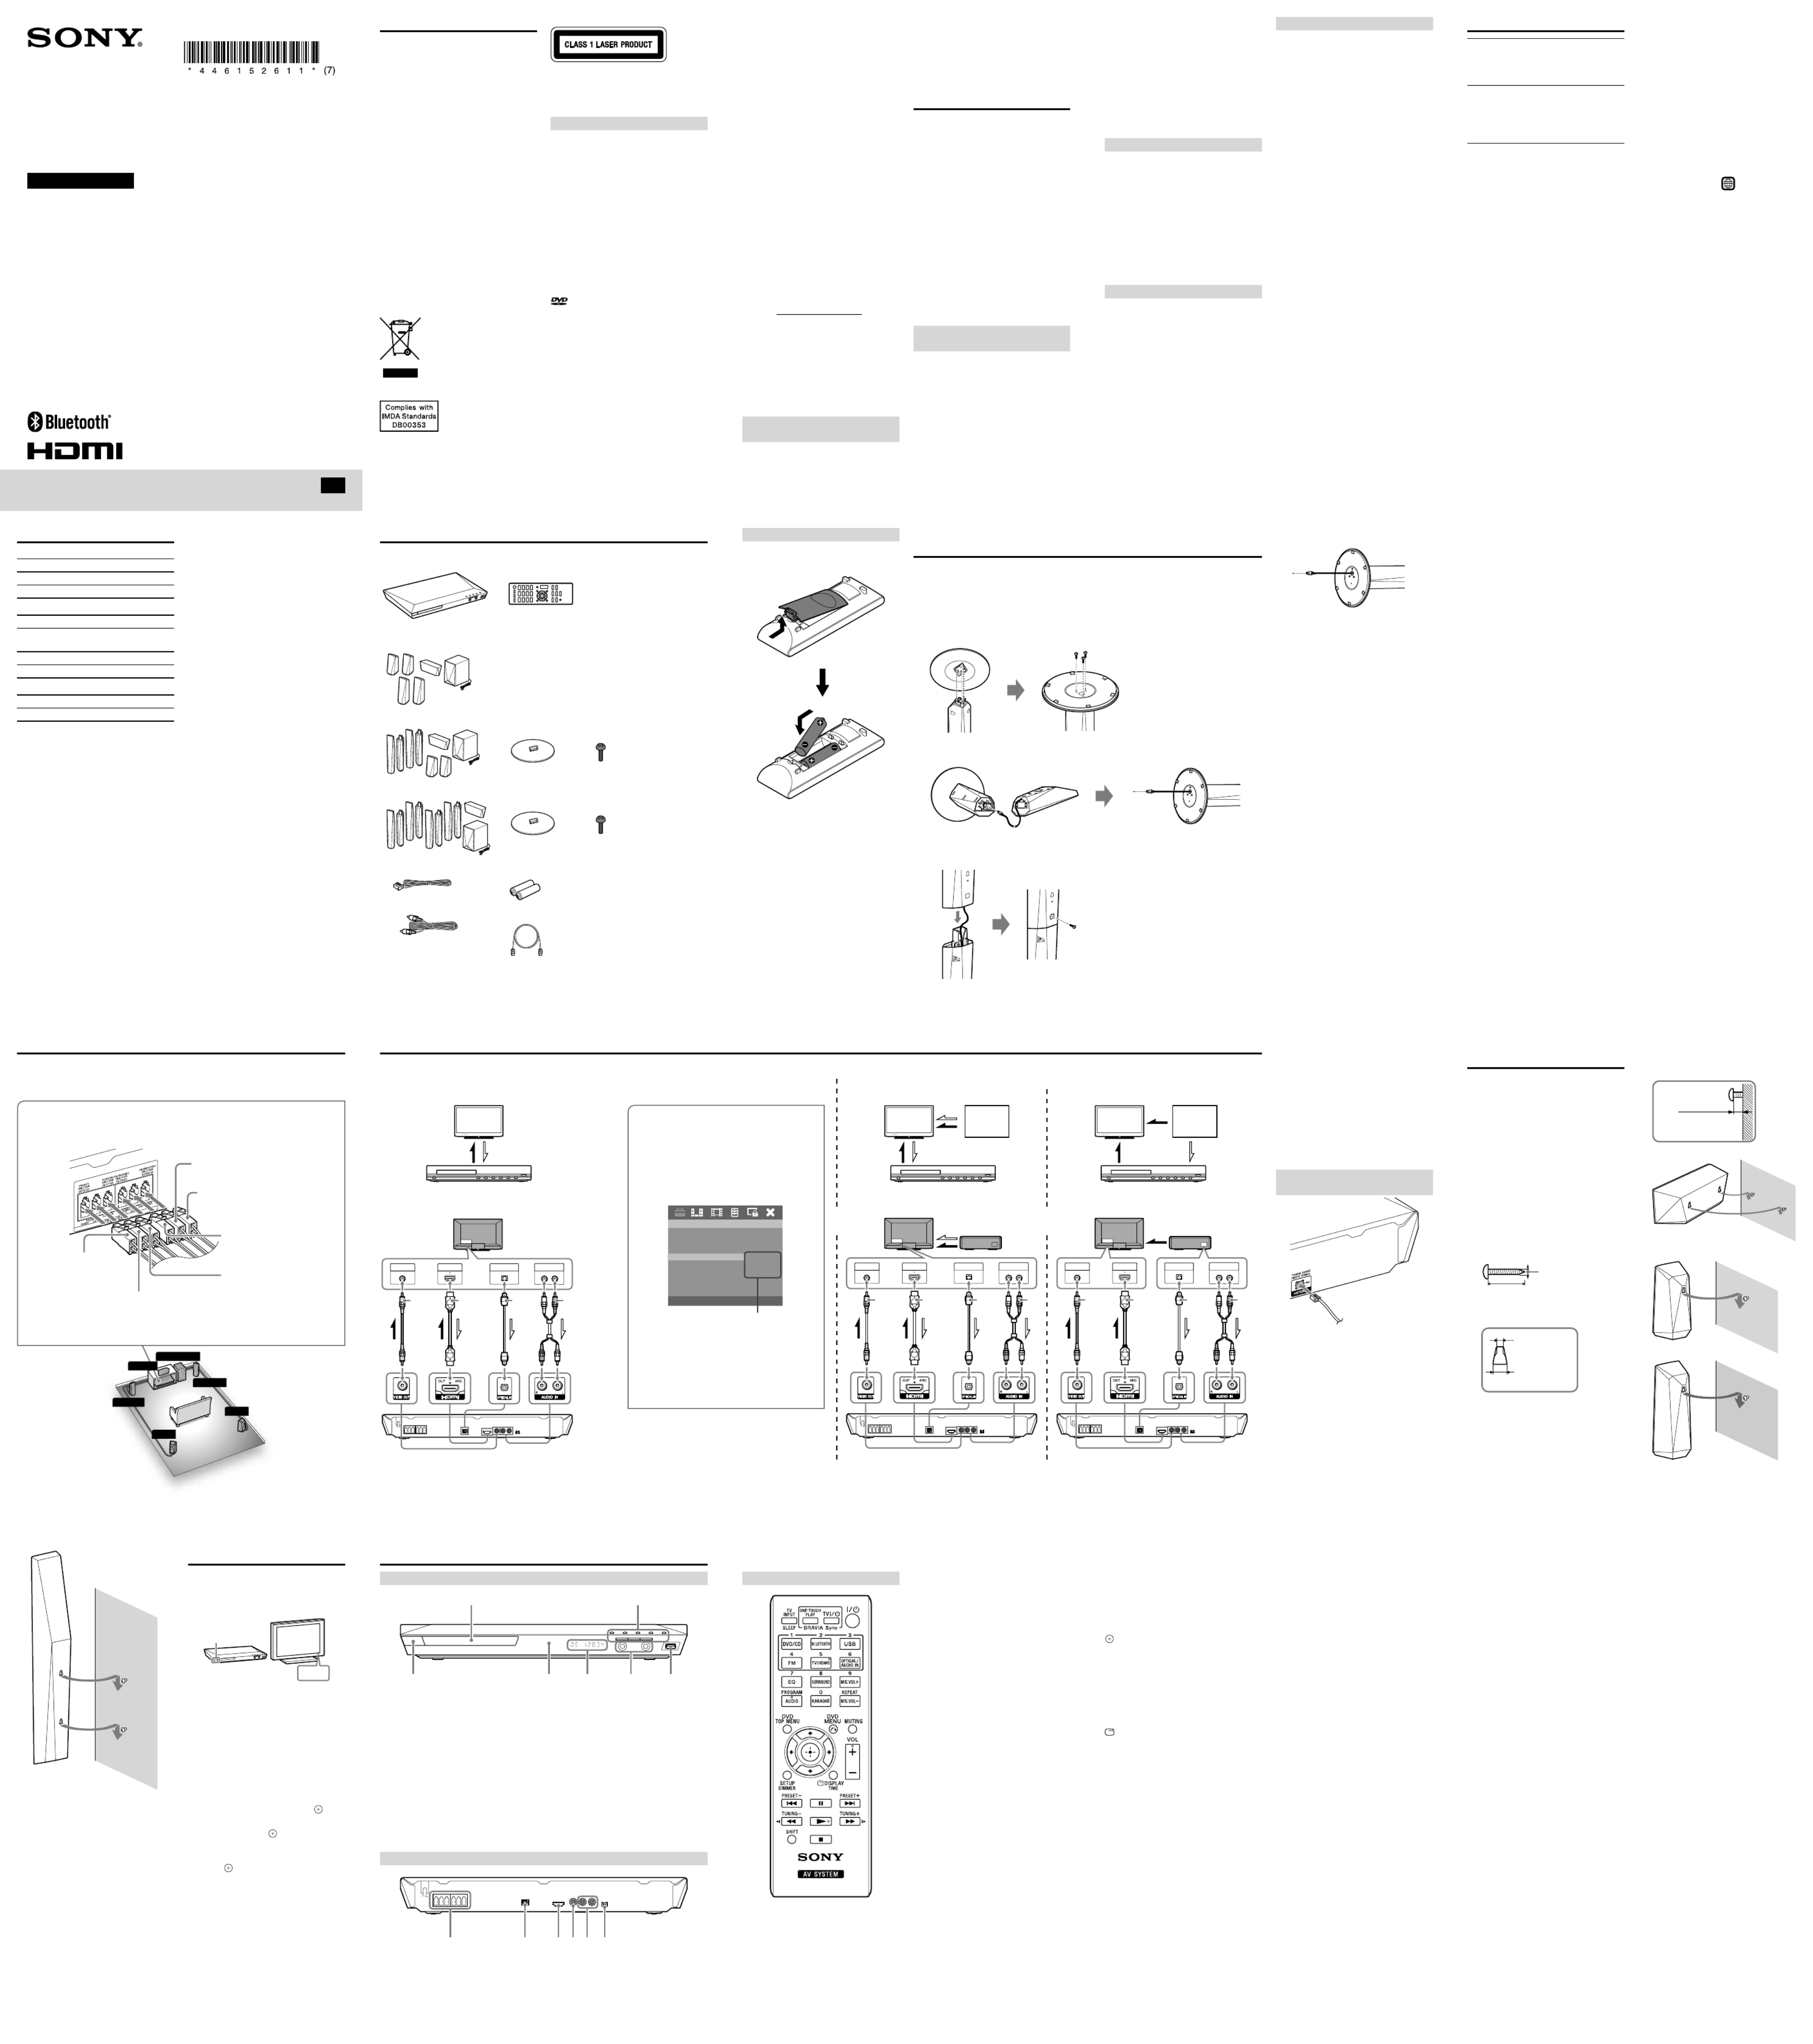
Checking the supplied items
Remote commander
(remote) (1)
Main unit (1)
Speaker packages
DAV-DZ350
Operating Instructions
(this manual)
FM wire antenna (aerial) (1)
R6 (size AA) batteries (2)
Video cord* (1)
High Speed HDMI cable* (1)
DAV-DZ650
Speaker assembly parts for the tall speakers
For DAV-DZ650
(8)(2)
DAV-DZ950
Speaker assembly parts for the tall speakers
For DAV-DZ950
(16)(4)
* High Speed HDMI cable and video cord are included only in certain areas.
Depending on the jacks on your TV or set-top box, select the video and audio connection method.
VIDEO INHDMI IN
OPTICAL OUT
AUDIO OUT
L R
AUDIO OUT
L R
VIDEO INHDMI IN
OPTICAL OUT
When connecting a TV and set-top box/PlayStation®3
Connecting a video cord and an audio cord
Select *1 or *2 for the video connection based on the jacks on the TV.
Select *3 or *4 for the audio connection based on the jacks on the TV.
When connecting to a TV only
The TV has OPTICAL OUT or AUDIO OUT jacks:
*1 *2*3
Video Audio
*2 *3
AUDIO OUT
L R
VIDEO INHDMI IN
OPTICAL OUT
The TV does not have OPTICAL OUT and AUDIO OUT
jacks:
*1 *2*3
Set-top box/
PS3™
Video
Video
Video
Audio
The TV has OPTICAL OUT or AUDIO OUT jacks:
*1
Video AudioAudio
Set-top box/
PS3™
*4
When connecting the ARC (Audio Return
Channel) compatible TV
Making an HDMI cable connection enables this
system to output TV sound when the TV is
compatible with the ARC function.*5
Select [TV (HDMI)] manually from [TV Audio] in
[General Setup Page]. For details, see “Using the
Setup Display”.
General Setup Page
TV Display
OSD Lang
Control for HDMI
16:9
ENG
On
TV (HDMI)
AUDIO IN
HDMI Audio
Screen Saver
Last Memory
Off
TV AudioHDMI
On
On
Auto StandbyOn
-- --
OPTICAL IN
Options
Note
To output the TV sound via the connected optical
cable, select [OPTICAL IN] from [TV Audio] in
[General Setup Page].
To output the TV sound via the connected analog
cable, select [AUDIO IN] from [TV Audio] in
[General Setup Page].
Video
Audio
*4 *4
*5 *5
Connecting the Speakers
Caution
Do not use any speakers other than those supplied with this system.
Insert the speaker cords to match the color of the SPEAKERS terminals of the unit.
SUBWOOFER
SUR L
SUR R
FRONT R
CENTER
FRONT L
Main unit
Rear panel of the main unit
SURROUND RIGHT
SPEAKER (GRAY)
SURROUND LEFT
SPEAKER (BLUE)
SUBWOOFER
(PURPLE)
CENTER SPEAKER
(GREEN)
FRONT LEFT SPEAKER
(WHITE)
FRONT RIGHT
SPEAKER (RED)
/ (on/standby)
Turns on the unit, or sets it to standby
mode.
Remote sensor
Front panel display
MIC 1/MIC2 jacks
(USB) port
Used for connecting a USB device.
Disc tray
Play operation buttons
(open/close)
Opens or closes the disc tray.
(play)
Starts or re-starts playback (resume play).
(stop)
Stops playback and remembers the stop
point (resume point).
The resume point for a title/track is the
last point you played.
VOL –/+
Adjusts the system’s volume.
FUNCTION
Selects the playback source.
/ (previous/next)
Unpacking
Connecting your TV
Parts and Controls
Front panel
SPEAKERS terminals
OPTICAL IN jack
HDMI OUT jack
VIDEO OUT jack
AUDIO IN jacks
FM ANTENNA jack
Rear panel
When Installing the
Speakers on a Wall
Caution
Contact a screw shop or installer for
information regarding the wall material or
screws to be used.
Use screws that are suitable for the wall
material and strength. As a plaster board
wall is especially fragile, attach the screws
securely to a beam. Install the speakers on a
vertical and flat wall where reinforcement is
applied.
Sony is not responsible for accidents or
damage caused by improper installation,
insufficient wall strength or improper screw
installation, natural calamity, etc.
1 Prepare screws (not supplied) that are
suitable for the hole on the back of
each speaker. See the illustrations
below.
5 mm
10 mm
4 mm
30 mm
Hole on the back of the speaker
2 Fasten the screws to the wall, then
hang the speaker on the wall.
Depth of fastened screw
3 to 5 mm
For the center speaker
For the small speakers
BRAVIA Sync
ONE-TOUCH PLAY
Activates One-Touch Play.
TV I/ (on/standby)*
Turns on the TV or sets it to standby mode.
/ (on/standby)
Turns on the system or sets it to standby
mode.
Function selection buttons
Select the playback source.
DVD/CD
BLUETOOTH
USB
FM
TV (HDMI)
OPTICAL/AUDIO IN
Switches the sound source between
OPTICAL IN and AUDIO IN.
EQ
Selects equalizer mode.
SURROUND
Selects surround audio output mode.
MIC VOL +
Increases the microphone volume.
AUDIO
Selects the audio format/track and FM mode.
KARAOKE
Opens or closes the Karaoke Setup menu.
MIC VOL –
Decreases the microphone volume.
Number buttons
Enter the title/chapter numbers, preset radio
stations, etc.
PROGRAM
Activates program play and presets radio
stations.
REPEAT
Activates repeat/shuffle playback mode.
DVD TOP MENU
Opens the DVD’s Top Menu.
DVD MENU
Opens or closes the DVD’s menu.
MUTING
Turns off the sound temporarily.
///
Moves the highlight to a displayed item.
(ENTER)
Enters the selected item.
VOL +/–
Adjusts the volume.
SETUP
Opens or closes the setup menu.
DIMMER
Switches the brightness of the front panel
display between DIM OFF and DIM ON.
DISPLAY
Opens or closes the Display Menu.
TIME
Switches time information during playback.
Playback operation buttons
/ (previous/next)
/ (fast reverse/fast forward)
/ (slow)
Activates slow reverse/slow forward when
/ is pressed in pause mode.
(pause)
(play)
(stop)
Radio operation buttons
PRESET +/–
TUNING +/–
* Works with Sony TVs only. Depending on
your TV, you may not be able to use some
of the buttons.
*1Supplied only in certain areas. This is the
basic connection via video cord (yellow).
*2Supplied only in certain areas. Picture
quality will be improved compared to a
video cord.
*3Sold separately. Sound quality will
improved compared to audio cord.
*4Sold separately. To listen to TV audio via
the system, connect with an audio cord
(red and white).
*5Available only when your TV is compatible
with the ARC function.
Connecting the FM wire antenna
(aerial)
Note
Find a location and an orientation that
provide good reception, and then set up the
antenna.
Set up the antenna away from the AC power
cord (mains lead), other cables, and metal
objects such as windows.
5
Assembling the tall-type speakers (DAV-DZ650/DAV-DZ950
only)
Spread a cloth on the floor to avoid damaging the floor when you assemble the speakers.
Note
The upper part of the front speakers can be directly wall mounted (the lower parts are not used). In
this case, the below assembly is not required.
1 Place the base () on the lower part of the speaker (), and secure it with three screws
( ).
Be sure use three screws for each speaker.
2 Thread the speaker cord of the upper part of the speaker () into the top of the lower
part of the speaker (), then pull the speaker cord from below the base ().
3 Place the upper part of the speaker () onto the lower part of the speaker () while
gently pulling the speaker cord from below the base. Then secure the upper and lower
parts of the speaker with a screw ().
Preparing the remote control
Insert two R6 (size AA) batteries by matching
the and ends on the batteries to the
markings inside the compartment.
10
15
20
Continued
Color System Setup
1 Connect the AC power cord (mains
lead).
2 Turn on the power of the main unit
and TV.
/
/
3 Press FUNCTION repeatedly or DVD/
CD to switch the function to DVD/CD.
Playback starts automatically if a disc
with an auto playback function is loaded.
Press twice to stop playback.
4 Switch the input selector on your TV
to display “Home Theatre System.”
5 Press SETUP in stop mode.
The Setup Menu appears.
6 Press / repeatedly to select
[Preference Page], then press .
7 Press / repeatedly to select [TV
Type], then press .
8 Press / repeatedly to select [PAL]
or [NTSC] from the displayed list, then
press .
9 Press SETUP to turn off the Setup
Menu.
Note
The display on the TV screen may be
interrupted momentarily after changing the
color system as described above.
4 Remove any slack of the speaker cord in the speaker by gently pulling it from below the
base ().
Playable Discs
DVD DVD-VIDEO
DVD-ROM
DVD-R/DVD-RW
DVD+R/DVD+RW
CD
CD-DA (Music CD)
CD-ROM
CD-R/CD-RW
VIDEO CD
Super VCD
A CD or DVD will not play if it has not been
correctly finalized. For more information,
refer to the operating instructions supplied
with the recording device.
Discs that cannot be played
Blu-ray Discs
HD DVDs
DVD-RAMs
DVD Audio discs
PHOTO CDs
Super Audio CDs
Data track of CD-Extras
Audio material side on DualDiscs
DVD-R/DVD-RW/DVD+R/DVD+RW in
VR (Video Recording) mode
CPRM (Content Protection for Recordable
Media)-compatible DVD-R/RW containing
content flagged as “Copy once.”
Notes on discs
This product is designed to playback discs
that conform to the Compact Disc (CD)
standard. DualDiscs and some music discs
encoded with copyright protection
technologies do not conform to the Compact
Disc (CD) standard. Therefore, these discs
may not be compatible with this product.
Note on playback operations of a DVD
Some playback operations of a DVD may be
intentionally restricted by software producers.
Since this system plays a DVD according to
the disc contents the software producers
designed, some playback features may not be
available.
Note about double-layer DVDs
The playback picture and sound may be
momentarily interrupted when the layers
switch.
Region code (DVD VIDEO only)
Your system has a region code printed on the
rear of the unit and will only play a DVD
VIDEO (playback only) labeled with an
identical region code or ALL .
Note about Multi Session CD
You can play only the first session of a
multisession disc.
Playable Types of Files
Video
File formatExtensions
MPEG4 Video1) “.mp4,” “.m4v”
Xvid Video“.avi”
Music
File formatExtensions
MP3 (MPEG1 Audio
Layer 3)2)
“.mp3”
WMA3) “.wma”
AAC 4) “.m4a”
Photo
File formatExtensions
JPEG“.jpg,” “.jpeg,” “.jpe”
1) AVC is not compatible.
2) MP3PRO format is not compatible.
3) WMA DRM,WMA Lossless or WMA
PRO format are not compatible.
4) AAC DRM and AAC Lossless formats are
not supported.
Note
Some files may not play depending on the
format, the encoding, or recording
condition.
Some USB devices may not work with this
system.
The system supports ISO 9660 Level 1/
Level 2, or Joliet in DATA CD.
The system supports UDF (Universal Disk
Format) in DATA DVD.
The system supports FAT12, FAT16, and
FAT32 in USB device.
The system can recognize the following files
or folders in DATA DVD, DATA CD and
USB device:
ˋup to 300 folders
ˋup to 648 files
It may take time to read files in the
following cases:
ˋthere are many folders or files.
ˋthe memory capacity of the USB device
that you are using is very large.
ˋthe memory of the USB device that you
are using is fragmented.
Remote control
SHIFT
Press and hold this button to use buttons with
purple text labels.
TV INPUT*
Switches the TV’s input source between the
TV signal and other input sources.
SLEEP
Sets the sleep timer.
Specyfikacje produktu
| Marka: | Sony |
| Kategoria: | Dźwięk w wideo |
| Model: | DAV-DZ650 |
Potrzebujesz pomocy?
Jeśli potrzebujesz pomocy z Sony DAV-DZ650, zadaj pytanie poniżej, a inni użytkownicy Ci odpowiedzą
Instrukcje Dźwięk w wideo Sony

14 Stycznia 2025
12 Stycznia 2025
11 Października 2024
5 Października 2024
9 Sierpnia 2024
9 Sierpnia 2024
9 Sierpnia 2024
8 Sierpnia 2024
8 Sierpnia 2024
8 Sierpnia 2024
Inne instrukcje Sony
9 Kwietnia 2025
5 Kwietnia 2025
5 Kwietnia 2025
5 Kwietnia 2025
5 Kwietnia 2025
5 Kwietnia 2025
4 Kwietnia 2025
4 Kwietnia 2025
4 Kwietnia 2025
4 Kwietnia 2025