Instrukcja obsługi Sony FH-SR1D
Sony Dźwięk w wideo FH-SR1D
Przeczytaj poniżej 📖 instrukcję obsługi w języku polskim dla Sony FH-SR1D (2 stron) w kategorii Dźwięk w wideo. Ta instrukcja była pomocna dla 64 osób i została oceniona przez 6 użytkowników na średnio 4.3 gwiazdek
Strona 1/2
HI-FI Carrying
Component System
FH-SR1D
WARNING
To reduce the risk of fire or electric shock, do
not expose this apparatus to dripping or
splashing, and do not place objects filled with
liquids, such as vases, on the apparatus.
To reduce the risk of fire, do not cover the
ventilation opening of the apparatus with
newspapers, tablecloths, curtains, etc.
Do not place the naked flame sources such as
lighted candles on the apparatus.
As the main plug is used to disconnect the
unit from the mains, connect the unit to an
easily accessible AC outlet. Should you notice
an abnormality in the unit, disconnect the
main plug from the AC outlet immediately.
Do not install the appliance in a confined
space, such as a bookcase or built-in cabinet.
Do not expose batteries or apparatus with
battery-installed to excessive heat such as
sunshine, fire or the like.
The unit is not disconnected from the mains
as long as it is connected to the AC outlet,
even if the unit itself has been turned off.
CAUTION
The use of optical instruments with this
product will increase eye hazard.
This appliance
is classified as a
CLASS 1
LASER
product. This
marking is
located on the
rear exterior.
Licences and Trademarks
This system incorporates with Dolby*
Digital.
* Manufactured under license from Dolby
Laboratories.
“Dolby” and the double-D symbol are
trademarks of Dolby Laboratories.
MPEG Layer-3 audio coding technology
and patents licensed from Fraunhofer IIS
and Thomson.
Windows Media is either a registered
trademark or trademark of Microsoft
Corporation in the United States and/or
other countries.
This product contains technology subject
to certain intellectual property rights of
Microsoft. Use or distribution of this
technology outside of this product is
prohibited without the appropriate
license(s) from Microsoft.
234
6 7 85
10 11 129
14 15 1613
ABOUT MPEG-4 VISUAL: THIS
PRODUCT IS LICENSED UNDER THE
MPEG-4 VISUAL PATENT PORTFOLIO
LICENSE FOR THE PERSONAL AND
NONCOMMERCIAL USE OF A
CONSUMER FOR DECODING VIDEO
IN COMPLIANCE WITH THE MPEG-4
VISUAL STANDARD (“MPEG-4 VIDEO”)
THAT WAS ENCODED BY A
CONSUMER ENGAGED IN A
PERSONAL AND NONCOMMERCIAL
ACTIVITY AND/OR WAS OBTAINED
FROM A VIDEO PROVIDER LICENSED
BY MPEG LA TO PROVIDE MPEG-4
VIDEO.
NO LICENSE IS GRANTED OR SHALL
BE IMPLIED FOR ANY OTHER USE.
ADDITIONAL INFORMATION
INCLUDING THAT RELATING TO
PROMOTIONAL, INTERNAL AND
COMMERCIAL USES AND LICENSING
MAY BE OBTAINED FROM MPEG LA,
LLC. SEE http://www.mpegla.com/
All other trademarks and registered
trademarks are of their respective holders.
In this manual, TM and ® marks are not
specified.
About this manual
“DVD” may be used as a general term for a
DVD VIDEO, DVD-R, DVD-RW, DVD+R
or DVD+RW.
In this manual, CD-R or CD-RW is
sometimes referred to as “DATA CD.”
In this manual, DVD-R, DVD-RW,
DVD+R or DVD+RW is sometimes
referred to as “DATA DVD.”
This manual mainly explains operations
using the remote, but the same operations
can also be performed using the buttons on
the unit having the same or similar names.
Playable Discs
DVDDVD VIDEO
DVD-ROM
DVD-R*/DVD-RW*
DVD+R*/DVD+RW*
CD
CD-DA (Music CD)
CD-ROM
CD-R*/CD-RW*
VIDEO CD
* If discs have not been correctly finalized,
they will not be played back. For more
information, refer to the operating
instructions supplied with the recording
device.
Discs that cannot be played
Blu-ray Discs
HD DVDs
DVD-RAMs
DVD Audio discs
PHOTO CDs
Super Audio CDs
Data track of CD-Extras
Audio material side on DualDiscs
DVD-R/DVD-RW/DVD+R/DVD+RW in
VR (Video Recording) mode
CPRM (Content Protection for Recordable
Media)-compatible DVD-R/RW containing
content flagged as “Copy once.”
Playable File Types
Video
File formatExtensions
Xvid video“.avi”
MPEG4 video1) “.mp4” or “.m4v”
Music
File formatExtensions
MP3 (MPEG1 Audio
Layer 3)2)
“.mp3”
WMA3) “.wma”
AAC4) “.m4a”
Photo
File formatExtensions
JPEG“.jpg” or “.jpeg”
1)Supported video and audio codecs are as
follows:
Video codec: MPEG4 Simple Profile
(AVC is not supported.)
Audio codec: AAC-LC (HE-AAC is not
supported.)
2)MP3 PRO format is not supported.
3)WMA DRM, WMA Lossless and WMA
PRO formats are not supported.
4)AAC DRM and AAC Lossless formats are
not supported.
Notes
Some files may not play depending on the
format, the encoding method or recording
condition.
Some USB devices may not work with this
system.
The system supports ISO 9660 Level 1/
Level 2 and Joliet for DATA CD.
The system supports UDF (Universal Disk
Format) for DATA DVD.
The system supports FAT12, FAT16 and
FAT32 for USB device.
The system can recognize the files or
folders on a DATA DVD, DATA CD or
USB device as follows:
up to 300 folders
up to 648 files
It may take time to read files in the
following cases:
there are too many folders or files.
the memory capacity of the USB device
is very large.
the memory of the USB device is
fragmented.
Compatible USB devices
with this system
Check the websites below for the information
about compatible USB devices.
For customers in Europe:
<http://support.sony-europe.com/>
For customers in Asia and other countries/
regions:
<http://www.sony-asia.com/support>
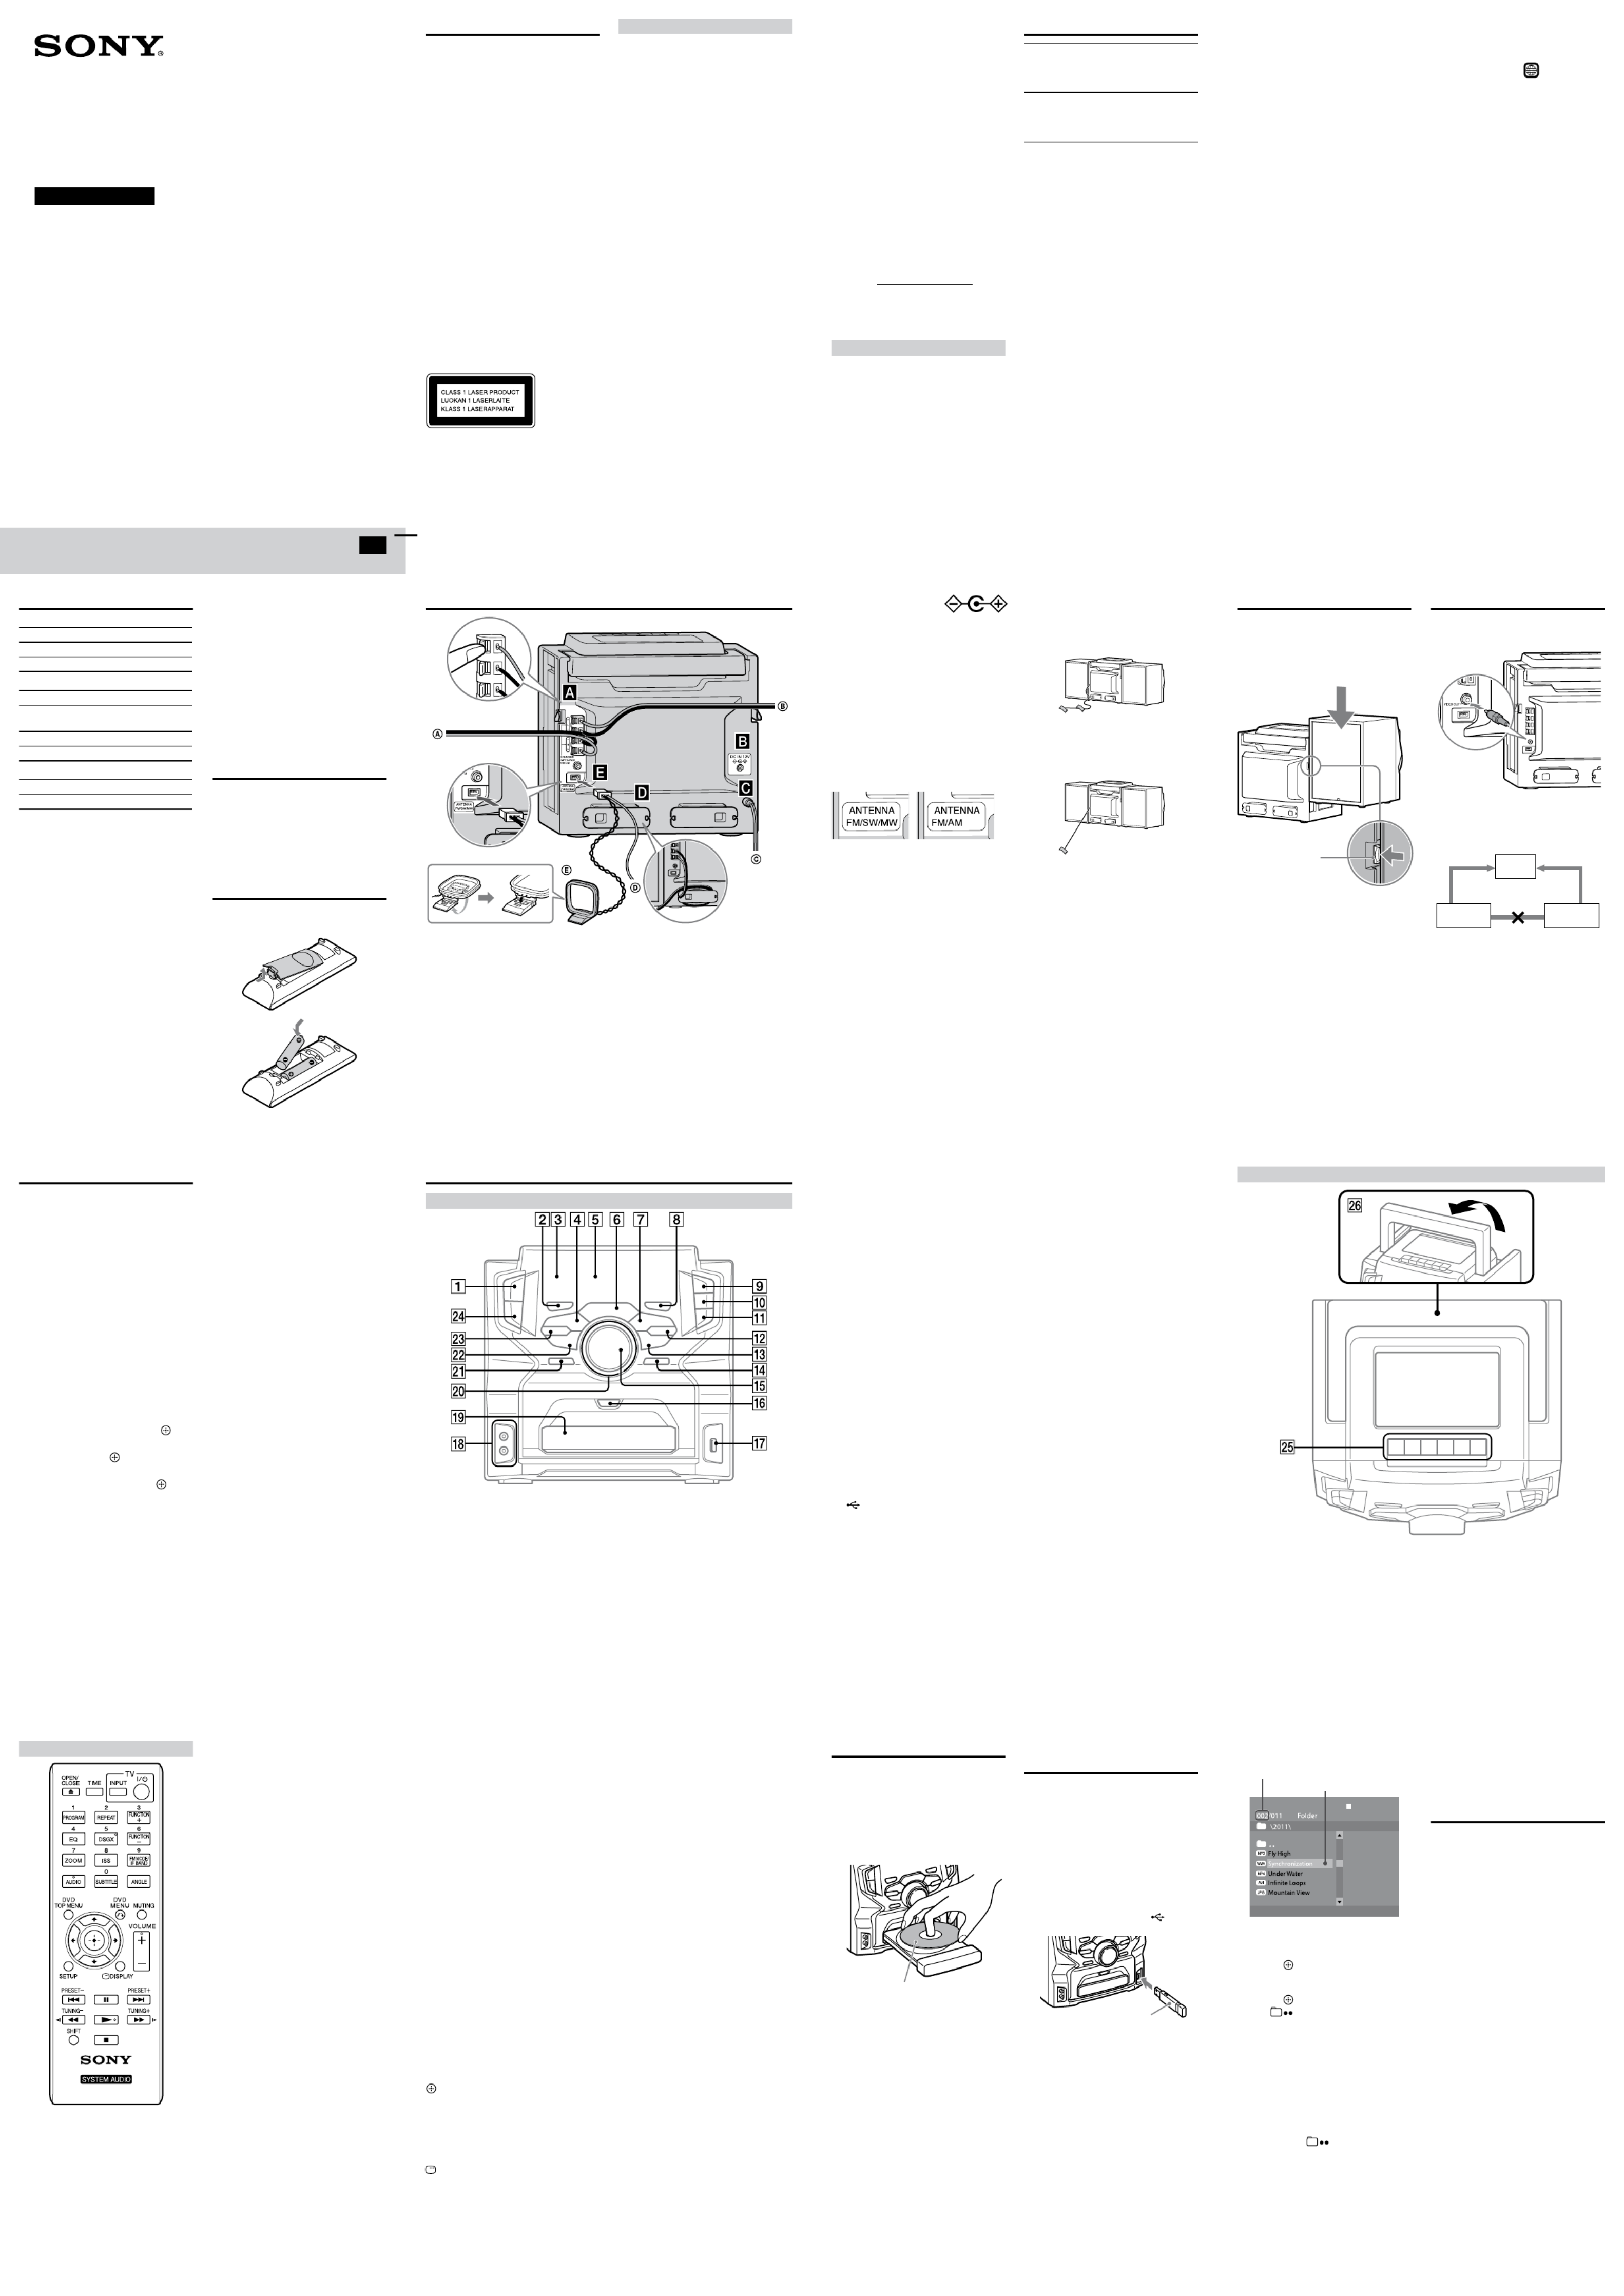
Preparing the remote
Insert the two supplied R6 (size AA)
batteries, matching the polarities as shown
below.
To right speaker
To left speaker
To wall outlet
FM (FM/SW) lead antenna
(Extended horizontally.)
MW (AM) loop antenna
©2011 Sony Corporation Printed in China
Continued
GB
Operating Instructions
4-267-766- (1)13
Music discs encoded with copyright
protection technologies
This product is designed to play back discs
that conform to the Compact Disc (CD)
standard. Recently, various music discs
encoded with copyright protection
technologies are marketed by some record
companies. Please be aware that among those
discs, there are some that do not conform to
the CD standard and may not be playable by
this product.
Note on DualDiscs
A DualDisc is a two sided disc product which
mates DVD recorded material on one side
with digital audio material on the other side.
However, since the audio material side does
not conform to the Compact Disc (CD)
standard, playback on this product is not
guaranteed.
Note on playback operations of a DVD
Some playback operations for a DVD may be
intentionally restricted by software
producers. Since this system plays a DVD
according to the disc contents, some playback
features may not be available.
Note about double-layer DVDs
The playback picture and sound may be
momentarily interrupted when the layers
switch.
Region code (DVD VIDEO only)
Your system has a region code printed on the
rear of the unit and will only play a DVD
VIDEO (playback only) labeled with an
identical region code or
ALL
.
Note about Multi Session CD
You can play only 1st session of a
multisession disc.
Hooking up the system securely
The outer electrode of the
DC IN 12V jack is
(minus) and the inner
one is + (plus).
Be sure not to connect the DC IN 12V jack
to a car cigarette lighter socket.
Power
Connect the power cord to a wall outlet.
If the supplied adaptor on the plug does not
fit your wall outlet, detach it from the plug
(only for models equipped with an adaptor).
Cable winders
You can adjust the speaker cable length by
wrapping the cables around the cable
winders.
Antennas
African modelsSouth African and
other models
Find a location and orientation that provide
good reception when you set up the
antennas.
Keep the antennas away from the speaker
cords and the power cord to avoid picking up
noise.
To improve FM and SW reception (African
models only)
Adjust the FM/SW antenna lead as shown
below.
For FM reception
Extend a portion of the lead
straight about 1.2 m from
the end.
For SW reception
Extend the lead fully.
Attaching the speakers
Align the grooves and slide the speaker unit
down until it snaps into the locked position.
To detach the speaker, unlock the speaker
unit using the unlock lever, and slide the
speaker all the way up and away from the
main unit.
Unlock lever
Connecting your TV
Connect the video input jack of your TV to
the VIDEO OUT jack on the unit, using the
supplied video cord.
When connecting a video deck
Connect the TV and the video deck using
video and audio cords (not supplied) as
shown below.
TV
Video deckUnit
Do not connect directly
If you connect a video deck between this
system and the TV, you may experience video
leakage when watching the video signal from
this system. Do not connect a video deck
between this system and TV.
Parts and Controls
Front panel
Color System Setup
Change the color system if necessary from
[PAL], [Multi] or [NTSC] after connecting
your TV. The factory default of the color
system is [PAL] for African, South African
and Russian models and [NTSC] for other
models.
1 Connect the power cord to a wall
outlet.
2 Press POWER on the unit to turn on
the system.
3 Press FUNCTION +/ repeatedly (or
press DVD/CD on the unit) to switch
the function to DVD/CD.
Playback starts automatically if a disc
with an auto playback function is loaded.
Press twice to stop playback.
4 Press SETUP in stop mode.
The setup menu appears.
5 Press / repeatedly to select
[Preference Page], then press .
6 Press / repeatedly to select [TV
Type], then press .
7 Press / repeatedly to select [PAL],
[Multi] or [NTSC], then press .
8 Press SETUP to turn off the Setup
Menu.
Note
The display on the TV screen may be
interrupted momentarily after changing the
color system as described above.
POWER button
Press to turn on or off the system.
EQ button
Press to select a preset sound effect.
Remote sensor
(rewind) button
Press to find a point in a track, file or
chapter.
TUNING button
Press to tune to a desired station.
Display
(play) button
Press to start or re-start playback (resume
play).
(fast forward) button
Press to find a point in a track, file or
chapter.
TUNING + button
Press to tune to a desired station.
DSGX button
Press to turn on or off the DSGX effect.
USB button
Press to select the USB function.
Speakers
Insert only the stripped portion of the cords.
DC IN 12V jack (African models only (except for South
African and other models))
You can connect a DC power source to the DC IN 12V jack.
If the AC power supply is cut off (because of a power failure,
for example), the power source automatically switches to DC
power. When the AC power supply resumes, the system
returns to AC power operation.
TUNER/BAND button
Press to select tuner function.
Press to select FM, MW (AM) or SW
reception mode.
TAPE button
Press to select the tape function.
(next) button
Press to select a track, file or chapter.
PRESET + button
Press to select a preset station.
(stop) button
Press to stop and remember the stop
point (resume point).
To re-start playback from the resume
point (resume play), press .
ENTER button
Press to enter/confirm the settings.
/// button
Press to move the cursor for item
selection.
In SW reception mode, pressing /
allows you to change the current
frequency, skipping to a specific
frequency.
OPEN/CLOSE button
Press to open or close the disc tray.
(USB) port
Used for connecting a USB device.
AUDIO IN (audio in L/R) jacks
Used for connecting an optional audio
component.
Disc tray
VOLUME control
Turn to adjust the volume.
AUDIO IN button
Press to select the AUDIO IN function.
(pause) button
Press to pause playback. To resume
playback, press the button again.
(previous) button
Press to select a track, file or chapter.
PRESET button
Press to select a preset radio station.
DVD/CD button
Press to select the DVD/CD function.
Top panel
(record) button, (play) button,
(rewind) button, (fast
forward) button, (stop/eject)
button, (pause) button
Press to operate the tape functions.
Carrying handle
Remote
OPEN/CLOSE
Press to open or close the disc tray.
TIME
Press to display or switch the time
information during playback.
TV INPUT
Press to switch the TV’s input source between
the TV signal and other input source.
Note that only Sony TVs can be operated
using this remote.
TV / (on/standby)
Press to turn on or off the TV.
Note that only Sony TVs can be operated
using this remote.
PROGRAM
Press to activate program play in the DVD/
CD function, or press to preset radio stations
in the tuner function.
REPEAT
Press to activate repeat/shuffle playback
mode.
FUNCTION +
Press to select a function in sequence.
EQ
Press to select a sound effect.
DSGX
Press to turn on or off the bass boost effect.
FUNCTION
Press to select a function in sequence.
ZOOM
Press to zoom in or zoom out of a displayed
picture when viewing a DVD VIDEO, a
VIDEO CD, an Xvid video, an MPEG4 video
or a JPEG image. You can move the
magnified portion of the picture by pressing
///.
ISS (Interference Suppress Switch)
Press to select “ISS-1” or “ISS-2” to suppress
whistling noises when recording MW (AM)
or SW radio programs onto a tape.
FM MODE/IF BAND
Press to select the FM reception mode
(monaural or stereo).
Press to select a preset bandwidth from
among “IFBAND-1,” “IFBAND-2,”
“IFBAND-3” or “IFBAND-4” while listening
to an MW (AM) or SW radio program. These
may help reduce interference on some
frequencies.
AUDIO
Press to select an audio signal format when
multiple audio signals are available.
SUBTITLE
Press to select a subtitle language when
multilingual subtitles are available.
ANGLE
Press to switch to other viewing camera
angles when multi-angles are recorded on a
DVD VIDEO.
Number buttons
Press to enter numbers for selecting a title/
chapter, preset radio station, etc.
DVD TOP MENU
Press to open the DVD top menu.
DVD MENU
Press to open or close the DVD menu.
When pressed during playback of JPEG
image files, a thumbnail view (digest view) is
displayed.
MUTING
Press to mute or unmute the sound.
///
Press to move the cursor for item selection.
In SW reception mode, pressing / allows
you to change the current frequency, skipping
to a specific frequency.
(enter)
Press to enter/confirm the settings.
VOLUME +/
Press to adjust the volume.
SETUP
Press to open or close the setup menu.
DISPLAY
Press to open or close the Display Menu.
Playback operation buttons
/ (previous/next)
/ (fast reverse/fast forward)
/ (slow reverse/slow forward)
Press to watch in slow-motion when pressed
in pause mode.
(play)
(pause)
(stop)
Radio operation buttons
PRESET +/
TUNING +/
SHIFT
Press and hold to use the pink number
buttons.
Playing a Disc
1 Press FUNCTION +/ repeatedly (or
press DVD/CD on the unit) to select
the DVD/CD function.
2 Press OPEN/CLOSE to open the disc
tray.
3 Place a disc in the disc tray, then
press OPEN/CLOSE to close the disc
tray.
With the label side up.
4 Press to start playback.
5 Press VOLUME +/ or turn VOLUME
control on the unit to adjust the
volume.
Playing Files on a Disc/USB
Device
1 Press FUNCTION +/ repeatedly (or
press DVD/CD or USB on the unit) to
select the DVD/CD or USB function.
DVD/CD: For a disc.
USB: For a USB device.
2 Load the source.
For a disc
Place a disc in the tray by pressing
OPEN/CLOSE to open or close the disc
tray.
For a USB device
Connect a USB device to the (USB)
port.
USB device
3 Select a desired file from the
displayed file list.
Cursor position number
Cursor
To move the cursor:
Press or .
To enter a folder:
Press or after moving the cursor
to a desired folder.
To return to the parent folder:
Press or after moving the cursor
to .
You can also check the current cursor
position and its number from the
following information that will appear on
the display.
[FLD] XXX:
Indicates that a folder is selected,
representing its cursor position number
(ex. “[FLD] 005”).
[BACK]:
Indicates that is selected.
File format and XXX:
Indicates the file format of a currently
selected file, representing its cursor
position number (ex. “WMA 002”).
4 Press to start playback.
5 Press VOLUME +/ or turn VOLUME
control on the unit to adjust the
volume.
Playing a Tape
Use buttons on the unit for tape operations.
1 Press FUNCTION +/ repeatedly (or
press TAPE on the unit) to select the
tape function.
2 Insert a tape.
Open the cassette deck holder by
pressing , and insert a tape into the
cassette holder.
3 Press to start playback.
4 Press VOLUME +/ or turn VOLUME
control on the unit to adjust the
volume.
Notes
Make sure there is no slack in the tape to
avoid damaging the tape or the tape deck.
Make sure to press after the tape has
been wound or rewound to the end using
the / button.
Do not turn off the system during
playback.
Specyfikacje produktu
| Marka: | Sony |
| Kategoria: | Dźwięk w wideo |
| Model: | FH-SR1D |
Potrzebujesz pomocy?
Jeśli potrzebujesz pomocy z Sony FH-SR1D, zadaj pytanie poniżej, a inni użytkownicy Ci odpowiedzą
Instrukcje Dźwięk w wideo Sony

14 Stycznia 2025
12 Stycznia 2025
11 Października 2024
5 Października 2024
9 Sierpnia 2024
9 Sierpnia 2024
9 Sierpnia 2024
8 Sierpnia 2024
8 Sierpnia 2024
8 Sierpnia 2024
Inne instrukcje Sony
9 Kwietnia 2025
5 Kwietnia 2025
5 Kwietnia 2025
5 Kwietnia 2025
5 Kwietnia 2025
5 Kwietnia 2025
4 Kwietnia 2025
4 Kwietnia 2025
4 Kwietnia 2025
4 Kwietnia 2025