Instrukcja obsługi Sony VGP-BMS11
Przeczytaj poniżej 📖 instrukcję obsługi w języku polskim dla Sony VGP-BMS11 (3 stron) w kategorii Akcesoria. Ta instrukcja była pomocna dla 40 osób i została oceniona przez 4 użytkowników na średnio 4.1 gwiazdek
Strona 1/3
BLUETOOTH® Laser Mouse
VGP-BMS11
© 2012 Sony Corporation Printed in China
4-425-053- (1)12
Operating Instructions/Mode d’emploi
English
WARNING
To reduce the risk of fire or electric shock, do not expose the unit to rain
or moisture.
To avoid electrical shock, do not open the cabinet. Refer servicing to
qualified personnel only.
Owner’s Record
The model number and the serial number are located inside the battery compartment of the
mouse. Record the serial number in the space provided below. Refer to this number whenever
you call your Sony dealer regarding this product.
Model No. VGP-BMS11
Serial No. ____________________
Safety information
Do not look directly into the lens. The laser light may cause eye injury.
In the following circumstances, set the power to off and have it checked by qualified personnel
before continuing its use.
–
Water or a foreign object has entered the mouse.
–
Smoke is coming out of the mouse.
–
There is an unusual noise or smell.
–
The mouse is dropped or the exterior of the mouse has broken.
Do not place the mouse in a location subject to:
–
On an unstable surface
–
In very humid areas or where there is no ventilation
–
Excessive dust
–
Direct sunlight or extreme heat
–
Mechanical vibration or shock
–
Greasy fumes
If the mouse is brought directly from a cold to a warm location or is placed in a very damp
room, moisture may condense on the inside of the mouse. If this occurs, the mouse may not
work properly.
Precautions on using the dry batteries
Caution:
Danger of explosion if the battery is incorrectly replaced. Replace only with the same or
equivalent type recommended by the manufacturer. Discard used batteries according to the
manufacturer’s instructions.
If the battery liquid is leaking:
– Do not touch the battery liquid directly. If your eyes, skin, or clothing comes into contact with the
battery liquid, wash well with pure water. If you have skin inflammation or a wound results, consult
a doctor immediately.
– Wipe the battery compartment carefully, and insert new batteries.
Dispose of used batteries promptly and properly. In some areas, the disposal of batteries in
household or business waste may be prohibited. Please use the appropriate public collection
system.
Batteries may explode or leak if recharged, or disposed of in fire.
Do not disassemble, heat above 60 ˚C (140 °F) or incinerate.
Do not mix old (used) and new batteries, or batteries of a different type. Be sure to use
batteries specified in “Power requirements” of “Specifications.”
Keep away from children.
Insert the batteries with the correct +/– orientation.
When the batteries have run out, or when you intend to not use the mouse over a prolonged
period, remove the batteries.
Do not short-circuit the metal terminals of the battery or wet them with any liquid, for
example, water, coffee, or juice.
Conditions of use
Do not use this device on hospital premises. Doing so may cause medical devices to
malfunction.
Do not use this device on an aircraft, as doing so may cause the aircraft's equipment to
malfunction.
If using this device near a pacemaker, make sure it is at least 20 cm (8 inches) away from the
pacemaker.
Sony is not responsible for any interference that you may experience or that may be caused
when operating this device.
Check for and respect airline restrictions on use of wireless capabilities. If use of the wireless
function is prohibited on the airline, set the power switch on this device to OFF before
boarding.
The equipment is classified as a CLASS 1 LASER PRODUCT and complies with the Laser
Products Safety Standard IEC/EN 60825-1(2007).
Caution - Repair and maintenance of this equipment should be made only by Sony authorized
technicians. Improper repairs and use can create safety hazards.
Caution - Use of controls or adjustments or performance of procedures other than those
specified herein may result in hazardous radiation exposure.
You can find the following sticker on the bottom of the equipment.
For customers in the U.S.A.
The following FCC statements apply only to the version of this model manufactured for sale in
the USA.
Other versions may not comply with FCC technical regulations.
This equipment has been tested and found to comply with the limits for a Class B digital device,
pursuant to Part 15 of the FCC Rules. These limits are designed to provide reasonable protection
against harmful interference in a residential installation. This equipment generates, uses, and
can radiate radio frequency energy and, if not installed and used in accordance with the
instructions, may cause harmful interference to radio communications. However, there is no
guarantee that interference will not occur in a particular installation. If this equipment does
cause harmful interference to radio or television reception, which can be determined by turning
the equipment off and on, the user is encouraged to try to correct the interference by one or
more of the following measures:
–Reorient or relocate the receiving antenna.
–Increase the separation between the equipment and receiver.
–Connect the equipment into an outlet on a circuit different from that to which the receiver is
connected.
–Consult the dealer or an experienced radio/TV technician for help.
Changes or modifications not expressly approved by the party responsible for compliance could
void the user’s authority to operate the equipment.
NOTE: The manufacturer is not responsible for any radio or TV interference caused by
unauthorized modifications to this equipment. Such modifications could void the user’s
authority to operate the equipment.
This device complies with Part 15 of the FCC Rules. Operation is subject to the following two
conditions: (1) this device may not cause harmful interference, and (2) this device must accept
any interference received, including interference that may cause undesired operation.
For customers in Canada
This Class B digital apparatus complies with Canadian ICES-003.
This device complies with Industry Canada license-exempt RSS standard(s). Operation is
subject to the following two conditions: (1) this device may not cause harmful interference, and
(2) this device must accept any interference received, including interference that may cause
undesired operation of the device.
For customers in the U.S.A. and Canada
This equipment complies with FCC radiation exposure limits set forth for uncontrolled
environment and meets the FCC radio frequency (RF) Exposure Guidelines in Supplement C to
OET65. This equipment has very low levels of RF energy that it is deemed to comply without
testing of specific absorption rate (SAR).
Before use
This product is a laser mouse equipped with BLUETOOTH technology.
It can be used with personal computers pre-installed with the Windows 8, Windows 7,
Windows Vista or Windows XP (SP2 and after) operating system and featuring
BLUETOOTH wireless technology.
Depending on the personal computer or version of software you are using, the mouse may
not operate by function correctly.
F or additional information, visit our website.
For North America : http://www.sony.com/vaio
For Europe : http://www.vaio.eu
For other countries and regions : http://vaio-online.sony.com
Notes
Operation cannot be guaranteed for all computers meeting the above system requirements.
Operation is not guaranteed for home-built computers, whitebox PCs, and computers with an
upgraded OS or multiboot system environment.
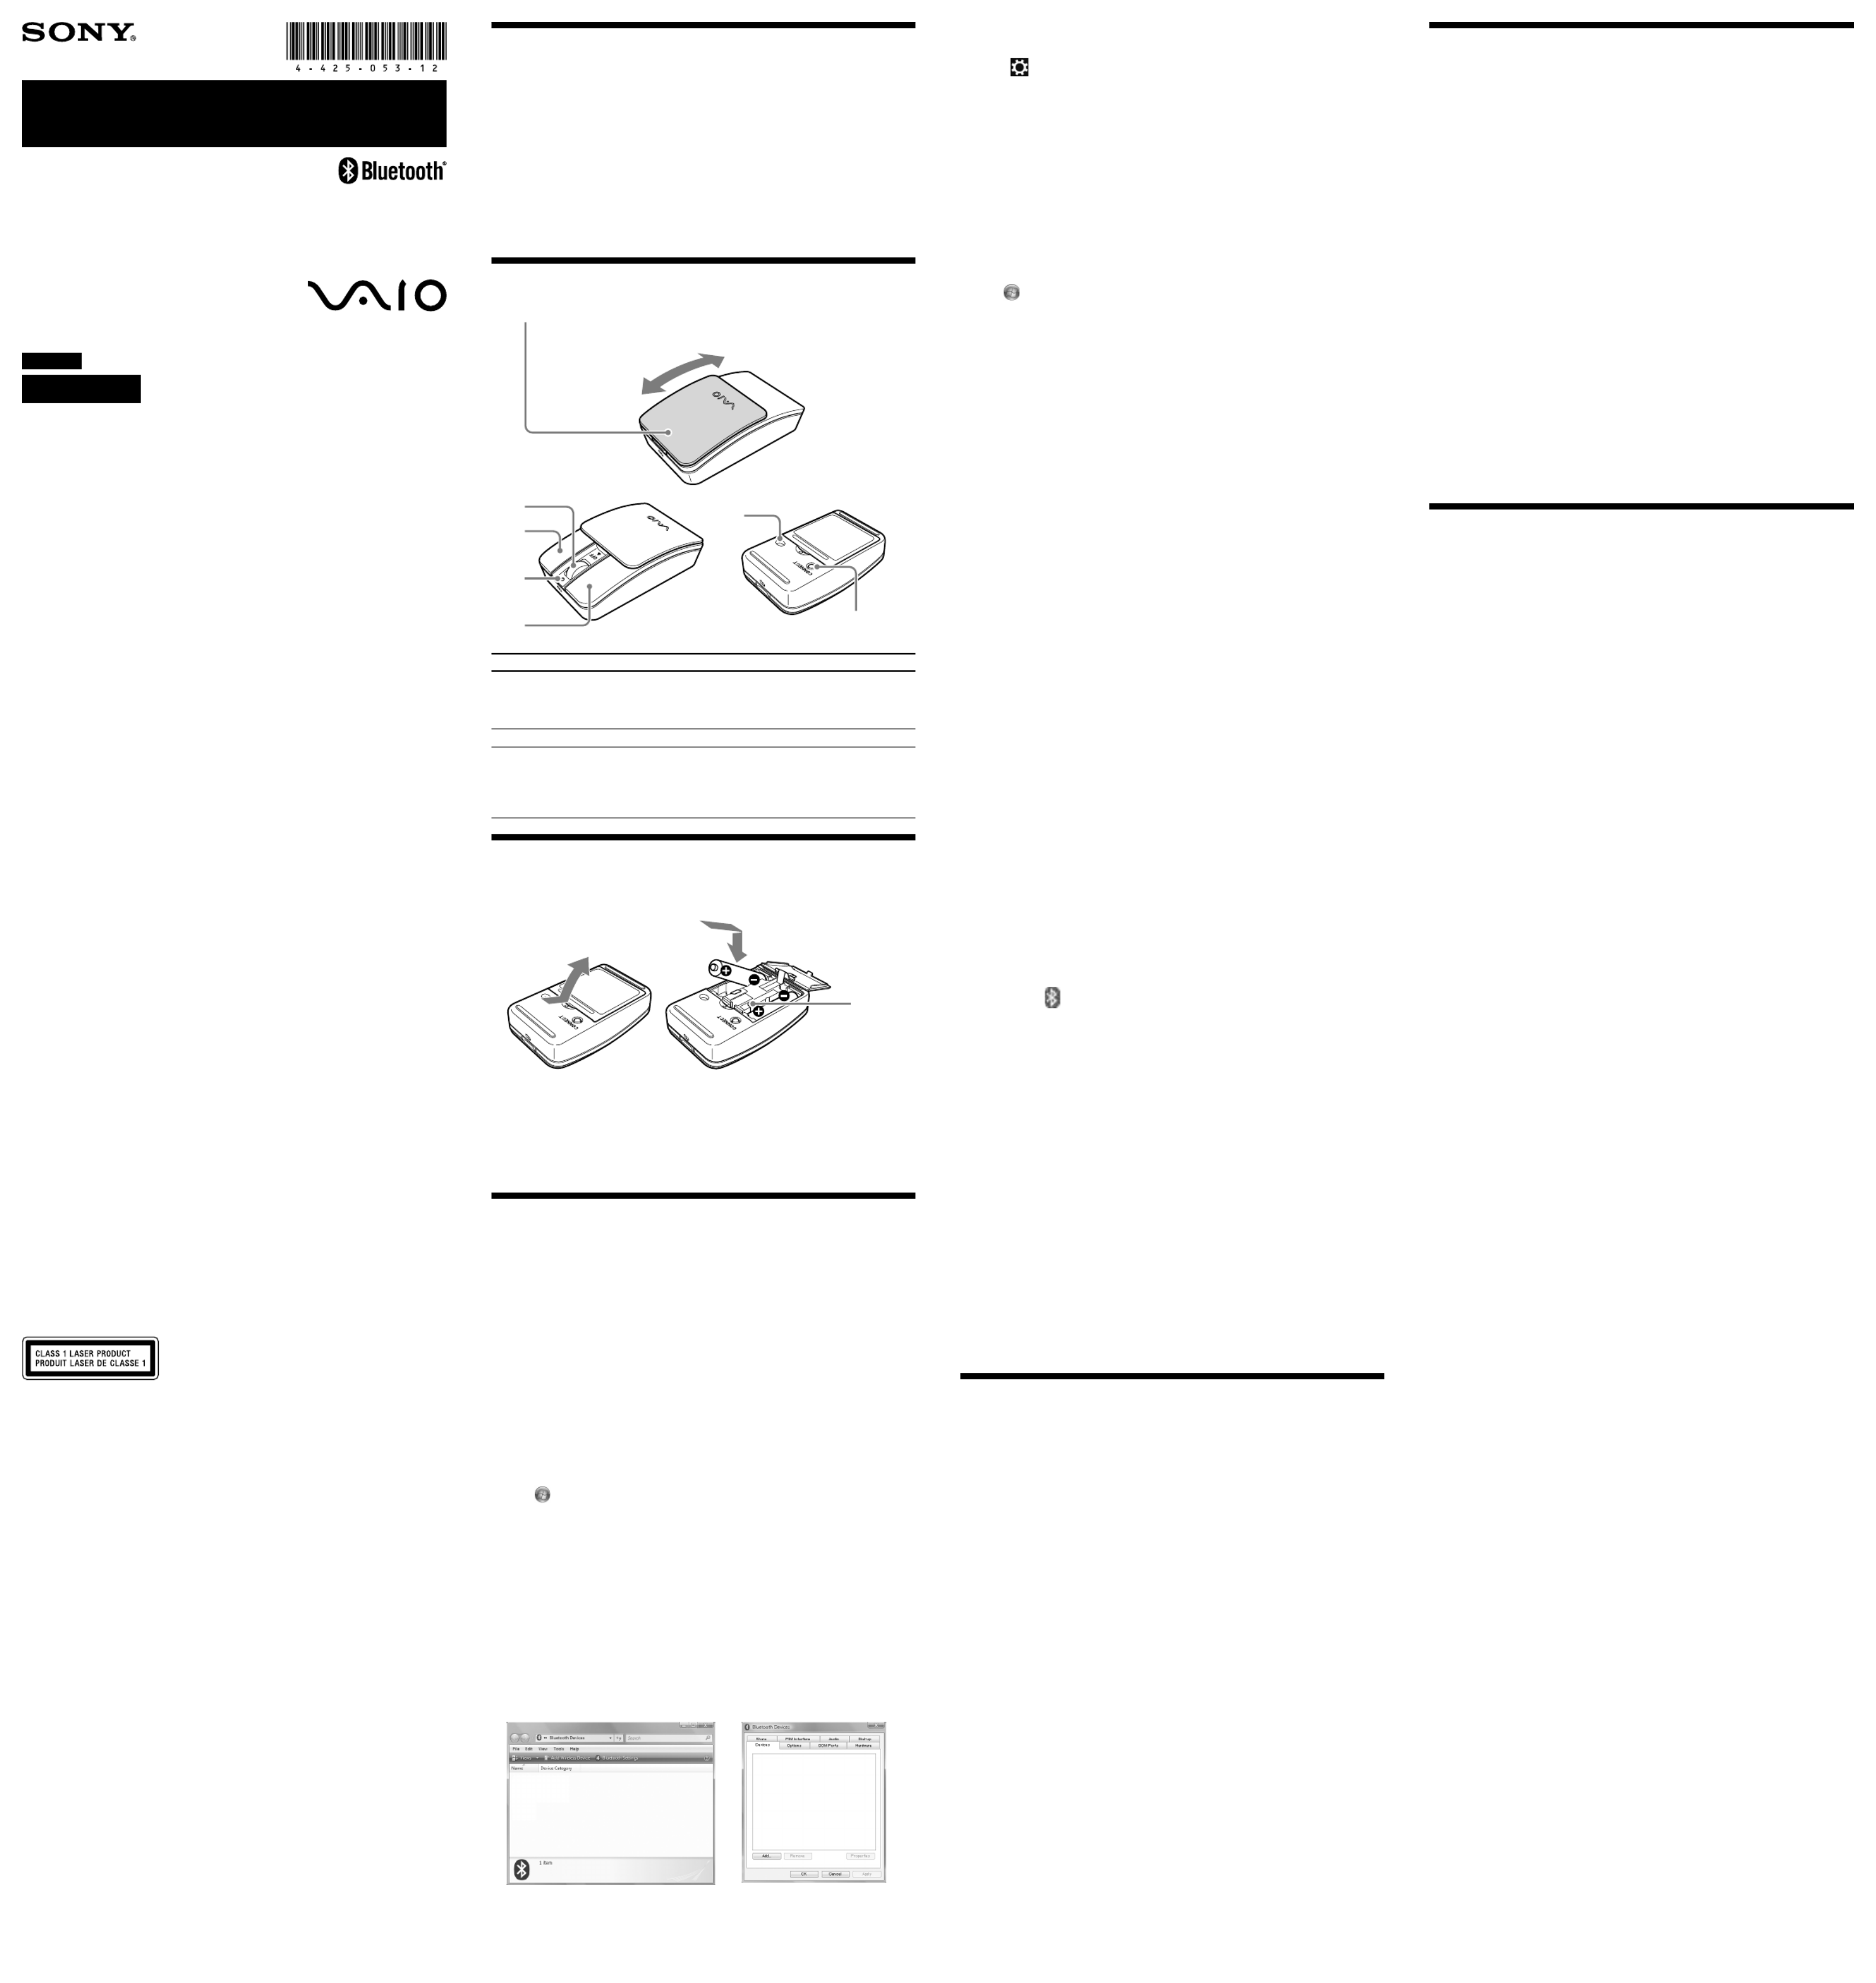
Part names
Button cover / Power switch
Opening and closing the sliding button cover turns the mouse on/off.
Power on
Power off
Wheel
button
Right
button
Status
light
Left
button
Lens
CONNECT button
Status light indicatorDescription
Lights up green (steady),
then turns off
If you set the power switch to ON, this mode is
entered after a few seconds.
When lit, the mouse is attempting to connect to a
computer.
Light is orange (flashing)Battery power is low. Replace the batteries.
Light is green (rapid flashing)If you push the CONNECT button, the flashing
status light indicates that the mouse is waiting to
connect to the personal computer.
About connecting, see “Enabling communication
between the mouse and your personal computer.”
Inserting batteries into the mouse
1 Turn off the mouse.
2 Open the battery compartment cover. Insert the two supplied batteries using
the correct +/– orientation.
Battery
removal
ribbon
3 Close the battery compartment cover.
Replacing the batteries
If cursor movement becomes sluggish, or the communication distance between the mouse
and your personal computer decreases, check the status light on the mouse.
The status light flashing orange indicates that the battery life is running low. Replace the
batteries.
When not using the mouse, set the power to off. This will extend battery life.
Enabling communication between the
mouse and your personal computer
Use the BLUETOOTH software installed on your personal computer to enable
communication between the mouse and your personal computer.
Note
Activate the BLUETOOTH software on your personal computer. Operation of the
BLUETOOTH software may vary depending on your personal computer.
For details, refer to the manuals provided with your personal computer.
The setup instructions are based on your operating system.
If your computer is pre-installed with Windows 8, go directly to the instructions for
Case A.
If your computer is pre-installed with Windows 7, go directly to the instructions for
Case B.
If your computer is pre-installed with Windows XP, go directly to the instructions for
Case E.
If your computer is pre-installed with Windows Vista, follow these steps (In certain
situations, you may be directed to the instructions for Case C, Case D or Case E):
1 Click (Start), then “Control Panel.”
2 Click the “Hardware and Sound” icon.
3 If the “Bluetooth Devices” icon is in the “Hardware and Sound” window:
Go to step 4.
If the “Bluetooth Devices” icon is not visible in the “Hardware and Sound”
window:
Close the “Control Panel” and go to Case E.
4 Click the “Bluetooth Devices” icon, and verify the contents of the window
displayed.
Note
If you switch to Classic View, double-click the “Bluetooth Devices” icon.
5 Review the Bluetooth Devices windows shown here.
If you see window 1, go to the instructions for Case C. If you see window 2, go to the
instructions for Case D.
Window 1Window 2
Case A
1 Open the charms.
2 Select (Settings).
3 Select “Change PC settings.”
4 Select “Devices.”
5 Turn on the mouse.
6 Press the CONNECT button on the bottom of the mouse.
The status light flashes green.
7 Select “Add a device.”
The device search begins. The “Select a device” window appears after the search.
8 In the “Select a device” window, select “VGP-BMS11.”
“VGP-BMS11” is displayed in the “Devices” list.
9 Move the mouse. If the pointer displayed on your screen moves appropriately,
the connection is complete.
Case B
1 Click (Start), then click “Devices and Printers.”
2 Turn on the mouse.
3 Press the CONNECT button on the bottom of the mouse.
The status light flashes green.
4 Click “Add a device” in the “Devices and Printers” window.
5 In the device list, select “VGP-BMS11,” and click “Next.”
Hint
If the “Select a pairing option” window is displayed, select “Pair without using a code,” and
click “Next.”
6 Click “Close” in the “Add a device” window.
7 Move the mouse. If the pointer displayed on your screen moves appropriately,
the connection is complete.
Case C
1 Turn on the mouse.
2 Press the CONNECT button on the bottom of the mouse.
The status light flashes green.
3 On the “Bluetooth Devices” window, click the “Add Wireless Device” icon.
4 In the device list, select “VGP-BMS11,” and click “Next.”
Hint
If the “Select a pairing option” window is displayed, select “Pair without using a code,”
and click “Next.”
5 On the “Pair with a Wireless Device” window, click “Close.”
6 Close the “Bluetooth Devices” window.
7 Move the mouse. If the pointer displayed on your screen moves appropriately,
the connection is complete.
Case D
1 Turn on the mouse.
2 On the “Bluetooth Devices” window, select the “Devices” tab and click “Add.”
The “Add Bluetooth Device Wizard” appears.
3 Press the CONNECT button on the bottom of the mouse.
The status light flashes green.
4 Select the “My device is set up and ready to be found” check box and click
“Next.”
5 In the device list, select “VGP-BMS11,” and click “Next.”
6 Select “Don’t use a passkey” and click “Next.”
7 Click “Finish.”
8 Click “OK.”
9 Move the mouse. If the pointer displayed on your screen moves appropriately,
the connection is complete.
Case E
1 Turn on the mouse.
2 Double-click in the notification area in the bottom right corner of your
personal computer’s desktop.
The “Bluetooth Settings” screen appears.
3 Click “New Connection.”
The “Add New Connection Wizard” screen appears.
4 Press the CONNECT button on the bottom of the mouse.
The status light flashes green.
5 Select “Express Mode” and click “Next.”
The search for BLUETOOTH devices begins.
6 In the device list, select “VGP-BMS11,” and click “Next.”
7 If the “Add New Connection Wizard” disappears, connection is complete. Go to
step 10.
8 If the prompt to connect the HID (Human Interface Device) device appears,
click “OK.”
9 Verify the contents of the window displayed, and click “Next.”
10
Move the mouse. If the pointer displayed on your screen moves appropriately,
the connection is complete.
Disconnecting
Turn off the mouse.
Reconnection
Turn on the mouse, then reconnect.
Note
It may take time to reconnect after turning off the mouse.
Notes on use
Due to the characteristics of the laser sensor, the mouse may not work properly on
transparent surfaces or on a mouse pad that has a clear surface. Avoid using on such
materials, or use a commercially available mouse pad that is compatible with a laser
sensor mouse.
Although the polytetrafluoroethylene (PTFE) fluorocarbon polymer in the sole is a
low-friction, non-stick material, the level of friction may vary depending on the
material of the desktop and mouse pad.
Hint
If necessary, you can adjust the mouse pointer speed under “Mouse Properties.”
To display “Mouse Properties” with the Windows 8 operating system, show the desktop, open
the charms, then select “Settings” - “Control Panel” - “Hardware and Sound” - “Mouse.”
To display “Mouse Properties” with the Windows 7 operating system, click “Hardware and
sound,” and then “Mouse” in the “Control Panel.”
To display “Mouse Properties” with Windows Vista and Windows XP operating systems, click
“Mouse” in the “Control Panel.” (If you use Windows XP operating system, switch to Classic View.)
Wireless communications
The 2.4 GHz band used by BLUETOOTH devices and wireless LAN devices is also
used by various other devices. BLUETOOTH devices and wireless LAN devices use the
technology to minimize the interference from other devices that use the same wave
length. Simultaneous use of the BLUETOOTH devices and wireless LAN devices,
however, may cause radio interference and result in reduced communication speeds
and distance than the standard values.
The data transfer rate will vary depending on distance and obstacles between devices,
device configuration, radio interference, operating system, software application, and so
on. In some cases, communication may be interrupted.
Communication range will vary according to whether walls or other obstacles are
located between devices, the material used in walls, the presence of radio frequency
interference and other environmental conditions, and the type of software being used.
If BLUETOOTH functionality and wireless LAN functionality are used at the same
time on the same personal computer, communication speed may be reduced due to
electromagnetic interference, and other unwanted effects may occur.
Maintenance
When you clean the mouse, make sure to remove the batteries.
Clean the outside of the mouse with a soft, dry cloth. Do not use any type of abrasive pad,
scouring powder, or solvent such as alcohol or benzine.
Specifications
Buttons / Wheel 2 buttons / 1 wheel
Position tracking method Laser sensor
Sensor resolution 300 dot/cm (800 dpi)
Communication method BLUETOOTH Standard Ver. 3.0
Communication distance 10 m (32 ft.) max. line of sight *
Frequency band 2.4 GHz
Power requirements Two LR03 (size AAA) alkaline batteries
Battery life Approx. 3 months (alkaline batteries) **
Dimensions Approx. 50.0 × 23.4 × 87.0 mm (2.0 × 1.0 × 3.5 in)
(w × h × d)
Mass Approx. 90 g (3.2 oz) (including batteries)
Operating temperature 5 °C to 35 °C (41 °F to 95 °F )
(temperature gradient less than 10 °C (18 °F) /hour)
Operating humidity 20% to 80% (not condensed), provided that humidity is
less than 65% at 35 °C ( 95 °F) (hygrometer reading of
less than 29 °C (84 °F))
Storage temperature –20 °C to +60 °C (–4 °F to +140 °F)
(temperature gradient less than 10 °C (18 °F) /hour)
Storage humidity 10% to 90% (not condensed), provided that humidity is
less than 20% at 60 °C (140 °F) (hygrometer reading of
less than 35 °C (95 °F))
Accessories LR03 (size AAA) Alkaline batteries (2)
Operating Instructions (this document)
* The communication range varies, due to walls or other obstacles between devices, the
materials used in the walls, environmental conditions such as radio frequency
interference, and the software program used.
** This estimate is based on five hours of use per day, five days per week. These could be
different depending on the usage environment.
Design and specifications are subject to change without notice.
Troubleshooting
If you are not able to locate a solution in this section, contact a Sony authorized dealer.
The laser does not light up when I turn on the mouse.
The laser light from the lens is invisible. This is not a malfunction.
The pointer/cursor does not move when I move the mouse.
Your computer’s operating system may not be compatible with this equipment. Use a
supported operating system.
The mouse is not turned on.
– If the mouse is turned off, the mouse and your personal computer are not
communicating. Turn on the mouse.
– With sufficient battery power, if you turned on the mouse, after a few seconds, the
status light lights green momentarily. If not, there are no batteries in the mouse, or
the batteries are exhausted. Insert new batteries. For more information, see “Inserting
batteries into the mouse.”
The mouse and the personal computer are not communicating.
For more information, see “Cannot connect to the personal computer.”
The mouse is being used on an unsuitable surface.
Due to the characteristics of the laser sensor, the mouse may not work properly on
transparent surfaces. Avoid using on such surfaces, or use a commercially available
mouse pad that is compatible with a laser sensor mouse.
The CONNECT button is pressed while operating the mouse.
If the CONNECT button is pressed while operating the mouse, the mouse goes into a
standby mode for about 3 minutes and cannot be operated during this time. If you press
the CONNECT button, turn off the mouse once before starting to work with the mouse.
The mouse may have difficulty communicating in an environment with 2.4 GHz
wireless LAN or other BLUETOOTH communication.
– It is best to use the mouse in a location with low interference from wireless devices.
– Processing performed by Windows or other software may temporarily disable the
mouse. Wait a few moments for the processing to finish before using the mouse.
– You may find some useful solutions in your personal computer’s operating
instructions. Refer to the manuals provided with your personal computer.
Cannot connect to the personal computer.
The mouse is not turned on.
For more information, see “The pointer/cursor does not move when I move the
mouse.”
Communication status between the mouse and your personal computer may not have
been properly established.
Make sure your personal computer is set as below.
– The WIRELESS switch is set to ON.
– BLUETOOTH function is in operation.
– Airplane mode of Windows 8 is set to OFF.
For details on how to set the WIRELESS switch, BLUETOOTH function, or Airplane
mode, refer to the manuals provided with your personal computer.
Turn off the mouse, after a few seconds, turn on the mouse to connect to the personal
computer. For details on connecting, see “Enabling communication between the mouse
and your personal computer.”
If the mouse and the personal computer are too far apart, transmission may be affected.
The maximum communication distance between the mouse and the personal computer
is about 10 m (32 ft.). If used on a metal table or if obstacles are between the mouse and
the personal computer, the usable distance may be less. Connect the mouse and the
personal computer as close as practically possible.
Depending on usage environment, communication distance may decrease, and
improper operation may result. In such a case, keep other electronic equipment away
from the host field.
The scrolling features do not work.
Your computer’s operating system may not be compatible with this equipment.
Use a supported operating system.
The program you are using is not compatible with the scrolling features.
When I am using the mouse, the display goes dark or the personal
computer enters power saving mode.
The computer’s power saving mode is ignoring mouse activity.
– Change the power management settings for the personal computer to prevent it from
entering power saving mode. For details, refer to the manuals provided with your
personal computer.
– Touch the touchpad or press any key on the keyboard to exit power saving mode.
The mouse pointer does not move smoothly across the screen.
The mouse may not work properly on transparent surfaces due to the characteristics of
the mouse’s laser sensor.
Avoid using on such materials, or use a commercially-available mouse pad that is
compatible with a laser sensor mouse.
Due to the characteristics of its laser sensor, if dust attaches to the bottom of the mouse,
the mouse may not work properly. In this case, remove the dust with a dry cotton swab.
Wipe gently to avoid scratching the lens, which could cause a malfunction.
Your mouse may be experiencing interference from other BLUETOOTH devices that
are connected to your computer.
Disconnect them all once, wait a few seconds, then connect them again.
Exiting power saving mode with the mouse is not possible.
Press any key on the keyboard.
The mouse does not move smoothly after returning from the power
saving mode.
Deactivate the BLUETOOTH connection, wait a few seconds, and then reestablish
connection.
I am asked to enter a key when connecting to my personal computer.
Enter “0000” as the key.
Trademarks and notice
VAIO is a trademark of Sony Corporation.
Microsoft, Windows, and Windows Vista are registered trademarks of Microsoft
Corporation in the United States and/or other countries.
The BLUETOOTH word mark and logos are owned by the Bluetooth SIG, Inc., and any
use of such marks by Sony Corporation is under license. Other trademarks and Trade
names are those of their respective owners.
In this manual, Microsoft® Windows® XP Home Edition and Microsoft® Windows® XP
Professional are referred to as Windows XP.
In this manual, Microsoft® Windows Vista® Home Basic, Microsoft® Windows Vista®
Home Premium, Microsoft® Windows Vista® Business and Microsoft® Windows Vista®
Ultimate are referred to as Windows Vista.
In this manual, Microsoft® Windows® 7 Ultimate, Microsoft® Windows® 7 Professional,
Microsoft® Windows® 7 Home Premium, Microsoft® Windows® 7 Home Basic and
Microsoft® Windows® 7 Starter are referred to as Windows 7.
In this manual, Microsoft® Windows® 8 and Microsoft® Windows® 8 Pro are referred to as
Windows 8.
All other names of systems, products, and services are trademarks of their respective
owners. In this manual, the
™
or
®
marks are not specified.
Specyfikacje produktu
| Marka: | Sony |
| Kategoria: | Akcesoria |
| Model: | VGP-BMS11 |
Potrzebujesz pomocy?
Jeśli potrzebujesz pomocy z Sony VGP-BMS11, zadaj pytanie poniżej, a inni użytkownicy Ci odpowiedzą
Instrukcje Akcesoria Sony

15 Stycznia 2025
13 Stycznia 2025
12 Stycznia 2025
12 Stycznia 2025
12 Stycznia 2025
12 Stycznia 2025
12 Października 2024
10 Października 2024
10 Października 2024
9 Października 2024
Instrukcje Akcesoria
Najnowsze instrukcje dla Akcesoria
5 Lipca 2024
5 Lipca 2024
5 Lipca 2024
5 Lipca 2024
4 Lipca 2024
28 Czerwca 2024
28 Czerwca 2024
28 Czerwca 2024
28 Czerwca 2024
28 Czerwca 2024