Instrukcja obsługi StarTech.com PEX40GQSFPI
StarTech.com Karta sieciowa/adapter PEX40GQSFPI
Przeczytaj poniżej 📖 instrukcję obsługi w języku polskim dla StarTech.com PEX40GQSFPI (2 stron) w kategorii Karta sieciowa/adapter. Ta instrukcja była pomocna dla 10 osób i została oceniona przez 6 użytkowników na średnio 4.0 gwiazdek
Strona 1/2
Quick-Start Guide
To view manuals, FAQs, videos, drivers, downloads, technical drawings, and more, visit www.startech.com/support.
Manual Revision: December 17, 2018 11:00 AM
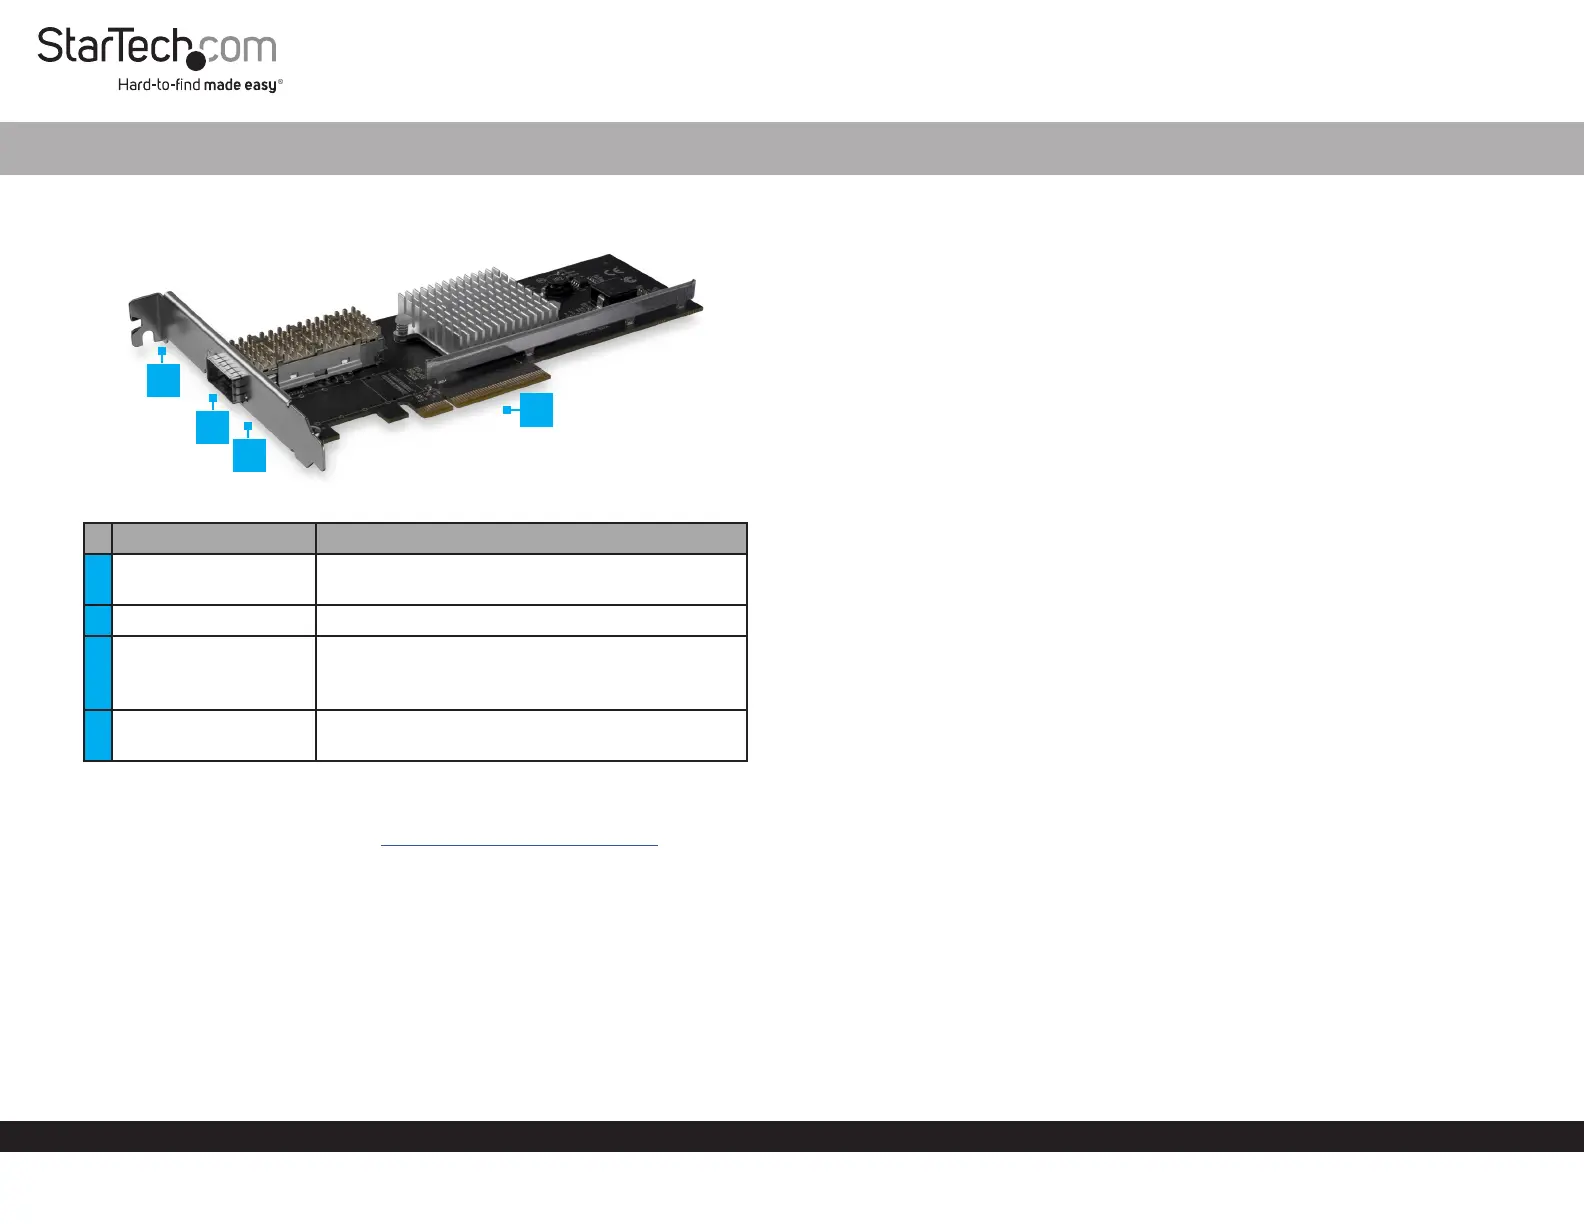
Product Diagram (PEX40GQSFPI)
PortFunction
1Mounting Bracket
• Used to mount the Network Card in a full-
prole computer system.
2QSFP+Slot• Used to connect a Network Device.
3Link LED/Activity LED
• Solid Green: The Network Card is connected
to a Network.
• Flashing: Indicates activity.
4PCIe p1-x8 Connector
• Used to connect the Network Card to a
Computer.
Requirements
For the latest requirements, please visit www.startech.com/PEX40GQSFPI.
• PCI Express® Enabled Computer with an PCI Express Slot (x 8 or x 16)
• One 40G QSFP+ Transceiver Module (sold separately)
• Module or Direct Attach Cable (sold separately)
• Operating Systems:
• Windows® 10, 8.1, 8, and 7
• Windows Server® 2016, 2008 R2, 2012
• Linux® Kernel 2.6.32 to 4.1.1.x (64-bit) LTS Versions
• Phillips Head Screwdriver
1-Port QSFP+ Server Network Card | PCIe
(Optional) Installing the Low Prole Bracket
To mount the Network Card in a low-prole computer system, replace the pre-installed
Full-Prole Mounting Bracket with the included Low-Prole Mounting Bracket.
1. Use a Phillips Head Screwdriver to remove the Bracket Screws (2) from the
Network Card.
2. Remove the Full-Prole Bracket from the Network Card.
3. Line up the Low-Prole Bracket with the Bracket Holes on the back of the
Network Card.
4. Insert the Bracket Screws (2) that you removed in Step 1 and tighten them in place.
Installing the Network Card
Note: Network cards can be severely damaged by static electricity. Make sure that
you’re properly grounded before you open your computer case or touch the PCIe card.
1. Turn o the Computer and any connected Devices (e.g. printers, etc.).
2. Disconnect any connected Devices and unplug the power cable from the
Computer.
3. Open the Computer Case. For more information, consult the user manual that came
with the Computer.
4. Locate a PCI Express p1-x8 or x16 Slot and remove the corresponding metal cover
plate from the back of the Computer Case.
5. Gently insert the PCIe p1-x8 Connector on the Network Card into the PCI Express
Slot on the Computer.
6. Use a Computer Case Screw (sold separately) to fasten the Bracket on the Network
Card to the back of the Computer Case.
7. Place the cover back onto your Computer Case.
8. Insert a 40G QSFP+ Transceiver Module into the QSFP+ slot on the Network Card.
2
3
4
1
Specyfikacje produktu
| Marka: | StarTech.com |
| Kategoria: | Karta sieciowa/adapter |
| Model: | PEX40GQSFPI |
Potrzebujesz pomocy?
Jeśli potrzebujesz pomocy z StarTech.com PEX40GQSFPI, zadaj pytanie poniżej, a inni użytkownicy Ci odpowiedzą
Instrukcje Karta sieciowa/adapter StarTech.com

14 Stycznia 2025
8 Stycznia 2025
28 Grudnia 2024
9 Października 2024
9 Października 2024
9 Października 2024
9 Października 2024
9 Października 2024
9 Października 2024
9 Października 2024
Instrukcje Karta sieciowa/adapter
Najnowsze instrukcje dla Karta sieciowa/adapter
8 Kwietnia 2025
3 Kwietnia 2025
3 Kwietnia 2025
2 Kwietnia 2025
2 Kwietnia 2025
1 Kwietnia 2025
30 Marca 2025
29 Marca 2025
14 Marca 2025
14 Marca 2025