Instrukcja obsługi Vello IR-O1
Przeczytaj poniżej 📖 instrukcję obsługi w języku polskim dla Vello IR-O1 (8 stron) w kategorii pilot. Ta instrukcja była pomocna dla 30 osób i została oceniona przez 9 użytkowników na średnio 4.4 gwiazdek
Strona 1/8
Introduction
Thank you for choosing Vello.
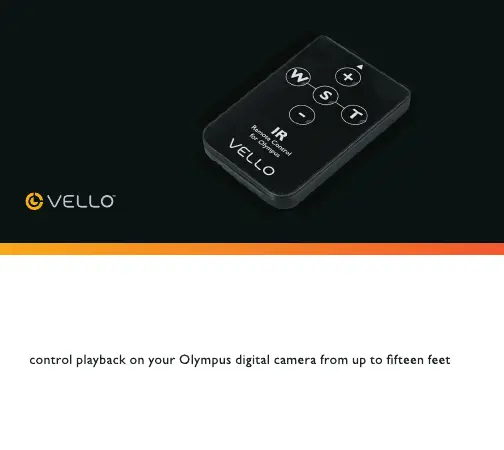
Congratulations on the purchase of your Vello IR-O1 infrared remote
control. This wireless remote lets you take photos, zoom in and out, and
away. The Vello IR-O1 is especially useful for preventing camera shake
during long exposures and for taking self-portraits. It can also be used to
trigger a remote camera when shooting events.
Precautions
Before using your Vello IR-O1infrared remote control, please read the
following safety notices carefully and thoroughly to ensure safe use, and to
help prevent damage to your remote control or injury to yourself or others.
•Remove the battery from this product before long-term storage
in order
to prevent it from leaking corrosive liquids.
•This product is not water resistant. Keep it away from rain, snow,
humidity, and general moisture.
substances such as paint thinner, benzene, or nail polish remover.
•Strong light and weak batteries may adversely affect the transmission of
the infrared signal.
•Dispose of used batteries properly. Never heat them or throw them into
heat, or explode.
Overview
Using Your IR-O1 as a Remote Trigger
The Vello IR-O1
To use your IR-O1 as a remote trigger, turn on your camera and follow
these steps:
1. Remove the plastic separator from the battery.
2. Set up your shot and make sure your camera is in focus.
www.vellogear.com
© Copyright 2012 Gradus Group
WIRELESS SHUTTER
ACTIVATION
INFRARED
REMOTE
CONTROL
USER MANUAL
3. Set your camera for remote triggering. For more information about the
remote triggering feature, consult your camera’s manual.
4. Aim the remote at the camera’s infrared sensor and press the S button to
release the shutter.
Note: With compatible cameras aim the remote at the camera’s infrared
sensor and press T or W button to zoom in or out.
Note: Please see your camera’s user manual for complete instructions and
supported features.
Important!
Because infrared tech
nology requires line-of-sight communication between
the two devices, make sure there are no obstructions between the remote
and your camera’s sensor.
Playback Mode
You can use your Vello IR-O1 remote to wirelessly control playback on your
Olympus camera when the camera is in playback mode. To advance to the
next frame, press the button marked with a plus sign (+). To go back to the
previous frame, press the button marked with a minus sign (-).
Replacing the Battery
The Vello IR-O1 is powered by a 3 V CR2025 lithium battery. To replace the
battery, follow these steps:
1. Push the tab in the direction indicated by
the arrow in the illustration, and pull the
battery tray out of the remote.
2. Remove the old battery and replace it with
a new one, making sure the side marked
with a plus sign (+) is facing up.
3. Push the battery tray back into the remote so it locks in place.
•Operating distance: up to 15 ft. (4.6 m)
•Operating temperatures: 41°F–104°F (5°C–40°C)
•Battery type: 3 V CR2025 lithium
•Typical battery life: up to 3 years; 20,000 exposures
•Dimensions: 2.2 × 1.3 × 0.27 in. (57 × 35 × 7 mm)
•Weight: 0.4 oz. (11.3 g)
Compatible Cameras
Olympus
®
E-1 / E-3 / E-5 / E-30 / E-420 / E-450 / E-500 / E-510 / E-520
E-620
Warranty
Vello provides a limited warranty that this product is free from defects in
materials and workmanship to the original purchaser under normal use f
or a
period of one (1) year from the original purchase date or thirty (30) days
after replacement whichever occurs later. Our responsibility with respect to
this limited warranty shall be limited solely to repair or replacement, at its
option, of any product which fails during normal consumer use.
To obtain warranty coverage during the Warranty Period, contact your
place of purchase (“Seller”) to obtain a return merchandise authorization
(“RMA”) number, and return to Seller the defective product alon
g with
proof of purchase and the RMA number. This warranty does not extend to
damage or failure which results from misuse, neglect, accident, alteration,
abuse, improper installation or maintenance. EXCEPT AS PROVIDED
HEREIN, VELLO MAKES NEITHER ANY EXPRESS WARRANTIES NOR
ANY IMPLIED WARRANTIES, INCLUDING BUT NOT LIMITED TO ANY
IMPLIED WARRANTY OF MERCHANTABILITY OR FITNESS FOR A
rights, and you may also have additional rights which vary from state to
state.
WTS
WideAngle
(zoom out)
Forward
(playback mode)
Rewind
(playback mode)
Shutter
Release
Telephoto
(zoom in)
IR-O1
CR2025
PUSH
OPEN
Introduction
Thank you for choosing Vello.
Congratulations on the purchase of your Vello IR-O1 infrared remote
control. This wireless remote lets you take photos, zoom in and out, and
away. The Vello IR-O1 is especially useful for preventing camera shake
during long exposures and for taking self-portraits. It can also be used to
trigger a remote camera when shooting events.
Precautions
Before using your Vello IR-O1infrared remote control, please read the
following safety notices carefully and thoroughly to ensure safe use, and to
help prevent damage to your remote control or injury to yourself or others.
•Remove the battery from this product before long-term storage
in order
to prevent it from leaking corrosive liquids.
•This product is not water resistant. Keep it away from rain, snow,
humidity, and general moisture.
substances such as paint thinner, benzene, or nail polish remover.
•Strong light and weak batteries may adversely affect the transmission of
the infrared signal.
•Dispose of used batteries properly. Never heat them or throw them into
heat, or explode.
Overview
Using Your IR-O1 as a Remote Trigger
The Vello IR-O1
To use your IR-O1 as a remote trigger, turn on your camera and follow
these steps:
1. Remove the plastic separator from the battery.
2. Set up your shot and make sure your camera is in focus.
www.vellogear.com
© Copyright 2012 Gradus Group
WIRELESS SHUTTER
ACTIVATION
INFRARED
REMOTE
CONTROL
USER MANUAL
3. Set your camera for remote triggering. For more information about the
remote triggering feature, consult your camera’s manual.
4. Aim the remote at the camera’s infrared sensor and press the S button to
release the shutter.
Note: With compatible cameras aim the remote at the camera’s infrared
sensor and press T or W button to zoom in or out.
Note: Please see your camera’s user manual for complete instructions and
supported features.
Important!
Becau
se infrared technology requires line-of-sight communication between
the two devices, make sure there are no obstructions between the remote
and your camera’s sensor.
Playback Mode
You can use your Vello IR-O1 remote to wirelessly control playback on your
Olympus camera when the camera is in playback mode. To advance to the
next frame, press the button marked with a plus sign (+). To go back to the
previous frame, press the button marked with a minus sign (-).
Replacing the Battery
The Vello IR-O1 is powered by a 3 V CR2025 lithium battery. To replace the
battery, follow these steps:
1. Push the tab in the direction indicated by
the arrow in the illustration, and pull the
battery tray out of the remote.
2. Remove the old battery and replace it with
a new one, making sure the side marked
with a plus sign (+) is facing up.
3. Push the battery tray back into the remote so it locks in place.
•Operating distance: up to 15 ft. (4.6 m)
•Operating temperatures: 41°F–104°F (5°C–40°C)
•Battery type: 3 V CR2025 lithium
•Typical battery life: up to 3 years; 20,000 exposures
•Dimensions: 2.2 × 1.3 × 0.27 in. (57 × 35 × 7 mm)
•Weight: 0.4 oz. (11.3 g)
Compatible Cameras
Olympus
®
E-1 / E-3 / E-5 / E-30 / E-420 / E-450 / E-500 / E-510 / E-520
E-620
Warranty
Vello provides a limited warranty that this product is free from defects in
materials and workmanship to the original purchaser under normal use f
or a
period of one (1) year from the original purchase date or thirty (30) days
after replacement whichever occurs later. Our responsibility with respect to
this limited warranty shall be limited solely to repair or replacement, at its
option, of any product which fails during normal consumer use.
To obtain warranty coverage during the Warranty Period, contact your
place of purchase (“Seller”) to obtain a return merchandise authorization
(“RMA”) number, and return to Seller the defective product alon
g with
proof of purchase and the RMA number. This warranty does not extend to
damage or failure which results from misuse, neglect, accident, alteration,
abuse, improper installation or maintenance. EXCEPT AS PROVIDED
HEREIN, VELLO MAKES NEITHER ANY EXPRESS WARRANTIES NOR
ANY IMPLIED WARRANTIES, INCLUDING BUT NOT LIMITED TO ANY
IMPLIED WARRANTY OF MERCHANTABILITY OR FITNESS FOR A
rights, and you may also have additional rights which vary from state to
state.
WTS
WideAngle
(zoom out)
Forward
(playback mode)
Rewind
(playback mode)
Shutter
Release
Telephoto
(zoom in)
IR-O1
CR2025
PUSH
OPEN
Introduction
Thank you for choosing Vello.
Congratulations on the purchase of your Vello IR-O1 infrared remote
control. This wireless remote lets you take photos, zoom in and out, and
away. The Vello IR-O1 is especially useful for preventing camera shake
during long exposures and for taking self-portraits. It can also be used to
trigger a remote camera when shooting events.
Precautions
Before using your Vello IR-O1infrared remote control, please read the
following safety notices carefully and thoroughly to ensure safe use, and to
help prevent damage to your remote control or injury to yourself or others.
•Remove the battery from this product before long-term storage in order
to prevent it from leaking corrosive liquids.
•This product is not water resistant. Keep it away from rain, snow,
humidity, and general moisture.
substances such as paint thinner, benzene, or nail polish remover.
•Strong light and weak batteries may adversely affect the transmission of
the infrared signal.
•Dispose of used batteries properly. Never heat them or throw them into
heat, or explode.
Overview
Using Your IR-O1 as a Remote Trigger
The Vello IR-O1
To use your IR-O1 as a remote trigger, turn on your camera and follow
these steps:
1. Remove the plastic separator from the battery.
2. Set up your shot and make sure your camera is in focus.
www.vellogear.com
© Copyright 2012 Gradus Group
WIRELESS SHUTTER
ACTIVATION
INFRARED
REMOTE
CONTROL
USER MANUAL
3. Set your camera for remote triggering. For more information about the
remote triggering feature, consult your camera’s manual.
4. Aim the remote at the camera’s infrared sensor and press the S button to
release the shutter.
Note: With compatible cameras aim the remote at the camera’s infrared
sensor and press T or W button to zoom in or out.
Note: Please see your camera’s user manual for complete instructions and
supported features.
Important!
Becau
se infrared technology requires line-of-sight communication between
the two devices, make sure there are no obstructions between the remote
and your camera’s sensor.
Playback Mode
You can use your Vello IR-O1 remote to wirelessly control playback on your
Olympus camera when the camera is in playback mode. To advance to the
next frame, press the button marked with a plus sign (+). To go back to the
previous frame, press the button marked with a minus sign (-).
Replacing the Battery
The Vello IR-O1 is powered by a 3 V CR2025 lithium battery. To replace the
battery, follow these steps:
1. Push the tab in the direction indicated by
the arrow in the illustration, and pull the
battery tray out of the remote.
2. Remove the old battery and replace it with
a new one, making sure the side marked
with a plus sign (+) is facing up.
3. Push the battery tray back into the remote so it locks in place.
•Operating distance: up to 15 ft. (4.6 m)
•Operating temperatures: 41°F–104°F (5°C–40°C)
•Battery type: 3 V CR2025 lithium
•Typical battery life: up to 3 years; 20,000 exposures
•Dimensions: 2.2 × 1.3 × 0.27 in. (57 × 35 × 7 mm)
•Weight: 0.4 oz. (11.3 g)
Compatible Cameras
Olympus
®
E-1 / E-3 / E-5 / E-30 / E-420 / E-450 / E-500 / E-510 / E-520
E-620
Warranty
Vello provides a limited warranty that this product is free from defects in
materials and workmanship to the original purchaser under normal use f
or a
period of one (1) year from the original purchase date or thirty (30) days
after replacement whichever occurs later. Our responsibility with respect to
this limited warranty shall be limited solely to repair or replacement, at its
option, of any product which fails during normal consumer use.
To obtain warranty coverage during the Warranty Period, contact your
place of purchase (“Seller”) to obtain a return merchandise authorization
(“RMA”) number, and return to Seller the defective product alon
g with
proof of purchase and the RMA number. This warranty does not extend to
damage or failure which results from misuse, neglect, accident, alteration,
abuse, improper installation or maintenance. EXCEPT AS PROVIDED
HEREIN, VELLO MAKES NEITHER ANY EXPRESS WARRANTIES NOR
ANY IMPLIED WARRANTIES, INCLUDING BUT NOT LIMITED TO ANY
IMPLIED WARRANTY OF MERCHANTABILITY OR FITNESS FOR A
rights, and you may also have additional rights which vary from state to
state.
WTS
WideAngle
(zoom out)
Forward
(playback mode)
Rewind
(playback mode)
Shutter
Release
Telephoto
(zoom in)
IR-O1
CR2025
PUSH
OPEN
Specyfikacje produktu
| Marka: | Vello |
| Kategoria: | pilot |
| Model: | IR-O1 |
Potrzebujesz pomocy?
Jeśli potrzebujesz pomocy z Vello IR-O1, zadaj pytanie poniżej, a inni użytkownicy Ci odpowiedzą
Instrukcje pilot Vello

25 Września 2024
25 Września 2024
25 Września 2024
Instrukcje pilot
Najnowsze instrukcje dla pilot
11 Października 2024
27 Września 2024
27 Września 2024
25 Września 2024
21 Września 2024
16 Września 2024
15 Września 2024
15 Września 2024
15 Września 2024
15 Września 2024