Instrukcja obsługi Xvive PX
Przeczytaj poniżej 📖 instrukcję obsługi w języku polskim dla Xvive PX (2 stron) w kategorii nieskategoryzowany. Ta instrukcja była pomocna dla 31 osób i została oceniona przez 9 użytkowników na średnio 4.1 gwiazdek
Strona 1/2
●
3-channel mixer and headphone amplier for personal in-ear-monitoring applications
●
Ultra-compact and lightweight design
●
Cat 5 cable transmits three channels of audio and 9 volts of Power over
Ethernet (PoE)
●
Three balanced female XLR plugs connect to your mixing console or other
audio devices
●
Level control knob powers o the unit all the way counterclockwise
●
Three balanced XLR to unbalanced 1/4” adapters included
●
DIP switches inside PX allow you to control how each channel is panned: left,
right, or both
●
PoE/battery power switch selects either Cat 5 9V PoE power or 2x AAA battery
power
●
Runs for up to 5 hours on 2 AAA batteries (not included)
●
LED indicates when battery power is being used
●
Sturdy beltpack clip
●
Ultra-rugged impact-resistant metal chassis
●
Ethernet cable can simultaneously transmit audio and power over a distance of
up to 200 ft
As a musician and/or singer, whether you’re performing live, rehearsing with a
band or recording in a studio, you need to hear both yourself and the other
musicians. But just as importantly, you need to have control over what you hear.
Everyone hears dierently from their own perspective, so everyone needs to
have control over their own mix.
Ideally, you’d have a monitor engineer—but in most situations it’s likely that you
or another band member are controlling the monitor mix from the stage. Or a
sound technician at the other end of the room has the control; but it’s hard to
communicate with them during a show. Instead of having a xed monitor mix
from the board, PX allows you to set up a simple three-channel monitor mix that
allows you to adjust the levels that matter to you the most—on the y. For
example, one knob could control your vocal level, one could control your
instrument level, and another could be a submix of other vocals and instruments.
With the PX system, control of that balance is always within reach, and always
adjusted perfectly to your liking!
FEATURES
NO SOUND
• Check that the audio source is connected to PX-B and sending signal
• Check that the EC25 cable is connected to PX-A and PX-B
• Check that input 1, 2, and 3 volume controls on PX-A are not turned all the way down
• Check that the main volume knob / power switch is turned on
• Check that earphones/headphones are properly connected
• Check that left and right channel switches in the battery case are not all set to
the o position
NO POWER
• Check that the PX-A power switch (/volume knob) is turned on
• Check that the power mode switch is correctly set to PoE or AAA battery
• Check that the batteries have been installed correctly
• Check to make sure that the PoE power adapter used is 9V/2A DC center-negative
• Check that the EC25 cable is in working order and connected properly
TROUBLESHOOTING
PRODUCT OVERVIEW
PORTABLE 3-CHANNEL
PERSONAL MIXER
For personal IEM/headphone mixes
for live and recording
COMPLETE PX SYSTEM
SPECIFICATIONS
Input type:
Input impedance:
Output type:
Output impedance:
Max. output:
Power input:
Battery life:
Current:
Ethernet cable length:
PoE power requirement:
Balanced XLR
13.3 kΩ
1/8” TRS (stereo)
8-80 Ω
2x 150 mW @ 16 Ω
PoE (Power over Ethernet) or 2x AAA batteries
~5 hours
~210 mA
25 feet / 7.6 m
9V/2A center-negative (powers up to 5 PX-A units)
9V / 500mA center-negative for one PX-A unit
LISTENING TO AUDIO AT EXCESSIVE VOLUMES CAN CAUSE PERMANENT
HEARING DAMAGE. USE AS LOW A VOLUME AS POSSIBLE.
Overexposure to excessive sound levels can damage your ears, resulting in
permanent noise-induced hearing loss. Do not use earphones for a long time and
set the volume below 50%.
Xvive accepts no liability for any loss which may be suered by any person who
relies either wholly or in part upon any description, photograph, or statement
contained herein. Technical specications, appearances and other information
are subject to change without notice.
LIMITED WARRANTY
LEGAL DISCLAIMER
For the applicable warranty terms and conditions and additional information
regarding the Xvive Limited Warranty, please email support@xvive.com.
WARNING
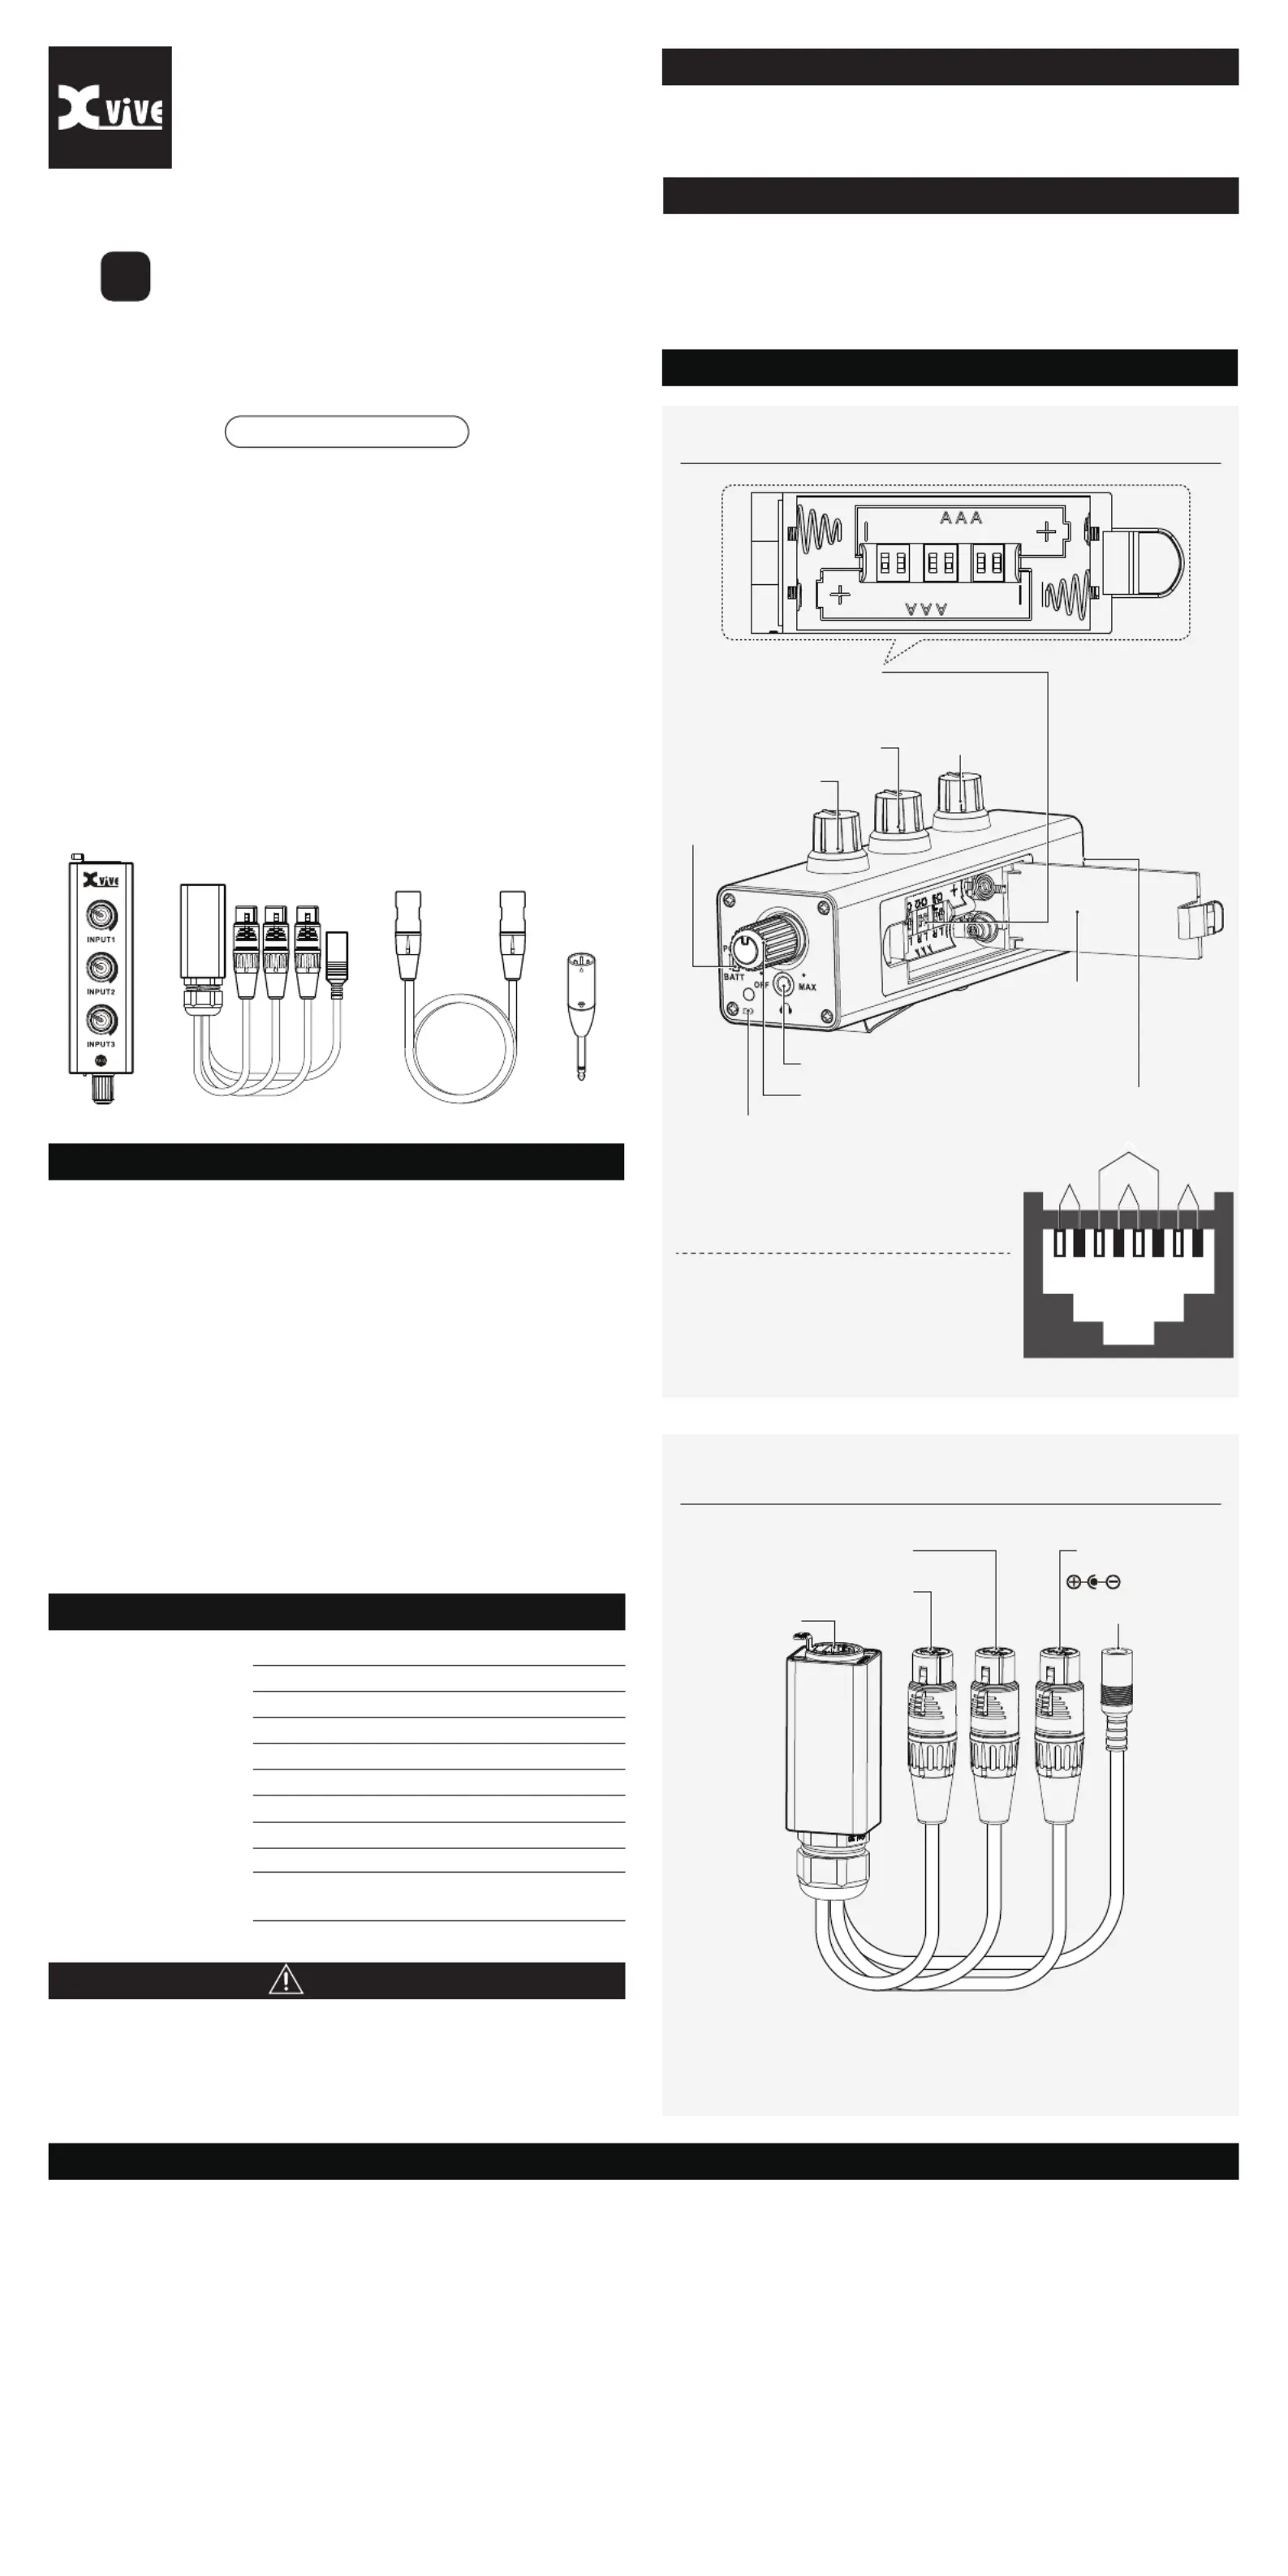
Input 1 Volume
Ethernet input
Input 2 Volume
Input 3 Volume
Power LED
PoE mode: solid on
Battery mode:
100% - 20% charged: Blue LED
20% - 10% charged: Pink LED
10% - 0% charged: Red LED
(When the LED is red, the batteries should be replaced)
Stereo setup DIP switches
L switch ON = audio is sent to the left earphone
R switch ON = audio is sent to the right earphone
L and R both ON = audio is sent to left and right sides
Earphone/headphone output
Earphone/headphone volume
PoE / battery
power switch
Battery compartment
and stereo setup
DIP switches
Ethernet output
Balanced XLR 1
Balanced XLR 2
9V DC center-negative
power input
Balanced XLR 3
Includes 3 balanced-XLR-to-¼”-unbalanced-TS adapters
PX-B
CH1
ONONON
LRLRLR
CH2
CH3
PX-A
PX
DISTORTED AUDIO
• Check if the master volume is too high
• Check the levels going in and out of the PX-A mixer
• Verify that each signal is not distorted at the audio source
• Low batteries can cause distortion. Check batteries and replace if necessary.
LOW AUDIO LEVEL FROM THE PXA EARPHONE OUTPUT
• Check the PX-A master volume (earphone/headphone output) level
• Check CH1, CH2, CH3 volume levels
• Check output levels from audio sources (e.g. mixing console aux outs)
MULTIPLE CONNECTIONS WITH PXH
• The PX-B signal can be sent to up to ve PX-A units via the PX-H Hub, to be
heard simultaneously by up to ve people. You can also stack multiple PX-H
units to build a larger system for more than 5 people.
XLR to ¼” TS
Adapter x 3
EC25PX-BPX-A
CH3CH1CH4
CH2
T568B
Orange+
White
Orange
Green
Brown+White
Brown
Green+White
Blue
Blue+White
ETHERNET INPUT
CH 1 is input 1 XLR hot and XLR coldBlueBlue+White, ,
CH 2 is input 3 XLR hot and XLR coldGreenGreen+White, ,
CH 3 is input 2 XLR hot and XLR coldOrangeOrange+White, ,
CH 4 is PoE power input, Brown (+), Brown+White (-)
Specyfikacje produktu
| Marka: | Xvive |
| Kategoria: | nieskategoryzowany |
| Model: | PX |
Potrzebujesz pomocy?
Jeśli potrzebujesz pomocy z Xvive PX, zadaj pytanie poniżej, a inni użytkownicy Ci odpowiedzą
Instrukcje nieskategoryzowany Xvive

22 Sierpnia 2024
20 Lipca 2024
20 Lipca 2024
10 Czerwca 2024
Instrukcje nieskategoryzowany
Najnowsze instrukcje dla nieskategoryzowany
28 Października 2024
28 Października 2024
27 Października 2024
27 Października 2024
27 Października 2024
27 Października 2024
27 Października 2024
27 Października 2024
27 Października 2024
27 Października 2024