Instrukcja obsługi Avidsen HomeSecure
Avidsen Niesklasyfikowane HomeSecure
Przeczytaj poniżej 📖 instrukcję obsługi w języku polskim dla Avidsen HomeSecure (3 stron) w kategorii Niesklasyfikowane. Ta instrukcja była pomocna dla 30 osób i została oceniona przez 2 użytkowników na średnio 4.4 gwiazdek
Strona 1/3
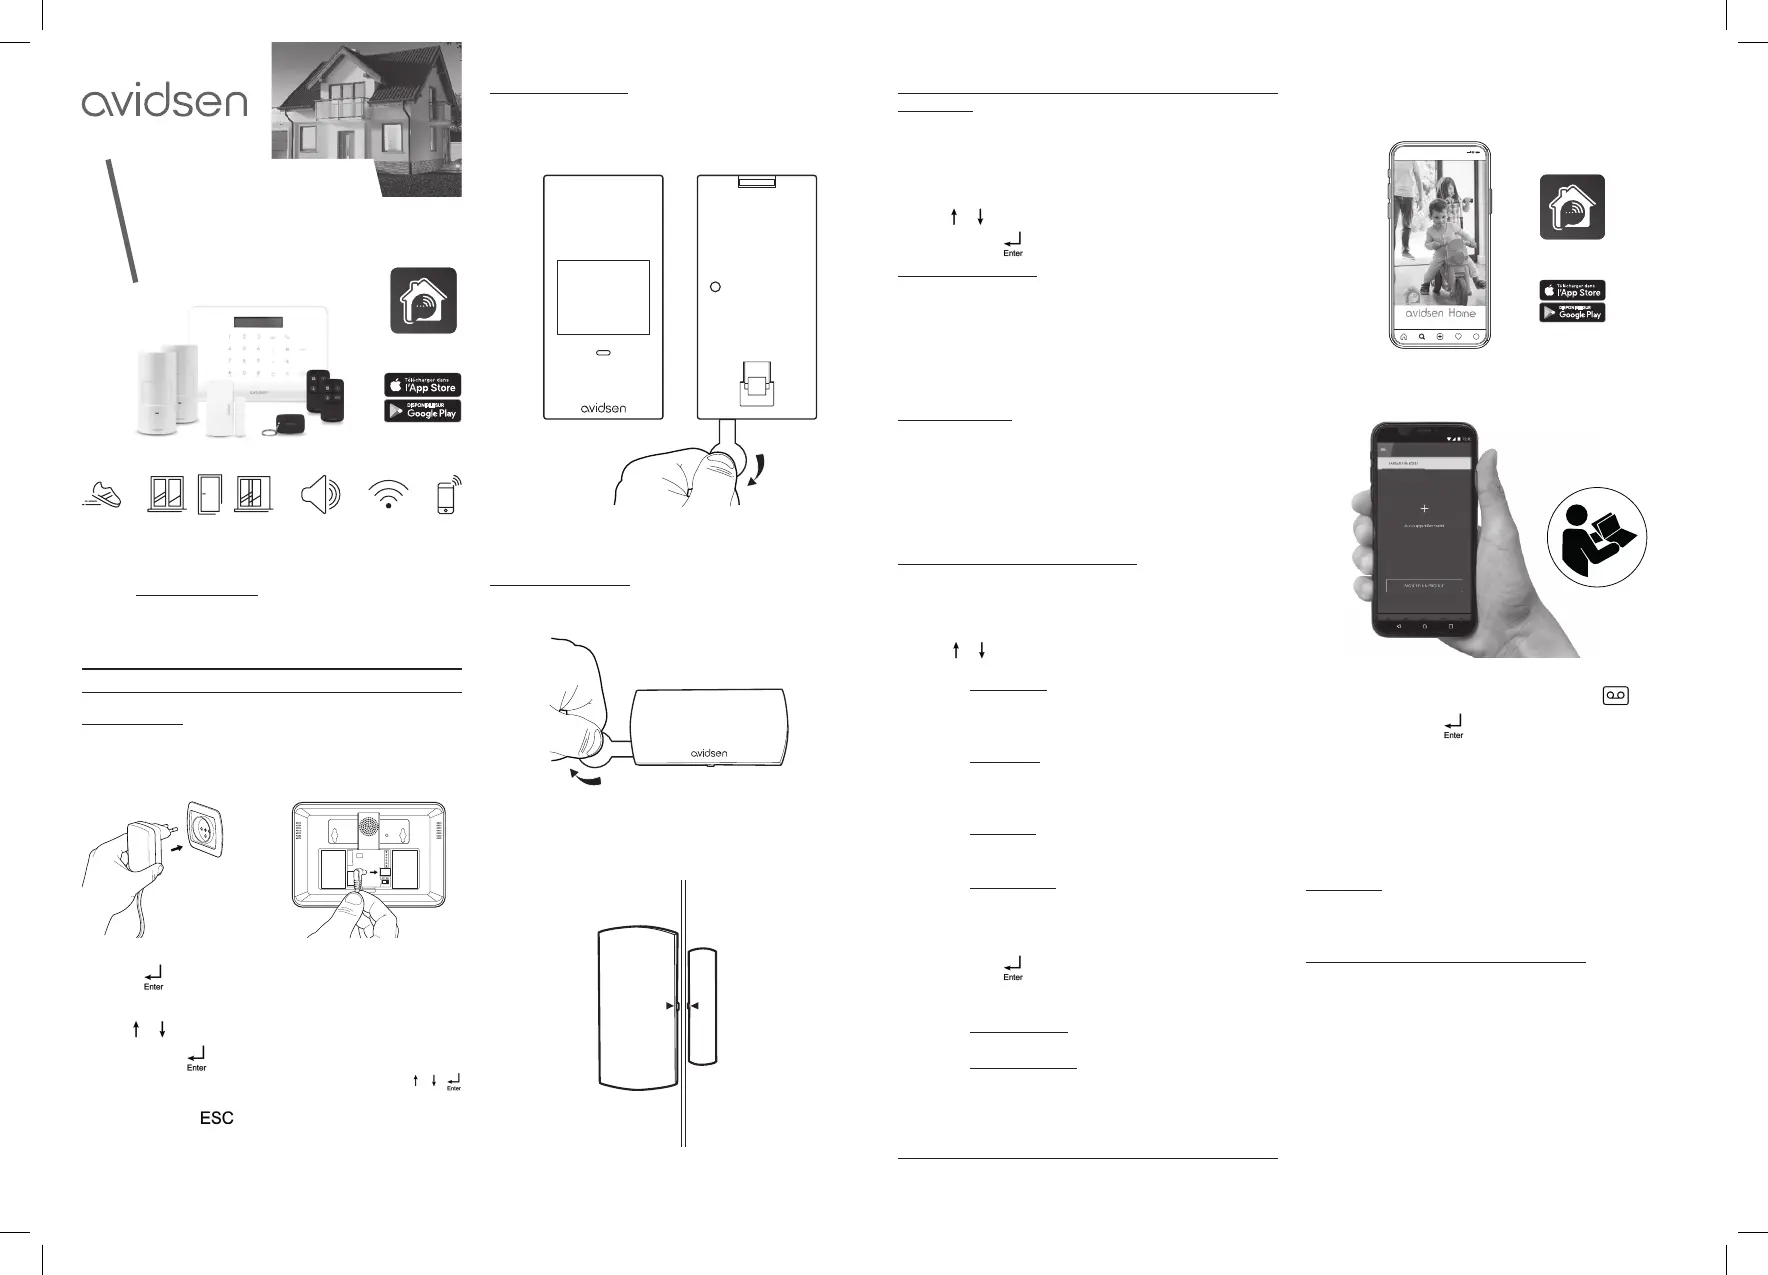
1. INSTALLATION
1.1 Central unit
Power your central unit using the mains adapter provided. Flip
the on/off switch on the back of the central unit to turn it on.
Enter configuration mode by entering 123456 on the keypad
and then
. The central unit displays "Main Menu - Wi-Fi
AP mode".
Use the
buttons to select "System Setting".
Confirm with the
button. The central unit displays "System
Setting - Date and Time". Here you can use the
buttons to set the central unit's date and time format and
language. Use the
button to return to the previous level
to change the settings. Do not change any of the other available
settings at this time.
Full instructions for your alarm system are available on the
website: www.avidsen.com.
Download this manual for more information on setting up and
using your HomeSecure alarm.
V3
WIRELESS
CONNECTED ALARM
HomeSecure
Ref. 127055
EN
Avidsen
Home
1.2 Motion detectors
Open each detector and power them with the batteries
provided.
Each detector is designed for an optimum installation height of
2.20 m.
1.3 Opening detector
Slide the back cover of the opening detector down to access
the battery compartment and insert the battery to power it.
The detector is designed to be installed on the fixed part of an
opening (door frame, window frame). The magnet is installed on
the moving part of the opening, 5 mm from the mark on the right
edge of the sensor.
5mm
1.4 Pairing detectors, remote control and badge with the
central unit
Enter configuration mode by entering 123456
on the keypad
and then Entry Symbol
. The central unit displays "Main Menu
- Wi-Fi AP mode".
Use the
buttons to select "Accessoires" (Accessories).
Confirm with the
button.
1.4.1 Remote control
In the "Accessoires" (Accessories) menu, select
"Télécommande " (Remote control) then press "Ajouter"
(Add). The central unit then waits for you to press the remote
control. Press any button on either remote control during the
countdown.
Then restart the countdown for the second remote control.
1.4.2 RFID badge
In the "Accessoires" (Accessories) menu, select "Badge
RFID" (RFID Badge) then press "Ajouter" (Add). The central
unit then waits for you to swipe the RFID badge in front of it.
Swipe your included badge in front of the RFID zone on the right
side of the central unit during the countdown.
1.4.3 Opening and motion detectors
In the "Accessoires" (Accessories) menu, select "Détect.
sans fil" (Wireless detection) then press "Ajouter" (Add). The
central unit displays "Zone normal" (Normal zone).
Use the
buttons to select the desired behaviour of the
accessory. There are four possible behaviours:
• Normal zone: The detector will trigger an alert if the
alarm is armed (both partially armed and fully armed
modes).
• Home zone: The detector will trigger an alert if the
alarm is in fully armed mode If in partially armed mode,
the detector will do nothing.
• 24H zone: the detector will trigger an alert
regardless of whether or not the alarm is armed.
• Entrance zone: the detector will trigger an alert if the
alarm is armed (both partially armed and fully armed
modes), but after a few-second delay, giving you time
to disarm before the alert is triggered.
Confirm with the
button.
The central unit then waits for a signal from the paired detector.
• Motion detector: press the button on the back of
the detector during the countdown.
• Opening detector: pass the magnet in front of the
mark on the edge of the detector during the countdown.
Repeat the procedure for each of your detectors.
1.5 Connecting to the Internet and the Avidsen Home app
Download the Avidsen Home app and enable the WiFi on your
smartphone or tablet.
Avidsen
Home
8:30
Open the app and create an account using your address
Avidsen Home
8:30
www.avidsen.com.
On your alarm unit, enter 123456 then press the button.
(Note: this is not the
button). The control panel displays
"Wi-Fi EZ Mode" followed by a three minute countdown.
During the countdown, add a new HomeSecure
product to the
Avidsen Home app on your smartphone. During the process,
you will be asked to tell your central unit which WiFi network to
use to access the Internet.
Important: system not compatible with 5GHz WiFi. Please
check the WiFi settings of your gateway with your Internet
service provider if you experience connection difficulties.
1.6 Inserting and configuring the SIM card
Using a SIM card is optional if you use the Avidsen Home app
or the central unit to arm and disarm your alarm system, but
necessary if you want to arm or disarm via text message or
voice call.
The SIM card must not be PIN code protected. It must allow text
messages and voice calls.
Disconnect the power to the central unit by unplugging the
mains adapter and flipping the on/off switch on the back. Insert
the SIM card into the slot on the back of the central unit before
turning the power back on.
Specyfikacje produktu
| Marka: | Avidsen |
| Kategoria: | Niesklasyfikowane |
| Model: | HomeSecure |
Potrzebujesz pomocy?
Jeśli potrzebujesz pomocy z Avidsen HomeSecure, zadaj pytanie poniżej, a inni użytkownicy Ci odpowiedzą
Instrukcje Niesklasyfikowane Avidsen

5 Października 2024
5 Września 2024
18 Sierpnia 2024
6 Sierpnia 2024
6 Sierpnia 2024
Instrukcje Niesklasyfikowane
Najnowsze instrukcje dla Niesklasyfikowane
29 Stycznia 2025
29 Stycznia 2025
29 Stycznia 2025
29 Stycznia 2025
29 Stycznia 2025
29 Stycznia 2025
29 Stycznia 2025
29 Stycznia 2025
29 Stycznia 2025
29 Stycznia 2025