Instrukcja obsługi AXESS AXDSPX-GM33
AXESS
Niesklasyfikowane
AXDSPX-GM33
Przeczytaj poniżej 📖 instrukcję obsługi w języku polskim dla AXESS AXDSPX-GM33 (8 stron) w kategorii Niesklasyfikowane. Ta instrukcja była pomocna dla 21 osób i została oceniona przez 11 użytkowników na średnio 4.7 gwiazdek
Strona 1/8
AXDSPX-GM33
INSTALLATION INSTRUCTIONS
AxxessInterfaces.com © COPYRIGHT 2024 METRA ELECTRONICS CORPORATION REV. 2/12/24 INSTAXDSPX-GM33
INTERFACE FEATURES
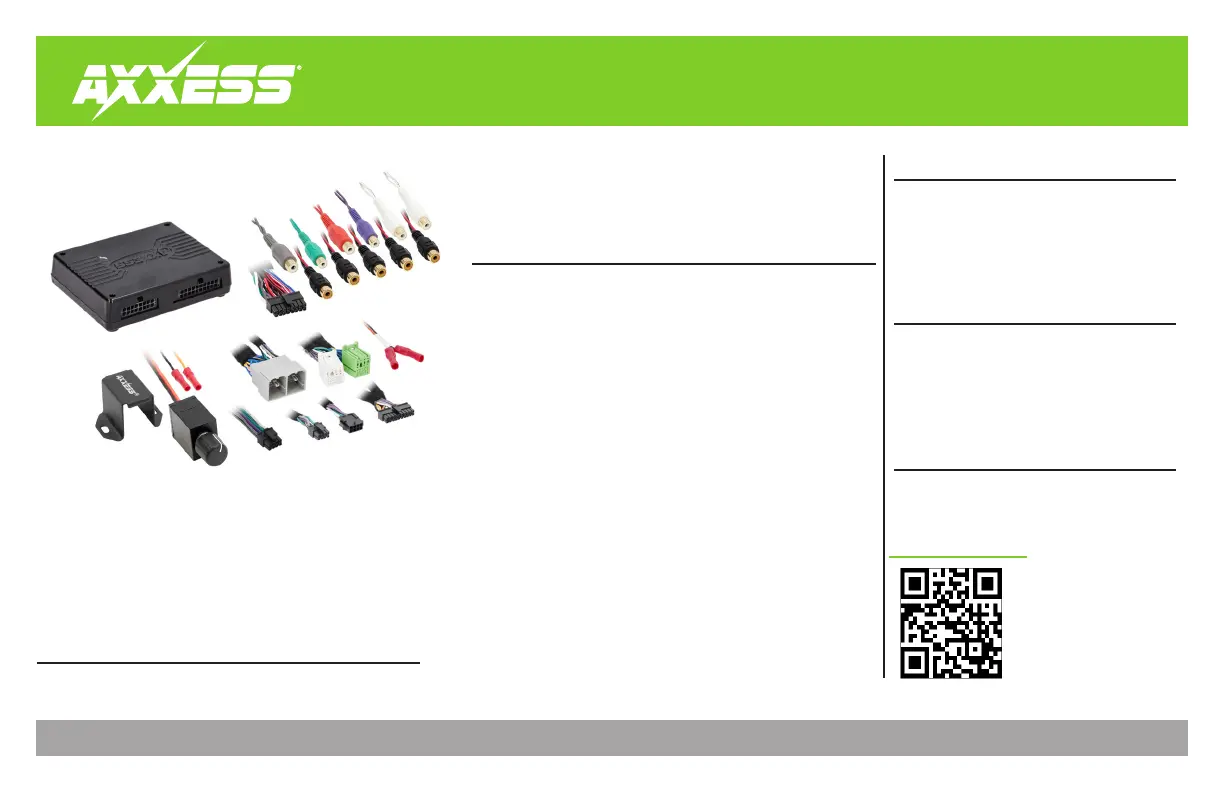
INTERFACE COMPONENTS
TOOLS & INSTALLATION ACCESSORIES REQUIRED
• Crimping tool and connectors, or solder gun,
solder, and heat shrink • Tape • Wire cutter
• Zip ties • Multimeter
TABLE OF CONTENTS
Installation Options ...............................................2
Installation .............................................................2
Connections ........................................................3-4
Mobile App .........................................................5-6
Specifications ......................................................... 7
GM DSP Interface With Pre-Wired Harness
2021-Up
• Designed for non-amplified models
• Includes a DSP (Digital Signal Processor)
• 31 Band graphic EQ or 5 Band Parametric EQ
• 10 individually assignable outputs
• Independent equalization on each of the 10 outputs
• Independent high pass, low pass, and bandpass filters
• Each channel can be delayed independently up to 10ms
• Clipping detection and limiting circuits
• Retains factory parking sensor chimes
• Retains OnStar
®
voice prompts
• Adjustable chime level
• Easy behind the radio installation with pre-wired harness
• Bass knob included for level control of subwoofer amp
• Settings adjusted via Bluetooth
®
in a smart device application (tablet
or mobile phone), compatible with both Android and Apple devices
• Read, write, and store configurations for future recall
• Password protect feature available in the mobile app
• Micro-B USB updatable
• AXDSPX-GM33 interface
• AXDSPX-GM33 output harness (LD-AX-DSP-OUT2)
• AXDSPX-GM33 vehicle T-harness (LD-DSP-GM33)
• Resistor Pad (LD-DSP-RPAD2)
• Bass knob (LD-BASSKNOB)
APPLICATIONS
Visit axxessinterfaces.com for current application list
www.MetraOnline.com
MetraOnline.com may be used
to assist with dash assembly
instructions. Simply enter your
Year, Make, Model vehicle into the
vehicle fit guide and look for the
Dash Kit Installation Instructions.
Specyfikacje produktu
| Marka: | AXESS |
| Kategoria: | Niesklasyfikowane |
| Model: | AXDSPX-GM33 |
Potrzebujesz pomocy?
Jeśli potrzebujesz pomocy z AXESS AXDSPX-GM33, zadaj pytanie poniżej, a inni użytkownicy Ci odpowiedzą
Instrukcje Niesklasyfikowane AXESS

28 Stycznia 2025

28 Stycznia 2025

10 Stycznia 2025

28 Grudnia 2024

28 Grudnia 2024

27 Grudnia 2024

27 Grudnia 2024

9 Października 2024

8 Października 2024

8 Października 2024
Instrukcje Niesklasyfikowane
- Tot Tutors
- Smart
- Tronic
- Lehle
- Zephyr
- Zenit
- SRS
- Eurospec
- My Arcade
- Farberware
- Ultimate Speed
- Dayclocks
- Estella
- Think Tank
- NuPrime
Najnowsze instrukcje dla Niesklasyfikowane

29 Stycznia 2025

29 Stycznia 2025

29 Stycznia 2025

29 Stycznia 2025

29 Stycznia 2025

29 Stycznia 2025

29 Stycznia 2025

29 Stycznia 2025

29 Stycznia 2025

29 Stycznia 2025