Instrukcja obsługi AXESS AXPIO-STY1
AXESS
Niesklasyfikowane
AXPIO-STY1
Przeczytaj poniżej 📖 instrukcję obsługi w języku polskim dla AXESS AXPIO-STY1 (24 stron) w kategorii Niesklasyfikowane. Ta instrukcja była pomocna dla 8 osób i została oceniona przez 4.5 użytkowników na średnio 4.5 gwiazdek
Strona 1/24
AXPIO-STY1
INSTALLATION INSTRUCTIONS
AxxessInterfaces.com © COPYRIGHT 2024 METRA ELECTRONICS CORPORATION REV. 7/30/24 INSTAXPIO-STY1
TABLE OF CONTENTS
Speaker Installation...............................................2
Dash Disassembly .............................................. 3-5
Connections ............................................................ 6
Kit Assembly ..........................................................7
Radio Operations ............................................... 8-9
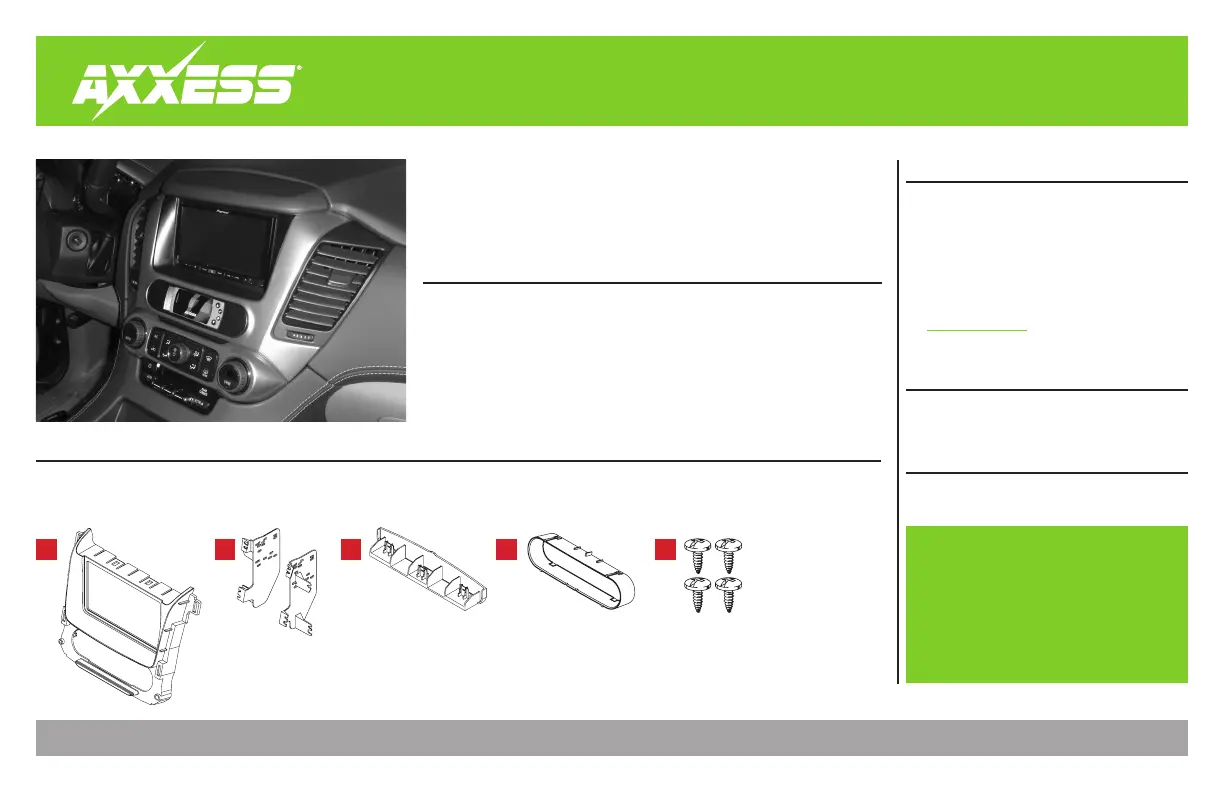
Chevrolet Suburban/Tahoe 2015-2020
GMC Yukon 2015-2020
KIT FEATURES
•
Designed for Pioneer DMH-W4600NEX/W4660NEX or DMH-WC5700NEX receivers
• Allows for the retention and adjustment of the factory personalization menu
through the Pioneer radio
• Provides a visual view of HVAC and gauges on the Pioneer screen (cannot be
adjusted via the screen)
(cont. on page 2)
KIT COMPONENTS
A) Radio housing trim panel • B) Brackets • C) Trim panel bracket • D) Pocket • E) #8 x 3/8" Truss-head Phillips screws (4)
Not Shown: Radio Interface, LD-GMLAN09-PIO, LD-BACKCAM-MOST, LD-GMSWC, AD-EU5, 40-GPS-PIO,
PR04AVIC-PIO / PRO4-PIORCA, LD-AX-SPK, AXUSB-GM6
Visit AxxessInterfaces.com for more detailed information about
the product and up-to-date vehicle specific applications.
WIRING & ANTENNA CONNECTIONS (sold separately)
•
RGB Extension Cable: Pioneer part # CD-RGB150A
(not sold by Metra)
TOOLS REQUIRED
• Panel removal tool • Phillips screwdriver
• 9/32" socket wrench
A B DC E
ATTENTION: With the key out of the ignition,
disconnect the negative battery terminal before
installing this product. Ensure that all installation
connections, especially the air bag indicator lights, are
plugged in before reconnecting the battery or cycling
the ignition to test this product.
NOTE: Refer also to the instructions included with the
aftermarket accessory before installing this device.
Specyfikacje produktu
| Marka: | AXESS |
| Kategoria: | Niesklasyfikowane |
| Model: | AXPIO-STY1 |
Potrzebujesz pomocy?
Jeśli potrzebujesz pomocy z AXESS AXPIO-STY1, zadaj pytanie poniżej, a inni użytkownicy Ci odpowiedzą
Instrukcje Niesklasyfikowane AXESS

28 Stycznia 2025

28 Stycznia 2025

10 Stycznia 2025

28 Grudnia 2024

28 Grudnia 2024

27 Grudnia 2024

27 Grudnia 2024

9 Października 2024

8 Października 2024

8 Października 2024
Instrukcje Niesklasyfikowane
- Warwick
- AJ.BA
- EQ-3
- Thermarest
- Elkay
- Baby Trend
- Grandstream
- Ergotools Pattfield
- Leviton
- Cooper & Quint
- Audio-Technica
- Festool
- Eller
- Needit
- CSL
Najnowsze instrukcje dla Niesklasyfikowane

29 Stycznia 2025

29 Stycznia 2025

29 Stycznia 2025

29 Stycznia 2025

29 Stycznia 2025

29 Stycznia 2025

29 Stycznia 2025

29 Stycznia 2025

29 Stycznia 2025

29 Stycznia 2025