Instrukcja obsługi AXESS AXVI-9006
AXESS
Niesklasyfikowane
AXVI-9006
Przeczytaj poniżej 📖 instrukcję obsługi w języku polskim dla AXESS AXVI-9006 (8 stron) w kategorii Niesklasyfikowane. Ta instrukcja była pomocna dla 10 osób i została oceniona przez 5.5 użytkowników na średnio 4.7 gwiazdek
Strona 1/8

AXVI-9006
I N S TA L L A T I O N I N S T R U C T I O N S
AxxessInterfaces.com © COPYRIGHT 2020 METRA ELECTRONICS CORPORATION REV. 5/10/23 INSTAXVI-9006
ATTENTION: With the key out of the
ignition, disconnect the negative battery
terminal before installing this product. Ensure
that all installation connections, especially the
air bag indicator lights, are plugged in before
reconnecting the battery or cycling the ignition
to test this product.
NOTE: Refer also to the instructions included
with the aftermarket radio.
INTERFACE FEATURES
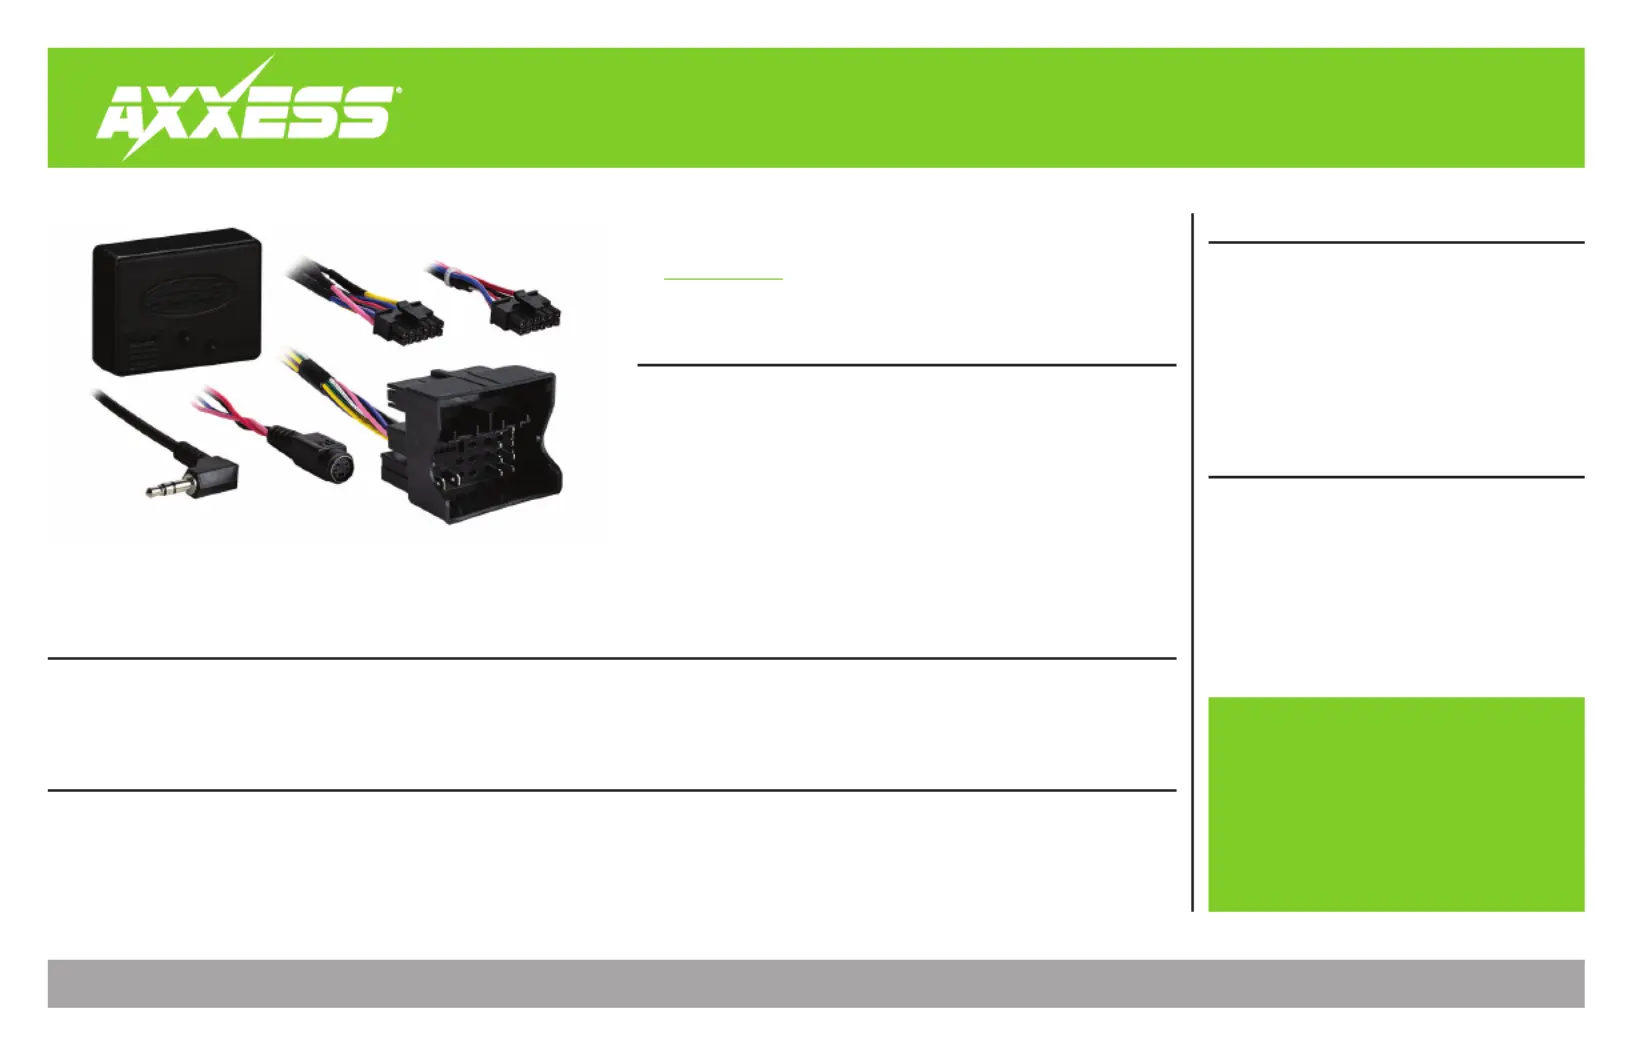
INTERFACE COMPONENTS
TOOLS REQUIRED
• Crimping tool and connectors, or solder gun,
solder, and heat shrink • Tape • Wire cutter
• Zip ties • Small flat-blade screwdriver
TABLE OF CONTENTS
Connections 2 ............................................................
Installation 3 .............................................................
Programming 3 .........................................................
Volkswagen Data Interface 2015-Up
APPLICATIONS
• Provides accessory power
(12-volt 10-amp)
• Retains R.A.P. (retained
accessory power)
• Provides NAV outputs (parking
brake, reverse, speed sense)
• For use in non-amplified
systems, or when replacing an
amplified system
• 48-inch leads for remote tuner
location
• Pre-wired AXSWC harness
(AXSWC sold separately)
• Retains the factory backup
camera
• Retains balance and fade
• Micro-B USB updatable
Volkswagen
Beetle 2016-2019 ................................................
Golf Series 2015-Up ...........................................
Jetta 2016-2019 ..................................................
Jetta GLI 2016-2018 ............................................
Passat...................................................2016-Up
Tiguan 2016-2017 ...............................................
• AXVI-9006 interface
• AXVI-9006 harness
Visit for more detailed information about the product and up-to-date
AxxessInterfaces.com
vehicle specific applications

2
CONNECTIONS
From the AXVI-9006 harness to the aftermarket radio:
• Connect the wire to the ground wire.Black
• Connect the wire to the battery wire.Yellow
• Connect the wire to the accessory wire.Red
• If the aftermarket radio has an illumination wire, connect the wire to it.Orange
• Tape off and disregard the wire, it will not be used in this application.Blue/White
• Connect the wire to the right front positive speaker output.Gray
• Connect the wire to the right front negative speaker output.Gray/Black
• Connect the wire to the left front positive speaker output.White
• Connect the wire to the left front negative speaker output.White/Black
• Connect the wire to the radio’s left rear positive speaker output.Green
• Connect the wire to the radio’s left rear negative speaker output.Green/Black
• Connect the wire to the radio’s right rear positive speaker output.Purple
• Connect the wire to the radio’s right rear negative speaker output.Purple/Black
The following (3) wires are for aftermarket multimedia/navigation radios that provide these
wires (if not required, tape them off and disregard them).
• Connect the wire to the parking brake wire.Light Green
• Connect the wire to the VSS or speed sense wire.Blue/Pink
• Connect the wire to the reverse wire.Green/Purple
•
If retaining the factory backup camera, connect the RCA jack to the backup camera inputYellow
.
12-pin AXSWC harness & 3.5mm jack:
The 12-pin AXSWC harness & 3.5mm jack are to be used with an AXSWC (sold separately) to
retain steering wheel audio controls. If the AXSWC is not being used, disregard this harness
and 3.5mm jack. If it is to be used, please refer to the AXSWC instructions for radio connections
and programming. Disregard the harness that comes with the AXSWC.
• Disregard the DIN connector, it will not be used in this application.

3
REV. 5/10/23 INSTAXVI-9006
With the key in the off position:
Connect the into the interface, and then to the wiring harness in the 1. AXVI-9006 harness
vehicle.
The harness will connect to the harness removed from the disc drive located in the Note:
glove box for remote tuner applications.
If an (sold separately) will be used, do not connect it until the interface is 2. AXSWC
programmed and fully functional.
Attention! If the interface ever loses power, the following steps will need to be performed again.
Please ensure that the owner of the vehicle knows this.
1.
Turn the key (or push-to-start button) to the ignition position and wait until the radio comes on
.
If the radio doesn’t not come on within 60 seconds, turn the key to the off position, Note:
disconnect the interface, check all connections, reconnect the interface, and then try again.
2. Turn the key (or push-to-start button) to the off position, then to the accessory position.
Test all functions of the installation for proper operation, before reassembling the dash.
INSTALLATION PROGRAMMING
Specyfikacje produktu
Marka: | AXESS |
Kategoria: | Niesklasyfikowane |
Model: | AXVI-9006 |
Potrzebujesz pomocy?
Jeśli potrzebujesz pomocy z AXESS AXVI-9006, zadaj pytanie poniżej, a inni użytkownicy Ci odpowiedzą
Instrukcje Niesklasyfikowane AXESS
28 Stycznia 2025
28 Stycznia 2025
10 Stycznia 2025
28 Grudnia 2024
28 Grudnia 2024
27 Grudnia 2024
27 Grudnia 2024
9 Października 2024
8 Października 2024
8 Października 2024
Instrukcje Niesklasyfikowane
- Niesklasyfikowane Sagemcom
- Niesklasyfikowane Baumr-AG
- Niesklasyfikowane Aukey
- Niesklasyfikowane GMB Gaming
- Niesklasyfikowane MuxLab
- Niesklasyfikowane Bellari
- Niesklasyfikowane Cinderella
- Niesklasyfikowane Vertiv
- Niesklasyfikowane Napoleon
- Niesklasyfikowane Hidrate
- Niesklasyfikowane Oregon Scientific
- Niesklasyfikowane TranzX
- Niesklasyfikowane Forge Adour
- Niesklasyfikowane Verbatim
- Niesklasyfikowane Fujifilm
Najnowsze instrukcje dla Niesklasyfikowane
29 Stycznia 2025
29 Stycznia 2025
29 Stycznia 2025
29 Stycznia 2025
29 Stycznia 2025
29 Stycznia 2025
29 Stycznia 2025
29 Stycznia 2025
29 Stycznia 2025
29 Stycznia 2025