Instrukcja obsługi Cudy WE3000S
Cudy Niesklasyfikowane WE3000S
Przeczytaj poniżej 📖 instrukcję obsługi w języku polskim dla Cudy WE3000S (2 stron) w kategorii Niesklasyfikowane. Ta instrukcja była pomocna dla 24 osób i została oceniona przez 2 użytkowników na średnio 4.6 gwiazdek
Strona 1/2
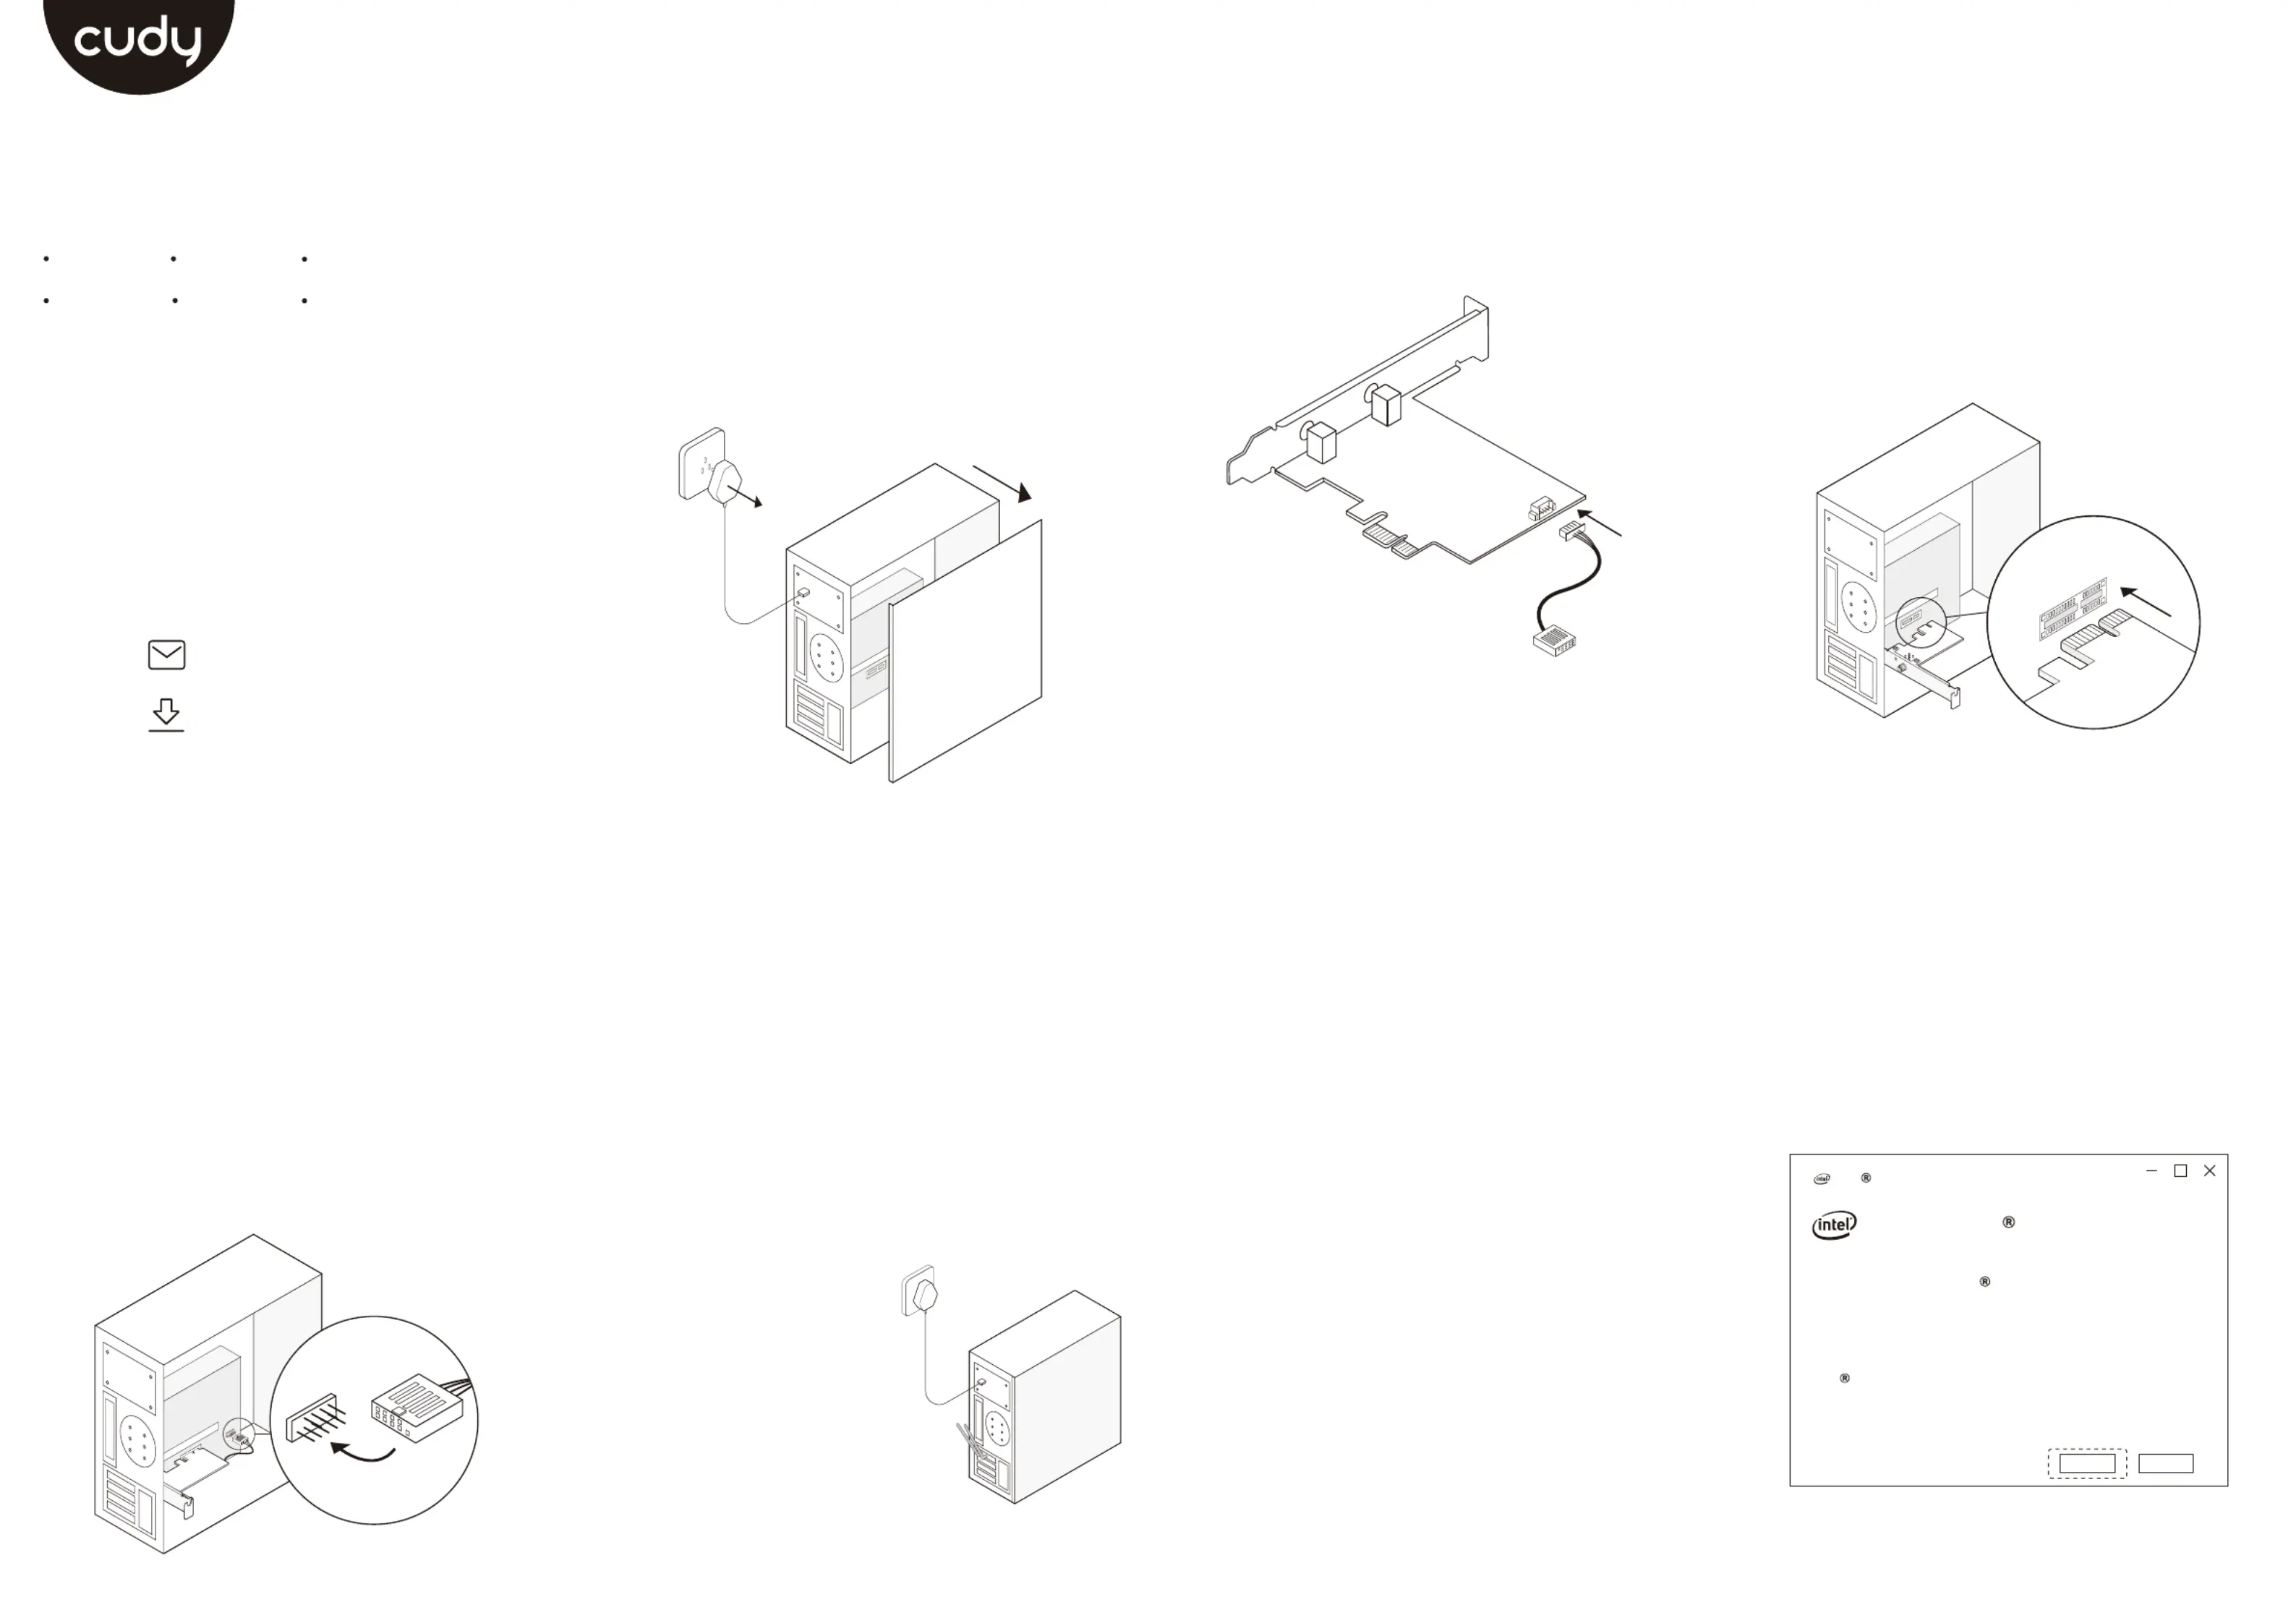
Hardware Installation
This installation method takes the win10_ bit system as 64
an example. Insert the CD into the CD-ROM drive, double-
click the drive letter, open the corresponding driver folder,
and double-click "WiFi_21.50.1_Driver_Win10.exe" to 64
run the installer to complete the installation.
Diese Installationsmethode nimmt das win10_-Bit-System als Beispiel. 64
Legen Sie die CD in das CD-ROM-Laufwerk ein, doppelklicken Sie auf
den Laufwerksbuchstaben, öffnen Sie den entsprechenden Treiberordner
und doppelklicken Sie auf "WiFi_21.50.1_Driver_Win10.exe", um das 64
Installationsprogramm auszuführen und die Installation abzuschließen.
Cette méthode d'installation prend comme exemple le système win10_ 64
bits. Insérez le CD dans le lecteur de CD-ROM, double-cliquez sur la lettre
du lecteur, ouvrez le dossier du pilote correspondant, puis double-cliquez
sur "WiFi_21.50.1_Driver_Win10.exe" pour lancer le programme 64
d'installation et terminer l'installation.
Questo metodo di installazione prende come esempio il sistema
win10_ bit. Inserire il CD nell'unità CD-ROM, fare doppio clic sulla 64
lettera dell'unità, aprire la cartella del driver corrispondente e fare doppio
clic su "WiFi_21.50.1_Driver_Win10.exe" per eseguire il programma di 64
installazione per completare l'installazione.
Este método de instalación toma el sistema win10_ bit como ejemplo. 64
Inserte el CD en la unidad de CD-ROM, haga doble clic en la letra de la
unidad, abra la carpeta del controlador correspondiente y haga doble
clic en "WiFi_21.50.1_Driver_Win10.exe" para ejecutar el instalador y 64
completar la instalación.
このインストール方法では、例としてwin10_64ビットシステムを使用します。
CDをCD-ROMドライブに挿入し、ドライブ文字をダブルクリックして、対応す
るドライバーフォルダーを開き、「WiFi_21.50.1_Driver_Win10.exe64」をダ
ブルクリックしてインストーラーを実行し、インストールを完了します。
4. Locate an available F_USB connector and carefully plug
the Bluetooth USB cable into it.
Suchen Sie einen verfügbaren F_USB-Anschluss und stecken Sie das
Bluetooth-USB-Kabel vorsichtig ein.
Recherchez un connecteur F_USB disponible et branchez soigneuse-
ment le câble USB Bluetooth à celui-ci.
Individua un connettore F_USB disponibile e collega con cura il cavo
USB Bluetooth al suo interno.
Localice un conector F_USB disponible y conecte con cuidado el cable
USB Bluetooth.
使用可能なF_USBコネクタを見つけて、Bluetooth USBケーブルを慎重に差
し込みます。
3. Locate an available PCIE X1 slot and carefully insert the
adapter.
Suchen Sie einen verfügbaren PCIE X1-Steckplatz und setzen Sie den
Adapter vorsichtig ein.
Recherchez un emplacement PCIE X1 disponible et insérez l’adaptateur
avec précaution.
Individuare uno slot PCIE X1 disponibile e inserire con cura l'adattatore.
Localice una ranura PCIE X1 disponible e inserte cuidadosamente el
adaptador.
使用可能なPCIE X1スロットを見つけて、アダプターを慎重に挿入します。
2. Connect the provided Bluetooth USB cable to the
adapter.
Schließen Sie das mitgelieferte Bluetooth-USB-Kabel an den Adapter an.
Connectez le câble USB Bluetooth fourni à l'adaptateur.
Collegare il cavo USB Bluetooth in dotazione all'adattatore.
Conecte el cable USB Bluetooth provisto al adaptador.
付属のBluetooth USBケーブルをアダプターに接続します。
1. Turn off your computer, unplug the power cable then
remove the case panel.
Schalten Sie Ihren Computer aus, ziehen Sie das Netzkabel ab und
entfernen Sie die Gehäuseabdeckung.
Éteignez votre ordinateur, débranchez le câble d'alimentation, puis retirez
le panneau du boîtier.
Spegnere il computer, scollegare il cavo di alimentazione, quindi
rimuovere il pannello della custodia.
Apague la computadora, desconecte el cable de alimentación y luego
retire el panel de la carcasa.
コンピューターの電源を切り、電源ケーブルを抜き、ケースパネルを取り外します。
Note: If the bracket is not suitable for your computer, detach it from the
adapter's board and replace it with the low-profile bracket.
Note: If the Bluetooth USB cable is not correctly connected to the
motherboard, Bluetooth function won’t work even after driver installation.
Email:
support@cudy.com
Driver & manual:
www.cudy.com/download
Quick Installation Guide
EnglishDeutsch
EspañolItaliano
Français
にほんご
5. Connect the antennas to the adapter.
Schließen Sie die Antennen an den Adapter an.
Connectez les antennes à l'adaptateur.
Collegare le antenne all'adattatore.
Conecte las antenas al adaptador.
アンテナをアダプターに接続します。
USB
Tip:To maximize performance, make sure the path between the antennas
and your router is clear.
6. Replace the case panel, plug in the power cable and
turn on your computer.
Bringen Sie die Gehäuseabdeckung wieder an, schließen Sie das
Netzkabel an und schalten Sie den Computer ein.
Replacez le panneau du boîtier,
branchez le câble d'alimentation et
allumez votre ordinateur.
Riposizionare il pannello della custodia,
collegare il cavo di alimentazione e
accendere il computer.
Vuelva a colocar el panel de la carcasa,
conecte el cable de alimentación y
encienda la computadora.
ケースパネルを交換し、電源ケーブルを接続
して、コンピューターの電源を入れます。
Bluetooth USB cable
Adapter
Wireless Adapter Driver Installation
Intel Software Installer
Welcome to Intel Software Installer
This installer will install Intel PROSet / Wireless WiFi Software
on your computer. Click “Next” to continue or Cancel to exit.
The following components will be installed:
Intel WiFi driver
Next
Cancel
Specyfikacje produktu
| Marka: | Cudy |
| Kategoria: | Niesklasyfikowane |
| Model: | WE3000S |
Potrzebujesz pomocy?
Jeśli potrzebujesz pomocy z Cudy WE3000S, zadaj pytanie poniżej, a inni użytkownicy Ci odpowiedzą
Instrukcje Niesklasyfikowane Cudy

31 Grudnia 2025
9 Października 2024
8 Października 2024
Instrukcje Niesklasyfikowane
Najnowsze instrukcje dla Niesklasyfikowane
29 Stycznia 2025
29 Stycznia 2025
29 Stycznia 2025
29 Stycznia 2025
29 Stycznia 2025
29 Stycznia 2025
29 Stycznia 2025
29 Stycznia 2025
29 Stycznia 2025
29 Stycznia 2025