Instrukcja obsługi EXSYS EX-1324
Przeczytaj poniżej 📖 instrukcję obsługi w języku polskim dla EXSYS EX-1324 (2 stron) w kategorii Kable do komputerów PC i urządzeń peryferyjnych. Ta instrukcja była pomocna dla 18 osób i została oceniona przez 6 użytkowników na średnio 4.0 gwiazdek
Strona 1/2
Because the designs of computers are different, only general installation instructions are
given. Please refer your computer’s reference manual whenever in doubt.
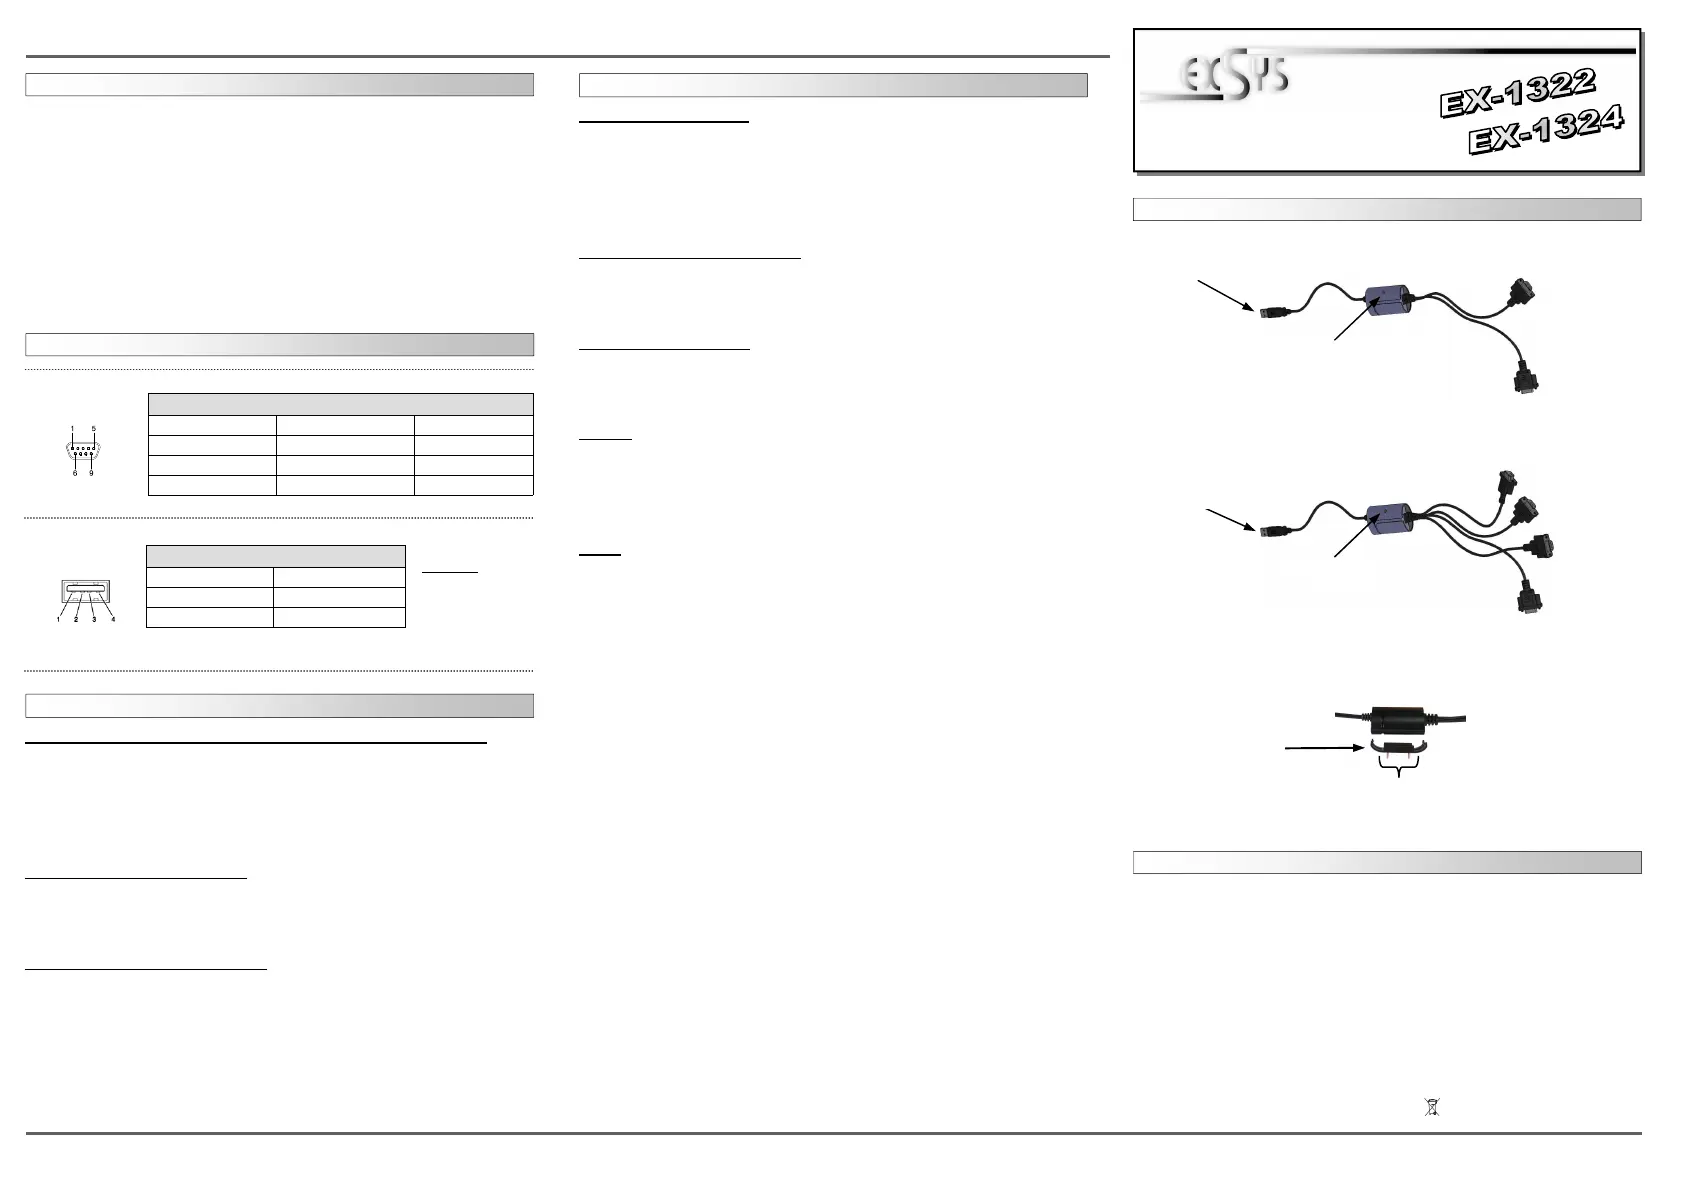
1. Plug the USB Type-A end of the Adapter cable into the USB host port of your PC or
into an available USB port on a USB hub
2. Connect the RS-232 Serial Devices to the DB9 male connectors of the Adapter
cable.
3. Use the supplied Wall Mounting Kit to fix the plastic housing body of the Adapter
cable in case required, if you need to fix it on a DIN RAIL, you may need to order
the optional DIN RAIL Clips (EX-6999) from your dealer.
4. Proceed with the next section “Installing Drivers” to install the virtual COM port
drivers for your Operating System.
HARDWARE INSTALLATION :
6 5
EX
EX
EX
-
-
-
1322/1324
1322/1324
1322/1324
English
English
English
EX
EX
EX
-
-
-
1322/1324
1322/1324
1322/1324
English
English
English
1
Die EX-1322 oder EX-1324 ist ein Kabel mit Umsetzung von USB 2.0 auf zwei respekti-
ve vier RS-232 Schnittstellen mit FIFO 16C550 Ports für den Anschluss von High Speed
Seriellen RS-232 Peripherie Geräten (z.B. Modem, Plotter usw.) Die EX-1322/1324 ist
Hot Plug & Play. Für die Einstellungen der I/O Adressen und Interrupts sind keine
Jumper und Einstellungen notwendig. Sie werden vom System BIOS und beim Installie-
ren des Betriebssystems automatisch vorgenommen. Die EX-1322/1324 hat zusätzlich
noch eine Halterung für Wand– oder Trägerschiene-Befestigung.
BESCHREIBUNG & TECHNISCHE DATEN :
AUFBAU :
Kompatibilität: USB 2.0 Anschluss
Betriebssysteme: WIN 9.x/ME/2000/XP/Server 2003/Vista/7/CE/Linux/MAC
Anschlüsse: 2 x 9 Pin Sub-D Stecker, 1 x USB 2.0 A-Stecker Upstream
Lieferumfang: EX-1322, Anleitung, CD, Wand– oder Din-Rail Halterung
Zertifikate:
CE
CECE
CE
/ FCC / RoHS / WEEE DE97424562 / WHQL
CONNECTORS:
DRIVER INSTALLATION :
Bedienungsanleitung
Bedienungsanleitung
Vers. 1.0 / 04.03.11
DB 9M:
Pin Signal Pin Signal Pin Signal
1 CDC 4 DTR 7 RTS
2 RXD 5 GROUND 8 CTS
3 TXD 6 DSR 9 RI
Serial 9 Pin male connectors:
USB B-Connector:
Attention!
Never plug in with
force or in wrong
direction.
Windows XP/Vista/2000/Server 2008&2003/Win7 (32&64-Bit) :
Windows will recognize a new “FT232R USB UART“ and open the hardware assistant.
Please choose manual installation and put the driver CD into your CD-Rom drive. Enter
the Path "D:\USB_to_IO\FTDI\(32_64bit)Win7_XP_Vista_2008_2008R2_2003_2000”.
into the box for the Path/Source and click at >next/continue<. Now Windows search for
the drivers in the specified directory. Follow the hardware assistant and finish the instal-
lation. If Windows recognizes other new devices repeat the above described steps.
Attention! Restart Windows in any case after installing the drivers.
CHECK THE INSTALLED DRIVER:
Click at Start<>Run< then enter “compmgmt.msc“ and click at >OK<. In the windows
that open select >Device Manager<. Under ”Ports (COM and LPT)“ you should find
one more new „USB Serial Port„ as sample(COM5). If you see this or similar entries
the module is installed correctly.
INSTALL THE PERIPHERAL DEVICE:
The speed from the serial ports can be set to the maximum baud rate of 115.2Kbaud.
With double click select for example>Device manager< > USB Serial Port (COM5)<.
Now you can select the different settings of baud rate, stop/start-bits etc. This setting
you can use also for the other COM ports.
DRIVER INSTALLATION :
Windows 98/98SE/ME:
Windows will recognize a new “FT232R USB UART“ and open the hardware assistant.
Please choose manual installation and put the driver CD into your CD-Rom drive (as
sample D:) . Now enter the Path “D:\USB_to_IO\FTDI\Win98_ME”into the box for the
Path/Source and click at >next/continue<. Now Windows search for the drivers in the
specified directory. Follow the hardware assistant and finish the installation. If Windows
recognizes other new devices repeat the above described steps. Attention! Restart
Windows in any case after installing the drivers.
CHECK THE INSTALLED DRIVER:
Click at Start<>Run< then enter “compmgmt.msc“ and click at >OK<. In the windows
that open select >Device Manager<. Under ”Ports (COM and LPT)“ you should find
one more new „USB Serial Port„ as sample(COM3). If you see this or similar entries
the module is installed correctly.
CHANGE PORT NUMBER:
If you like to change the port number for example COM 3 to COM 5, open the >Device
Manager< click at >COM3<, >Settings< and then >Advance<. There you can change
between COM 3 to 256.
LINUX:
There are drivers available for Linux. The drivers are located in the folder
“D:\USB_to_IO\FTDI\Linux x86_64“ on the driver CD. They are supported by the most
versions of Linux. Because each individual distribution and kernel version of Linux is
different, sadly we cant provide a installation instruction. Please refer to the installation
manual for standard IO ports from your Linux version !
MAC:
There are drivers available for MAC. The drivers are located in the folder
“D:\USB_to_IO\FTDI\MAC OSX or Mac_OS_9_8“ on the driver CD. They are sup-
ported by the most versions of MAC OS. Because each individual version of MAC OS is
different, sadly we cant provide a installation instruction. Please refer to the installation
manual for standard IO ports from your MAC OS version !
Wand– oder Din-Rail
Halterung
RS-232
Port 1
USB A-Stecker
zum PC
RS-232
Port 2
EX-1322
EX-1324
RS-232
Port 1
RS-232
Port 2
RS-232
Port 3
RS-232
Port 4
USB A-Stecker
zum PC
Die Schrauben werden nicht
mitgeliefert
Power LED
Power LED
USB 2.0 A-male connector:
Pin Signal Pin Signal
1 VCC 3 DATA+
2 DATA- 4 GND
Specyfikacje produktu
| Marka: | EXSYS |
| Kategoria: | Kable do komputerów PC i urządzeń peryferyjnych |
| Model: | EX-1324 |
Potrzebujesz pomocy?
Jeśli potrzebujesz pomocy z EXSYS EX-1324, zadaj pytanie poniżej, a inni użytkownicy Ci odpowiedzą
Instrukcje Kable do komputerów PC i urządzeń peryferyjnych EXSYS

9 Października 2024
1 Października 2024
1 Października 2024
1 Października 2024
1 Października 2024
1 Października 2024
1 Października 2024
1 Października 2024
1 Października 2024
1 Października 2024
Instrukcje Kable do komputerów PC i urządzeń peryferyjnych
Najnowsze instrukcje dla Kable do komputerów PC i urządzeń peryferyjnych
29 Stycznia 2025
12 Stycznia 2025
10 Stycznia 2025
4 Stycznia 2025
2 Stycznia 2025
2 Stycznia 2025
2 Stycznia 2025
2 Stycznia 2025
1 Stycznia 2025
30 Grudnia 2025