Instrukcja obsługi Foscam FNA216HE
Foscam Niesklasyfikowane FNA216HE
Przeczytaj poniżej 📖 instrukcję obsługi w języku polskim dla Foscam FNA216HE (2 stron) w kategorii Niesklasyfikowane. Ta instrukcja była pomocna dla 30 osób i została oceniona przez 4 użytkowników na średnio 4.8 gwiazdek
Strona 1/2
6578
123
4
Quick Setup Guide
Network Video Recorder
V2.0
305503001059
WARNING
Before installing a hard disk drive (HDD), please make sure the power
is disconnected from the NVR.
It is recommended that a hard drive be used in 7200 high-speed or
above.
1. Remove the cover from the NVR by unfastening the screws on the
rear and bottom.
2. Connect one end of the data cable and power cable to the
motherboard of NVR and the other end to the HDD.
3. Place the HDD on the bottom of the device and then fasten the
screws on the bottom to x the HDD.
Must be disposed of properly, always follow the local waste and
recycle laws when you get rid of the used battery
May explode if damaged or disposed of in re.
Do not short-circuit.
Do not disassembie
Do not use if soaked into water.
Do not attempt to disassemble, open or service the battery.
Non rechargeable.
If the battery level is low, please replace the button battery with a
new one according to the model after disassembling in steps 1 and 2.
4. Re-install the cover of the NVR and fasten screws.
Foscam cameras and NVRs require good security practices to
safeguard your privacy. You should regularly change your camera or
NVR password which is the combination of numbers, letters and
symbols.
You should update your camera or NVR regularly. Make sure your
camera or NVR has the latest rmware installed for your specic model
and better experience.
Please keep the device horizontally and avoid inclination or inversion.
Do not install the NVR in humid and dusty environment.
Put the NVR in drafty environment in case of ventilation port being
blocked.
Don't touch the power switch with wet hand or damp items to avoid
shock.
Do not splash liquid or metal ling on the NVR To avoid short-circuit
fault or blaze.
Explosion may happen because of improper replacement of battery,
Quick Setup Guide
NVR
Screw Pack
DC Power Adapter
Ethernet Cable
Data Wire and Power Wire
of the Hard Drives
Warning Card
USB Mouse
Uncheck the checkbox
3.P2P. If you want to know the UID of the device, please scan
the QR code. If you don’t want to use the Setup Wizard
next time, uncheck the Setup Wizard checkbox. Click the
Finish button to complete the setup wizard.
or Right-click uncheck the →MainMenu→Conguration →
Setup Wizard Finish checkbox. Click thebutton to complete the
setup wizard.
Uncheck the checkbox
Download Foscam APPP2P
HDD
HDD
+
CR1220
CAUTION:
Package Contents
Security Warning
1Before You Start
2Hard Disk Installation
Procedure
1. If you want to use Foscam VMS or App, the NVR needs to be connected
to a router. If you only use the LAN to connect to the monitor, you don’t
need to connect to the router.
2. Connect your display to one of the video outputs (VGA or HD-OUT
interface).
3. Connect an external storage device to the USB interface of the NVR as
a backup.
4. Connect a mouse to the USB interface.
5. Some devices need to connect to your router using an Ethernet cable,
including the NVR, PC and IP Camera.
6. Connect the power adapter to the power input port.
7. The NVR DHCP server will open if it does not detect and connect a
router within the 30s, which is used for searching and connecting to
the IPC on the PoE NVR or switch.
Computer
Router
Ethernet
Cable
Ethernet
Cable
VGA Cable
Monitor
Mouse
NVR
HDMI Cable
USB HDD
Ethernet
Cable
(PoE) Camera
NVR Power Adapter
(DC 52V)
TV
4Device Connection
5Log In
6 Setup Wizard
1. Turn on the power switch on the rear panel.
After the NVR starts up successfully, the power LED and HDD LED
indicators will turn green. The startup page is displayed on the
screen.
2. Change user name and password .
For your security, please set a new user name and password for your
NVR before Log In.
4. After modifying the password, you will be taken to the .Setup Wizard
3. Login page.
Enter the Username and Password, then click on the button.OK
*You need to set an inital user name and password for the rst use.
*The maximum username lngth is 20, including numbers, letters and symbols:
_-@$*
*The password should be a combination of 6-12 numbers, letters, symbols.
Sybbols support: ~!@#%^*()_+{}:|<>?’-;\,./
3NVR Rear Panel
Power Switch
GND
Power Input
(DC52V )
RJ45
VGA Output
Audio Out
Network
HD-OUT
USB Port
Alarm Indicator
REC Indicator
Power Indicator
If a router is connected at this time, the NVR cannot be found when
adding it by APP or VMS, and the NVR needs to be restarted.
Remarks: Users can customize the startup time or close of the NVR
DHCP server.
CR1220 Battery
(3V, 35mAh,0.105Wh,
Chemical System:
Lithium)
For detailed manuals, tools, etc., please visit foscam.com/downloads.
The Setup Wizard can walk you through some important settings on
the NVR.
1.Setting the time.
2. Format HDD. Click the button to set up the HDD. Format
Note that this will delete all les on the HDD.
HDD Full SettingSelect Stop Record and Overwrite . .
9
Auto-add Foscam camera(s)
7
Add IP Camera
You can add an IP Camera that is connected to the internet on the NVR.
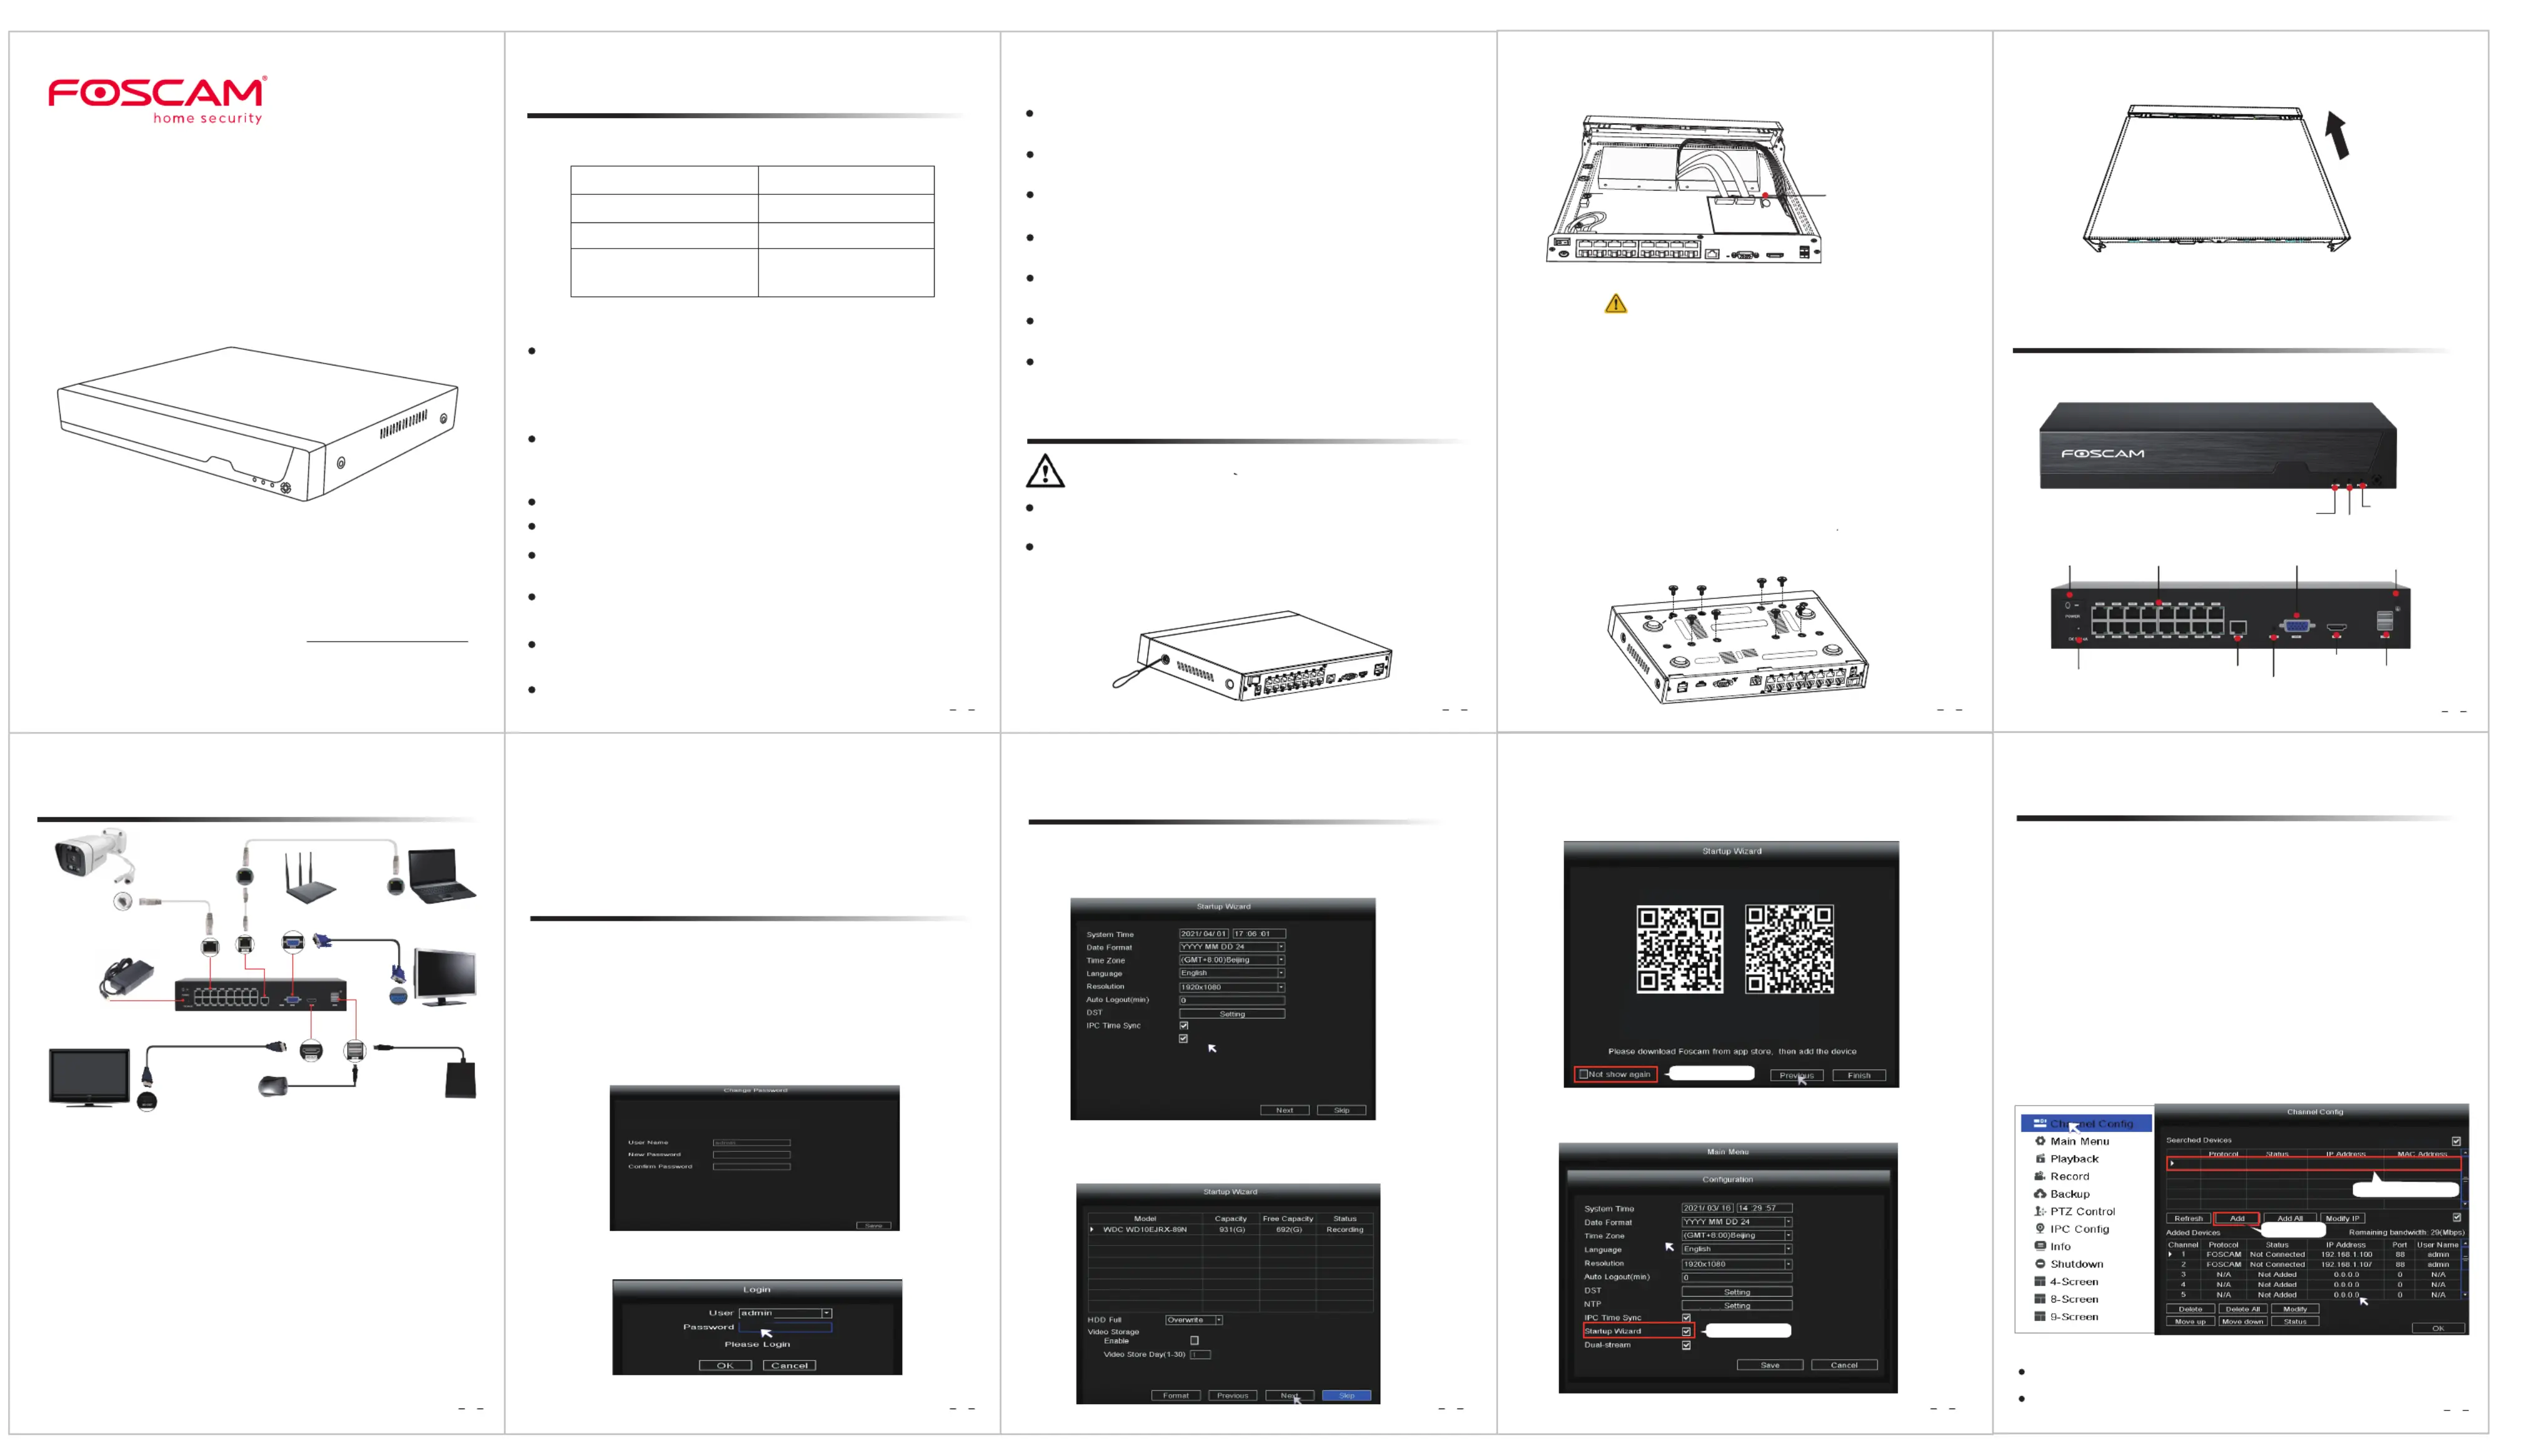
1. Right-click on main interface, select.Channel Cong
2. Selector your IP CameraAuto-add Foscam camera(s)
3. Click Add.
4. Enter username and password of the camera. If your camera is in the
factory default state, you do not need to enter the user name and
password.
5. Click OK.
Select a protocol depending on which IP Camera you have.
FOSCAM protocol: The High Denition (HD) IP Cameras for Foscam.
ONVIF protocol: IP Cameras which support ONVIF protocol.
Kitchen
Garden
FOSCAM
FOSCAM
FOSCAM
Not Connected
Not Connected
Not Connected
192.168.1.100
192.168.1.107
192.168.1.109
1. Select Your IP Camera
2. Click Add
Camera Name
Doorway
Bitrate Adaptive
Auto-add Foscam camera(s)
Note: If the camera is added during factory default status, the username
and password will be the same as the NVR.
●
●
●
●
●
●
●
do not replace it by yourself; If you need, make sure it is the same type
of battery. And do not open or repair the battery.
Do not take the device apart when it is operating (or connecting to
power).
Please use suitable and professional hard disk to ensure continues
and stable recording.
Lightning protection is needed when device is connected to commu-
nication cables.
Check the power supply to avoid damage because of voltage
mismatch.
Make sure the NVR working within suitable temperature and humidity
environment.
Short circuit may occur when dust become wet on circuit board.
Please clean the dust on connectors and NVR case.
Operating Temperature0°C ~ 50°C (32°F ~ 122°F).:
Specyfikacje produktu
| Marka: | Foscam |
| Kategoria: | Niesklasyfikowane |
| Model: | FNA216HE |
Potrzebujesz pomocy?
Jeśli potrzebujesz pomocy z Foscam FNA216HE, zadaj pytanie poniżej, a inni użytkownicy Ci odpowiedzą
Instrukcje Niesklasyfikowane Foscam

13 Stycznia 2025
16 Sierpnia 2024
Instrukcje Niesklasyfikowane
Najnowsze instrukcje dla Niesklasyfikowane
29 Stycznia 2025
29 Stycznia 2025
29 Stycznia 2025
29 Stycznia 2025
29 Stycznia 2025
29 Stycznia 2025
29 Stycznia 2025
29 Stycznia 2025
29 Stycznia 2025
29 Stycznia 2025