Instrukcja obsługi Hikvision DS-PDCL12-EG2
Hikvision system alarmowy DS-PDCL12-EG2
Przeczytaj poniżej 📖 instrukcję obsługi w języku polskim dla Hikvision DS-PDCL12-EG2 (8 stron) w kategorii system alarmowy. Ta instrukcja była pomocna dla 28 osób i została oceniona przez 3 użytkowników na średnio 4.6 gwiazdek
Strona 1/8
WiredPIRCeilingDetector
DS-PDCL12-EG2
UserManual
EN50131-1:2006+A1+A2+A3
EN50131-2-2:2017
EnvironmentClassII
SecurityGrade2
TestedbyTÜVRheinland
HangzhouHikvisionDigitalTechnologyCO.,Ltd.No.555QianmoRoad,BinjiangDistrict,Hangzhou310052,China
English
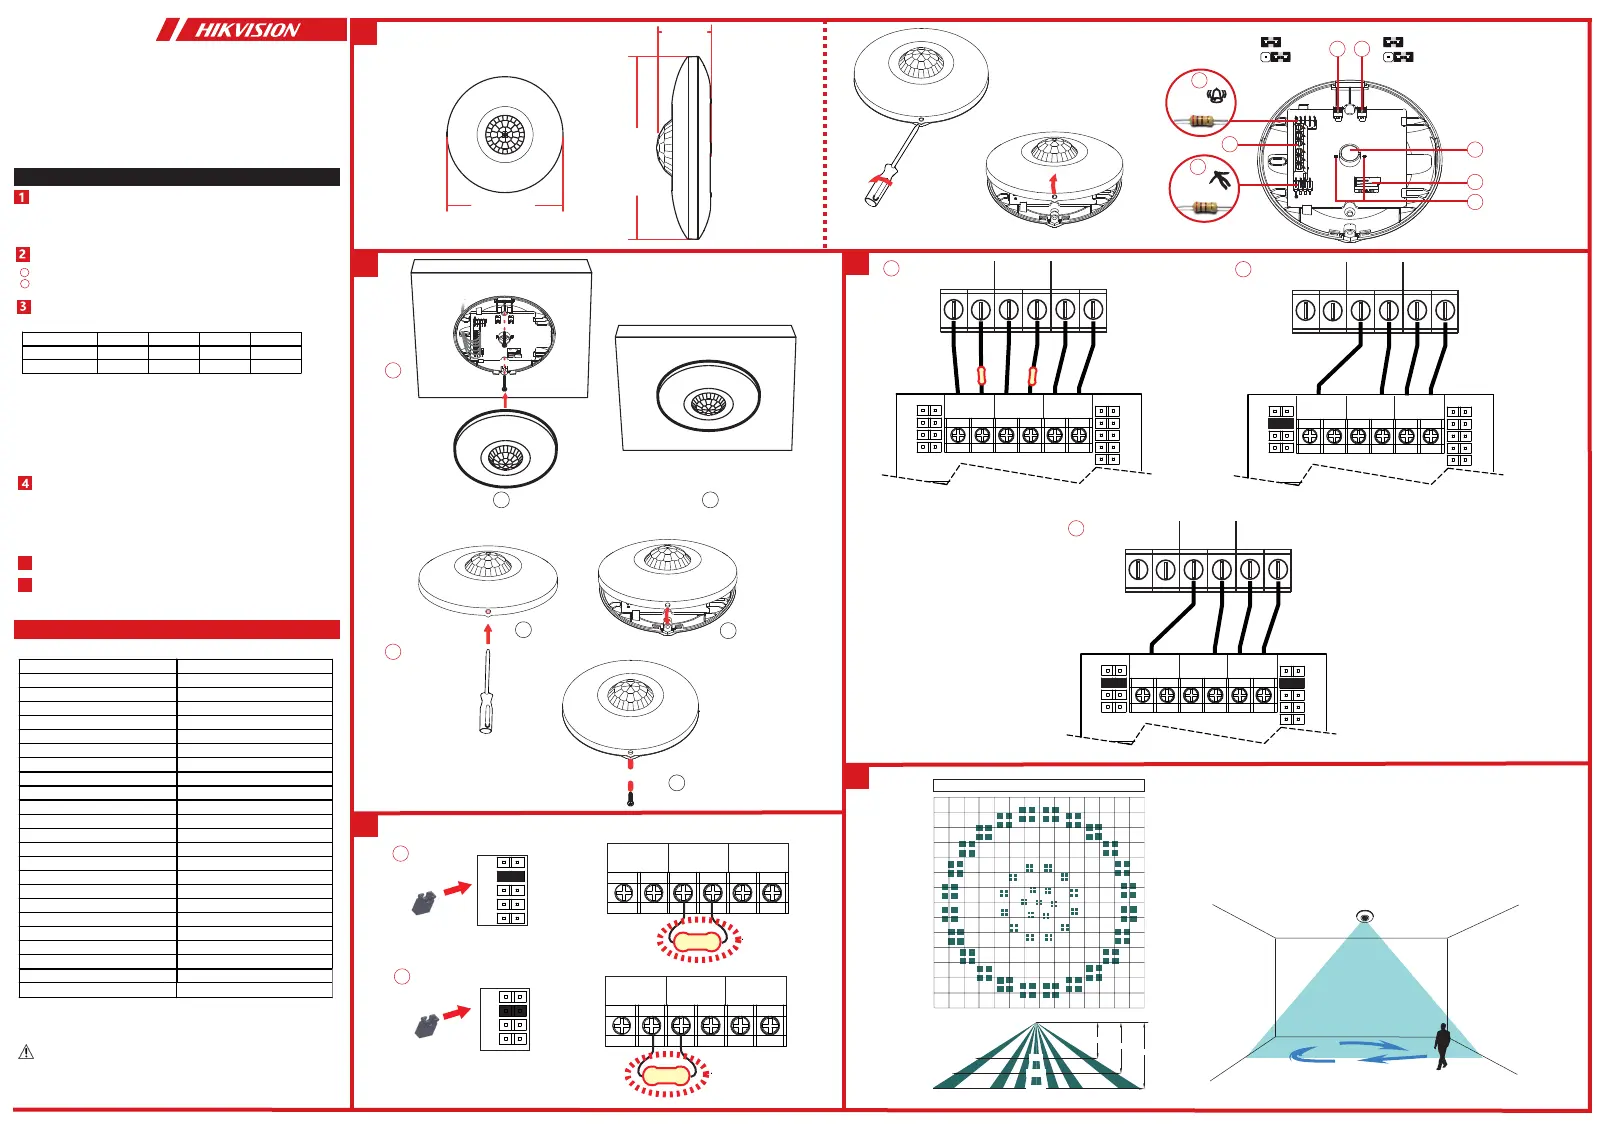
Appearance
Specification
5
6
ResistorWiring
ConnectionType
DetectionRange
PoweringOn
Note:Theresistormustbeconnectedinserieswithoneendofthe
detector.
a.NormallyClosed
b.SingleEndofLineWiring
c.DoubleEndofLineWiring
Afterpoweringon,theindicatorflashesrapidly.Oncethedetectorselftestis
completed,theLEDindicatorwillgooutuntilthedetectordetectsmovement.
RelayStatus
NormalPIRAlarmPIRFaultTamper
AlarmRelayCloseOpenOpenClose
TamperRelay
Close
CloseClose
Open
MountingbyExpansionScrew
ReinforcingBucklebyScrew(Optional)
a
b
UD23903B-E
PleaseusethepowersuppliescomplywiththerequirementsofEN50131-6at
theappropriategradeandenvironmentalclass.
Pleasedonotobscurethedetector’sfieldofviewpartiallyorcompletely.
Installation
1.TamperEOLpin2.Terminals3.AlarmEOLpin
4.LEDjumper5.Sensitivityjumper6.PIRsensor
7.Tamper8.LEDindicator
Method1:UsethejumpertoselectEOL(EndofLine)resistanceon
TAMPER/ALARMEOLpins.
Method2:AddtheresistortoTAMPER/ALARMwiringports.
Note:IfEOLwiringisnotused,leavethejumpersOFF.Donotforcethe
jumperifitisnotmatchedthepin.Method1&2shouldnotbeusedonthe
ALARM/TAMPERatthesametime.
a.AlarmResistance:1K,2K2,4K7,5K6,6K8
b.TamperResistance:1K,2K2,4K7,5K6
Detectionmethod
PassiveInfrared
Detectionrange12m
DetectionAngle360°
Detectionzones172
Detectablespeed0.3~2m/s
SensitivityAuto,low
Whitelightfilter6500lux
DigitaltemperaturecompensationSupport
CreepzoneprotectionSupport
DigitalprocessingSupport
SealedopticsSupport
TamperprotectionFront
LEDindicatorBlue(Alarm)
Powersupply9to16VDC
Typicalvoltage12VDC
Operationtemperature-10°Cto55°C(14°Fto131°F)
Storagetemperature-20°Cto60°C(-4°Fto140°F)
Operationhumidity10%to90%
Dimensionφ101.2mm×32.9mm
Weight109.5g
Mountingheight2.4to4m
MountingmethodCeiling
ApplicationscenarioIndoor
PowerConsumption13mAMax
2
1
12
a
2_KA3×25
a
=
=
4K7
2K2
1K
5K6
ALARM
+
-
EOL
TAMPER
EOL
2.2K
4K7
2K2
1K
5K6
6K8
ALARM
+
-
EOL
TAMPER
EOL
2.2K
b
ALARM
TAMPER
b
1
2
3
3
5
ZONE2
COM
ZONE1
COM
+
-
ALARMTAMPER
+-
6K8
5K6
4K7
2K2
1K
5K6
4K7
2K2
1K
ALARMTAMPER
EOLEOL
a
2.2K
2.2K
4
ZONE2
COM
ZONE1
COM
+
-
ALARMTAMPER
+-
6K8
5K6
4K7
2K2
1K
5K6
4K7
2K2
1K
ALARMTAMPER
EOLEOL
b
ZONE2
COM
ZONE1
COM
+
-
ALARMTAMPER
+-
6K8
5K6
4K7
2K2
1K
5K6
4K7
2K2
1K
ALARMTAMPER
EOLEOL
c
8
7
6
1
4
5
101.2mm
101.2mm
32.9mm
8m
10m
12m
2.4m
3m
4m
4m
2m
0m
6m
2m
4m
6m
6m6m4m4m2m2m0m
Zone:172
Plane:3
1K,2K2,
4K7,5K6
1K,2K2,
4K7,5K6,6K8
LEDON
LOW
LEDOFF
AUTO(Default)
2
3
Specyfikacje produktu
| Marka: | Hikvision |
| Kategoria: | system alarmowy |
| Model: | DS-PDCL12-EG2 |
Potrzebujesz pomocy?
Jeśli potrzebujesz pomocy z Hikvision DS-PDCL12-EG2, zadaj pytanie poniżej, a inni użytkownicy Ci odpowiedzą
Instrukcje system alarmowy Hikvision

19 Grudnia 2024
3 Października 2024
24 Września 2024
24 Września 2024
24 Września 2024
24 Września 2024
24 Września 2024
24 Września 2024
24 Września 2024
24 Września 2024
Instrukcje system alarmowy
Najnowsze instrukcje dla system alarmowy
3 Kwietnia 2025
2 Kwietnia 2025
2 Kwietnia 2025
2 Kwietnia 2025
2 Kwietnia 2025
4 Marca 2025
4 Marca 2025
25 Lutego 2025
24 Lutego 2025
24 Lutego 2025