Instrukcja obsługi Iiyama MD-WM8060
Iiyama
Niesklasyfikowane
MD-WM8060
Przeczytaj poniżej 📖 instrukcję obsługi w języku polskim dla Iiyama MD-WM8060 (2 stron) w kategorii Niesklasyfikowane. Ta instrukcja była pomocna dla 10 osób i została oceniona przez 5.5 użytkowników na średnio 4.9 gwiazdek
Strona 1/2

MD-WM8060 INSTRUCTION MANUAL_1.1
MANUEL_1.1
BEDIENUNGSANLEITUNG_1.1
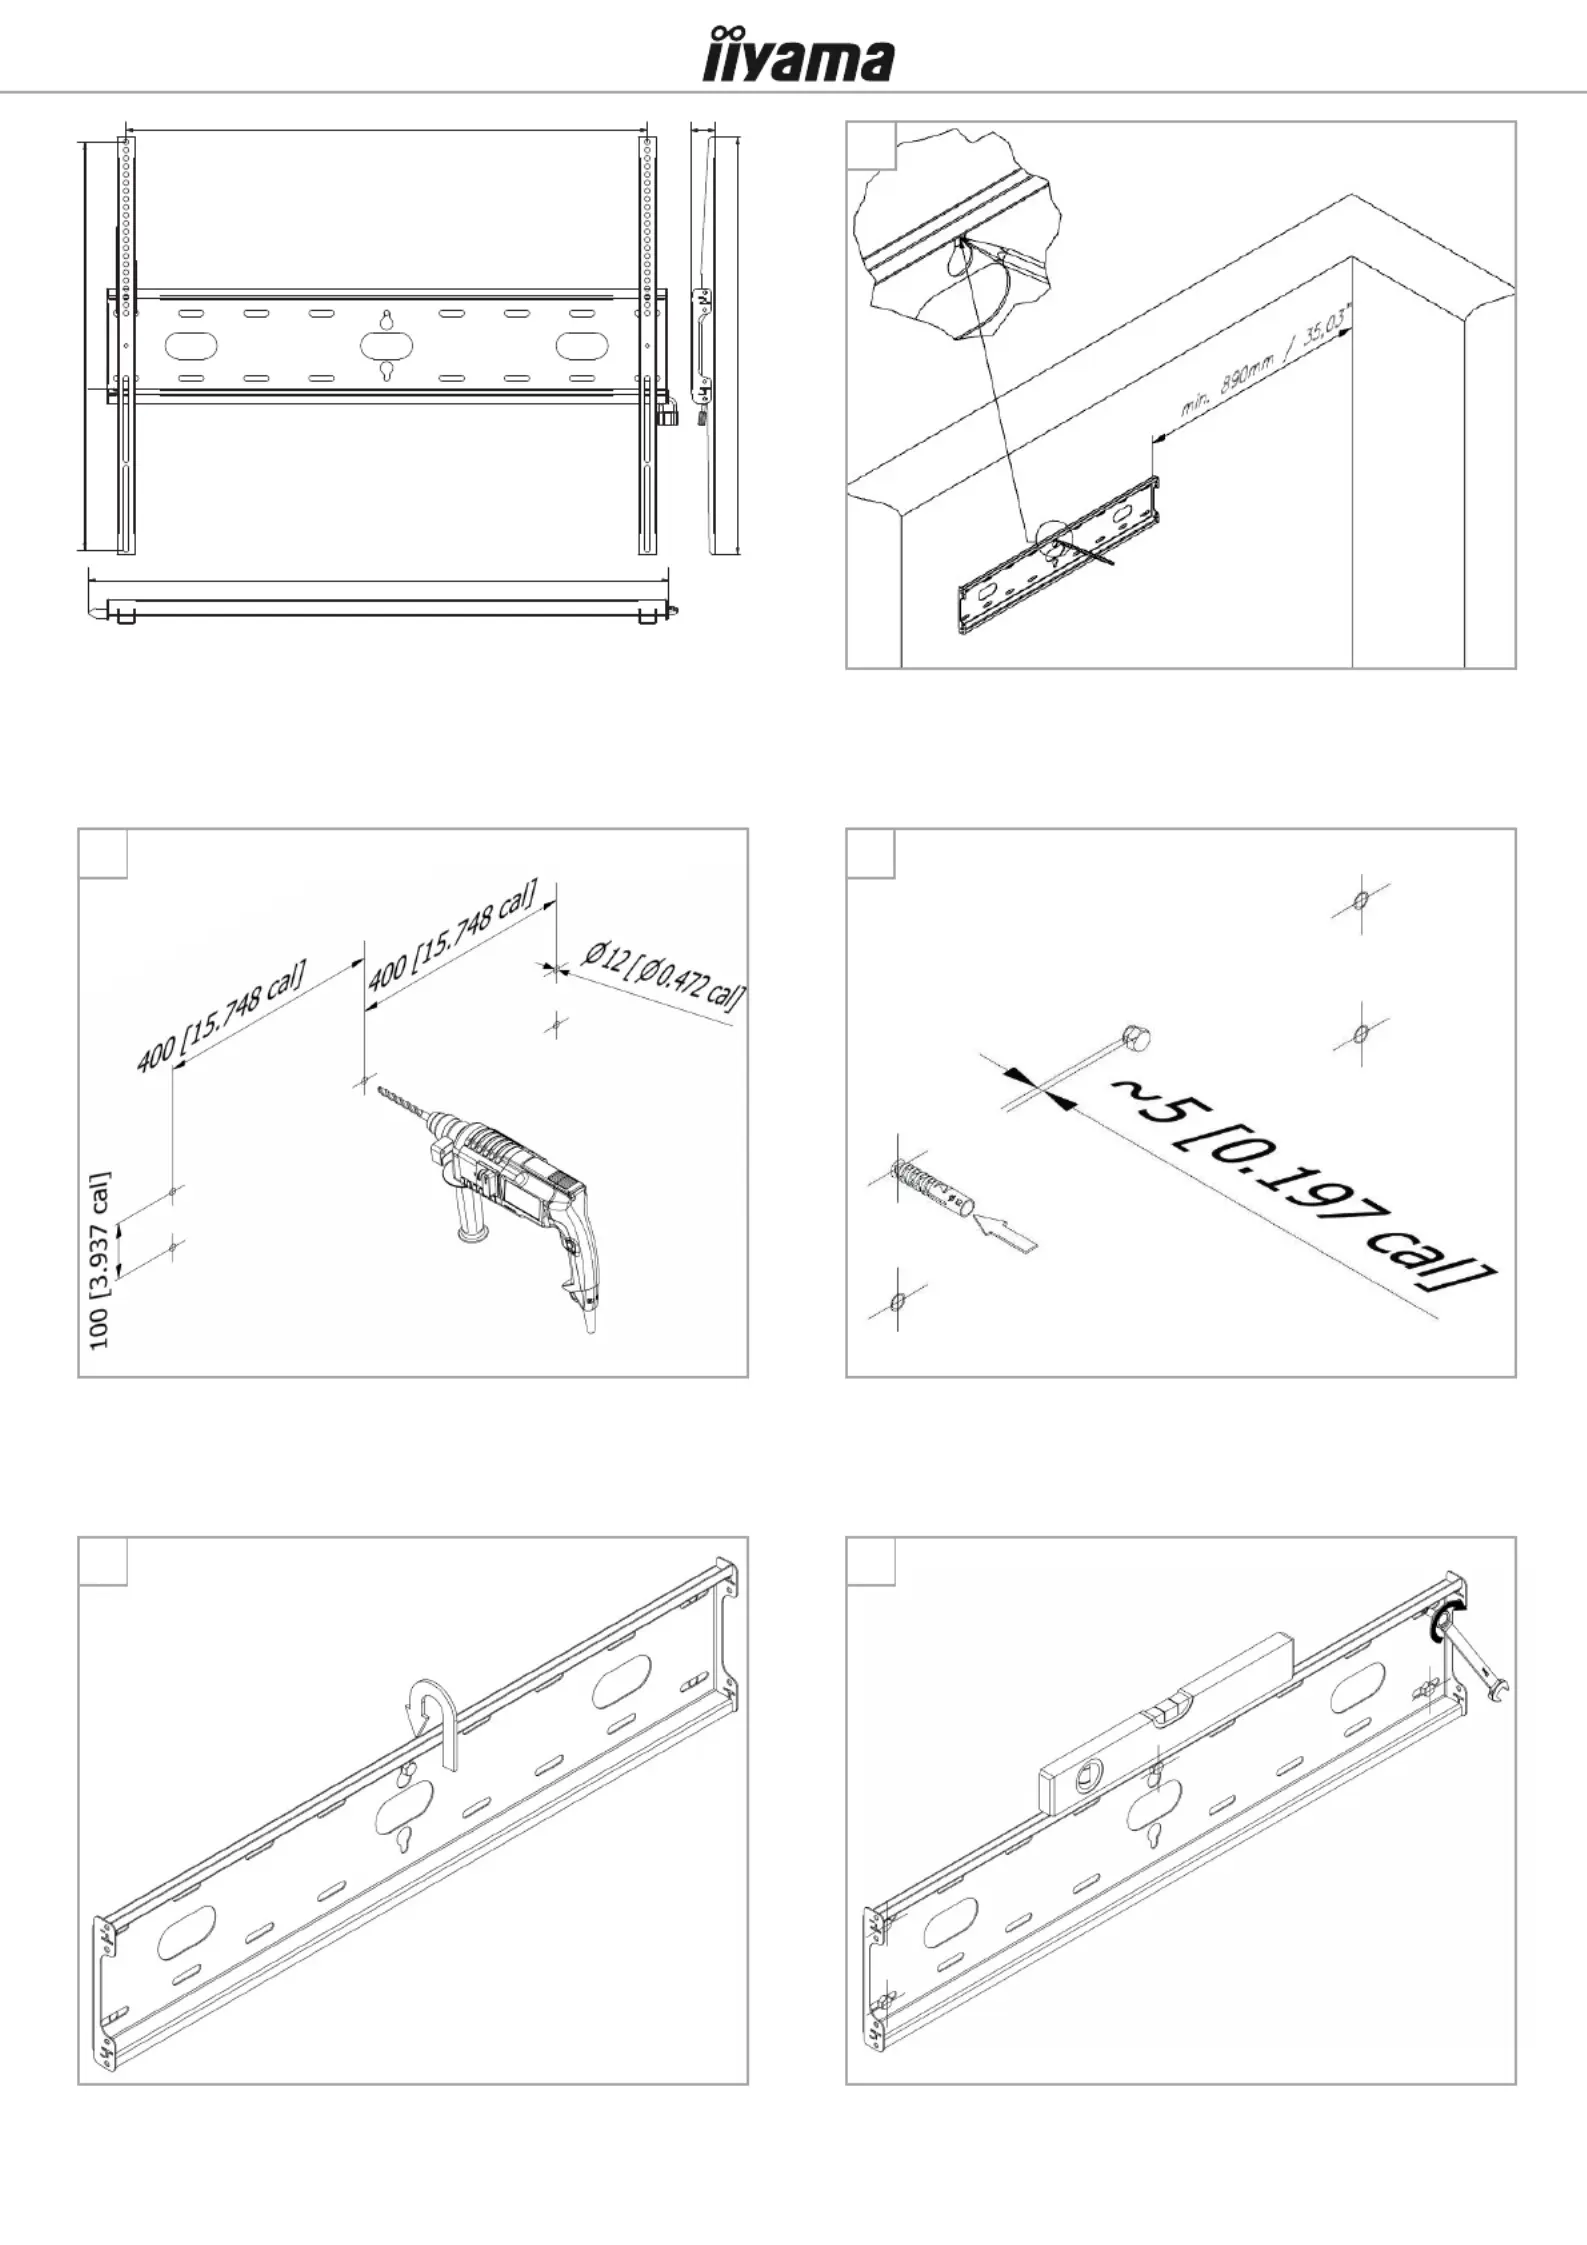
Aer hanging the plate, level it and then screw in the remaining screws.
Nachdem Sie die Plae aufgehängt haben, richten Sie sie aus und schrauben Sie
dann die restlichen Schrauben ein.
Après avoir accroché la plaque, nivelez-la, puis vissez les vis restantes.
Hanging the board on the wall (Hang the plate on the screw).
Auängen des Bres an die Wand (Hängen Sie die Plae an die Schraube).
Accrochez la planche au mur (accrochez la plaque à la vis).
1a
compable with VESA / kompabel mit VESA / compable avec VESA :
100x100, 200x200, 300x200, 300x300, 400x200, 400x300, 400x400, 600x400, 800x400, 800x600
maximum weight of a screen / maximales gewicht eines bildschirms / poids maximum d’un écran :
125 kg / 273.37 Ib
2 2a
1b
Mounng back plate
EN
Montage der Rückplae
DE
Plaque arrière de montage
FR
It is recommended to screw in only one central screw, leaving approx. 5mm of clearance
between the screw head and the wall.
EN
Es wird empfohlen, nur eine zentrale Schraube einzuschrauben, so dass ca. 5mm Freiraum
bleibt zwischen dem Schraubenkopf und der Wand.
DE
Il est recommandé de visser une seule vis centrale, ce qui laisse environ 5 mm
de dégagement entre la tête de vis et le mur.
FR
EN
DE
FR
EN
DE
FR
600mm / 23,62”
890,5mm / 35,059”
VESA min 100x100 / VESA max 800x600 37,5mm / 1,47”
640mm / 25,19”
1

To protect the monitor against uncontrolled removal, secure it by inserng
the lock into the "T" hole. The lock should go through the plate and both arms.
MD-WM8060 INSTRUCTION MANUAL_1.1
MANUEL_1.1
BEDIENUNGSANLEITUNG_1.1
spacers/
Distanzstücke/
entretoises
3
4 4a
3a
3b
Blockade inserng/
Blockade einfügen/
Inseron de blocus
If the length of the screw is too
long, use spacers.
EN
Wenn die Länge der Schraube zu
lang, verwenden Sie Abstandshalter.
DE
Si la longueur de la vis est trop longue
long, ulisez des entretoises.
FR
Place the monitor on a flat and so
surface with the screen facing down.
EN
Legen Sie den Monitor auf eine flache und weiche
Oberfläche mit dem Bildschirm nach unten.
DE
Placez le moniteur sur un écran plat et souple
Surface avec l’écran tourné vers le bas.
FR
At this stage of assembly, connect all possible
power and signal cables to the monitor.
EN
Schließen Sie in dieser Phase der Montage
alle möglichen Strom- und Signalkabel zum Monitor.
DE
A ce stade de montage, connectez tout ce qui est possible
câbles d’alimentaon et de signal vers le moniteur.
FR
Hook the arms screwed to the monitor onto the wall plate.
EN
Befesgen Sie die am Monitor verschraubten Arme an der Wandplae.
DE
Accrochez les bras vissés au moniteur sur la plaque murale.
FR
Screw the two arms to the VESA holes located on the back of the monitor. The row of holes
made in the arm should be directed towards the top of the monitor.
EN
Schrauben Sie die beiden Arme an die VESA-Löcher auf der Rückseite des Monitors.
Die Reihe der Löcher Der Arm sollte zur Oberseite des Monitors gerichtet sein.
DE
Vissez les deux bras aux trous VESA situés à l’arrière du moniteur. La rangée de trous
Fait dans le bras doit être dirigé vers le haut du moniteur.
FR
It should be noted that both hooks on both arms are hung on the board in a secure and
stable manner.
EN
Es ist zu beachten, dass beide Haken an beiden Armen in einem sicheren und
Stabile Art und Weise.
DE
Il convient de noter que les deux crochets des deux bras sont suspendus à la planche dans
un cadre sécurisé et de manière stable.
FR
EN
Um den Monitor vor unkontrolliertem Enernen zu schützen, sichern Sie ihn durch Einsetzen
die Verriegelung in das "T"-Loch. Das Schloss sollte durch die Plae und beide Arme gehen.
DE
Pour protéger le moniteur contre le retrait incontrôlé, fixez-le en insérant
la serrure dans le trou en « T ». La serrure doit passer par la plaque et les deux bras.
FR
Pass the hasp of the padlock through the holes in the lock and the wall
plate and close it.
EN
Führen Sie die Klappe des Vorhängeschlosses durch die Löcher im Schloss und in der Wand
Teller und schließen Sie es.
DE
Passez le crochet du cadenas à travers les trous de la serrure et du mur
Plaquez et fermez-le.
FR
Specyfikacje produktu
Marka: | Iiyama |
Kategoria: | Niesklasyfikowane |
Model: | MD-WM8060 |
Potrzebujesz pomocy?
Jeśli potrzebujesz pomocy z Iiyama MD-WM8060, zadaj pytanie poniżej, a inni użytkownicy Ci odpowiedzą
Instrukcje Niesklasyfikowane Iiyama
29 Grudnia 2024
16 Grudnia 2024
10 Grudnia 2024
10 Grudnia 2024
10 Grudnia 2024
8 Października 2024
5 Października 2024
5 Października 2024
5 Października 2024
5 Października 2024
Instrukcje Niesklasyfikowane
- Niesklasyfikowane TechN
- Niesklasyfikowane Ctek
- Niesklasyfikowane Eurospec
- Niesklasyfikowane Kenmore
- Niesklasyfikowane RIKON
- Niesklasyfikowane Philips
- Niesklasyfikowane Netsys
- Niesklasyfikowane Q-CONNECT
- Niesklasyfikowane Azden
- Niesklasyfikowane Nokia
- Niesklasyfikowane Baracuda
- Niesklasyfikowane Philco
- Niesklasyfikowane Gretsch
- Niesklasyfikowane Simplicity
- Niesklasyfikowane Winston
Najnowsze instrukcje dla Niesklasyfikowane
29 Stycznia 2025
29 Stycznia 2025
29 Stycznia 2025
29 Stycznia 2025
29 Stycznia 2025
29 Stycznia 2025
29 Stycznia 2025
29 Stycznia 2025
29 Stycznia 2025
29 Stycznia 2025