Instrukcja obsługi Klein Tools 56416
Klein Tools Niesklasyfikowane 56416
Przeczytaj poniżej 📖 instrukcję obsługi w języku polskim dla Klein Tools 56416 (3 stron) w kategorii Niesklasyfikowane. Ta instrukcja była pomocna dla 39 osób i została oceniona przez 3 użytkowników na średnio 4.6 gwiazdek
Strona 1/3
ENGLISH
CONTENTS
• 56416 Rechargeable MODbox
™
Area Light
• 20" (51 cm) USB-C Cable
• This Instruction Sheet
GENERAL SPECIFICATIONS
• Operating Temperature: -4°F to 122°F (-20°C to 50°C)
• Storage Temperature: -4°F to 113°F (-20°C to 45°C)
• Charging Temperature: 32°F to 113°F (0°C to 45°C)
• Dimensions
4.75" × 3.5" × 3" (120.7 mm × 89 mm × 76.2 mm)
• Weight: 0.550 kg (1.213 lbs)
• Charging Time: 6 Hours
• Charging Requirements: 5V DC, 2.4A max
• Battery Type: Internal, 21700 Lithium Ion, 3.6V / 10000mAh
• Output Capacity: 36Wh
• Shelf Life: Charge every 3 months
• Drop Protection: 9.8' (3m)
• Ingress Protection (IP) Rating: IP66
Specifications subject to change.
WARNINGS
Read, understand, and follow these instructions to ensure safe operation.
Failure to observe these warnings can result in risk of fire, electric shock,
serious injury and/or property damage.
•
DO NOT use the product if it is damaged or modified.
Damaged or modified batteries may exhibit unpredictable behavior
resulting in fire, explosion, or injury.
•
Risk of fire and burns. DO NOT open, crush, heat above specified
maximum temperature or incinerate. Prolonged exposure to direct
sunlight can result in elevated temperatures.
•
DO NOT immerse in water or other liquids.
•
Properly seal the charging port cover to achieve specified water &
foreign object ingress protection. Keep seal free of dirt, oil, sand, or
other material that interferes with proper sealing. Failure to do so can
result in risk of fire or electric shock.
•
DO NOT open the charging port cover if wet or in a wet environment.
Thoroughly dry the unit and the seal around water-resistant cover
completely before opening water resistant cover.
•
DO NOT subject to impacts or drops greater than 3 m (9.8 ft).
Drops
larger than this may not show signs of damage, but internal
components may have been compromised. It is advisable to replace
the unit if any such severe events occur.
•
DO NOT attempt to repair the product or charging cable. There are no
user-serviceable parts.
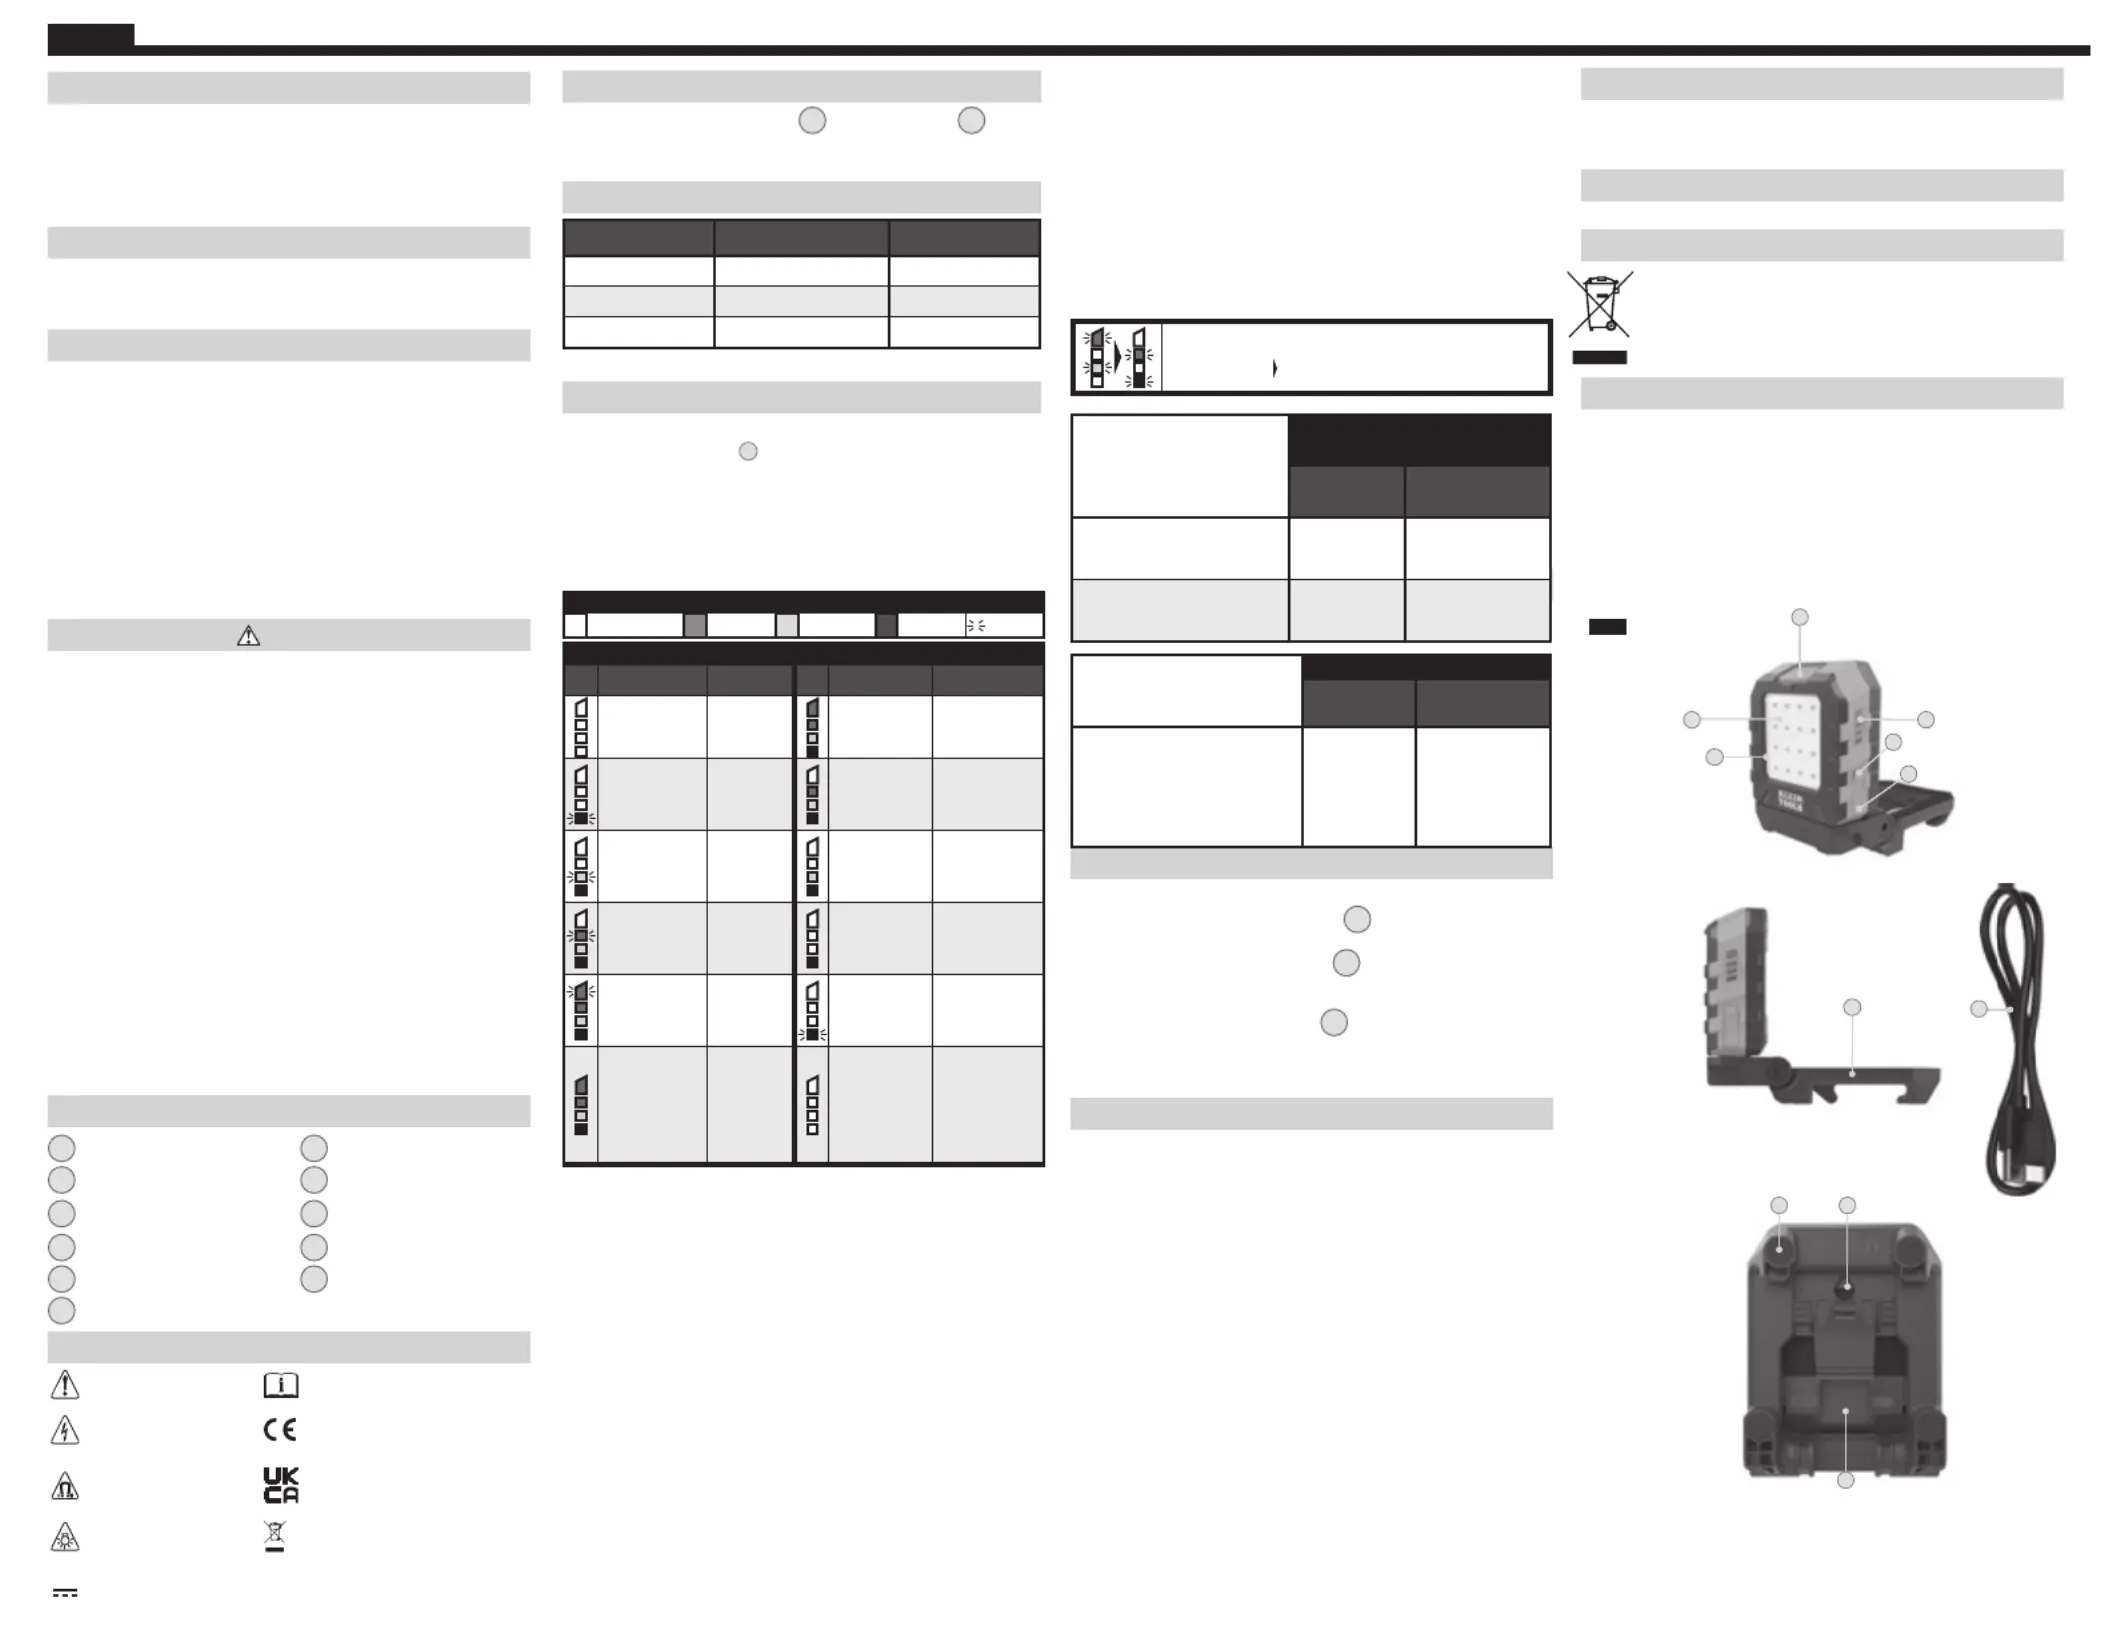
FEATURE DETAILS (FIG. A)
1
Power button
7
Kickstand
2
Battery Status Indicator
8
MODbox
™
Clasp
3
USB-C input
9
Magnets (x4)
4
Charging Flap
10
Nail hole
5
Main Area Light LEDs (x16)
11
USB-C Cable
6
Glow Ring
SYMBOLS ON PRODUCT
Warning or CautionRead Instructions
Risk of Electrical Shock
Conformité Européenne. Conforms with
European Economic Area directives
Strong Magnetic Field
UKCA - United Kingdom
Conformity Assessment
Do Not Stare at
Operating Lamp:
Visible Radiation
WEEE – Battery disposal
Direct Current (DC)
DESCRIPTION
The Klein Tools 56416 MODbox
™
Area Light is a lithium-ion powered work light
with multiple mounting options via the 90˚ pivoting kickstand, MODbox
™
compatible
mount, strong magnets, and a nail hole. The light rotates 360˚ to direct the light
where needed. This compact, rugged, 9.8' (3 m) drop-rated, 1000 lumen work light,
is IP66 water and dust-resistant, making it a durable, reliable, versatile light for
professional active daily use
OPERATING INSTRUCTIONS
•
Press and hold the power button
1
to turn ON the light
5
•
When the light is on, press and release the power button to cycle
through the modes in this order, HIGH, MEDIUM, LOW
LUMEN AND RUNTIME SPECIFICATIONS
MODELUMENS OUTPUTRUNTIME (HRS)
High10009
Medium
42514
Low
30021
NOTE:
Lumen output and runtimes accurate under optimal operating conditions
BATTERY STATUS INDICATOR
While light is OFF, press and release power button to show battery level
on Battery Status Indicator
2
, refer to Table 2 for status specifications.
•
Main light flashes 3 times at battery charge level 5% and 1%
•
If the unit does not turn on (no LEDs or indicator bars illuminated), the
battery is fully discharged. Plug in unit
(see CHARGING INSTRUCTION section) and allow to charge fully for a
minimum of 6 hours.
LEGEND
Not IlluminatedGreen LEDYellow LEDRed LEDBlinking
TABLE 1 - CHARGING STATUSTABLE 2 - CHARGE REMAINING
LEDStatus% ChargedLEDStatus
Remaining
Charge
Not illuminated
Not illuminated
Not illuminated
Not illuminated
0% charged
Solid green
Solid green
Solid yellow
Solid red
91% to
100% charge
remaining
Not illuminated
Not illuminated
Not illuminated
Blinking red
1% to 35%
charged
Not illuminated
Solid green
Solid yellow
Solid red
61% to
90% charge
remaining
Not illuminated
Not illuminated
Blinking yellow
Solid red
36% to 60%
charged
Not illuminated
Not illuminated
Solid yellow
Solid red
36% to
60% charge
remaining
Not illuminated
Blinking green
Solid yellow
Solid red
61% to 90%
charged
Not illuminated
Not illuminated
Not illuminated
Solid red
11% to
35% charge
remaining
Blinking green
Solid green
Solid yellow
Solid red
91% to 99%
charged
Not illuminated
Not illuminated
Not illuminated
Blinking red
1% to 10%
charge
remaining
Solid green
Solid green
Solid yellow
Solid red
100%
charged
(illuminates
for one
minute)
Not illuminated
Not illuminated
Not illuminated
Not illuminated
0%
charge
remaining
CHARGING INSTRUCTIONS & CHARGE STATUS INDICATOR
Connect USB-C cable connection to the light, plug the other end of
cable into USB port, or AC adapter (not included). USB adapter/power
supply should not exceed the specified charging voltage and current (see
GENERAL SPECIFICATIONS).
The battery level indicator bars will illuminate (see TABLE 1)
CHARGE MODE:
While charging, the light can be turned ON with a
400-lumen output. Once the charging cable is disconnected the light will
automatically switch to the previous mode used. While in this mode, light will
be fully charged from 0% - 100% battery charge level within 30 hours
NOTE:
Lumen output and runtimes accurate under optimal operating conditions
FCC AND IC COMPLIANCE
See this product’s page at www.kleintools.comfor FCC compliance
information.
Canada ICES-003 (B) / NMB-003 (B)
WARRANTY
www.kleintools.com/warranty
DISPOSAL / RECYCLE
Do not place equipment and its accessories in the trash.
Items must be properly disposed of in accordance with
local regulations. Please see www.epa.govrecycle/ for
additional information.
CUSTOMER SERVICE
KLEIN TOOLS, INC.
450 Bond Street, Lincolnshire, IL 60069 1-800-553-4676
customerservice@kleintools.com www.kleintools.com
BATTERY INTERNAL TEMPERATURE PROTECTION INDICATION
While charging the light, if internal battery temperature
exceeds 45°C the charge current to the battery is limited to avoid
damaging the battery pack. If the internal battery temperature still rises
above 50°C, charging battery pack will be stopped with following LED
indication:
• The fuel gauge status LED Red, Green and Yellow, Green LED will blink
alternately and light will shut down and stop charging or discharging if
temperature conditions in Table 3 (protection) below are detected.
• The battery will resume normal operation after the internal battery
temperatures return to normal operating ranges shown in Table 4
(recovery) below.
Alternating blinking LEDs
(Green/Yellow Green/Red)
TABLE 3
PROTECTION
TEMPERATURE
CHARGING
DISCHARGING
(IN USE)
High Temperature
Shut-Down:
Above
122°F (50°C)
Above
140°F (60°C)
Low Temperature
Shut-Down:
Below
32°F (0°C)
Below
-4°F (-20°C)
TABLE 4
RECOVERY
TEMPERATURE
CHARGING
DISCHARGING
(IN USE)
After a high- or low-temperature
shut-down, the battery's internal
temperature must return to within
these ranges to resume normal
operation:
41°F to 104°F
(5°C to 40°C)
14°F to 122°F
(-10°C to 50°C)
MODbox
™
COMPATIBILITY
To mount to MODbox
™
rail
• Hook the top two “feet” of the kickstand
7
on the top rail
• Firmly press on the base of the area light until there is an
audible click to lock the MODbox
™
clip
8
and bottom feet
from the bottom rail.
To remove from MODbox
™
rail
• Apply pressure to the MODbox
™
clip
8
• Begin to pull the light from the rail starting from the bottom.
• Unhook the top feet from the top rail and remove the light.
MAINTENANCE
CLEANING: Be sure the device is disconnected from all power sources and
devices. Use a clean, dry, soft, lint-free cloth to wipe down the entire unit.
Do not use abrasive cleaners or solvents
STORAGE:If storing for more than 1 month, charge completely before
storage, and recharge approximately every 3 months to avoid full
discharge. Store in cool temperatures, mild hu
midity, and away from direct
sunlight (See GENERAL SPECIFICATIONS).
Leaving in a vehicle or other confined spaces in extreme hot temperatures
can lead to decrease in service life, overheating, or fire. Extreme
cold temperatures below the specified storage range can also harm
performance and service life. Keep away from corrosive chemicals and
gases.
After taking out of storage, inspect visually to make sure device and all
accessories look satisfactory. Allow unit to return
to ambient conditions
before recharging or charging other devices.
RECHARGING:Recharge as needed. There are no pre-designated intervals
at which to recharge as long as you are using regularly. Avoid discharging
completely on a regular basis, as this can impact overall life. Regularly
inspect ports and charging cable for any debris, dirt, damage, and
corrosion. DO NOT attempt to fix. Replace device and/or cable as needed.
FIG. A
7
1
2
3
4
6
5
109
8
11
Specyfikacje produktu
| Marka: | Klein Tools |
| Kategoria: | Niesklasyfikowane |
| Model: | 56416 |
Potrzebujesz pomocy?
Jeśli potrzebujesz pomocy z Klein Tools 56416, zadaj pytanie poniżej, a inni użytkownicy Ci odpowiedzą
Instrukcje Niesklasyfikowane Klein Tools

14 Stycznia 2025
5 Stycznia 2025
5 Stycznia 2025
26 Grudnia 2024
14 Grudnia 2024
9 Października 2024
9 Października 2024
9 Października 2024
9 Października 2024
6 Października 2024
Instrukcje Niesklasyfikowane
Najnowsze instrukcje dla Niesklasyfikowane
29 Stycznia 2025
29 Stycznia 2025
29 Stycznia 2025
29 Stycznia 2025
29 Stycznia 2025
29 Stycznia 2025
29 Stycznia 2025
29 Stycznia 2025
29 Stycznia 2025
29 Stycznia 2025