Instrukcja obsługi LevelOne WAN-9180
LevelOne Niesklasyfikowane WAN-9180
Przeczytaj poniżej 📖 instrukcję obsługi w języku polskim dla LevelOne WAN-9180 (2 stron) w kategorii Niesklasyfikowane. Ta instrukcja była pomocna dla 43 osób i została oceniona przez 7 użytkowników na średnio 4.2 gwiazdek
Strona 1/2
LevelOne
WAN‐9180
‐5GHz18dBiDirectionalDualPolarizationOutdoorPanelAntenna
Quick Installation Guide
English
Português
Deutsch
Svenska
Français
Slovenščina
Español
繁體中文
Nederlands
한국어
Dansk
Русский
Italiano
Polish
Ελληνικά
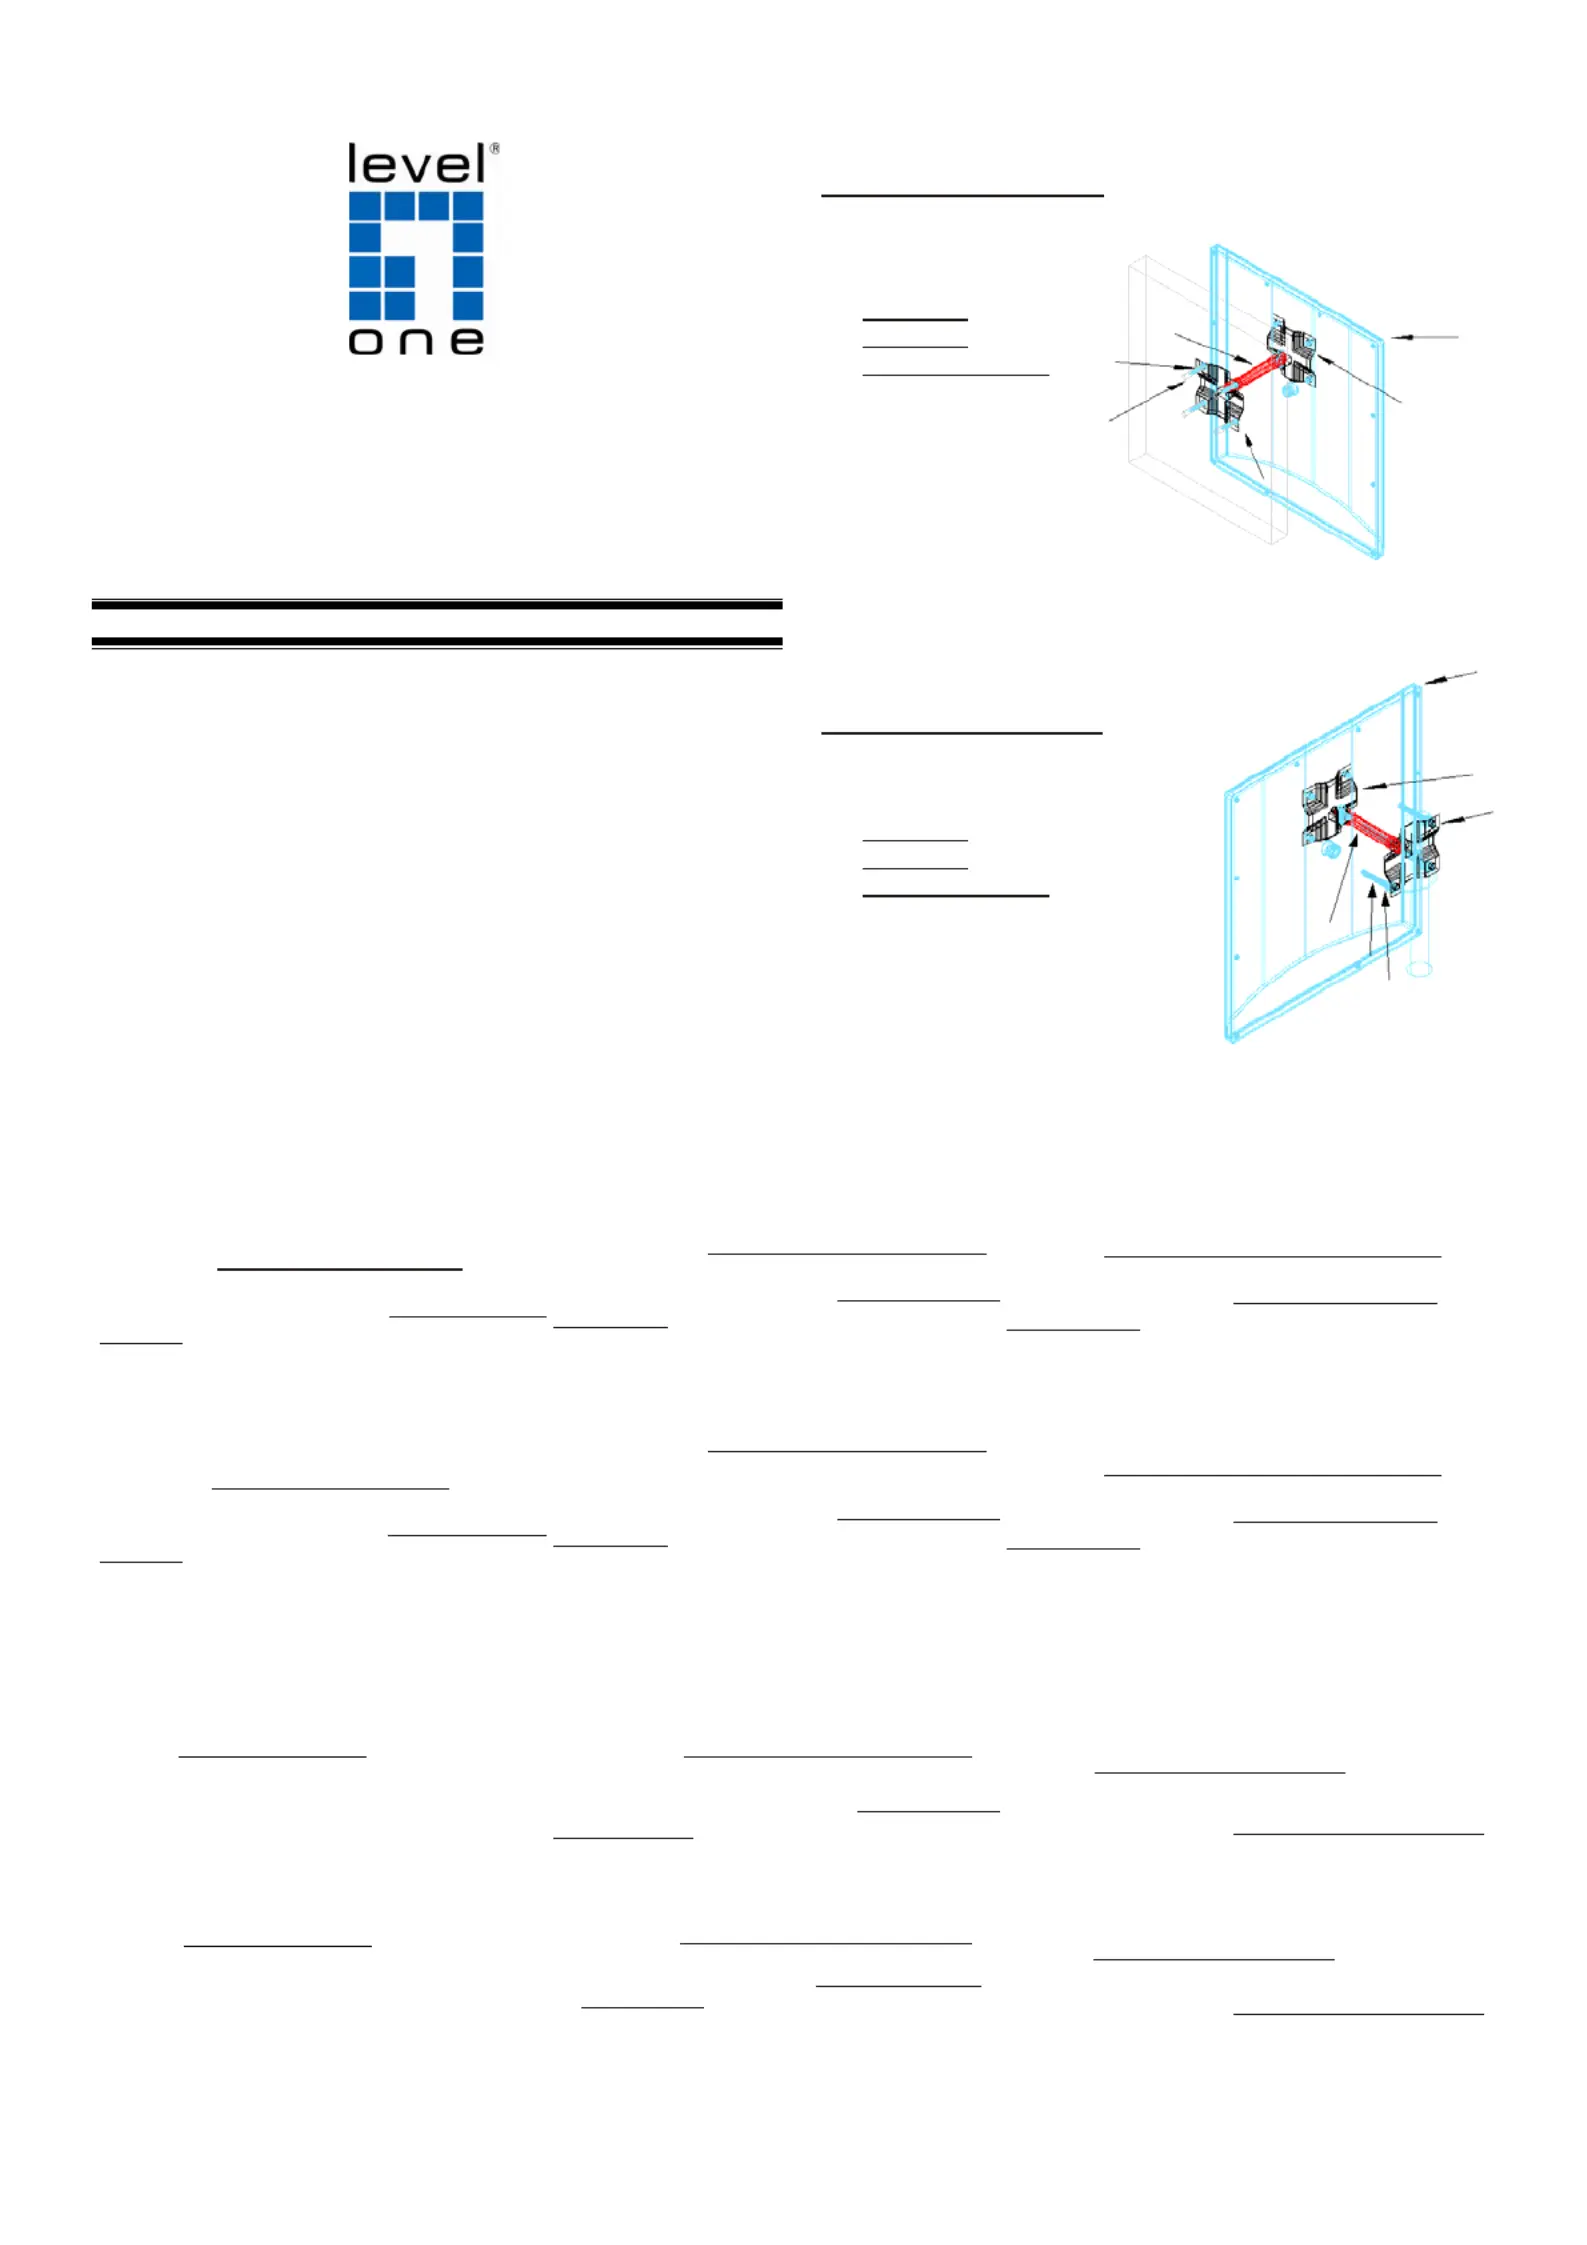
Mounting Instruction
1.
Fastening to a wall
Parts:
EnglishDeutschFrançais
1.Assembly step:
(1) Drill suitable holes at the position on the wall by
using the wall mount as drilling template.
(2) Attach the
Swivel Regulator & Fix Mount to the
wall with screws.
(3) Assemble the antenna with the
SwivelRegulator &
Fix Mount with a screw, washer and nut. Adjust the
antenna to appropriate angle and then fasten the nut.
1.Montageschritt:
(1) Bohren Sie geeignete Löcher an der
entsprechenden Stelle in die Wand, wobei Sie die
Wandhalterung als Bohrschablone verwenden.
(2) Befestigen Sie
Schwenkregler und Festhalterung
mit Schrauben an der Wand.
(3) Montieren Sie die Antenne mit
Schwenkregler und
Festhalterung mit einer Schraube, Unterlegscheibe
und Mutter. Stellen Sie die Antenne auf den
geeigneten Winkel ein, und ziehen Sie die Mutter
dann fest.
1.Procédure d’assemblage :
(1) Percez des trous adaptés sur la position voulue sur le
mur en vous servant du gabarit de perçage.
(2) Fixez le
support de fixation et de réglage pivotant au
mur avec des vis.
(3) Montez l’antenne sur le
support de fixation et de
réglage pivotant avec un boulon, une rondelle et un écrou.
Réglez l’antenne de façon à avoir l’angle approprié, puis
serrez l’écrou.
2.Assembly step:
(1) Attach the
Swivel regulator & fix mount to
the pole with U bolts, spring washers and nuts.
(2) Assemble the antenna with the Swivel Regulator &
Fix Mount with a screw, washer and nut. Adjust the
antenna to appropriate angle and then fasten the nut.
2.Montageschritt:
(1) Befestigen Sie
Schwenkregler und Festhalterung
mit U-Bolzen, Federscheiben und Muttern am
Mast.
(2) Montieren Sie die Antenne mit Schwenkregler und
Festhalterung mit einer Schraube, Unterlegscheibe
und Mutter. Stellen Sie die Antenne auf den
geeigneten Winkel ein, und ziehen Sie die Mutter
dann fest.
2.Procédure d’assemblage :
(1) Fixez le
support de fixation et de réglage pivotant au
montant avec étriers, rondelles élastiques et écrous.
(2) Montez l’antenne sur le support de fixation et de
réglage pivotant avec un boulon, une rondelle et un écrou.
Réglez l’antenne de façon à avoir l’angle approprié, puis
serrez l’écrou.
EspañolNederlandsDansk
1.Pasos para la Instalación:
(1) Haga los agujeros en la superficie de montaje,
usando la plataforma de montaje como plantilla
(2)Fije la
Plataforma de Montaje a la pared con
tornillos
(3) Ensamble la antena en la Plataforma de Montaje,
fijándola con un tornillo, arandela y tuerca. Ajuste la
antena en el ángulo adecuado, y luego aprete la
tuerca
1.Montagestap:
(1) Boor geschikte gaten op de positie in de muur door
de wandmontage te gebruiken als boormal.
(2) Bevestig de
draaiarmregelaar & vaste montage
aan de muur met schroeven.
(3) Monteer de antenne met de
draaiarmregelaar
& vaste montage met een schroef, sluitring en moer.
Stel de antenne op de juiste hoek af en maak
vervolgens de moer vast.
1.Samle trin:
(1) Bor passende huller i muren, brug monterings plade
som bore skema.
(2) Påsæt
Swirvel Regulator & Fix Mount til muren med
skruerne.
(3) Sammel antennen med
Swirvel Regulator & Fix Mount
med en bolt, spændskive og møtrik. Juster antennen til
den rigtige vinkel og spænd derefter møtrikken.
2.Pasos para la Instalación::
(1) Fije la
Plataforma de Montaje al poste con los
Pernos en U, arandelas y tuercas.
(2)Ensamble la antena en la Plataforma de Montaje,
fijándola con un tornillo, arandela y tuerca. Ajuste la
antena en el ángulo adecuado, y luego aprete la
tuerca.
2.Montagestap:
(1) Bevestig de
draaiarmregelaar & vaste montage
aan de pool met U-bouten, veerringen en moeren.
(2) Monteer de antenne met de
draaiarmregelaar &
vaste montage met een schroef, sluitring en moer.
Stel de antenne op de juiste hoek af en maak
vervolgens de moer vast.
2.Samle trin:
(1) Monter
Swirvel regulator & fix mountpå masten med U
bolte, spænds skiver og møtrikker.
(2) Sammel antennen med
Swirvel Regulator & Fix Mount
med en bolt, spændskive og møtrik. Juster antennen til
den rigtige vinkel og spænd derefter møtrikken.
1 = antenna
2 =
Fix Mount
3 = Fix Mount
4 = Swivel Regulator
5 = Spring washers& scr
4
1
5
2
6 = Plastic Pegs
6
3
2.
1
Fastening to a pole
2
Parts:
1 = antenna
3
2 =
Fix Mount
3 = Fix Mount
4 = Swivel Regulator
5 = U Bolts
4
6 = Spring washers& Nuts
5
6
Specyfikacje produktu
| Marka: | LevelOne |
| Kategoria: | Niesklasyfikowane |
| Model: | WAN-9180 |
Potrzebujesz pomocy?
Jeśli potrzebujesz pomocy z LevelOne WAN-9180, zadaj pytanie poniżej, a inni użytkownicy Ci odpowiedzą
Instrukcje Niesklasyfikowane LevelOne

12 Stycznia 2025
9 Stycznia 2025
9 Stycznia 2025
9 Stycznia 2025
9 Stycznia 2025
30 Grudnia 2025
9 Października 2024
9 Października 2024
7 Października 2024
7 Października 2024
Instrukcje Niesklasyfikowane
Najnowsze instrukcje dla Niesklasyfikowane
29 Stycznia 2025
29 Stycznia 2025
29 Stycznia 2025
29 Stycznia 2025
29 Stycznia 2025
29 Stycznia 2025
29 Stycznia 2025
29 Stycznia 2025
29 Stycznia 2025
29 Stycznia 2025