Instrukcja obsługi Metra 95-3031B
Metra Niesklasyfikowane 95-3031B
Przeczytaj poniżej 📖 instrukcję obsługi w języku polskim dla Metra 95-3031B (4 stron) w kategorii Niesklasyfikowane. Ta instrukcja była pomocna dla 14 osób i została oceniona przez 4 użytkowników na średnio 4.6 gwiazdek
Strona 1/4
Metra. The World’s Best Kits.
®
MetraOnline.com © COPYRIGHT 2020 METRA ELECTRONICS CORPORATION REV. 1/21/20 INST95-3031B
INSTALLATION INSTRUCTIONS
95-3031B
Attention!Let the vehicle sit with the key
out of the ignition for a few minutes before
removing the factory radio. When testing the
aftermarket equipment, ensure that all factory
equipment is connected before cycling the
key to ignition.
KIT FEATURES
• ISO DDIN radio provision
• Painted scratch resistant matte black to match the factory finish
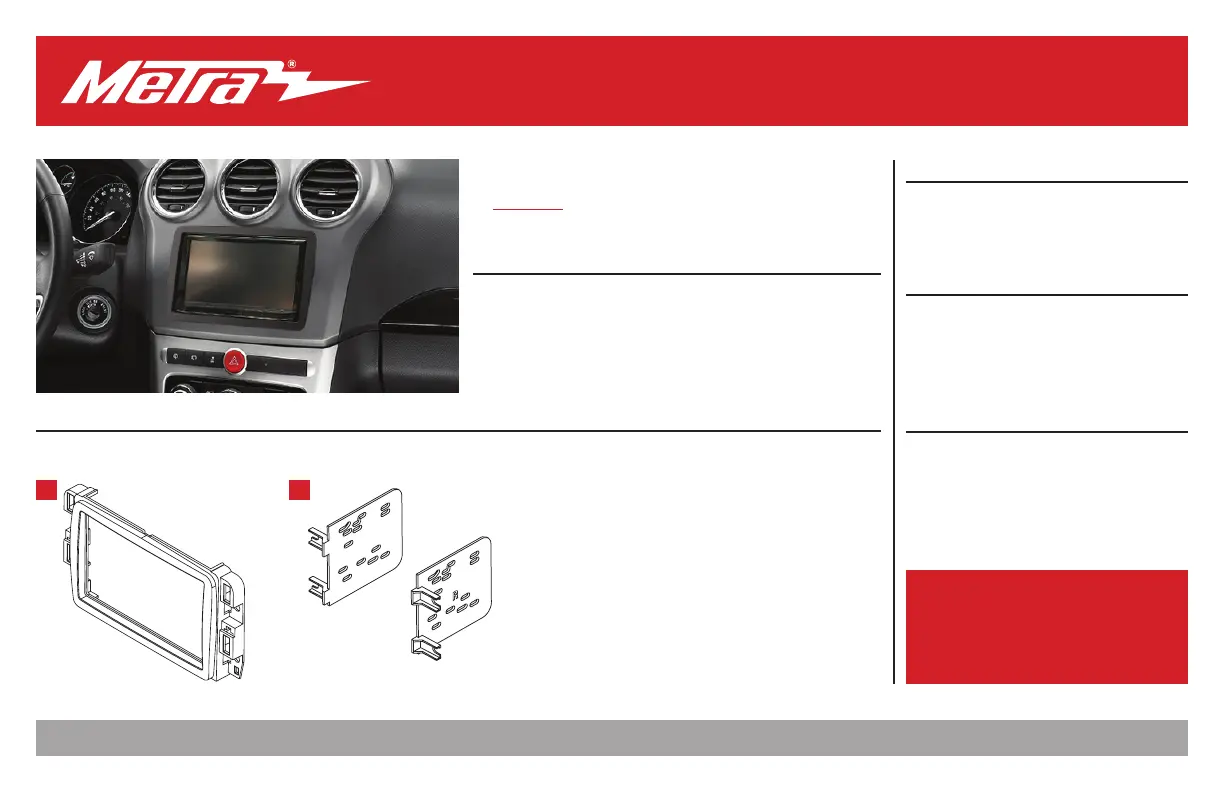
KIT COMPONENTS
• A) Radio bezel • B) Radio brackets
TOOLS REQUIRED
• Panel removal tool • Phillips screwdriver
• 9/32” socket wrench
TABLE OF CONTENTS
Dash Disassembly ..................................................2
Kit Assembly ..........................................................3
WIRING & ANTENNA CONNECTIONS
Wiring Harness: See metraonline for harness
interface solutions
Antenna Adapter: 40-CR10
(sold separately)
Chevrolet Captiva Sport (w nav)2014-2015
Visit MetraOnline.com for more detailed information about the product and up-to-date vehicle
specific applications
AB
Specyfikacje produktu
| Marka: | Metra |
| Kategoria: | Niesklasyfikowane |
| Model: | 95-3031B |
Potrzebujesz pomocy?
Jeśli potrzebujesz pomocy z Metra 95-3031B, zadaj pytanie poniżej, a inni użytkownicy Ci odpowiedzą
Instrukcje Niesklasyfikowane Metra

13 Stycznia 2025
13 Stycznia 2025
1 Stycznia 2025
1 Stycznia 2025
11 Grudnia 2024
9 Października 2024
9 Października 2024
9 Października 2024
9 Października 2024
9 Października 2024
Instrukcje Niesklasyfikowane
Najnowsze instrukcje dla Niesklasyfikowane
29 Stycznia 2025
29 Stycznia 2025
29 Stycznia 2025
29 Stycznia 2025
29 Stycznia 2025
29 Stycznia 2025
29 Stycznia 2025
29 Stycznia 2025
29 Stycznia 2025
29 Stycznia 2025