Instrukcja obsługi OttLite 6D200C-SHPR
Przeczytaj poniżej 📖 instrukcję obsługi w języku polskim dla OttLite 6D200C-SHPR (1 stron) w kategorii Ulga. Ta instrukcja była pomocna dla 17 osób i została oceniona przez 9 użytkowników na średnio 5.0 gwiazdek
Strona 1/1
Dual Shade LED Floor Lamp with USB Charging Station
6D200C-SHPR PL-0094
INS160285 REV090216
English Dual Shade LED Floor Lamp with USB Charging Station
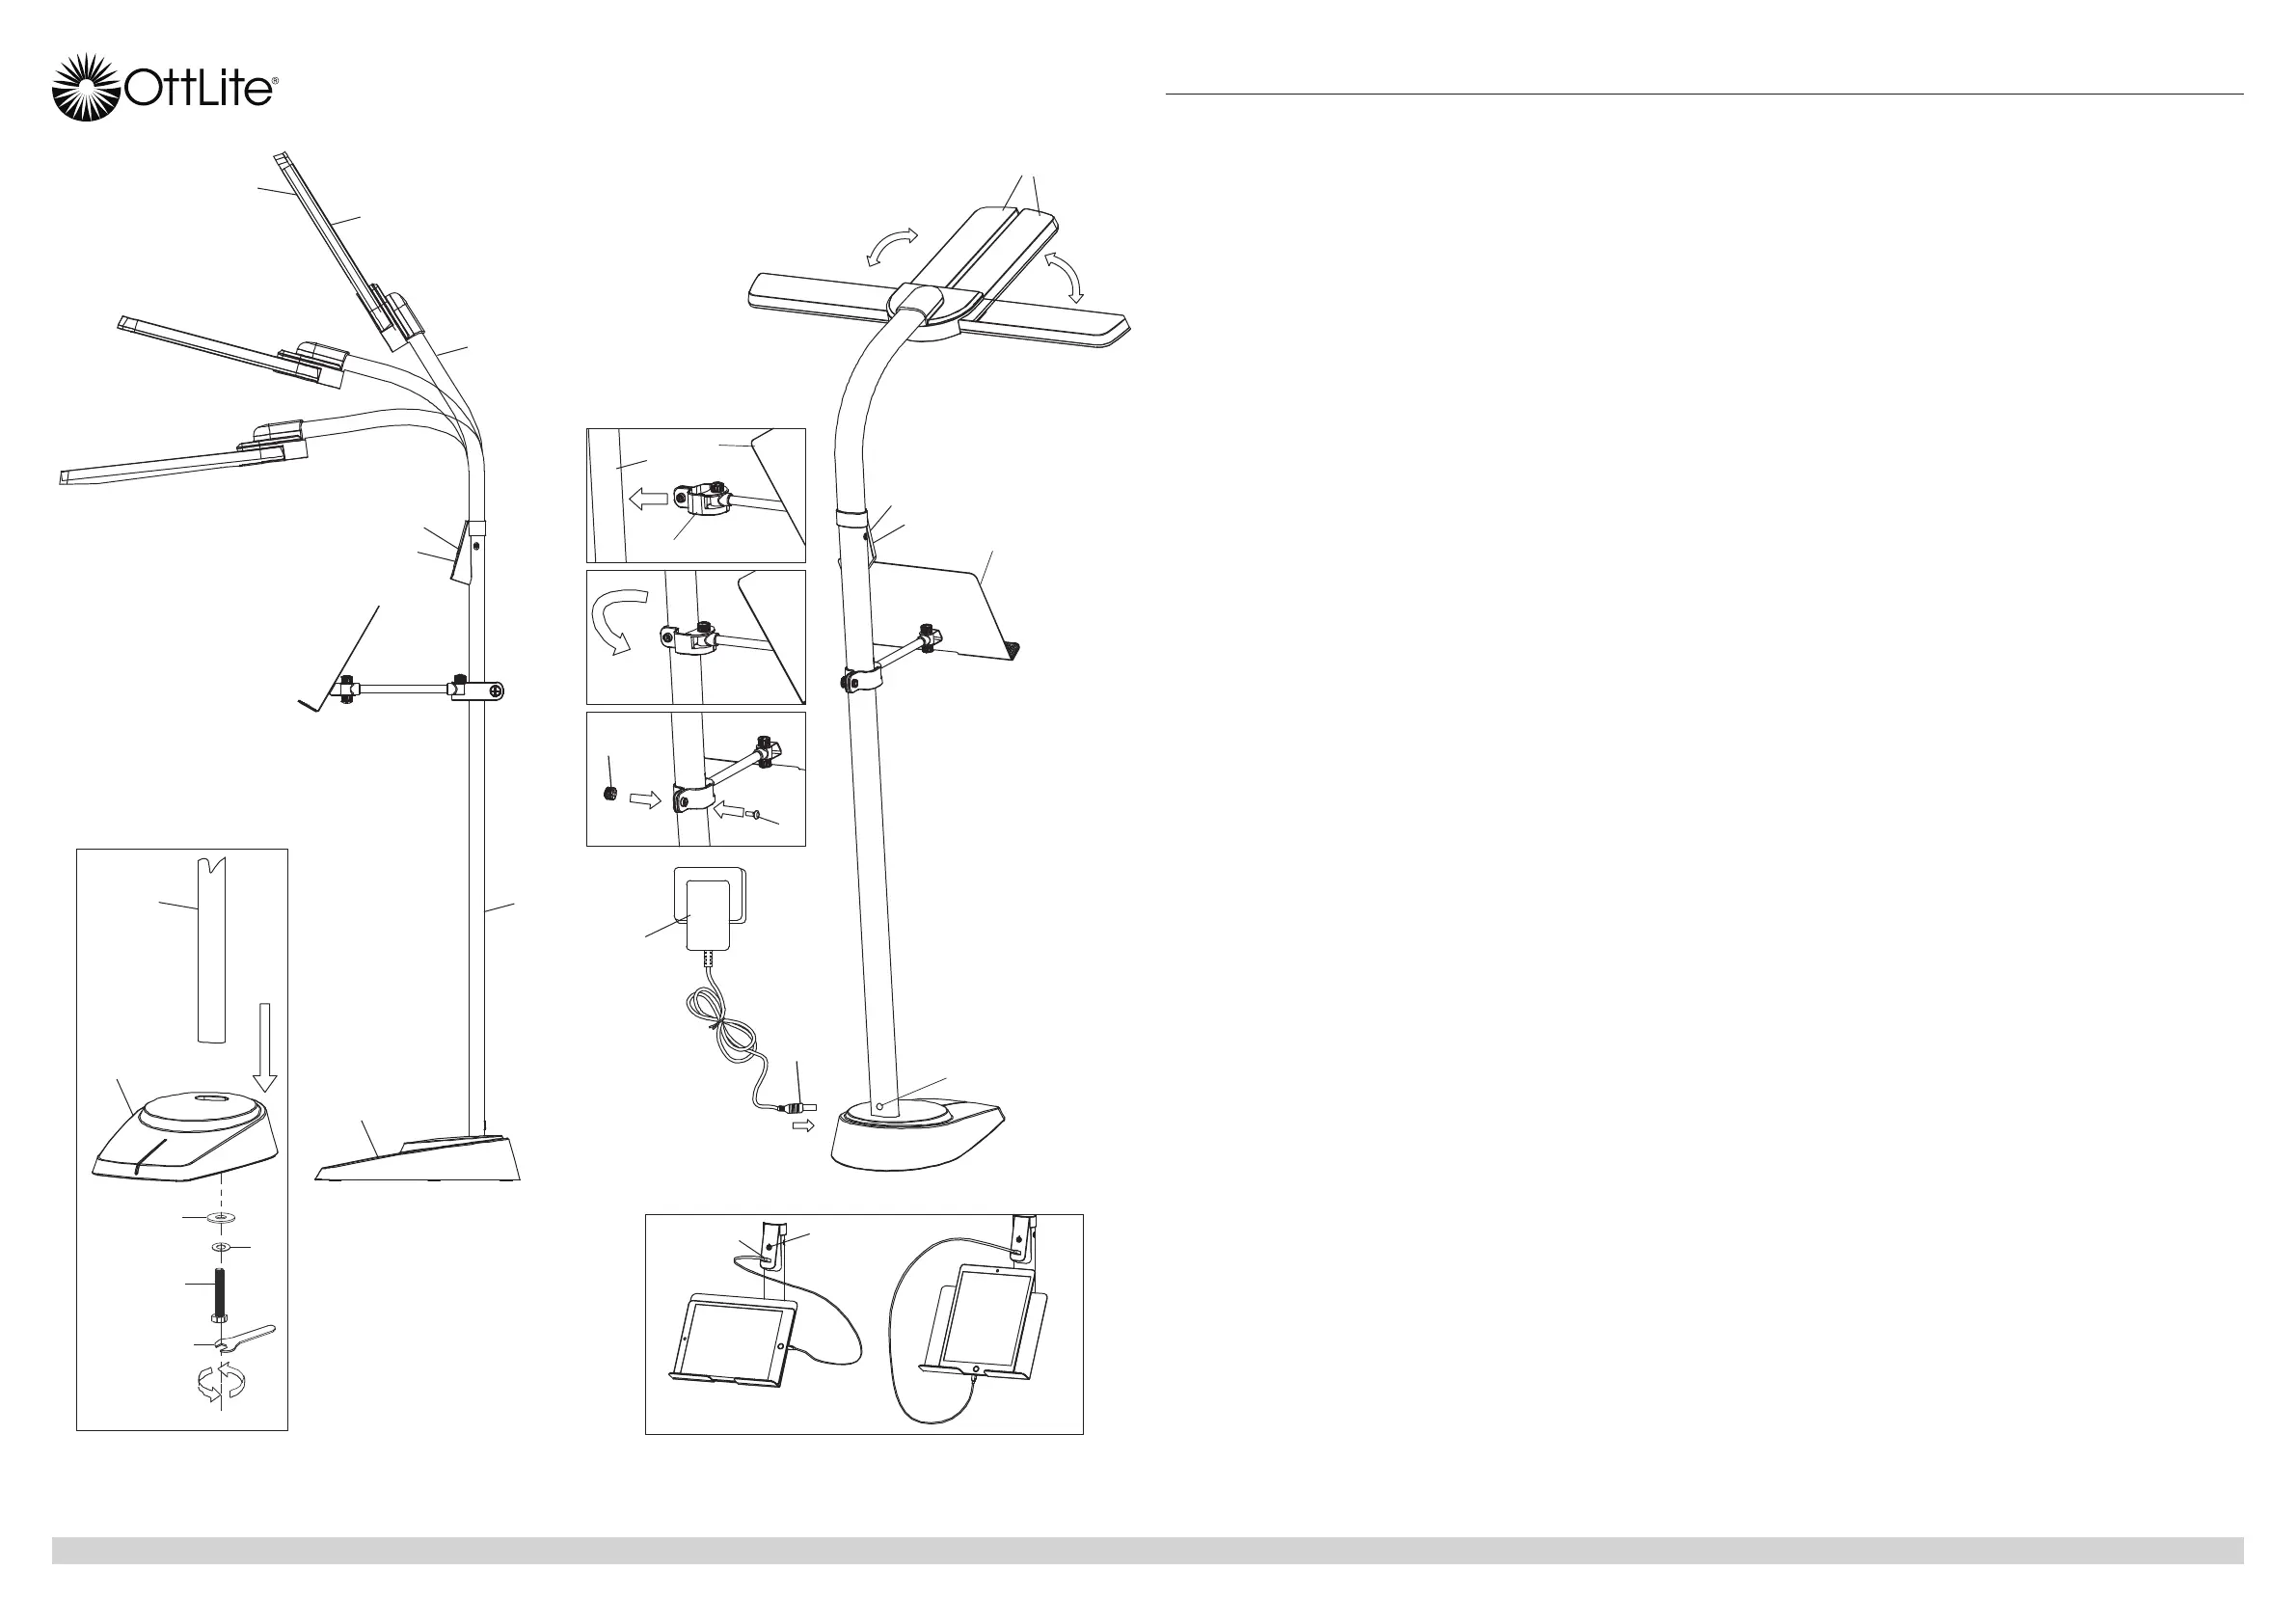
Figure 1
Figure 2
Figure 3
M
Q
D
C
E
B
P
N
CONGRATULATIONS!
You’ve purchased the finest in natural lighting technology with your new OttLite
®
product.
PRODUCT REGISTRATION FORM
Please complete the enclosed Product Registration Form and return it today by
mail, or register online by going to: OttLite.com/warranty
WARNING: To prevent electric shock, make sure the lamp is
not plugged in until all assembly steps are complete.
LAMP ASSEMBLY
1. Unpack all lamp parts and lay out with the Base (A) lying flat on a steady
surface.
2. The adjustable stand attachment (L) should be placed aside to be installed
after assembling floor lamp. SEE ADJUSTABLE STAND ATTACHMENT
ASSEMBLY section for proper installation instructions.
3. To ease assembly, straighten flex-neck (C) so that neck and dual shade (D)
are in a straight line.
4. Remove wrench (G), bolt (H) and washers (J, K) from the plastic bag included
in the box containing the base.
NOTE:On occasions, washers (J, K) may be ONE solid washer that will
serve the same purpose.
5. Firmly insert the pole (B) into the hole located in the base (A).
6. Insert bolt (H) through the lock washer (J), then through flat washer (K), and
finally into the recessed hole in the bottom of the base (A) as shown in the
Figure 1.
7. Use the enclosed wrench (G) to tighten the bolt (H) securely, turning
clockwise until tight.
8. Connect the A/C adapter input (N) into connector (P) located in the rear-bottom
of pole (B).
OPERATION
1.Plug the A/C Adapter (M) into a standard household 120V AC outlet.
NOTE:Only use with supplied AC adapter to avoid damage or fire.
2.Turn the lamp ON & OFF by using power switch (E) located in the front-
lower side of flex-neck assembly (C). Power switch (E) is a “touch” switch that
controls the dimmer function for 4 levels of brightness.
3.To power LED settings, slightly touch the switch (E) to achieve the following:
•turn lamp “ON” to 1st brightness setting; touch the switch “once”
•for 2nd brightness setting; touch the switch “two-times”
•for 3rd brightness setting; touch the switch “three-times”
•for 4th brightness setting; touch the switch “four-times”
•to turn lamp “OFF”; touch the switch “five-times”.
4.To position the shade simply bend the flex-neck (C) as needed to point
the light. To avoid damaging the lamp, DO NOT force the flex-neck into a
sharp bend.
5.Dual shades (D) each have a LED light panel for multiple ways to position light.
SAFETY WARNING:TO REDUCE THE RISK OF FIRE, ELECTRIC
SHOCK, OR INJURY TO PERSONS
1. Turn lamp off and WAIT UNTIL LAMP HEADS (D) ARE COOL before handling.
2. The LED panels (Q) might get hot after several hours of continuous use, DO
NOT place your hands directly on LED light panels.
3. Never use with an extension cord unless the plug can be fully inserted into
the receptacles in the extension cord.
4. Do not alter the plug.
5. The lamp heads included with this unit cannot be replaced by the consumer.
NOTE: The important safety instructions appearing in this instruction sheet are
not meant to cover all possible conditions and situations that may occur. It must
be understood that common sense, caution, and care must be used with any
electrical product.
ADJUSTABLE STAND ATTACHMENT ASSEMBLY
1.The following items should be included in the package. See Figure 2.
L. Adjustable stand (clamp (U) already assembled).
S. Screw-bolt
T. Tension knob
2.Removed tension knob (T) and screw-bolt (S) already installed on clamp (U).
3.Attach clamp (U) onto front side of pole (B) beneath panel containing touch
switch (E) and USB port (F).
4.Spread clamp (U) just enough to fit over the pole, as shown in Figure 2.
5.Insert screw-bolt (S) into clamp (U) from the same side it was removed as
shown in Figure 2.
6.Thread tension knob (T) onto the screw-bolt (S) then tighten firmly by hand.
NOTE:DO NOT over tighten tension knob as this may damage it.
7.The adjustable stand is now ready for use. See Figure 3 for proper placement
of tablet or other materials.
CAUTION: The maximum loading on the adjustable stand (L)
is 2 pounds. Overloading the adjustable stand may damage
the stand assembly.
CAUTION!IF THE ExTERNaL FLExIbLE CabLE OR CORD OF THIS LUmINaIRE
IS DamagED, IT SHaLL bE ExCLUSIvELY REPLaCED bY THE maNUFaCTURER OR ITS
SERvICE agENT OR a SImILaR qUaLIFIED PERSON IN ORDER TO avOID a HazaRD.
INDOOR USE ONLY.
FCC PART 15
NOTE: This equipment has been tested and found to comply with the limits
for a Class B digital device, pursuant to Part 15 of the FCC rules. These limits
are designed to provide reasonable protection against harmful interference
in a residential installation. This equipment generates, uses and can radi-
ate radio frequency energy and, if not installed and used in accordance with
the instructions, may cause harmful interference to radio communications.
However, there is no guarantee that the interference will not occur in a par-
ticular installation. If this equipment does cause harmful interference to radio
or television reception, which can be determined by turning the equipment
off and on, the user is encouraged to try to correct the interference by one or
more of the following measures:
• Reorient or relocate the receiving antenna.
• Increase the separation between the equipment and receiver.
• Connect the equipment into an outlet on a circuit different from that of
the receiver.
• Consult the dealer or an experienced radio/TV technician for help.
CAUTION:aNY CHaNgE OR mODIFICaTION TO PRODUCT NOT ExPRESSLY
RECOgNIzED bY OTTLITE TECHNOLOgIES vOIDS OTTLITE’S RESPONSIbILITY FOR
PROPER FUNCTION OF PRODUCT.
CAN ICES-3 (B) / NMB-3 (B)
AC/DC ADAPTER
Input: AC 100-240V, 50/60 Hz, 1.4A
Output: 18V DC, 1.3A with a Male DC Plug
THIS LAMP CONTAINS a 5V-2.1A USB output port (F) located
in the front-lower side of flex-neck assembly (C), beneath power
switch (E).
B
A
K
J
H
G
F
USB
USB
D
L
L
U
T
S
E
B
E
F
A
F
Specyfikacje produktu
| Marka: | OttLite |
| Kategoria: | Ulga |
| Model: | 6D200C-SHPR |
Potrzebujesz pomocy?
Jeśli potrzebujesz pomocy z OttLite 6D200C-SHPR, zadaj pytanie poniżej, a inni użytkownicy Ci odpowiedzą
Instrukcje Ulga OttLite

9 Stycznia 2025
8 Stycznia 2025
8 Stycznia 2025
2 Stycznia 2025
2 Stycznia 2025
9 Października 2024
9 Października 2024
Instrukcje Ulga
Najnowsze instrukcje dla Ulga
9 Kwietnia 2025
8 Kwietnia 2025
8 Kwietnia 2025
8 Kwietnia 2025
8 Kwietnia 2025
7 Kwietnia 2025
5 Kwietnia 2025
5 Kwietnia 2025
5 Kwietnia 2025
5 Kwietnia 2025