Instrukcja obsługi OttLite VW2009
Przeczytaj poniżej 📖 instrukcję obsługi w języku polskim dla OttLite VW2009 (4 stron) w kategorii Ulga. Ta instrukcja była pomocna dla 20 osób i została oceniona przez 3 użytkowników na średnio 4.9 gwiazdek
Strona 1/4
CONGRATULATIONS! You’ve purchased the nest in natural lighting technology
with your new OttLite
®
product.
PRODUCT REGISTRATION FORM
Please complete the enclosed Product Registration Form and return it today by mail
, or
register online by going to: OttLite.com/warranty
WARNING: To prevent electric shock, make sure the lamp is not plugged in until
all steps are complete.
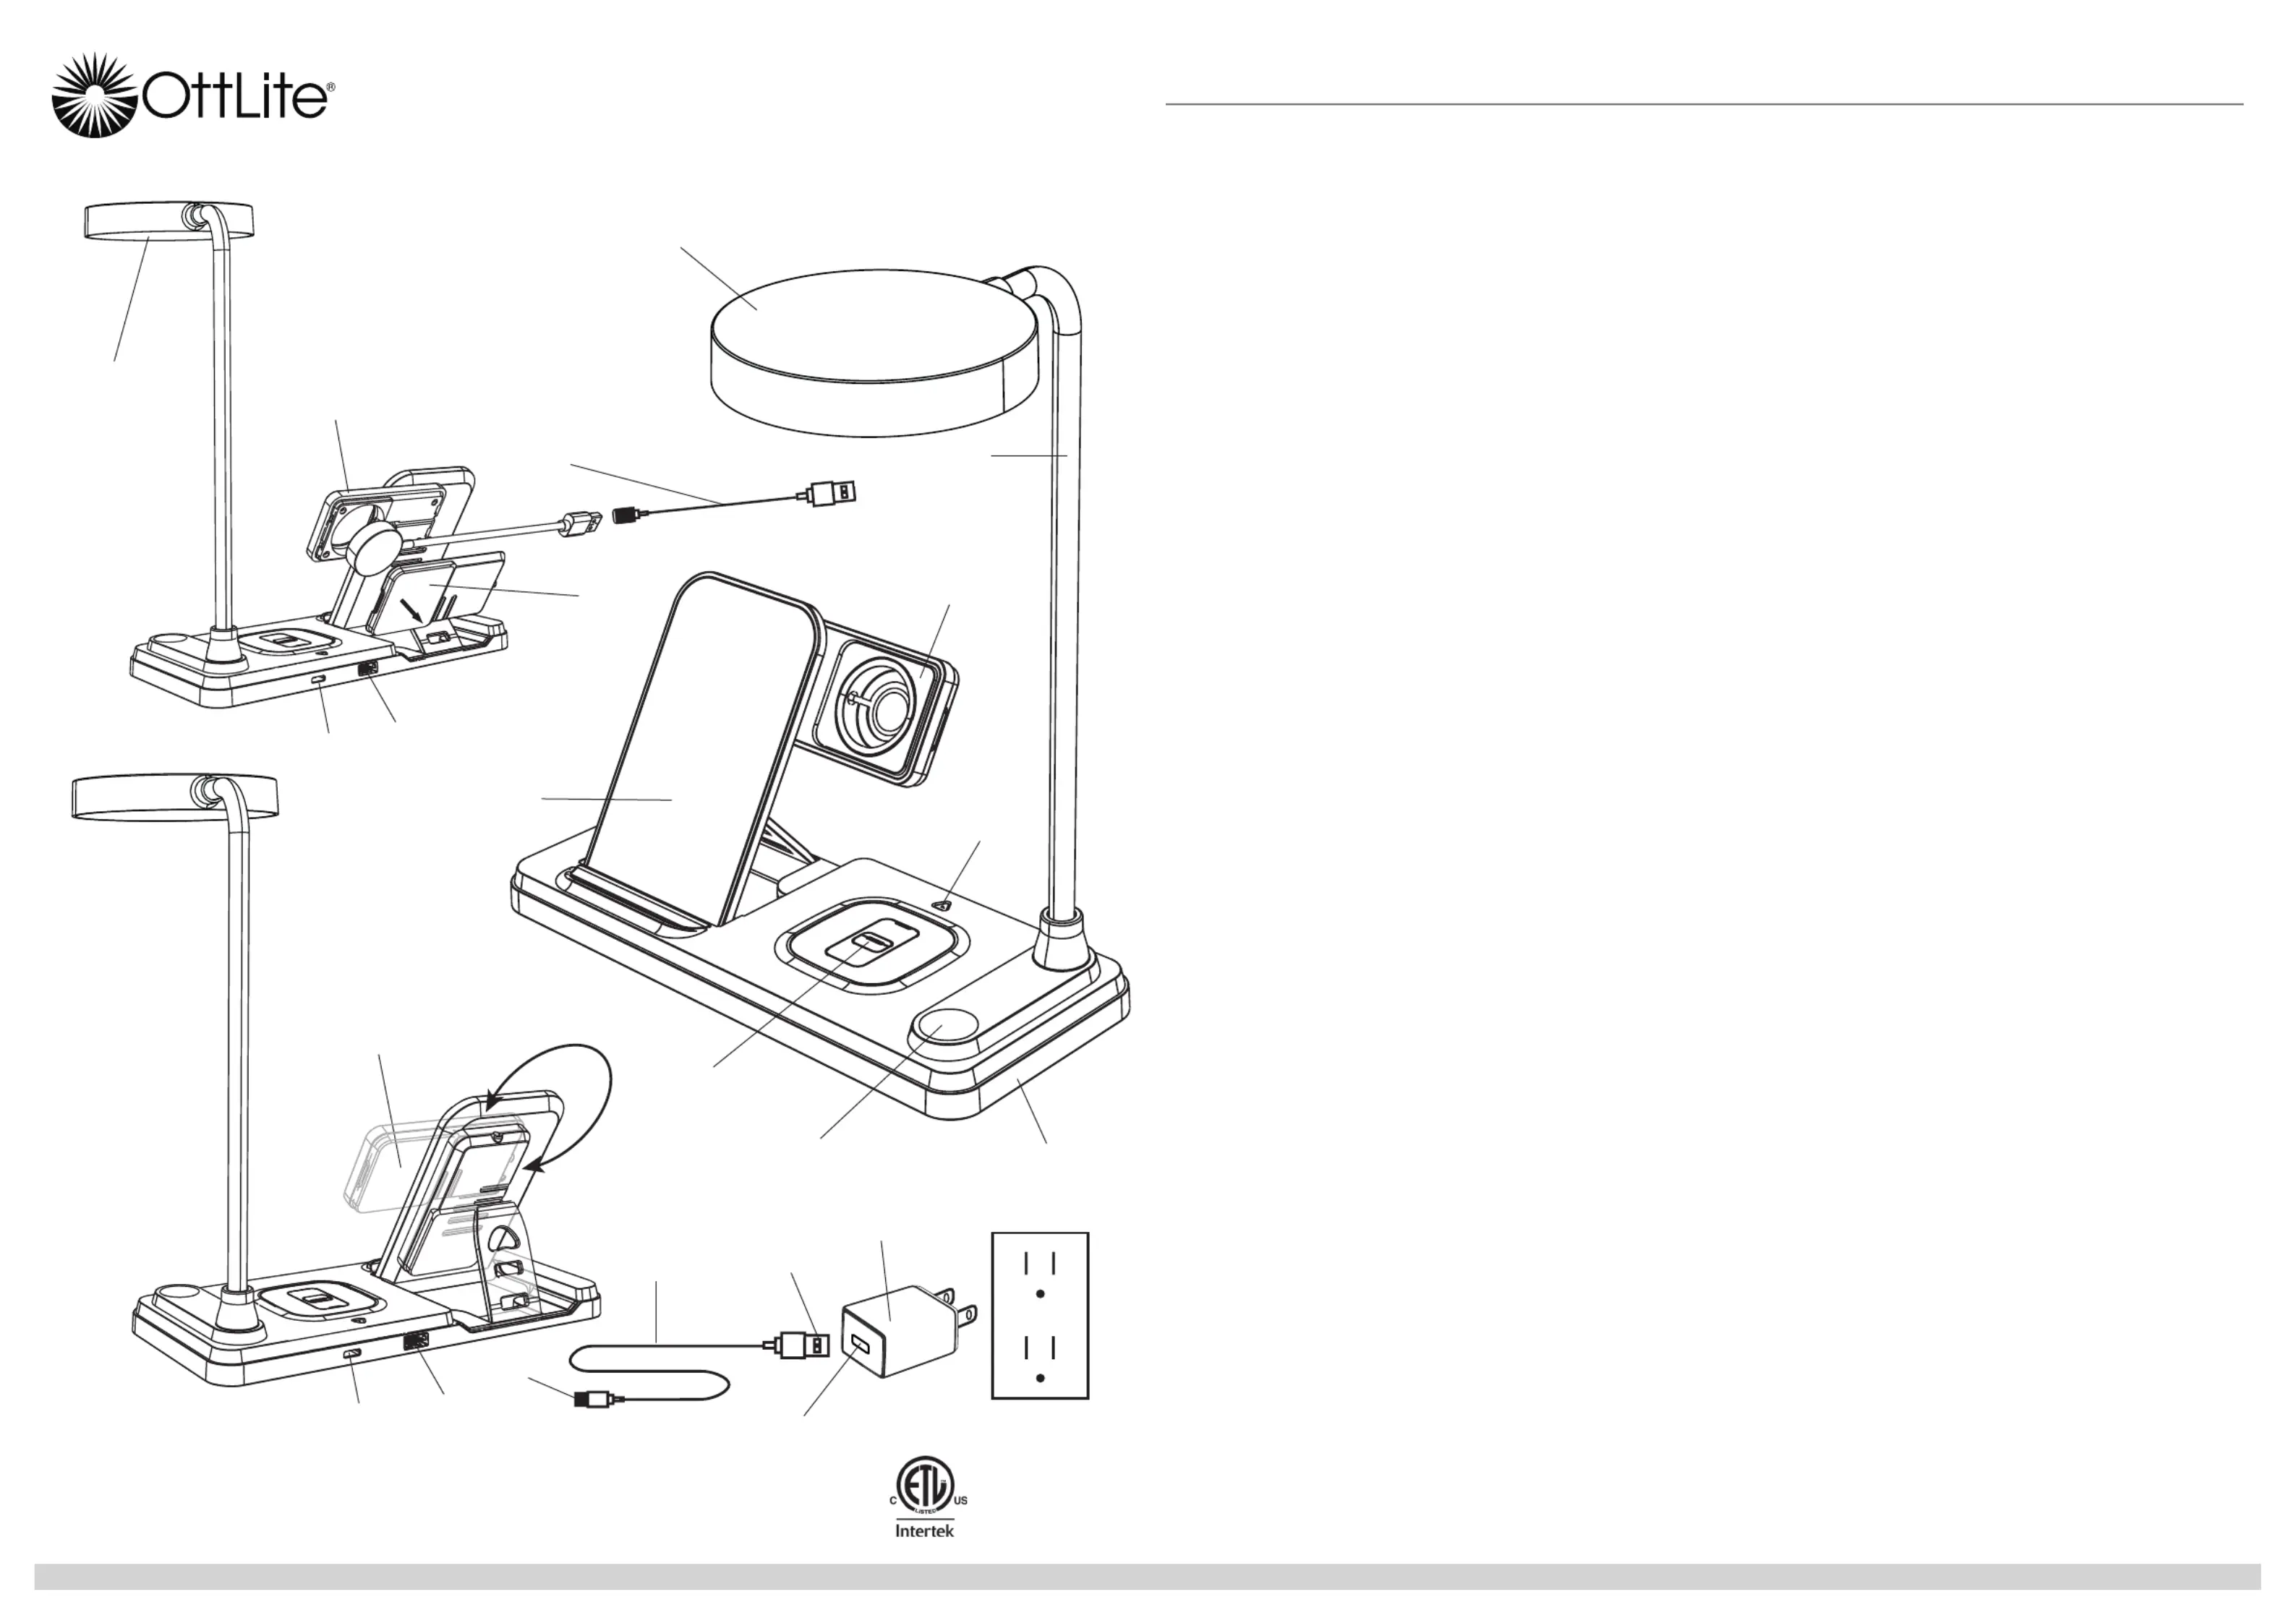
NOTE: THIS UNIT IS FULLY ASSEMBLED
1. Remove lamp from packing, placing lamp body base (A) at on a steady surface.
2. Connect USB-A connector (B) on cable (C) into adapter port (D). Connect USB-C
connector (E) into lamp port (G).
3. Plug the power adapter (F) into a standard household 120V AC outlet.
4. Turn the lamp ON/OFF by using power switch (H).
5. This lamp provides three color modes. To adjust lighting color mode, slightly
touch switch (H) to achieve the following:
• Turn lamp “” to 1st color mode; touch the switch “once”;ON
• for 2nd color mode; touch the switch “two-times”;
• for 3rd color mode; touch the switch “three-times”;
• to turn lamp “OFF”; touch the switch “four-times”.
6. To adjust the brightness, slightly “press and hold” switch (H) until desired
brightness setting is achieved.
7. To reposition the light, hold the lamp base (A) steady and grasp either ex-neck
(J) or shade (K) depending on needed adjustment. DO NOT FORCE the shade
or lamp body outside allowable adjustable range as excessive adjustment may
cause damage.
WIRELESS CHARGING INSTRUCTIONS:
Wireless charging requires a compatible device.
Wireless charging area (L) is for mobile phones. Wireless charging (M) can be
used for mobile phones or earbuds.
To wirelessly charge a device, perform the following:
•
For Wireless Charging Area (L), adjust stand to desired position and place into
notches on backside of stand.
• Place the device face up on the middle of the wireless charging area (L) or (M).
• When the device is centered on the wireless charging area, indicator light (N)
will turn BLUE, indicating the device is charging properly. Check the NOTE:
device periodically to determine if device is fully charged, as lamp DOES NOT
give any indication of when device is fully charged.
NOTE: If
wireless charging indicator light (N)
is illuminated
RED, this indicates the
wireless charger is in standby mode and
the device needs to be properly centered.
WATCH CHARGING STAND INSTRUCTIONS:
To use the watch charging stand to charge a watch, a wireless watch charger will
need be provided (not included).
• If not already visible, rotate the watch charging stand (Q) out from behind
wireless charging area (L) as shown in Diagram 2.
• Remove cover (P) and place watch charger inside the hole on stand (Q). Refer to
Diagram 1. Make sure the watch charger cable is properly placed in slots to
avoid pinching the cable. If the watch charger does not t securely in the hole,
place charger in one of the two provided silicone covers before placing charger
in the watch charging stand.
•
Connect wireless watch charger with USB-A connector into lamp port (R). If the
wireless
watch charger is provided with a USB-C connector, use converter cable
(S).
• Place the device face up on the middle of the wireless charging area.
NOTE: Check the device periodically to determine if device is fully charged, as
lamp DOES NOT give any indication of when the device is fully charged.
NOTE: USB port (R) is rated 5V, 0.5A and can be used to charge items such as
smartwatches, cellular phones, etc.
CAUTION!
DEVICE MAY BECOME WARM DURING CHARGING. THIS IS NORMAL
AND PART OF THE PROCESS. CHARGING TIMES VARY BY DEVICE.
SAFETY WARNING:TO REDUCE THE RISK OF FIRE, ELECTRIC
SHOCK, OR INJURY TO PERSONS
1. Turn lamp off and WAIT UNTIL LAMP HEAD IS COOLbefore handling.
2. The LED panel (T) might get hot after several hours of continuous use DO NOT
place your hands directly on LED light panel.
3. Never use with an extension cord unless the plug can be fully inserted into the
receptacles in the extension cord.
4. Do not alter the plug.
5. The lamp head included with this unit cannot be replaced by the consumer.
6. INDOOR USE ONLY.
NOTE: The important safety instructions appearing in this instruction sheet are
not meant to cover all possible conditions and situations that may occur. It must
be understood that common sense, caution, and care must be used with any
electrical product.
CAUTION!
IF THE EXTERNAL FLEXIBLE CABLE OR CORD OF THIS LUMINAIRE
IS DAMAGED, IT SHALL BE EXCLUSIVELY REPLACED BY THE MANUFACTURER OR ITS
SERVICE AGENT OR A SIMILAR QUALIFIED PERSON IN ORDER TO AVOID A HAZARD.
INDOOR USE ONLY.
CAUTION!
THE LIGHT SOURCE OF THIS LUMINAIRE IS NOT REPLACEABLE;
WHEN THE LIGHT SOURCE REACHES ITS END OF LIFE THE WHOLE LUMINAIRE SHALL
BE REPLACED.
CAUTION: Any change or modication to product not expressly recognized by
OttLite Technologies voids OttLite’s responsibility for proper function of product.
FCC PART 15
Note: This equipment has been tested and found to comply with the limits for
a Class B digital device, pursuant to Part 15 of the FCC rules. These limits
are designed to provide reasonable protection against harmful interference
in a residential installation. This equipment generates, uses and can radiate
radio frequency energy and, if not installed and used in accordance with
the instructions, may cause harmful interference to radio communications.
However, there is no guarantee that the interference will not occur in a particular
installation. If this equipment does cause harmful interference to radio or
television reception, which can be determined by turning the equipment off and
on, the user is encouraged to try to correct the interference by one or more of the
following measures:
• Reorient or relocate the receiving antenna.
• Increase the separation between the equipment and receiver.
• Connect the equipment into an outlet on a circuit different from that to which
the receiver is connected.
• Consult the dealer or an experienced radio/TV technician for help.
Changes or modications not expressly approved by the party responsible for
compliance could void the user’s authority to operate the equipment.
This device complies with Part 15 of the FCC Rules. Operation is subject to the
following two conditions:
(1) this device may not cause harmful interference, and
(2) this device must accept any interference received, including interference that
may cause undesired operation.
ENGLISHLED Desk Light with Multi-Device Charging Station
LED Desk Light with Multi-Device Charging Station
VW2009 L025
INS240811 REV073124
C
J
K
D
F
B
T
L
M
N
H
A
G
R
E
S
P
Q
Diagram 1
Q
Q
Diagram 2
R
G
Specyfikacje produktu
| Marka: | OttLite |
| Kategoria: | Ulga |
| Model: | VW2009 |
Potrzebujesz pomocy?
Jeśli potrzebujesz pomocy z OttLite VW2009, zadaj pytanie poniżej, a inni użytkownicy Ci odpowiedzą
Instrukcje Ulga OttLite

9 Stycznia 2025
8 Stycznia 2025
8 Stycznia 2025
2 Stycznia 2025
2 Stycznia 2025
9 Października 2024
9 Października 2024
Instrukcje Ulga
Najnowsze instrukcje dla Ulga
9 Kwietnia 2025
8 Kwietnia 2025
8 Kwietnia 2025
8 Kwietnia 2025
8 Kwietnia 2025
7 Kwietnia 2025
5 Kwietnia 2025
5 Kwietnia 2025
5 Kwietnia 2025
5 Kwietnia 2025