Instrukcja obsługi Séura MC-1
Séura
Niesklasyfikowane
MC-1
Przeczytaj poniżej 📖 instrukcję obsługi w języku polskim dla Séura MC-1 (2 stron) w kategorii Niesklasyfikowane. Ta instrukcja była pomocna dla 17 osób i została oceniona przez 9 użytkowników na średnio 3.9 gwiazdek
Strona 1/2

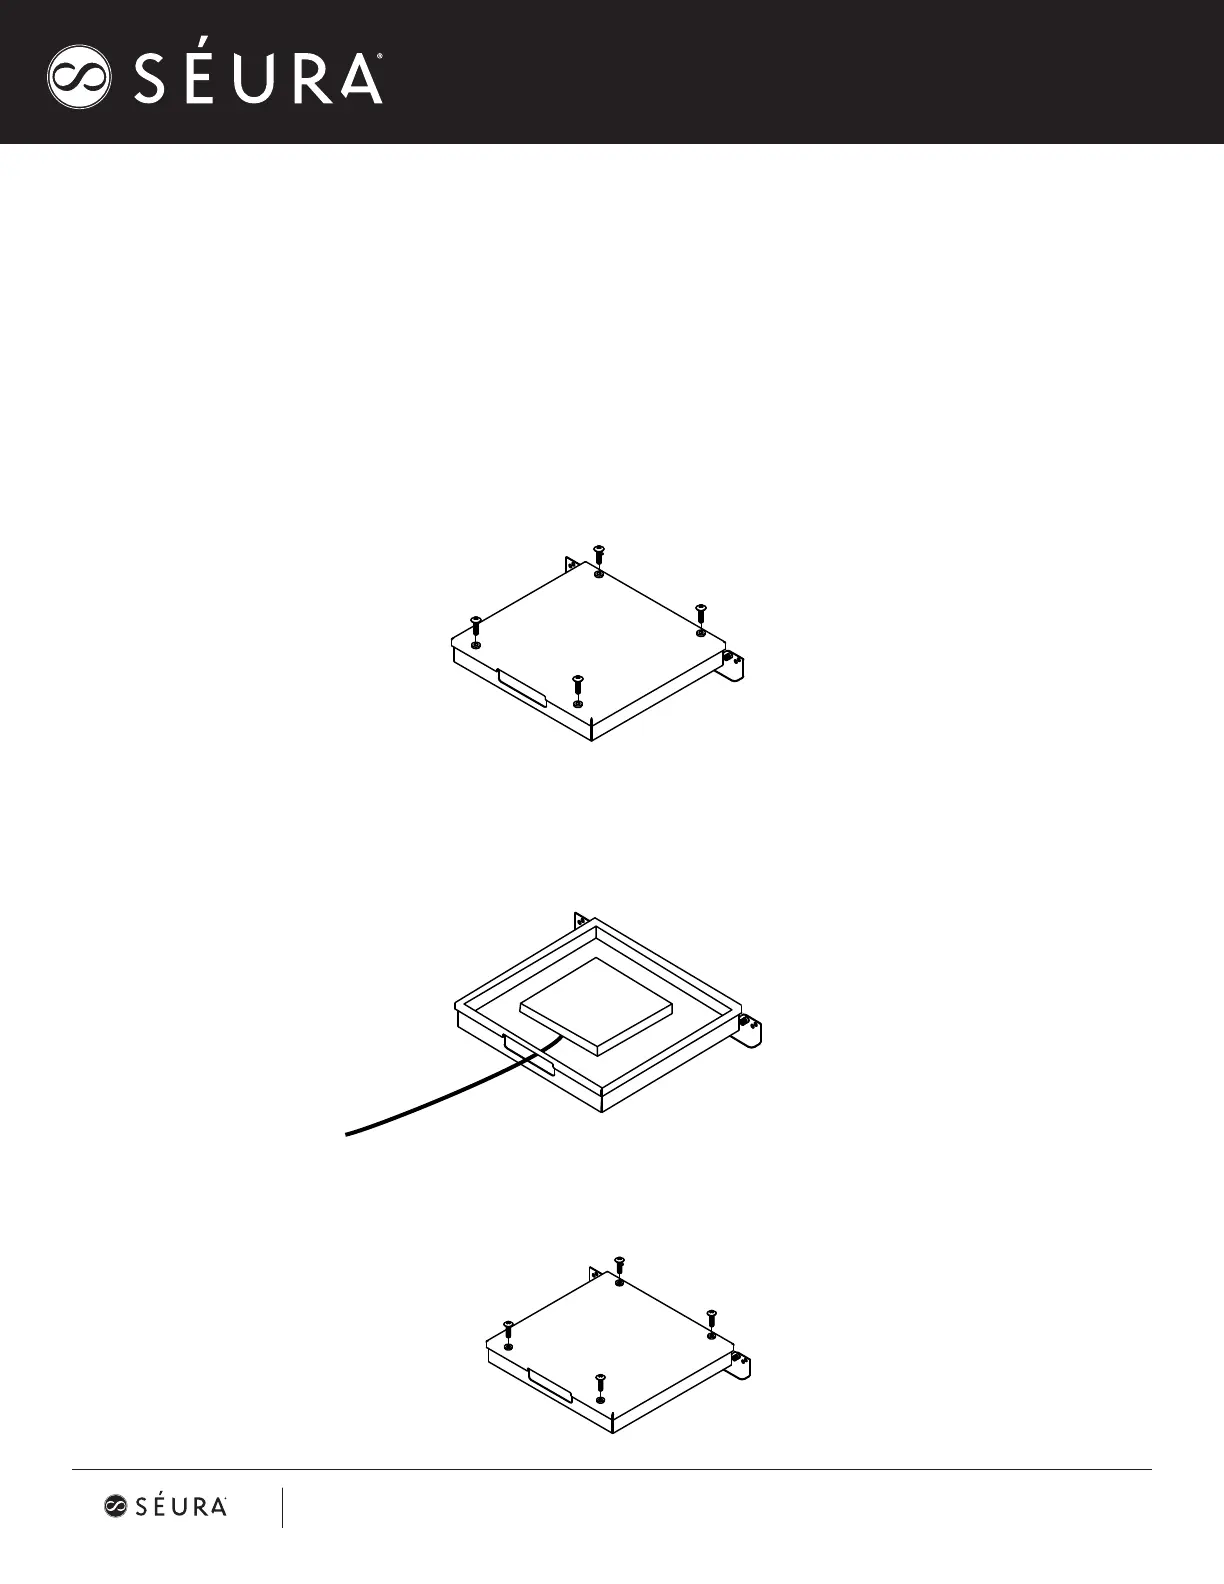
Séura External Media Compartment Installation Instructions
Compatible with Shade Series 2™ 55-inch, 65-inch, and 75-inch TVs
(models: SHD2-55, SHD2-65, SHD2-75)
TOOLS REQUIRED
Phillips Head #3 Screwdriver
Allen Wrench, 5/32-inches
1. Use a Philips #3 screwdriver to unscrew the four ¼-20 screws and remove the cover from the
External Media Compartment.
2. The hardware kit that includes two stake adapters and six screws will be located inside of the
External Media Compartment. Remove the hardware kit and place your desired media devices in the
compartment. Wires from the media devices should exit the media compartment by the foam gasket.
3. Use the four ¼-20 screws that were previously removed in step 1 to re-aach the cover to the
External Media Compartment
Séura External Media Compartment
Publish date: tober 18, 021 11:00 AM. Information is s j t to change without notice. Oc 2 ub ec
© 10/18/21 Séura
1230 Ontario Road, Green Bay, Wisconsin 54311
1 00- 7-3872 contacts@seura.com-8 95
www.seura.com
#94-069001

4. Locate the two stake pocket adapters and four screws that came in the hardware kit. Line up the stake
pocket adapters with the correct set of holes on each wing. There are two sets of holes on each wing: the
inside set of holes is for Shade Series 2™ 55-inch and 65-inch TVs and the outside set of holes is for the
Shade Series 2™ 75-inch TV. Using an Allen wrench and the four provided screws, screw the steak pocket
adapters in place. Leave these screws a lile loose to allow adjust-ability – you’ll tighten them later.
5. Place the Shade Series 2™ TV in a safe position for mounting the External Media Compartment to the
back of the TV. We recommend laying the TV face-down on a flat, so surface.
6. Align the stake pocket adapters on the External Media Compartment with the stake pocket holes located
near the boom of the Shade Series 2™ TV. Slide the compartment into position and tighten the four
screws from step 4.
7. Insert two ¼-20 screws through the holes on the back of the TV and into the stake pocket adapters to
aach the adapters to the back of the TV.
8. Open the main A/V compartment on the back of the Shade Series 2 TV and make wiring connections
from the media devices in the External Media Compartment to the inputs located in the main media
compartment on the Shade Series 2 TV. Close the A/V compartment and test unit to verify functionality.
SOUNDBA C PATIB T YR OM ILI
JUN 2021E
Publish date: tober 18, 2021 11:00 AM. Information is s j t to change without notice. Oc ub ec
© 10/18/21 Séura
1230 Ontario Road, Green Bay, Wisconsin 54311
1 00- 7-3872 contacts@seura.com-8 95
www.seura.com #94-069001
Specyfikacje produktu
Marka: | Séura |
Kategoria: | Niesklasyfikowane |
Model: | MC-1 |
Potrzebujesz pomocy?
Jeśli potrzebujesz pomocy z Séura MC-1, zadaj pytanie poniżej, a inni użytkownicy Ci odpowiedzą
Instrukcje Niesklasyfikowane Séura
2 Października 2024
2 Października 2024
1 Października 2024
1 Października 2024
1 Października 2024
1 Października 2024
1 Października 2024
1 Października 2024
Instrukcje Niesklasyfikowane
- Niesklasyfikowane Shelly
- Niesklasyfikowane Argon
- Niesklasyfikowane Chandler
- Niesklasyfikowane Kiloview
- Niesklasyfikowane Etna
- Niesklasyfikowane Hameg
- Niesklasyfikowane Skil
- Niesklasyfikowane Kogan
- Niesklasyfikowane Visage
- Niesklasyfikowane Nikon
- Niesklasyfikowane Eventide
- Niesklasyfikowane Rapoo
- Niesklasyfikowane Brother
- Niesklasyfikowane Busch And Müller
- Niesklasyfikowane Envivo
Najnowsze instrukcje dla Niesklasyfikowane
29 Stycznia 2025
29 Stycznia 2025
29 Stycznia 2025
29 Stycznia 2025
29 Stycznia 2025
29 Stycznia 2025
29 Stycznia 2025
29 Stycznia 2025
29 Stycznia 2025
29 Stycznia 2025