Instrukcja obsługi Shelly Plus i4
Shelly inteligentny dom Plus i4
Przeczytaj poniżej 📖 instrukcję obsługi w języku polskim dla Shelly Plus i4 (3 stron) w kategorii inteligentny dom. Ta instrukcja była pomocna dla 56 osób i została oceniona przez 3 użytkowników na średnio 4.8 gwiazdek
Strona 1/3
EN
USER & SAFETY GUIDE
SHELLY PLUS I4
Read before use
This document contains important technical and safety infor-
mation about the device, its safety use and installation.
⚠CAUTION! Before beginning the installation, please read this
guide and any other documents accompanying the device care-
fully and completely. Failure to follow the installation procedures
could lead to malfunction, danger to your health and life, viola
-
tion of the law or refusal of legal and/or commercial guarantee
(if any). Allterco Robotics EOOD is not responsible for any loss
or damage in case of incorrect installation or improper operation
of this device due to failure of following the user and safety in-
structions in this guide.
ESP_DBG_UART
U0TXD
U0RXD
+3.3_ESP
RESET
Reset button
GPIO0
GND
1
⚠CAUTION! High voltage. Do not connect to the serial inter-
face, when Shelly® Plus i4 is power supplied.
Product Introduction
Shelly® is a line of innovative microprocessor-managed devic-
es, which allow remote control of electric appliances through a
mobile phone, tablet, PC, or home automation system. Shelly®
devices can work standalone in a local Wi-Fi network or they
can also be operated through cloud home automation services.
Shelly® devices can be accessed, controlled and monitored
remotely from any place the User has Internet connectivity,
as long as the devices are connected to a Wi-Fi router and the
Internet. Shelly® devices have integrated web servers, through
which the user may adjust, control and monitor them. The cloud
function could be used, if it is activated through the web server
of the device or the settings in the Shelly Cloud mobile applica-
tion. The user can register and access Shelly Cloud using either
Android or iOS mobile application, or with any internet browser
at https://my.shelly.cloud/
Shelly® Devices have two Wi-Fi modes - Access Point (AP) and
Client mode (CM). To operate in Client Mode, a Wi-Fi router
must be located within the range of the device. Devices can
communicate directly with other Wi-Fi devices through HTTP
protocol. An API is provided by Allterco Robotics EOOD.
For more information, please visit:
https://shelly-api-docs.shelly.cloud/#shelly-family-overview
Control your home with your voice
Shelly® devices are compatible with Amazon Echo and Google
Home supported functionalities. Please see our step-by-step
guide on: https://shelly.cloud/support/compatibility/
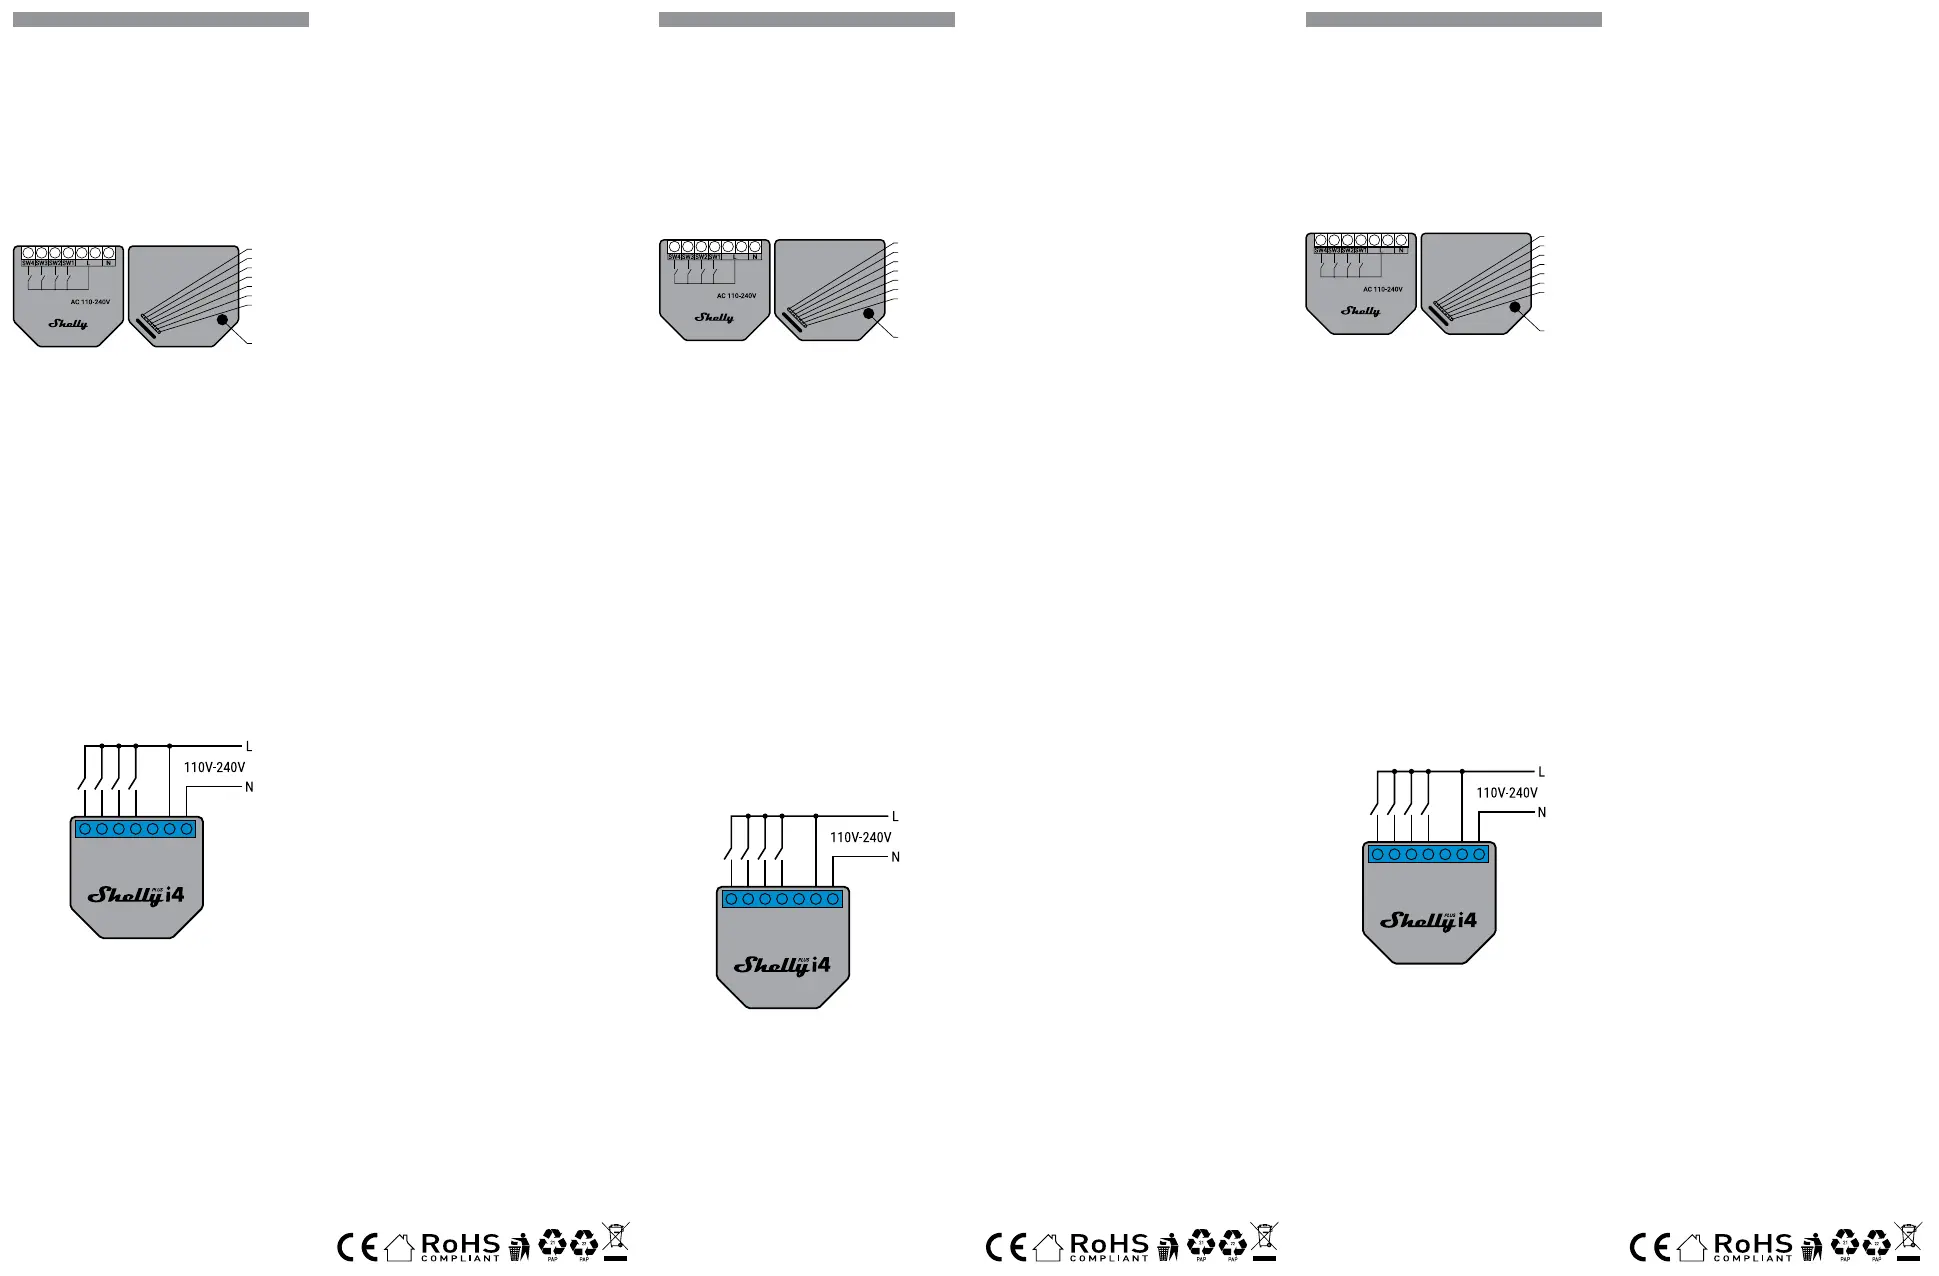
SW4SW3SW1SW2LLN
g.1
Legend
• N: Neutral terminal/wire
• L: Live (110-240V) terminal/wire
• SW1: Switch terminal
• SW2: Switch terminal
• SW3: Switch terminal
• SW4: Switch terminal
Installation Instructions
Shelly® Plus i4 (the Device) is a Wi-Fi switch input designed
to control other devices over the Internet. It can be retrotted
into a standard in-wall console, behind light switches or other
places with limited space.
⚠CAUTION! Danger of electrocution. The mounting/installa-
tion of the Device should be done by a qualied electrician.
⚠CAUTION! Connect the Device only in the way shown in these
instructions. Any other method could cause damage and/or in-
jury.
⚠CAUTION! Use the Device only in a power grid and with appli-
ances that comply with all applicable regulations. Short circuit
in the power grid or any appliance connected to the Device may
damage the Device.
Before starting, use a phase meter or multimeter to check that
DE
BENUTZER- &
SICHERHEITSLEITFADEN
SHELLY PLUS I4
Vor Benutzung lesen
Dieses Dokument enthält wichtige technische und sicherheits-
technische Informationen über das Gerät und seine sichere
Verwendung und Installation.
⚠ACHTUNG! Bevor Sie mit der Installation beginnen, lesen Sie
bitte die Begleitdokumentation sorgfältig und vollständig durch.
Die Nichtbeachtung der empfohlenen Verfahren kann zu Fehl-
funktionen, Lebensgefahr oder Gesetzesverstößen führen. All-
terco Robotics EOOD haftet nicht für Verluste oder Schäden im
Falle einer falschen Installation oder Bedienung dieses Geräts.
ESP_DBG_UART
U0TXD
U0RXD
+3.3_ESP
RESET
Reset button
GPIO0
GND
1
⚠ACHTUNG! Hohe Spannung. Schließen Sie die serielle
Schnittstelle nicht an, wenn der Shelly® Plus i4 mit Strom ver
-
sorgt wird.
Produkteinführung
Shelly® ist eine Reihe innovative mikroprozessorgesteuerte
Geräte, die die Fernsteuerung von Elektrogeräten über ein
Mobiltelefon, Tablet, PC oder Hausautomationssystem ermög-
lichen. Shelly®-Geräte können eigenständig in einem lokalen
Wi-Fi-Netzwerk arbeiten oder auch über Cloud-Heimautoma-
tisierungsdienste betrieben werden. Auf Shelly®-Geräte kann
von jedem Ort, an dem der Benutzer über eine Internetver-
bindung verfügt, aus der Ferne zugegriffen, sie gesteuert und
überwacht werden, solange die Geräte mit einem WLAN-Router
und dem Internet verbunden sind. Shelly®-Geräte verfügen über
integrierte Webserver, über die der Benutzer sie einstellen, steu-
ern und überwachen kann. Die Cloud-Funktion kann verwendet
werden, wenn sie über den Webserver des Geräts oder die Ein-
stellungen in der Shelly Cloud-Mobilanwendung aktiviert wird.
Der Benutzer kann sich über die mobile Android- oder iOS-App
oder mit einem beliebigen Internetbrowser unter
https://my.shelly.cloud/ registrieren und auf Shelly Cloud zu-
greifen.
Shelly®-Geräte haben zwei WiFi-Modi - Access Point (AP) und
Client-Modus (CM). Für den Betrieb im Client-Modus muss sich
ein WLAN-Router in Reichweite des Geräts benden. Geräte
können über das HTTP-Protokoll direkt mit anderen WiFi-Gerä-
ten kommunizieren. Eine API kann vom Hersteller bereitgestellt
werden.
Weitere Informationen nden Sie unter:
https://shelly-api-docs.shelly.cloud/#shelly-family-overview
Steuern Sie Ihr Zuhause mit Ihrer Stimme
Shelly®-Geräte sind mit den von Amazon Echo und Google
Home unterstützten Funktionen kompatibel. Bitte lesen Sie
unsere Schritt-für-Schritt-Anleitung auf:
https://shelly.cloud/support/compatibility/
SW4SW3SW1SW2LLN
abb.1
Legende
• N: Neutralklemme/Draht
• L: Stromführende Klemme/Draht (110-240 V)
• SW1: Schalterklemme
• SW2: Schalterklemme
• SW3: Schalterklemme
• SW4: Schalterklemme
Installationsanleitung
Der WiFi-Switch-Eingang Shelly Plus i4 (das Gerät) sendet mög-
licherweise Befehle zur Steuerung anderer Geräte über das
Internet. Es ist für die Montage in einer Standard-Wandkonsole
hinter Steckdosen und Lichtschaltern oder an anderen Orten
mit begrenztem Platz vorgesehen. Shelly kann als eigenstän-
diges Gerät oder als Zubehör für einen anderen Hausautoma-
tionscontroller verwendet werden.
⚠ACHTUNG! Stromschlaggefahr. Die Montage/Installation des
Gerätes sollte von einer qualizierten Elektriker durchgeführt
IT
GUIDA PER L’UTENTE E LA SICUREZZA
SHELLY PLUS I4
Leggere prima dell’uso
Questo documento contiene importanti informazioni tecniche
e di sicurezza sul dispositivo e sul suo uso e installazione in
sicurezza.
⚠ATTENZIONE! Prima di iniziare l’installazione leggere atten-
tamente e completamente la documentazione allegata. La man-
cata osservanza delle procedure consigliate potrebbe portare a
malfunzionamenti, pericolo per la vita o violazione della legge.
Allterco Robotics EOOD non è responsabile per eventuali perdite
o danni in caso di installazione o funzionamento errati di questo
dispositivo.
ESP_DBG_UART
U0TXD
U0RXD
+3.3_ESP
RESET
Reset button
GPIO0
GND
1
⚠ATTENZIONE! Alta tensione. Non connettersi all’interfaccia
seriale quando Shelly® Plus i4 è alimentato.
introduzione al prodotto
Shelly® è una linea di dispositivi innovativi gestiti da micropro-
cessore, che consentono il controllo remoto di elettrodomestici
tramite telefono cellulare, tablet, PC o sistema domotico. I di-
spositivi Shelly® possono funzionare autonomamente in una
rete Wi-Fi locale, oppure possono essere gestiti anche tramite
servizi di automazione domestica cloud. È possibile accede-
re, controllare e monitorare i dispositivi Shelly® in remoto da
qualsiasi luogo in cui l’Utente disponga di connettività Internet,
purché i dispositivi siano connessi a un router WiFi e a Internet.
I dispositivi Shelly® dispongono di server web integrati, attra-
verso i quali l’utente può regolarli, controllarli e monitorarli.. La
funzione cloud potrebbe essere utilizzata, se attivata tramite il
server web del Dispositivo o le impostazioni nell’applicazione
mobile Shelly Cloud. L’Utente può registrarsi e accedere a Shel-
ly Cloud utilizzando l’applicazione mobile Android o iOS o con
qualsiasi browser Internet all’indirizzo https://my.shelly.cloud/
I dispositivi Shelly® hanno due modalità WiFi: Access Point
(AP) e Client mode (CM). Per operare in modalità client, un rou-
ter WiFi deve trovarsi all’interno della portata del dispositivo. I
dispositivi possono comunicare direttamente con altri disposi-
tivi WiFi tramite il protocollo HTTP. Un’API può essere fornita
dal produttore.
Per ulteriori informazioni, visitare:
https://shelly-api-docs.shelly.cloud/#shelly-family-overview
Controlla la tua casa con la tua voce
I dispositivi Shelly® sono compatibili con le funzionalità sup-
portate da Amazon Echo e Google Home. Consulta la nostra
guida passo passo su:
https://shelly.cloud/support/compatibility/
SW4SW3SW1SW2LLN
g.1
Leggenda
• N: Terminale neutro/lo
• L: Terminale/cavo in tensione (110-240 V)
• SW1: interruttore terminale
• SW2: interruttore terminale
• SW3: interruttore terminale
• SW4: interruttore terminale
Istruzioni per l’installazione
L’ingresso dello switch WiFi Shelly Plus i4 (il Dispositivo) può
inviare comandi per il controllo di altri dispositivi, tramite In-
ternet. È concepito per essere montato in una consolle a muro
standard, dietro prese di corrente e interruttori della luce o in
altri luoghi con spazio limitato. Shelly può funzionare come di-
spositivo autonomo o come accessorio per un altro controller
di automazione domestica.
⚠ATTENZIONE! Pericolo di folgorazione. Il montaggio/instal-
lazione del dispositivo deve essere eseguito da elettricista per-
sona qualicata.
⚠ATTENZIONE! Collegare il Dispositivo solo nel modo mostra-
to in queste istruzioni. Qualsiasi altro metodo potrebbe causare
the breakers are turned off and there is no voltage on their ter
-
minals and the cables you are working with. When you are sure
that there is no voltage, you can proceed to wiring the Device.
Connect up to 4 switches to a “SW” terminal of the Device and
the Live wire as shown on g. 1.
Connect the Live wire to an “L” terminal and the Neutral wire to
the “N” terminal of the Device.
⚠CAUTION! Do not insert multiple wires in a single terminal.
⚠RECOMMENDATION: Connect the Device using solid sin-
gle-core cables.
Initial inclusion
You can choose to use Shelly® with the Shelly Cloud mobile ap-
plication and Shelly Cloud service. Instructions on how to con-
nect your device to the Cloud and control it through the Shelly
App can be found in the “App guide”.
You can also familiarize yourself with the instructions for Man
-
agement and Control through the embedded Web interface at
192.168.33.1 in the Wi-Fi network, created by the Device.
⚠CAUTION! Do not allow children to play with the button/
switch connected to the Device. Keep the Devices for remote
control of Shelly (mobile phones, tablets, PCs) away from chil-
dren.
Specication
• Power supply: 110-240V, 50/60Hz AC
• Dimensions (HxWxD): 42x38x17 mm
• Working temperature: 0°C to 40°C
• Electrical consumption: < 1 W
• Multi-click support: Up to 12 possible actions (3 per button)
• Scripting (mjs): YES
• MQTT: YES
• URL Actions: 20
• CPU: ESP32
• Flash: 4MB
• Operational range: (depending on terrain and building struc-
ture): up to 50 m outdoors, up to 30 m indoors
• Radio signal power: 1 mW
• Radio protocol: WiFi 802.11 b/g/n
• Frequency Wi-Fi : 2412-2472 МHz; (Max. 2495 MHz)
• Frequency Bluetooth: TX/RX: 2402- 2480 MHz (Max.
2483.5MHz)
• RF output Wi-Fi: <20 dBm
• RF output Bluetooth: <10 dBm
• Bluetooth: v.4.2
• Basic/EDR: YES
• Bluetooth modulation: GFSK, π/4-DQPSK, 8-DPSK
Declaration of conformity
Hereby, Allterco Robotics EOOD declares that the radio equip-
ment type Shelly Plus i4 in compliance with Directive 2014/53/
EU, 2014/35/EU, 2014/30/EU, 2011/65/EU. The full text of the
EU declaration of conformity is available at the following inter-
net address:
https://shelly.cloud/knowledge-base/devices/shelly-plus-i4/
Manufacturer: Allterco Robotics EOOD
Address: Bulgaria, Soa, 1407, 103 Cherni vrah Blvd.
Tel.: +359 2 988 7435
E-mail: support@shelly.cloud
Web: http://www.shelly.cloud
Changes in the contact data are published by the Manufacturer
at the ocial website of the Device
https://www.shelly.cloud
All rights to trademark Shelly®, and other intellectual rights
associated with this Device belong to Allterco Robotics EOOD.
werden.
⚠ACHTUNG! Schließen Sie das Gerät nur auf die in dieser An-
leitung gezeigte Weise an. Jede andere Methode kann zu Schä-
den und/oder Verletzungen führen.
⚠ACHTUNG! Verwenden Sie das Gerät nur in einem Stromnetz
und mit Geräten, die allen geltenden Vorschriften entsprechen.
Ein Kurzschluss im Stromnetz oder ein an das Gerät angeschlos-
senes Gerät kann das Gerät beschädigen.
Überprüfen Sie vor dem Starten, ob die Leistungsschalter aus-
geschaltet sind und an ihren Klemmen keine Spannung anliegt.
Dies kann mit einem Phasenmesser oder Multimeter erfolgen.
Wenn Sie sicher sind, dass keine Spannung anliegt, können Sie
mit der Verdrahtung der Kabel.
Schließen Sie bis zu 4 Schalter an eine “SW”-Klemme des Ge-
räts und den stromführenden Draht an, wie in Abb. 1 gezeigt.
Schließen Sie den stromführenden Draht an einem Klemme “L”
und den neutralen Draht an die Klemme “N” des Geräts an.
⚠ACHTUNG! Schließen Sie nicht mehrere Drähte an eine ein
-
zige Klemme an.
⚠EMPFEHLUNG: Schließen Sie das Gerät mit soliden, einad-
rigen Kabeln an.
Erste einschliessung
Sie können wählen, ob Sie Shelly mit der mobilen Shelly Cloud-
Anwendung und dem Shelly Cloud-Dienst verwenden möchten.
Eine Anleitung, wie Sie Ihr Gerät mit der Cloud verbinden und
über die Shellly App steuern, nden Sie in der „App-Anleitung“.
Sie können sich auch über die eingebettete Webschnittstelle
mit den Anweisungen für Management und Kontrolle vertraut
machen unter 192.168.33.1 im vom Gerät erstellten Wi-Fi-Netz-
werk.
⚠ACHTUNG! Lassen Sie Kinder nicht mit der Taste/dem Schal-
ter spielen, die mit dem Gerät verbunden ist. Halten Sie die Ge-
räte zur Fernsteuerung von Shelly (Mobiltelefone, Tablets, PCs)
von Kindern fern.
Spezikation
• Stromversorgung: 110-240V, 50/60Hz AC
• Abmessungen (HxBxL): 42x38x17 mm
• Arbeitstemperatur 0°C bis 40°C
• Elektrischer Verbrauch < 1 W
• Unterstützung von Mehrfachklicks: Bis zu 32 mögliche Ak-
tionen (8 pro Taste)
• Skripting (mjs) JA
• MQTT JA
• URL-Aktionen 20
• CPU ESP32
• Flash 4MB
• Einsatzbereich: (je nach Gelände und Gebäudestruktur) - bis
zu 50 m im Freien, bis zu 30 m im Innenbereich
• Funksignalleistung 1mW
• Funkprotokoll WiFi 802.11 b/g/n
• Frequenz WLAN: 2412-2472 МHz; (Max. 2495 MHz)
• Frequenz Bluetooh TX/RX: 2402- 2480 (Max. 2483.5 MHz)
• RF output WLAN: <20 dBm
• RF output Bluetooh: <10 dBm
• Bluetooth: v.4.2
• Basic/EDR: JA
• Bluetooth-Modulation: GFSK, π/4-DQPSK, 8-DPSK
Konformitätserklärung
Hiermit erklärt Allterco Robotics EOOD, dass die Funkanlage
Typ Shelly Plus i4 der Richtlinie 2014/53/EU, 2014/35/EU,
2014/30/EU, 2011/65/EU entspricht. Den vollständigen Text
der EU-Konformitätserklärung nden Sie unter folgender Inter-
netadresse:
https://shelly.cloud/knowledge-base/devices/shelly-plus-i4/
Hersteller: Allterco Robotics EOOD
Adresse: Bulgarien, Soa, 1407, 103 Cherni vrah Blvd.
Tel.: +359 2 988 7435
E-Mail: support@shelly.cloud
Web: http://www.shelly.cloud
Änderungen der Kontaktdaten werden vom Hersteller auf der
oziellen Website des Geräts http://www.shelly.cloud .
Alle Rechte an den Marken Shelly® sowie andere geistige Rech-
te in Verbindung mit diesem Gerät gehören Allterco Robotics
EOOD.
danni e/o lesioni.
⚠ATTENZIONE! Utilizzare il dispositivo solo in una rete elettri
-
ca e con apparecchi che rispettano tutte le norme vigenti. Corto-
circuito nella rete elettrica o qualsiasi apparecchio collegato al
Dispositivo può danneggiare il Dispositivo.
Prima di iniziare, vericare che gli interruttori siano spenti e che
non ci sia tensione sui loro terminali. Questo può essere fatto
con un misuratore di fase o un multimetro. Quando sei sicuro
che non c’è tensione, puoi iniziare a cablare i cavi.
Collegare no a 4 interruttori a un terminale “SW” del dispositi-
vo e il lo sotto tensione come mostrato in g. 1.
Collegare il lo sotto tensione ai morsetti “L” e il lo neutro ai
morsetti “N” del dispositivo.
⚠ATTENZIONE! Non inserire più li in un unico morsetto.
⚠RACCOMANDAZIONE: Collegare l’apparecchio con cavi uni-
polari solidi.
Inclusione iniziale
Puoi scegliere se desideri utilizzare Shelly con l’applicazione
mobile Shelly Cloud e il servizio Shelly Cloud. Le istruzioni su
come connettere il proprio dispositivo al Cloud e controllarlo
tramite l’App Shellly si trovano nella “Guida all’App”.
È inoltre possibile acquisire familiarità con le istruzioni per la
gestione e il controllo tramite l’interfaccia Web incorporata a
192.168.33.1 nella rete Wi-Fi, creata dal Dispositivo.
⚠ATTENZIONE! Non consentire ai bambini di giocare con il
pulsante/interruttore collegato al dispositivo. Tenere i Dispositivi
per il controllo remoto di Shelly (cellulari, tablet, PC) lontano dalla
portata dei bambini.
Speciche
• Alimentazione elettrica: 110-240V, 50/60Hz AC
• Dimensioni (AxPxL): 42x38x17 mm
• Temperatura di lavoro 0°C no a 40°C
• Consumo elettrico < 1 W
• Supporto multi-click: Fino a 12 azioni possibili (3 per pul-
sante)
• Scripting (mjs) S
• MQTT S
• Azioni URL 20
• CPU ESP32
• Flash 4 MB
• Raggio d’azione (a seconda del terreno e della struttura
dell’edicio): no a 50 m all’aperto, no a 30 m all’interno
• Potenza segnale radio 1mW
• Protocollo radio WiFi 802.11 b/g/n
• Frequenza Wi-Fi: 2412-2472 МHz; (Massimo 2495 MHz)
• Frequenza Bluetooh TX/RX: 2402- 2480 MHz (Massimo.
2483.5 MHz)
• RF output Wi-Fi: <20 dBm
• RF output Bluetooh: <10 dBm
• Bluetooth: v.4.2
• Basic/EDR: S
• Modulazione Bluetooth: GFSK, π/4-DQPSK, 8-DPSK
Dichiarazione di conformità
Con la presente, Allterco Robotics EOOD dichiara che il tipo di
apparecchiatura radio Shelly Plus i4 è conforme alla Direttiva
2014/53/UE, 2014/35/UE, 2014/30/EU, 2011/65/EU. Il testo
completo della dichiarazione di conformità UE è disponibile al
seguente indirizzo internet:
https://shelly.cloud/knowledge-base/devices/shelly-plus-i4/
Produttore: Allterco Robotics EOOD
Indirizzo: Bulgaria, Soa, 1407, 103 Cherni vrah Blvd.
Tel.: +359 2 988 7435
E-mail: support@shelly.cloud
Web: http://www.shelly.cloud
Le modiche ai dati di contatto sono pubblicate dal Produttore
sul sito Web uciale del Dispositivo http://www.shelly.cloud
Tutti i diritti sui marchi commerciali Shelly® e altri diritti intel-
lettuali associati a questo dispositivo appartengono a Allterco
Robotics EOOD.
Specyfikacje produktu
| Marka: | Shelly |
| Kategoria: | inteligentny dom |
| Model: | Plus i4 |
Potrzebujesz pomocy?
Jeśli potrzebujesz pomocy z Shelly Plus i4, zadaj pytanie poniżej, a inni użytkownicy Ci odpowiedzą
Instrukcje inteligentny dom Shelly

27 Marca 2025
9 Października 2024
23 Września 2024
23 Września 2024
22 Września 2024
22 Września 2024
22 Września 2024
22 Września 2024
21 Września 2024
21 Września 2024
Instrukcje inteligentny dom
Najnowsze instrukcje dla inteligentny dom
29 Marca 2025
29 Marca 2025
29 Marca 2025
18 Marca 2025
18 Marca 2025
12 Marca 2025
25 Lutego 2025
19 Lutego 2025
14 Lutego 2025
30 Stycznia 2025