Instrukcja obsługi Shelly Vintage
Shelly inteligentny dom Vintage
Przeczytaj poniżej 📖 instrukcję obsługi w języku polskim dla Shelly Vintage (2 stron) w kategorii inteligentny dom. Ta instrukcja była pomocna dla 67 osób i została oceniona przez 4 użytkowników na średnio 4.6 gwiazdek
Strona 1/2
INITIAL INCLUSION
Install the Shelly to the light socket. Press the switch/button to
which Shelly is connected. The Shelly should turn on. Press the
switch/button again and Shelly will turn off. You may choose if
you want to use Shelly with the Shelly Cloud mobile application
and Shelly Cloud service. You can also familiarize yourself with
the instructions for Management and Control through the em-
bedded Web interface.
FACTORY RESET
You can return your Shelly Vintage to its factory settings by
switching the switch/button to which the bulb is connected 5
times. You need to wait 3 seconds after every switch off and 1
second after every switch on. If your bulb is successfully reset
it will blink few times and then turn the light on. If unsuccessful
please contact our support at support@shelly.cloud!
THE SHELLY CLOUD MOBILE APPLICATION
Shelly Cloud gives you the opportunity to control and adjust all
Shelly® devices from anywhere in the world. All you need is
an Internet connection and our mobile application, installed on
your smartphone or tablet.
Registration
The rst time you load the Shelly Cloud mobile app, you have to
create an account which can manage all your Shelly® devices.
Forgotten Password
In case you forget or lose your password, just enter the e-mail
address you have used in your registration. You will then re-
ceive instructions to change your password.
⚠WARNING! Be careful when you type your e-mail address
during the registration, as it will be used in case you forget
your password.
After registering, create your rst room (or rooms), where you
are going to add and use your Shelly devices.
Shelly Cloud gives you opportunity to create scenes for auto-
matic turning on or off of the Devices at predened hours or
based on other parameters like temperature, humidity, light etc.
Shelly Cloud allows easy control and monitoring using a mobile
phone, tablet or PC.
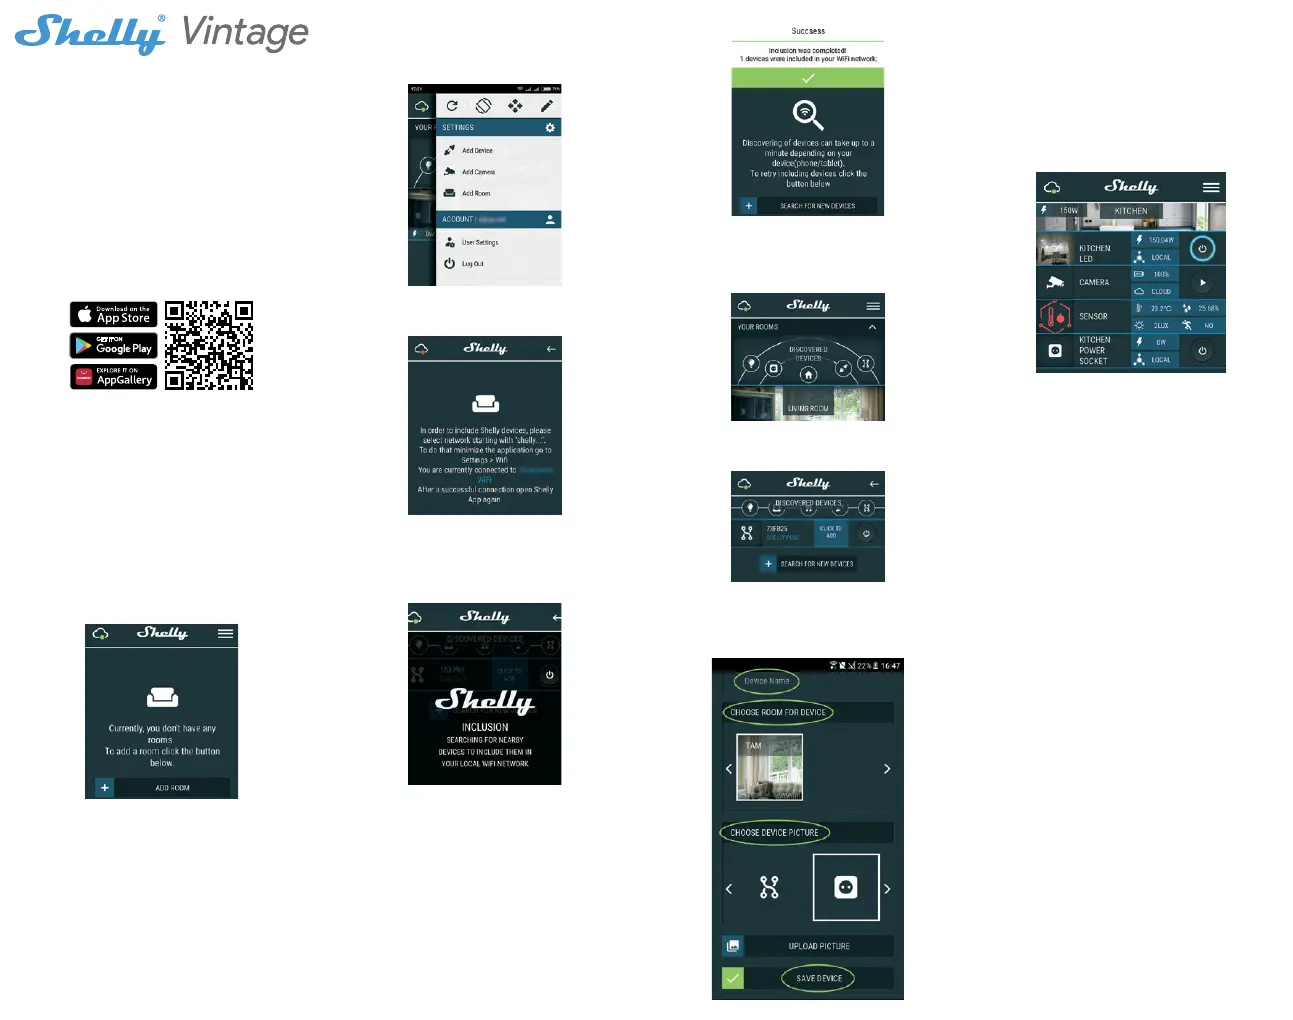
Device Inclusion
To add a new Shelly device, connect it to the power grid.
Step 1
Install your Shelly into the light socket and turn the light on.
⚠WARNING! In case the Device has not created its own WiFi
network with SSID like shellyvintage-764CF7 check if you
have power connected to Shelly. If you do not see an active
WiFi network with SSID like shellyvintage-764CF7, you need
to reset your Shelly Bulb to its factory settings and try again.
Step 2
Choose “Add Device”. In order to add more devices later, use
the app Menu at the top right corner of the main screen and
click “Add Device”. Type the name (SSID) and password for the
WiFi network, to which you want to add the Device.
Step 3
WiFi inclusion
If using iOS: you will see the following screen:
Open the Settings menu of your phone. Go to WiFi and con-
nect to the WiFi network created by Shelly, e.g.shellyvin-
tage-764CF7.
If using Android: your phone/tablet will automatically scan
and include all new Shelly devices in the WiFi network that
you are connected to.
Upon successful Device Inclusion to the WiFi network
you will see the following pop-up:
Step 4
Approximately 30 seconds after discovery of any new devices
оn the local WiFi network, а list will be displayed by default in
the “Discovered Devices” room.
Step 5
Enter the Discovered Devices and choose the Device you want
to include in your account.
Step 6
Enter a name for the Device (in the Device Name eld). Choose
a Room, in which the device has to be positioned. You can
choose an icon or add a picture to make it easier to recognize.
Press “Save Device”.
Step 7
To enable connection to the Shelly Cloud service for remote
control and monitoring of the Device, press “yes” on the fol-
lowing pop-up.
SHELLY DEVICE SETTINGS
After your Shelly device is included in the app, you can control
it, change its settings and automate the way it works. To switch
the Device on and off, use the Power button. To enter at the
details menu of the Device, click on it’s name. From the details
menu you may control the Device, as well as edit its appear-
ance and settings.
Timer
Тo manage the power supply automatically, you may use:
• Auto OFF: After turning on, the power supply will automati-
cally shutdown after a predened time (in seconds). A value
of 0 will cancel the automatic shutdown.
• Auto ON: After turning off, the power supply will be auto-
matically turned on after a predened time (in seconds). A
value of 0 will cancel the automatic power-on.
Weekly Schedule
This function requires an Internet connection. To use Internet,
your Shelly has to be connected to a local WiFi network with an
active internet connection.
Shelly may turn on/off automatically at a predened time, at
sunrise/sunset, or at a specied time before or after sunrise/
sunset. Multiple schedules are possible.
Night Mode
With this mode you can set a period of time and level of bright-
ness, in which any turning on will set the brightness to the
predened level. You must select a start & end time, with the
brightness level.
Internet/Security
• WiFi Mode - Client: Allows the device to connect to an avail-
able WiFi network. After typing the details in the respective
elds, press Connect.
• WiFi Client Backup: Add a backup WiFi network, in case
your primary one becomes unavailable.
• WiFi Mode - Acess Point: Congure Shelly to create a Wi-Fi
Access point. After typing the details in the respective elds,
press Create Access Point.
• Cloud: Enable or Disable connection to the Cloud service.
• Restrict Login: Restrict the web interface of Shely with a
User- name and Password. After typing the details in the
elds, press Restrict Shelly.
Specyfikacje produktu
| Marka: | Shelly |
| Kategoria: | inteligentny dom |
| Model: | Vintage |
Potrzebujesz pomocy?
Jeśli potrzebujesz pomocy z Shelly Vintage, zadaj pytanie poniżej, a inni użytkownicy Ci odpowiedzą
Instrukcje inteligentny dom Shelly

27 Marca 2025
9 Października 2024
23 Września 2024
23 Września 2024
22 Września 2024
22 Września 2024
22 Września 2024
22 Września 2024
21 Września 2024
21 Września 2024
Instrukcje inteligentny dom
Najnowsze instrukcje dla inteligentny dom
29 Marca 2025
29 Marca 2025
29 Marca 2025
18 Marca 2025
18 Marca 2025
12 Marca 2025
25 Lutego 2025
19 Lutego 2025
14 Lutego 2025
30 Stycznia 2025