Instrukcja obsługi Shelly Wave i4
Shelly inteligentny dom Wave i4
Przeczytaj poniżej 📖 instrukcję obsługi w języku polskim dla Shelly Wave i4 (2 stron) w kategorii inteligentny dom. Ta instrukcja była pomocna dla 30 osób i została oceniona przez 4 użytkowników na średnio 4.4 gwiazdek
Strona 1/2
EN
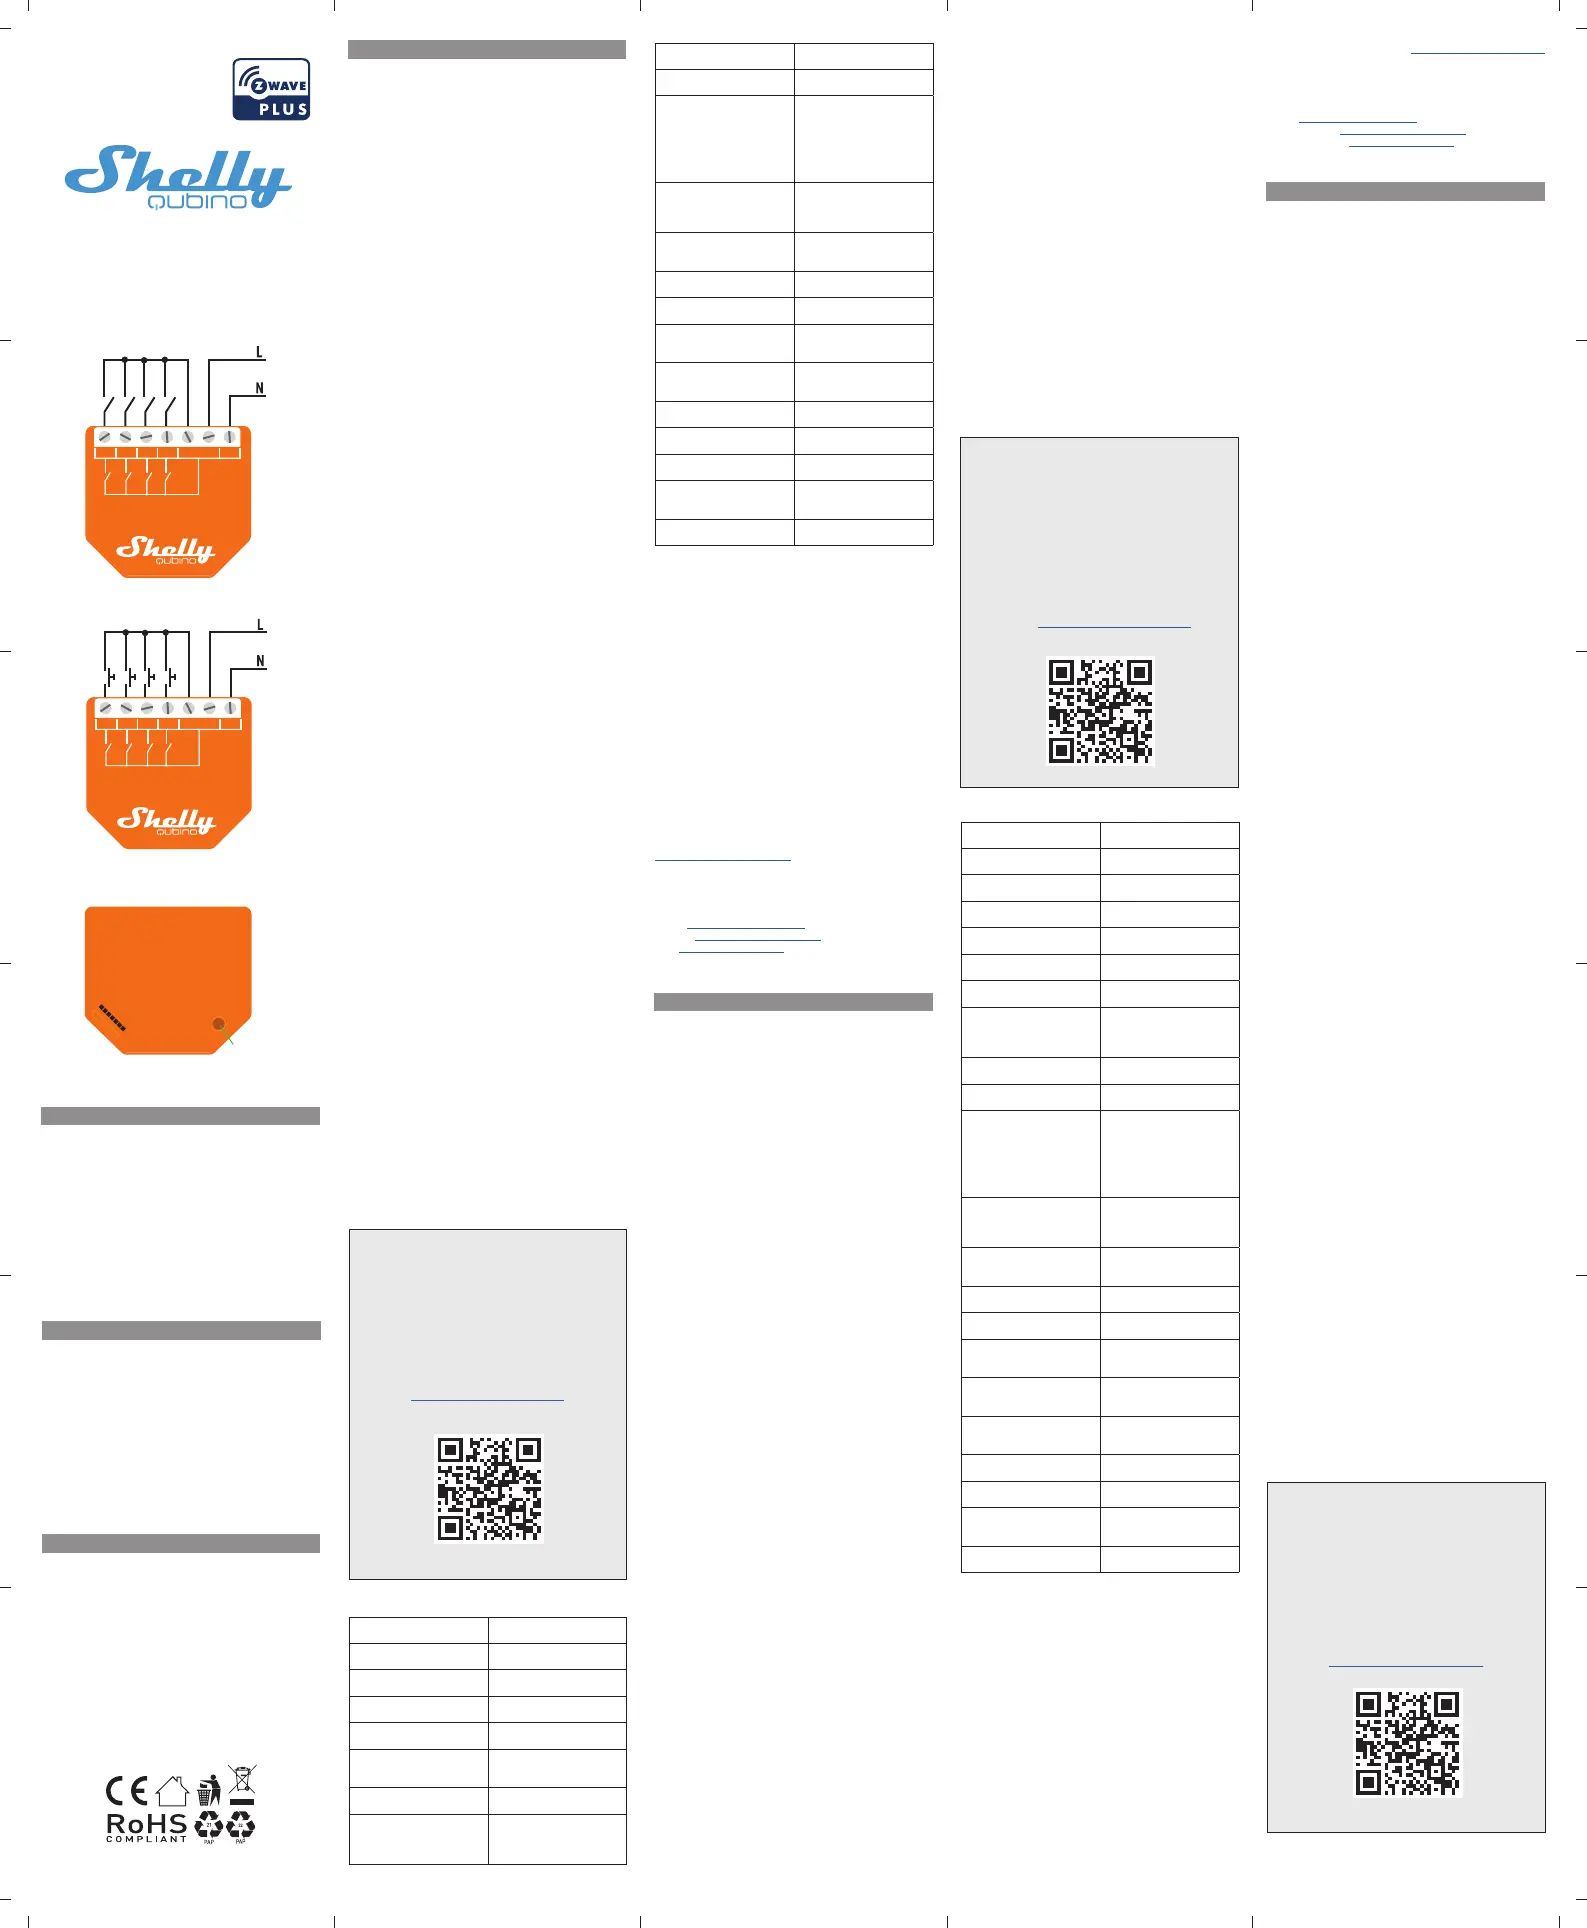
LEGEND
Device terminals:
• N: Neutral terminal
• L: Live terminal (110–240 V AC)
• SW1: Switch/push-button input terminal
• SW2: Switch/push-button input terminal
• SW3: Switch/push-button input terminal
• SW4: Switch/push-button input terminal
Wires:
• N: Neutral wire
• L: Live wire (110-240 V AC)
Button:
• S: S button (Fig. 3)
EN
USER AND SAFETY GUIDE
Z-Wave™ 4 digital inputs controller
READ BEFORE USE
This document contains important technical and safety infor-
mation about the Device, its safe use and installation.
⚠CAUTION! Before beginning the installation, please read ca-
refully and entirely this guide and any other documents accom-
panying the Device. Failure to follow the installation procedures
could lead to malfunction, danger to your health and life, viola-
tion of law or refusal of legal and/or commercial guarantee (if
any). Shelly Europe Ltd. is not responsible for any loss or dama-
ge in case of incorrect installation or improper operation of this
device due to failure of following the user and safety instructions
in this guide.
TERMINOLOGY
Gateway – A Z-Wave™ gateway, also referred to as a Z-Wave™
controller, Z-Wave™ main controller, Z-Wave™ primary controller,
or Z-Wave™ hub, etc., is a device that serves as a central hub for
a Z-Wave™ smart home network. The term “gateway” is used
in this document.
S button - The Z-Wave™ Service button, which is located on
Z-Wave™ devices and is used for various functions such as in-
clusion (adding), exclusion (removing), and resetting the device
to its factory default settings. The term “S button” is used in
this document.
Device – In this document, the term “Device” is used to refer to
the Shelly Qubino device that is a subject of this guide.
ABOUT SHELLY QUBINO
Shelly Qubino is a line of innovative microprocessor-managed
devices, which allow remote control of electric circuits with
a smartphone, tablet, PC, or home automation system. They
work on Z-Wave™ wireless communication protocol, using a
gateway, which is required for the conguration of devices.
When the gateway is connected to the internet, you can control
Shelly Qubino devices remotely from anywhere. Shelly Qubino
devices can be operated in any Z-Wave™ network with other
Z-Wave™ certied devices from other manufacturers. All mains
operated nodes within the network will act as repeaters regard-
less of vendor to increase reliability of the network. Devices are
designed to work with older generations of Z-Wave™ devices
and gateways.
ABOUT THE DEVICE
The Device is a 4-digital inputs module (110-240 V AC) that
controls other devices within the Z-Wave network. It enables
manual activation or deactivation of scenes with a switch/
push-button.
INSTALLATION INSTRUCTIONS
The Device can be retrotted into a standard in-wall console,
behind switches or other places with limited space.
For the installation instructions, refer to the wiring schemes
(Fig. 1-2) in this user guide.
⚠CAUTION! Danger of electrocution. Mounting/installation of
the Device to the power grid has to be performed with caution,
by a qualied electrician.
⚠WARNING! Danger of electrocution. Every change in the
connections has to be done after ensuring there is no voltage
present at the Device terminals.
⚠CAUTION! Do not open the Device. It does not contain any
parts that can be maintained by the user. For safety and licens-
ing reasons, unauthorized change and/or modication of the
Device is not permitted.
⚠CAUTION! Use the Device only with a power grid and appli-
ances that comply with all applicable regulations. A short cir-
cuit in the power grid or any appliance connected to the Device
may damage it.
⚠CAUTION! Do not shorten the antenna.
⚠RECOMMENDATION: Place the antenna as far away as
possible from metal elements as they can cause signal inter-
ference.
⚠CAUTION! Connect the Device only in the way shown in
these instructions. Any other method could cause damage
and/or injury.
⚠CAUTION! Do not install the Device where it can get wet.
⚠CAUTION! Do not use the Device if it has been damaged!
⚠CAUTION! Do not attempt to service or repair the Device
yourself!
⚠RECOMMENDATION: Connect the Device using solid sin-
gle-core cables or stranded cables with ferrules.
⚠CAUTION! Before starting the mounting/installation of the
Device, check that the breakers are turned off and there is no
voltage on their terminals. This can be done with a mains volt-
age tester or multimeter. When you are sure that there is no
voltage, you can proceed to connecting the wires.
⚠CAUTION! Do not insert multiple wires in a single terminal.
⚠CAUTION! Do not allow children to play with the push-but-
tons/switches connected to the Device. Keep the devices for
remote control of Shelly Qubino (mobile phones, tablets, PCs)
away from children.
SPECIFICATIONS
Power supply AC110-240 V, 50/60 Hz
Power supply DCNo
Power consumption< 0.2 W
Overload protectionNo
Power measurement (W)No
Working without a neutral
line
No
Number of inputs4
Distanceup to 40 m indoors (131
ft.) (depends on local
condition)
Z-Wave™ repeaterYes
CPUZ-Wave™ S800
Z-Wave™ frequency bands868,4 MHz; 865,2 MHz;
869,0 MHz; 921,4 MHz;
908,4 MHz; 916 MHz; 919,8
MHz; 922,5 MHz; 919,7-
921,7-923,7 MHz; 868,1
MHz; 920,9 MHz
Maximum radio frequency
power transmitted in fre-
quency band(s)
< 25 mW
Size (H x W x D)37x42x16 ±0.5 mm /
1.46x1.65x0.63 ±0.02 in
Weight17 g / 0.6 oz
MountingWall console
Screw terminals max.
torque
0.4 Nm / 3.5 lbin
Conductor cross section0.5 to 1.5 mm² / 20 to 16
AWG
Conductor stripped length5 to 6 mm / 0.20 to 0.24 in
Shell materialPlastic
ColorOrange
Ambient temperature-20°C to 40°C / -5°F to
105°F
Humidity30 % to 70 % RH
OPERATIONAL INSTRUCTIONS
If the SW is congured as a switch (default), each toggle of the
switch will trigger the predened scene.
If the SW is congured as a push-button in the Device settings,
each press of the push-button will trigger the predened scene.
IMPORTANT DISCLAMER
Z-Wave™ wireless communication may not always be 100%
reliable. This Device should not be used in situations in which
life and/or valuables are solely dependent on its functioning. If
the Device is not recognized by your gateway or appears incor-
rectly, you may need to change the Device type manually and
ensure that your gateway supports Z-Wave Plus™ multi-channel
devices.
ORDERING CODE: QNSN-0A24XXX
XX – Values dene product version per region.
DECLARATION OF CONFORMITY
Hereby, Shelly Europe Ltd. (former Allterco Robotics EOOD)
declares that the radio equipment type Wave i4 is in compli-
ance with Directive 2014/53/ EU, 2014/35/EU, 2014/30/EU,
2011/65/EU. The full text of the EU declaration of Conformity
is available at the following internet address:
https://shelly.link/Wavei4-DoC
MANUFACTURER
Shelly Europe Ltd.
Address: 103 Cherni vrah Blvd., 1407 Soa, Bulgaria
Tel.: +359 2 988 7435
E-mail: zwave-shelly@shelly.cloud
Support: https://support.shelly.cloud/
Web: https://www.shelly.com
Changes in the contact data are published by the Manufacturer
at the ofcial website.
DE
BENUTZER- UND SICHERHEITSHANDBUCH
Z-Wave™ Controller mit 4 digitalen
Eingängen
BITTE VOR GEBRAUCH DURCHLESEN
Dieses Dokument enthält wichtige technische und sicherheit-
stechnische Informationen über das Gerät und seine sichere
Verwendung und Installation.
⚠ACHTUNG! Bevor Sie mit der Installation beginnen, lesen
Sie bitte die Begleitdokumentation sorgfältig und vollständig
durch. Die Nichtbeachtung der empfohlenen Verfahren kann zu
Fehlfunktionen, Lebensgefahr oder Gesetzesverstößen führen.
Shelly Europe Ltd. haftet nicht für Verluste oder Schäden im
Falle einer falschen Installation oder Bedienung dieses Geräts.
TERMINOLOGIE
Gateway - Ein Z-Wave™-Gateway, auch als Z-Wave™-Control-
ler, Z-Wave™-Hauptcontroller, Z-Wave™-Primärcontroller oder
Z-Wave™-Hub usw. bezeichnet, ist ein Gerät, das als zentraler
Hub für ein Z-Wave™-Smart-Home-Netzwerk dient. In diesem
Dokument wird der Begriff “Gateway” verwendet.
S-Taste - Die Z-Wave™ Service-Taste, die sich auf Z-Wave™-
Geräten bendet und für verschiedene Funktionen wie die Auf-
nahme (Hinzufügen), der Ausschluss (Entfernen) und das Zu-
rücksetzen des Geräts auf die Werkseinstellungen verwendet
wird. In diesem Dokument wird der Begriff “S-Taste” verwendet.
Gerät - In diesem Dokument bezieht sich der Begriff “Gerät” auf
das Shelly Qubino Gerät, das Gegenstand dieses Handbuchs
ist.
ÜBER SHELLY QUBINO
Shelly Qubino ist eine Reihe innovativer, mikroprozessorges-
teuerter Geräte, die die Fernsteuerung von Stromkreisen mit
einem Smartphone, Tablet, PC oder einem Hausautomatis-
ierungssystem ermöglichen. Sie arbeiten mit dem drahtlosen
Z-Wave™-Kommunikationsprotokoll und verwenden ein Gate-
way, das für die Konguration der Geräte erforderlich ist. Wenn
das Gateway mit dem Internet verbunden ist, können Sie die
Shelly Qubino Geräte von überall aus fernsteuern. Shelly Qubi-
no Geräte können in jedem Z-Wave™ Netzwerk mit anderen
Z-Wave™ zertizierten Geräten anderer Hersteller betrieben
werden. Alle netzbetriebenen Knotenpunkte innerhalb des
Netzwerks werden unabhängig vom Hersteller als Repeater
fungieren, um die Zuverlässigkeit des Netzwerks zu erhöhen.
Die Geräte sind so konzipiert, dass sie mit älteren Generationen
von Z-Wave™-Geräten und Gateways funktionieren.
ÜBER DAS GERÄT
Das Gerät ist ein Modul mit 4 digitalen Eingängen (110-240
V AC), das andere Geräte innerhalb des Z-Wave-Netzwerks
steuert. Es ermöglicht die manuelle Aktivierung oder Deaktiv-
ierung von Szenen mit einem Schalter/Taster.
INSTALLATIONSANLEITUNG
Das Gerät kann nachträglich in eine Standard-Unterputzdose,
hinter Schaltern oder an anderen Stellen mit wenig Platz einge-
baut werden.
Die Installationsanweisungen nden Sie in den Schaltplänen
(Abb. 1-2) in diesem Benutzerhandbuch.
⚠VORSICHT! Gefahr eines Stromschlages. Die Montage/
Installation des Geräts an das Stromnetz muss von einem qual-
izierten Elektriker mit Vorsicht durchgeführt werden!
⚠VORSICHT! Es besteht Stromschlaggefahr. Bei jeder
Änderung der Anschlüsse muss sichergestellt werden, dass an
den Klemmen des Geräts keine Spannung anliegt!
⚠VORSICHT! Öffnen Sie das Gerät nicht. Es enthält keine
Teile, die vom Benutzer gewartet werden können. Aus Sicherhe-
its- und Zulassungsgründen ist das eigenmächtige Verändern
und/oder Modizieren des Gerätes nicht gestattet.
⚠VORSICHT! Verwenden Sie das Gerät nur mit einem Strom-
netz und Geräten, die allen geltenden Vorschriften entsprechen.
Ein Kurzschluss im Stromnetz oder in einem an das Gerät ang-
eschlossenen Gerätes kann dieses beschädigen!
⚠VORSICHT! Kürzen Sie die Antenne nicht!
⚠EMPFEHLUNG: Stellen Sie die Antenne möglichst weit von
metallischen Gegenständen auf, da diese Signalstörungen ver-
ursachen können.
⚠VORSICHT! Schließen Sie das Gerät nur auf die in dieser An-
leitung beschriebene Weise an. Jede andere Methode kann zu
Schäden und/oder Verletzungen führen!
⚠VORSICHT! Installieren Sie das Gerät nicht an einem Ort, an
dem es nass werden kann!
⚠VORSICHT! Verwenden Sie das Gerät nicht, wenn es bes-
chädigt ist!
⚠VORSICHT! Versuchen Sie nicht, das Gerät selbst zu warten
oder zu reparieren!
⚠EMPFEHLUNG: Schließen Sie das Gerät mit massiven einad-
rigen Kabeln oder Litzenkabeln mit Aderendhülsen an.
⚠VORSICHT! Bevor Sie mit der Installation/Montage des
Geräts beginnen, prüfen Sie, ob die Leitungsschutzschalter
(Sicherungen) ausgeschaltet sind und keine Spannung an den
Klemmen anliegt. Dies kann mit einem Phasenprüfer oder Mul-
timeter erfolgen. Wenn Sie sicher sind, dass keine Spannung
anliegt, können Sie mit dem Anschluss der Drähte fortfahren.
⚠VORSICHT! Schließen Sie nicht mehrere Drähte an eine
einzige Klemme an.
⚠VORSICHT! Erlauben Sie Kindern nicht, mit den an das Gerät
angeschlossenen Tasten/Schaltern zu spielen. Halten Sie die
Geräte zur Fernsteuerung des Shelly Qubino (z.B.: Mobiltele-
fone, Tablets, PCs) von Kindern fern.
SPEZIFIKATION
Stromversorgung AC110-240 V, 50/60 Hz
Stromversorgung DCNein
Stromverbrauch< 0.2 W
ÜberlastungsschutzNein
Leistungsmessung (W)Nein
Arbeiten ohne NeutralleiterNein
Anzahl der Eingänge4
EntfernungBis zu 40 m in Innenräumen
(131 ft.) (abhängig von den
örtlichen Gegebenheiten)
Z-Wave™ RepeaterJa
CPUZ-Wave™ S800
Z-Wave™ Frequenzbänder868,4 MHz; 865,2 MHz;
869,0 MHz; 921,4 MHz;
908,4 MHz; 916 MHz; 919,8
MHz; 922,5 MHz; 919,7-
921,7-923,7 MHz; 868,1
MHz; 920,9 MHz
Maximale übertragene
Funkfrequenzleistung in
Frequenzband(en)
< 25 mW
Größe (H × B × T)37x42x16 ±0.5 mm /
1.46x1.65x0.63 ±0.02 in
Gewicht17 g / 0.6 oz.
MontageWandkonsole
Schraubklemmen max.
Drehmoment
0.4 Nm / 3.5 lbin
Querschnitt des Leiters0,5 bis 1,5 mm²/20 bis 16
AWG
Länge des abisolierten
Leiters
5 bis 6 mm/0,20 bis 0,24 in
GehäusematerialKunststoff
FarbeOrange
Umgebungstemperatur-20 °C bis 40 °C/-5 °F bis
105 °F
Luftfeuchtigkeit30% bis 70% RH
BETRIEBLICHE ANWEISUNGEN
Wenn der SW als Schalter konguriert ist (Standard), wird
bei jedem Umschalten des Schalters die vordenierte Szene
ausgelöst.
Wenn der SW in den Geräteeinstellungen als Taster kongu-
riert ist, wird bei jedem Druck auf den Taster die vordenierte
Szene ausgelöst.
WICHTIG
Die Z-Wave™ drahtlose Kommunikation ist nicht immer 100 %
verlässlich. Dieses Gerät soll nicht in Situationen verwendet
werden, in denen menschliches Leben oder Wertgegenstände
allein von seinem Funktion abhängen. Falls das Gerät von Ihrem
Gateway nicht erkannt oder falsch angezeigt wird, müssen Sie
eventuell den Gerätetyp manuell eingeben und sicherstellen,
dass Ihr Gateway Z-Wave Plus™- Multikanalgeräte unterstützt.
BESTELLCODES: QNSN-0A24XXX
XX - Werte geben die Produktversion bezogen auf die Region
an.
KONFORMITÄTSERKLÄRUNG
Hiermit erklärt Shelly Europe Ltd. (ehemals Allterco Robot-
ics EOOD), dass der Funkanlagentyp Wave i4 der Richtlinie
2014/53/EU, 2014/35/EU, 2014/30/EU, 2011/65/EU entspricht.
Den vollständigen Text der EU-Konformitätserklärung nden Sie
For more detailed installation instructions,
use cases, and comprehensive guidance
on adding/removing the Device to/from
a Z-Wave™ network, factory reset, LED
signalization, Z-Wave™ command classes,
parameters, and much more, refer to the
extended user guide at:
https://shelly.link/Wavei4-KB
EXTENDED USER GUIDE
unter folgender Internetadresse: https://shelly.link/Wavei4-DoC
HERSTELLER
Shelly Europe Ltd.
Adresse: 103 Cherni vrah Blvd., 1407 Soa, Bulgarien
Tel.: +359 2 988 7435
E-Mail: zwave-shelly@shelly.cloud
Kundensupport: https://support.shelly.cloud/
Ofzielle Website: https://www.shelly.com
Änderungen der Kontaktdaten werden vom Hersteller auf des-
sen ofziellen Website veröffentlicht.
IT
GUIDA ALL’USO E ALLA SICUREZZA
Controllore Z-Wave™ a 4 ingressi digitali
LEGGERE PRIMA DELL’USO
Questo documento contiene importanti informazioni tecniche
e di sicurezza sul Dispositivo e sul suo uso e installazione in
sicurezza.
⚠ATTENZIONE!Prima di iniziare l’installazione, leggere
attentamente e completamente questa guida e tutti gli altri
documenti allegati al Dispositivo. La mancata osservanza delle
procedure di installazione potrebbe causare malfunzionamenti,
pericoli per la salute e la vita, violazione delle leggi o la rinuncia
alla garanzia legale e/o commerciale (se presente). Shelly Eu-
rope Ltd. non si assume alcuna responsabilità per eventuali per-
dite o danni in caso di installazione errata o utilizzo improprio del
Dispositivo a causa della mancata osservanza delle istruzioni
per l’uso e la sicurezza del Dispositivo fornite in questa guida.
TERMINOLOGIA
Gateway – Un gateway Z-Wave™, anche chiamato controller
Z-Wave™, controller principale Z-Wave™, hub Z-Wave™, ecc., è
un dispositivo che funge da hub centrale per una rete domesti-
ca intelligente in tecnologia Z-Wave™. In questo documento si
utilizzerà semplicemente il termine “gateway”.
Pulsante S – E’ il pulsante di Servizio Z-Wave™, che si trova sui
dispositivi Z-Wave™ e viene utilizzato per varie funzioni come
per l’inclusione (aggiunta), l’esclusione (rimozione) e il ripris-
tino delle impostazioni predenite di fabbrica del dispositivo.
In questo documento si utilizzerà semplicemente il termine
“pulsante S”.
Dispositivo - In questo documento, il termine “Dispositivo” è
utilizzato per riferirsi al dispositivo Shelly Qubino che è oggetto
di questa guida.
A PROPOSITO DI SHELLY QUBINO
Shelly Qubino è una linea di dispositivi innovativi gestiti da
microprocessore, che consentono il controllo remoto dei cir-
cuiti elettrici con smartphone, tablet, PC o sistema domotico.
Funzionano su protocollo di comunicazione wireless Z-Wave™,
utilizzando un gateway, necessario per la congurazione dei
dispositivi. Quando il gateway è connesso a Internet, puoi
controllare i dispositivi Shelly Qubino in remoto da qualsiasi
luogo. I dispositivi Shelly Qubino possono essere utilizzati in
qualsiasi rete Z-Wave™ con altri dispositivi certicati Z-Wave™
di altri produttori. Tutti i nodi gestiti dalla rete all’interno della
rete fungeranno da ripetitori indipendentemente dal fornitore
per aumentare l’afdabilità della rete. I dispositivi sono proget-
tati per funzionare con le generazioni precedenti di dispositivi
e gateway Z-Wave™.
A PROPOSITO DEL DISPOSITIVO
Il Dispositivo è un modulo con 4 ingressi digitali (110-240 V
CA) che controlla altri dispositivi all’interno della rete Z-Wave.
Consente l’attivazione o la disattivazione manuale delle scene
tramite un interruttore/pulsante.
ISTRUZIONI PER L’INSTALLAZIONE
Il Dispositivo può essere installato a posteriori in una normale
scatola a incasso, dietro interruttori o in altri luoghi con spazio
limitato.
Per le istruzioni di installazione, fare riferimento agli schemi di
cablaggio (Figura 1-2) presenti in questo manuale utente.
⚠ATTENZIONE! Pericolo di folgorazione. Il montaggio/in-
stallazione del Dispositivo alla rete elettrica deve essere ese-
guito con cautela da un elettricista qualicato.
⚠ATTENZIONE!Pericolo di folgorazione. Ogni modica dei
collegamenti deve essere effettuata dopo essersi assicurati
che non ci sia tensione ai morsetti dell’apparecchio.
⚠ATTENZIONE! Non aprire il Dispositivo. Il Dispositivo non
contiene parti che possano essere manutenute dall’utente.
Per motivi di sicurezza e di licenza, non è consentito apportare
modiche e/o cambiamenti non autorizzati al Dispositivo.
⚠ATTENZIONE! Utilizzare il Dispositivo solo con una rete
elettrica e con apparecchi conformi a tutte le norme vigenti.
Un cortocircuito nella rete elettrica o in qualsiasi apparecchio
collegato al Dispositivo può danneggiarlo.
⚠ATTENZIONE! Non accorciare l’antenna.
⚠RACCOMANDAZIONE: Posizionare l’antenna il più lontano
possibile da elementi metallici in quanto essi potrebbero cau-
sare interferenze di segnale.
⚠ATTENZIONE! Collegare il Dispositivo solo nel modo indica-
to in queste istruzioni. Qualsiasi altro metodo potrebbe causare
danni e/o lesioni.
⚠ATTENZIONE! Non installare il Dispositivo in un luogo che
possa bagnarsi.
⚠ATTENZIONE! Non utilizzare il Dispositivo se è stato dan-
neggiato!
⚠ATTENZIONE! Non tentare di riparare o riparare il Dispos-
itivo da soli!
⚠RACCOMANDAZIONE: Collegare il Dispositivo utilizzando
cavi unipolari solidi o cavi a trefoli con ghiere.
⚠ATTENZIONE! Prima di iniziare l’installazione/montaggio
del Dispositivo, controllare che gli interruttori siano spenti e che
non ci sia tensione sui loro terminali. Questo può essere fatto
con un indicatore di tensione di rete o un multimetro. Quando
siete sicuri che non c’è tensione, potete procedere al collega-
mento dei li.
⚠ATTENZIONE Non inserire più li in un unico morsetto.
⚠ATTENZIONE! Non permettere ai bambini di giocare con i
pulsanti/interruttori collegati al Dispositivo. Tenere i dispositivi
per il controllo remoto di Shelly Qubino (telefoni cellulari, tablet,
PC) lontano dai bambini.
Detailliertere Installationsanweisungen,
Anwendungsfälle und umfassende Anleitun-
gen zum Hinzufügen/Entfernen des Geräts
zu/aus einem Z-Wave™-Netzwerk, zum
Zurücksetzen auf die Werkseinstellungen,
zur LED-Signalisierung, zu Z-Wave™-Befe-
hlsklassen, Parametern und vielem mehr
nden Sie im erweiterten Benutzerhandbuch
unter:https://shelly.link/Wavei4-KB
ERWEITERTEN
BENUTZERHANDBUCH
DE
LEGENDE
Geräteklemmen:
• N: Neutralklemme
• L: Stromführende Klemme (110-240 V AC)
• SW1: Eingangsklemme für Schalter/Taster
• SW2: Eingangsklemme für Schalter/Taster
• SW3: Eingangsklemme für Schalter/Taster
• SW4: Eingangsklemme für Schalter/Taster
Drähte:
• N: Neutralleiter
• L: Stromführende Leitung (110-240 V AC)
Taste:
• S: Die S-Taste (Abb. 3)
IT
LEGENDA
Terminali del Dispositivo:
• N: Terminale neutro
• L: Terminale sotto tensione (110-240 V CA)
• SW1: Terminale di ingresso per il pulsante/interuttore
• SW2: Terminale di ingresso per il pulsante/interuttore
• SW3: Terminale di ingresso per il pulsante/interuttore
• SW4: Terminale di ingresso per il pulsante/interuttore
Fili:
• N: Filo neutro
• L: Filo sotto tensione (110 - 240 V CA)
Pulsante:
• S: Pulsante S (Fig. 3)
B4123V 0.0.31/2
Per istruzioni di installazione più detta-
gliate, casi d’uso e una guida completa su
come aggiungere/rimuovere il dispositivo
da/in una rete Z-Wave™, ripristino alle
impostazioni di fabbrica, segnalazioni LED,
classi di comandi Z-Wave™, parametri e
molto altro, consultare il manuale utente
esteso disponibile al seguente indirizzo:
https://shelly.link/Wavei4-KB
MANUALE UTENTE ESTESO
Wave i4
SW4SW3SW2
SW1
LN
AC 110-240 V
SW4SW3SW2
SW1
LN
AC 110-240 V
S
Fig.1/
Abb.1/
Imagen 1/
Image 1
Fig.2/
Abb.2/
Imagen 2/
Image 2
Fig.3/
Abb.3/
Imagen 3/
Image 3
Specyfikacje produktu
| Marka: | Shelly |
| Kategoria: | inteligentny dom |
| Model: | Wave i4 |
| Kolor produktu: | Pomarańczowy |
| Nadaje się do użytku w pomieszczeniach: | Tak |
| Materiał obudowy: | Plastik |
| Wbudowany wyświetlacz: | Nie |
| Częstotliwość wejściowa AC: | 50 / 60 Hz |
| Napięcie wejściowe AC: | 110 - 240 V |
| Wysokość produktu: | 16 mm |
| Szerokość produktu: | 37 mm |
| Głębokość produktu: | 42 mm |
| Waga produktu: | 17 g |
| Ilość na paczkę: | 1 szt. |
| Technologia łączności: | Bezprzewodowy |
| Zakres temperatur (eksploatacja): | -20 - 40 °C |
| Zakres wilgotności względnej: | 30 - 70 % |
| Pobór mocy: | 0.2 W |
| Model: | Mądry przełącznik |
| Rodzaj opakowania: | Pudełko |
| Wykończenie: | Matowy |
| Maksymalny zakres wewnętrzny (pomieszczenie): | 40 m |
| Moc nadawania: | 25 dBmW |
| Ilość modułów: | 1 |
| Maksymalny prąd przełączania (AC): | 16 A |
Potrzebujesz pomocy?
Jeśli potrzebujesz pomocy z Shelly Wave i4, zadaj pytanie poniżej, a inni użytkownicy Ci odpowiedzą
Instrukcje inteligentny dom Shelly

27 Marca 2025
9 Października 2024
23 Września 2024
23 Września 2024
22 Września 2024
22 Września 2024
22 Września 2024
22 Września 2024
21 Września 2024
21 Września 2024
Instrukcje inteligentny dom
Najnowsze instrukcje dla inteligentny dom
29 Marca 2025
29 Marca 2025
29 Marca 2025
18 Marca 2025
18 Marca 2025
12 Marca 2025
25 Lutego 2025
19 Lutego 2025
14 Lutego 2025
30 Stycznia 2025