Instrukcja obsługi StarTech.com ADJSHELFHD2
StarTech.com Niesklasyfikowane ADJSHELFHD2
Przeczytaj poniżej 📖 instrukcję obsługi w języku polskim dla StarTech.com ADJSHELFHD2 (2 stron) w kategorii Niesklasyfikowane. Ta instrukcja była pomocna dla 20 osób i została oceniona przez 6 użytkowników na średnio 4.9 gwiazdek
Strona 1/2
Quick-Start Guide
To view manuals, FAQs, videos, drivers, downloads, technical drawings, and more, visit www.startech.com/support.
Manual Revision: June 9, 2022 10:06 AM
To view manuals, FAQs, videos, drivers, downloads, technical drawings, and more, visit www.startech.com/support.
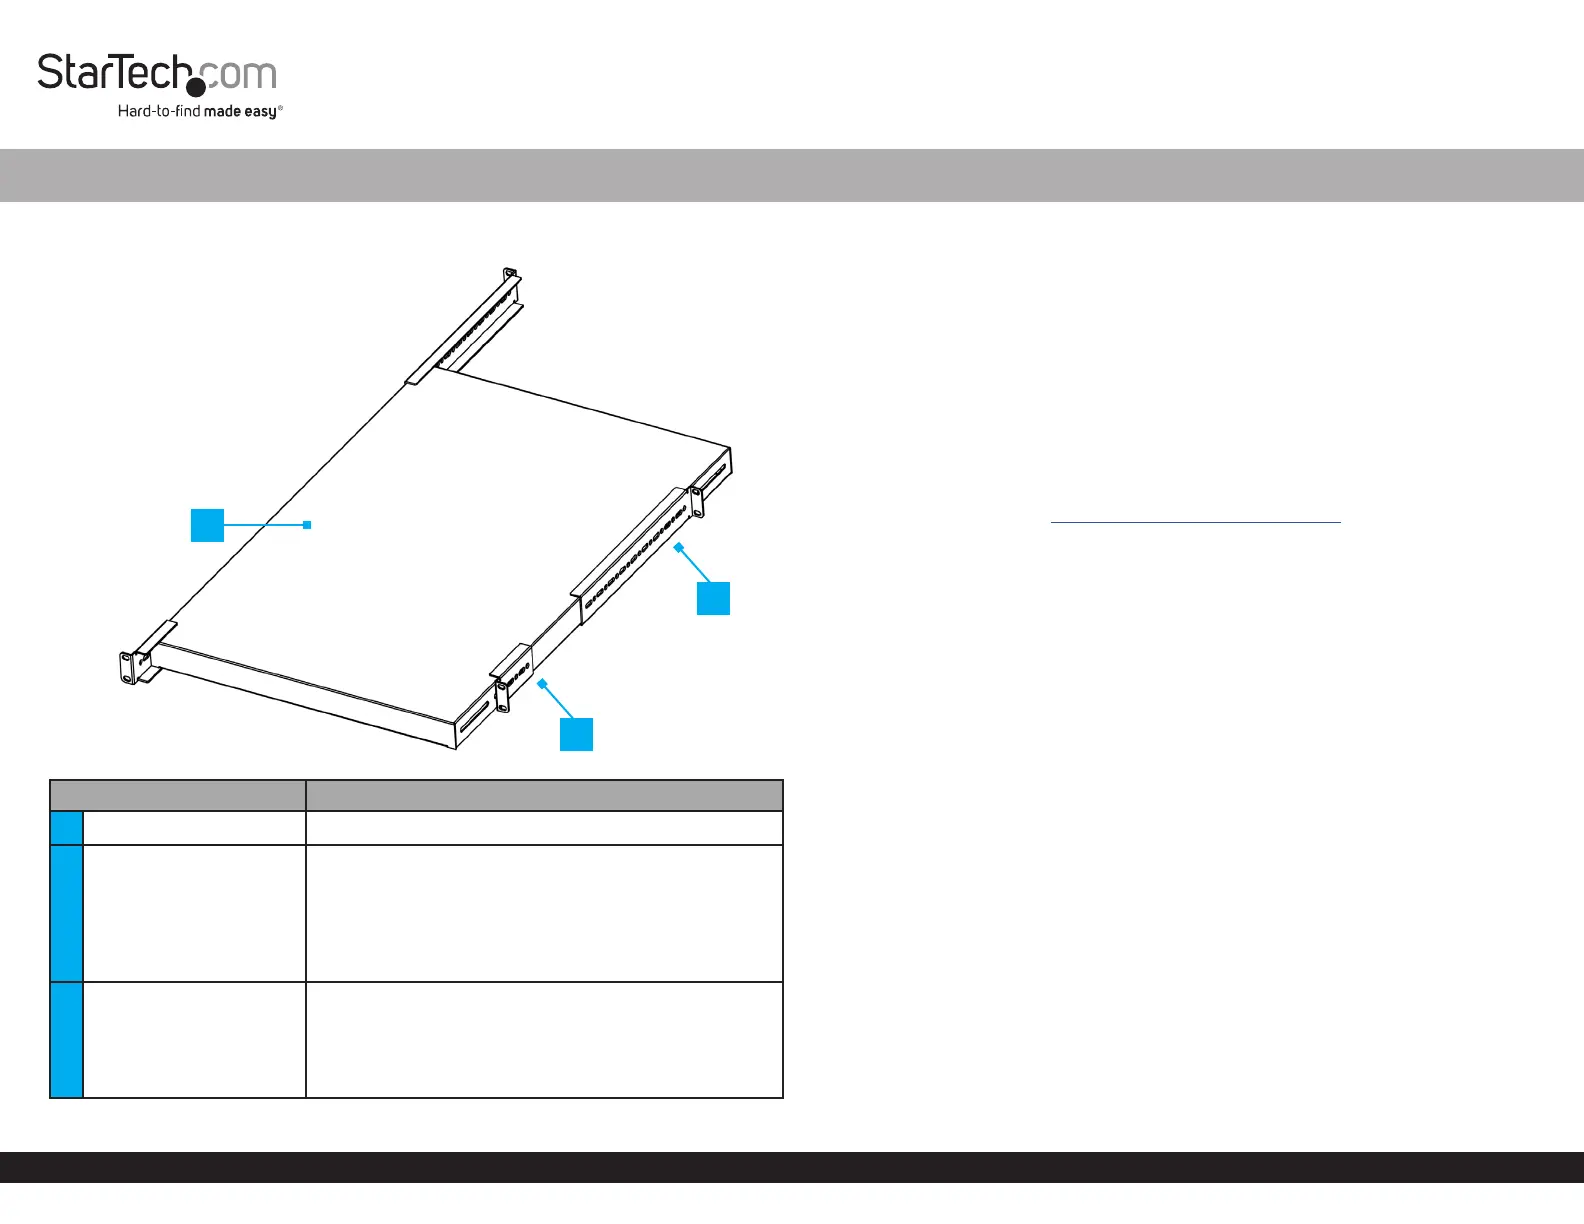
Product Diagram
ADJSHELFHD2
ComponentFunction
1Shelf Surface • Mount the server rack equipment
2Front Mounting Brackets
• Fasten Shelf to the Front Posts of the rack or
cabinet
• Holes on the sides of the Mounting Brackets allow
for Depth Adjustment. M6x12 mm Screws (x 4)
secure the Mounting Brackets to the desired depth
• Allows for up to 5.7 in (146.9 mm ) depth adjustment
3Rear Mounting Brackets
• Fasten Shelf to the Rear Posts of the rack or cabinet
• Holes on the sides of the Mounting Brackets allow
for Depth Adjustment. M6x12 mm Screws (x 4)
secure the Mounting Brackets to the desired depth
• Allows for up to 13 in (332.1 mm) depth adjustment
1U 4-Post Adjustable Mounting Depth Heavy Duty Shelf - 27.5 in Depth
Package Contents
• 1U Shelf Body x 1
• Front Mounting Brackets x 2
• Rear Mounting Brackets x 2
• M6x12 mm Screws x 8
• M6 Cage Nuts x 8
• M6 Plastic Washers x 8
• Quick-Start Guide x 1
Requirements
For the latest manuals, product information, technical specications, and declarations
of conformance, please visit: www.StarTech.com/ADJSHELFHD2
• For square cage holes, M6 cage nuts are included. For M6 threaded holes, no cage
nuts are needed. Refer to the manufacturer of the rack to determine the mounting
hole type
• Phillips head screwdriver
• Cage nut tool (Optional)
Warnings!
Readthe entire Quick-Start Guide and ensure the instructions are fully understood
before assembling and using this product.
Beforeadding equipment to this product, ensure this product has been properly
mounted.
Neveroperate this product if parts are missing or damaged.
Ensurethe weight of the equipment does not exceed the weight capacity of this
product. If the weight capacity is exceeded, personal injury or damage to the
equipment is possible. This product can support the following weight: up to 264 lb (120
kg). The maximum supported weight is only possible when all four mounting brackets
are properly mounted to all posts on a four post rack.
Arrangeyour equipment in the rack in descending order of weight. The lightest
equipment is installed at the top of the rack, and the heaviest is on the bottom.
Installation
1. Locate a suitable location in the rack or cabinet to mount the Shelf. The Shelf
requires 1U of Space.
Tomount the shelf leveled, ensure the mounting brackets are mounted on the same U
height number. To determine this, most four posts racks or cabinets have labeled front
and rear posts.
*Product may vary from image
2
1
3
Specyfikacje produktu
| Marka: | StarTech.com |
| Kategoria: | Niesklasyfikowane |
| Model: | ADJSHELFHD2 |
Potrzebujesz pomocy?
Jeśli potrzebujesz pomocy z StarTech.com ADJSHELFHD2, zadaj pytanie poniżej, a inni użytkownicy Ci odpowiedzą
Instrukcje Niesklasyfikowane StarTech.com

9 Stycznia 2025
9 Stycznia 2025
9 Stycznia 2025
9 Stycznia 2025
9 Stycznia 2025
8 Stycznia 2025
8 Stycznia 2025
8 Stycznia 2025
8 Stycznia 2025
8 Stycznia 2025
Instrukcje Niesklasyfikowane
Najnowsze instrukcje dla Niesklasyfikowane
29 Stycznia 2025
29 Stycznia 2025
29 Stycznia 2025
29 Stycznia 2025
29 Stycznia 2025
29 Stycznia 2025
29 Stycznia 2025
29 Stycznia 2025
29 Stycznia 2025
29 Stycznia 2025