Instrukcja obsługi StarTech.com SV231DVGAU2A
StarTech.com Niesklasyfikowane SV231DVGAU2A
Przeczytaj poniżej 📖 instrukcję obsługi w języku polskim dla StarTech.com SV231DVGAU2A (2 stron) w kategorii Niesklasyfikowane. Ta instrukcja była pomocna dla 12 osób i została oceniona przez 9 użytkowników na średnio 4.4 gwiazdek
Strona 1/2
Manual Revision: 07/10/2015
For the most up-to-date information, please visit: www.startech.com
DE: Bedienungsanleitung - de.startech.com
FR: Guide de l'utilisateur - fr.startech.com
ES: Guía del usuario - es.startech.com
IT: Guida per l'uso - it.startech.com
NL: Gebruiksaanwijzing - nl.startech.com
PT: Guia do usuário - pt.startech.com
Quick Start Guide
Packaging Contents
• 1 x dual VGA USB KVM switch
• 1 x universal power adapter (NA/UK/EU/AU)
• 4 x rubber feet
• 1 x instruction manual
System Requirements
• 1 or 2 VGA monitors (monitor, projector, TV, etc.)
• A USB keyboard and mouse
• Microphone and speakers (optional)
SV231DVGAU2A / SV431DVGAU2A
2 / 4 Port Dual VGA USB KVM Switch with Audio & USB Hub
*actual product may vary from photos
Please visit www.startech.com/SV231DVGAU2A or www.startech.com/
SV431DVGAU2A for product specications.
LED Indicators
PC Selection Indicators
Green: Connected PC detected
(powered on)
Red: Active PC
O: No PC detected
Installation
For complete operating instructions / specications, please
visit www.startech.com/SV231DVGAU2A or www.startech.com/
SV431DVGAU2A.
Note: Prior to installation, please power o all devices that will be
connected to this system.
1. Connect 1 or 2 VGA monitors to the console connectors on the
back of the KVM switch.
2. Connect a USB keyboard and mouse into the marked USB ports
on the KVM switch.
3. (Optional) Connect a microphone and set of speakers to the
console audio ports.
4. (Optional) Connect your additional USB peripherals to the USB
hub ports.
Operation
Switching Between Systems
Pushbuttons
For the 2 port (SV231DVGAU2A) version, the front button will toggle
between the two computers when pressed.
For the 4 port (SV431DVGAU2A) version, each button on the front
panel associates with a connected computer for selection.
Hotkeys
A hotkey command is a short keyboard sequence for selecting
a computer, activating a computer scan, etc. A hotkey sequence
starts with two Left Ctrl keystrokes, pressed within 0.2 seconds and
followed by one or two keystrokes to complete the command.
A built-in buzzer generates a high-pitched beep for correct hotkey
commands; otherwise, one low-pitch beep occurs to indicate errors
and the bad key sequence won’t be forwarded to the selected
computer.
Note: To disable hotkey functions, press and hold Left Shift and press
Num Lock twice, then release Shift followed by pressing Left Ctrl
once.
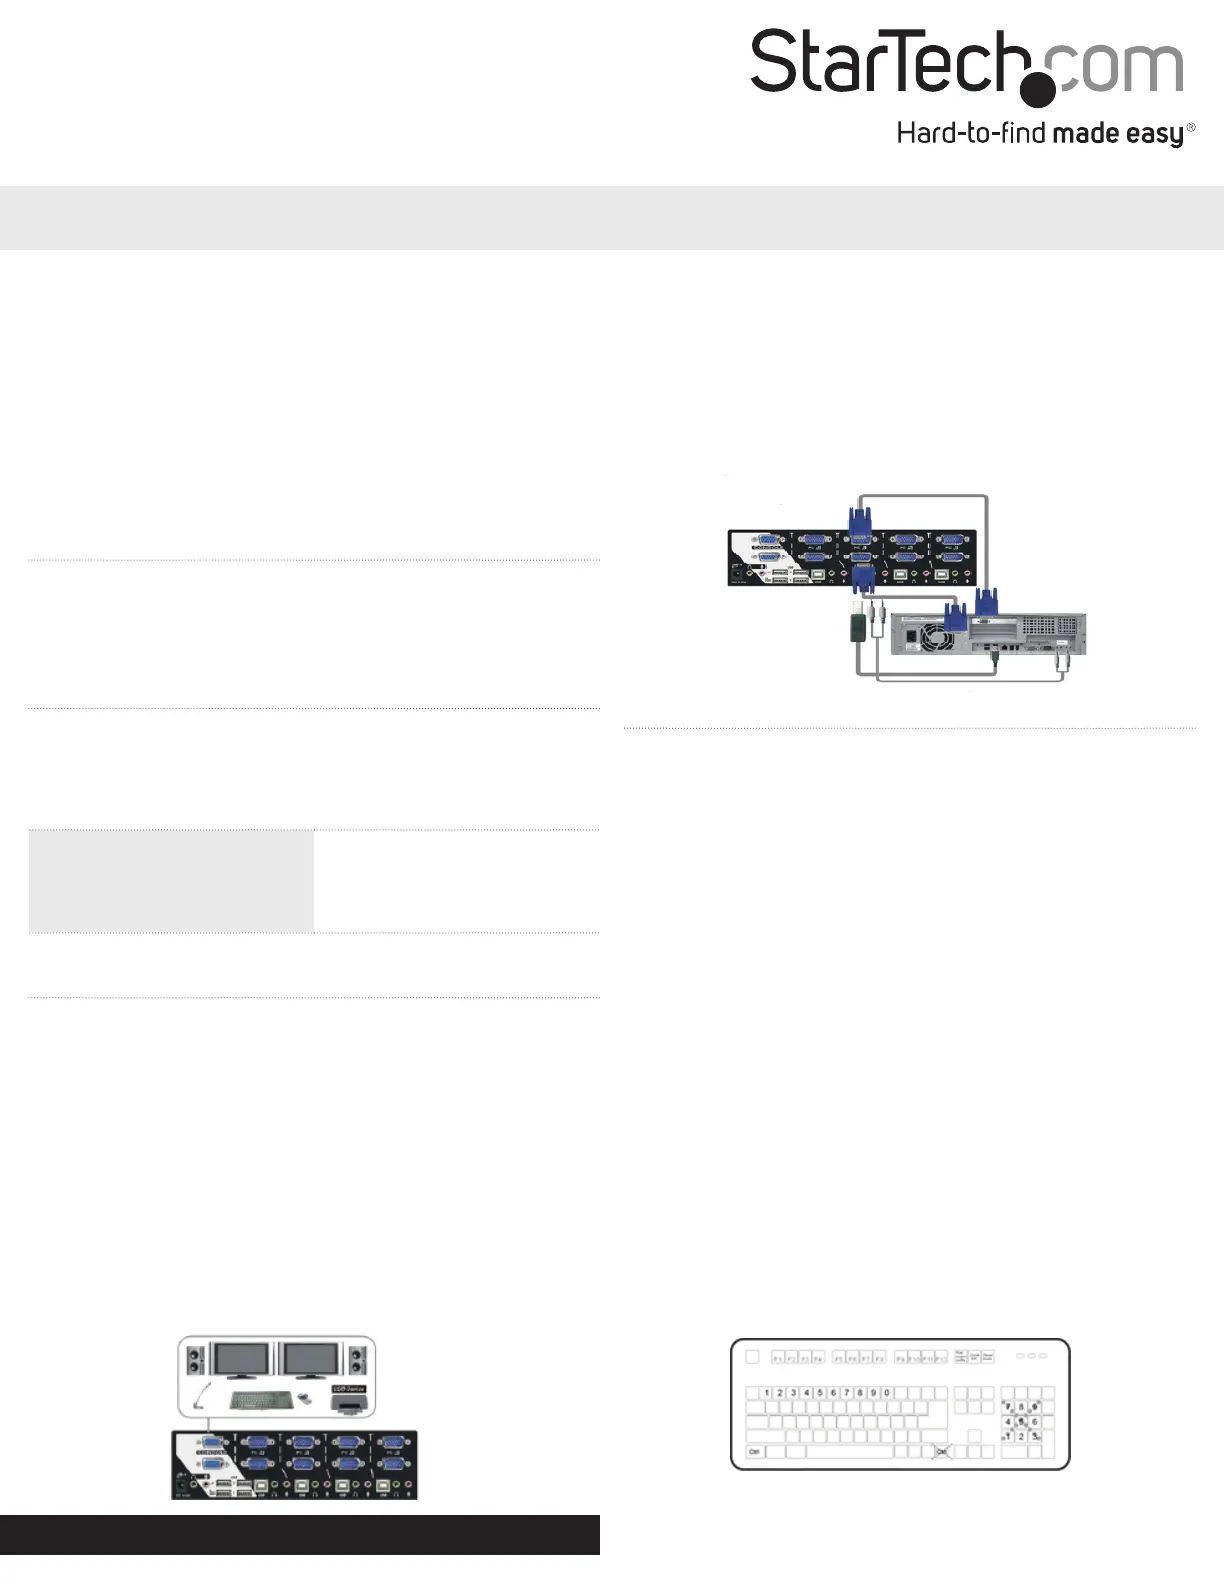
5. Connect a male-to-male VGA cable from the VGA port on your
computer to the PC1 VGA port. Repeat for the secondary display
if needed.
6. Connect a USB A-B cable from an available port on your
computer to the PC1 USB port.
7. (Optional) Connect a 3.5 mm audio cable from your computer to
the PC1 audio ports.
8. Repeat steps 5 to 7 for the other PC connections.
Specyfikacje produktu
| Marka: | StarTech.com |
| Kategoria: | Niesklasyfikowane |
| Model: | SV231DVGAU2A |
Potrzebujesz pomocy?
Jeśli potrzebujesz pomocy z StarTech.com SV231DVGAU2A, zadaj pytanie poniżej, a inni użytkownicy Ci odpowiedzą
Instrukcje Niesklasyfikowane StarTech.com

9 Stycznia 2025
9 Stycznia 2025
9 Stycznia 2025
9 Stycznia 2025
9 Stycznia 2025
8 Stycznia 2025
8 Stycznia 2025
8 Stycznia 2025
8 Stycznia 2025
8 Stycznia 2025
Instrukcje Niesklasyfikowane
Najnowsze instrukcje dla Niesklasyfikowane
29 Stycznia 2025
29 Stycznia 2025
29 Stycznia 2025
29 Stycznia 2025
29 Stycznia 2025
29 Stycznia 2025
29 Stycznia 2025
29 Stycznia 2025
29 Stycznia 2025
29 Stycznia 2025