Instrukcja obsługi StarTech.com UNIRAILS1UB
StarTech.com Niesklasyfikowane UNIRAILS1UB
Przeczytaj poniżej 📖 instrukcję obsługi w języku polskim dla StarTech.com UNIRAILS1UB (2 stron) w kategorii Niesklasyfikowane. Ta instrukcja była pomocna dla 19 osób i została oceniona przez 3 użytkowników na średnio 4.8 gwiazdek
Strona 1/2
Quick-Start Guide
To view manuals, FAQs, videos, drivers, downloads, technical drawings, and more, visit www.startech.com/support.
Manual Revision: August 23, 2019 10:33 AM
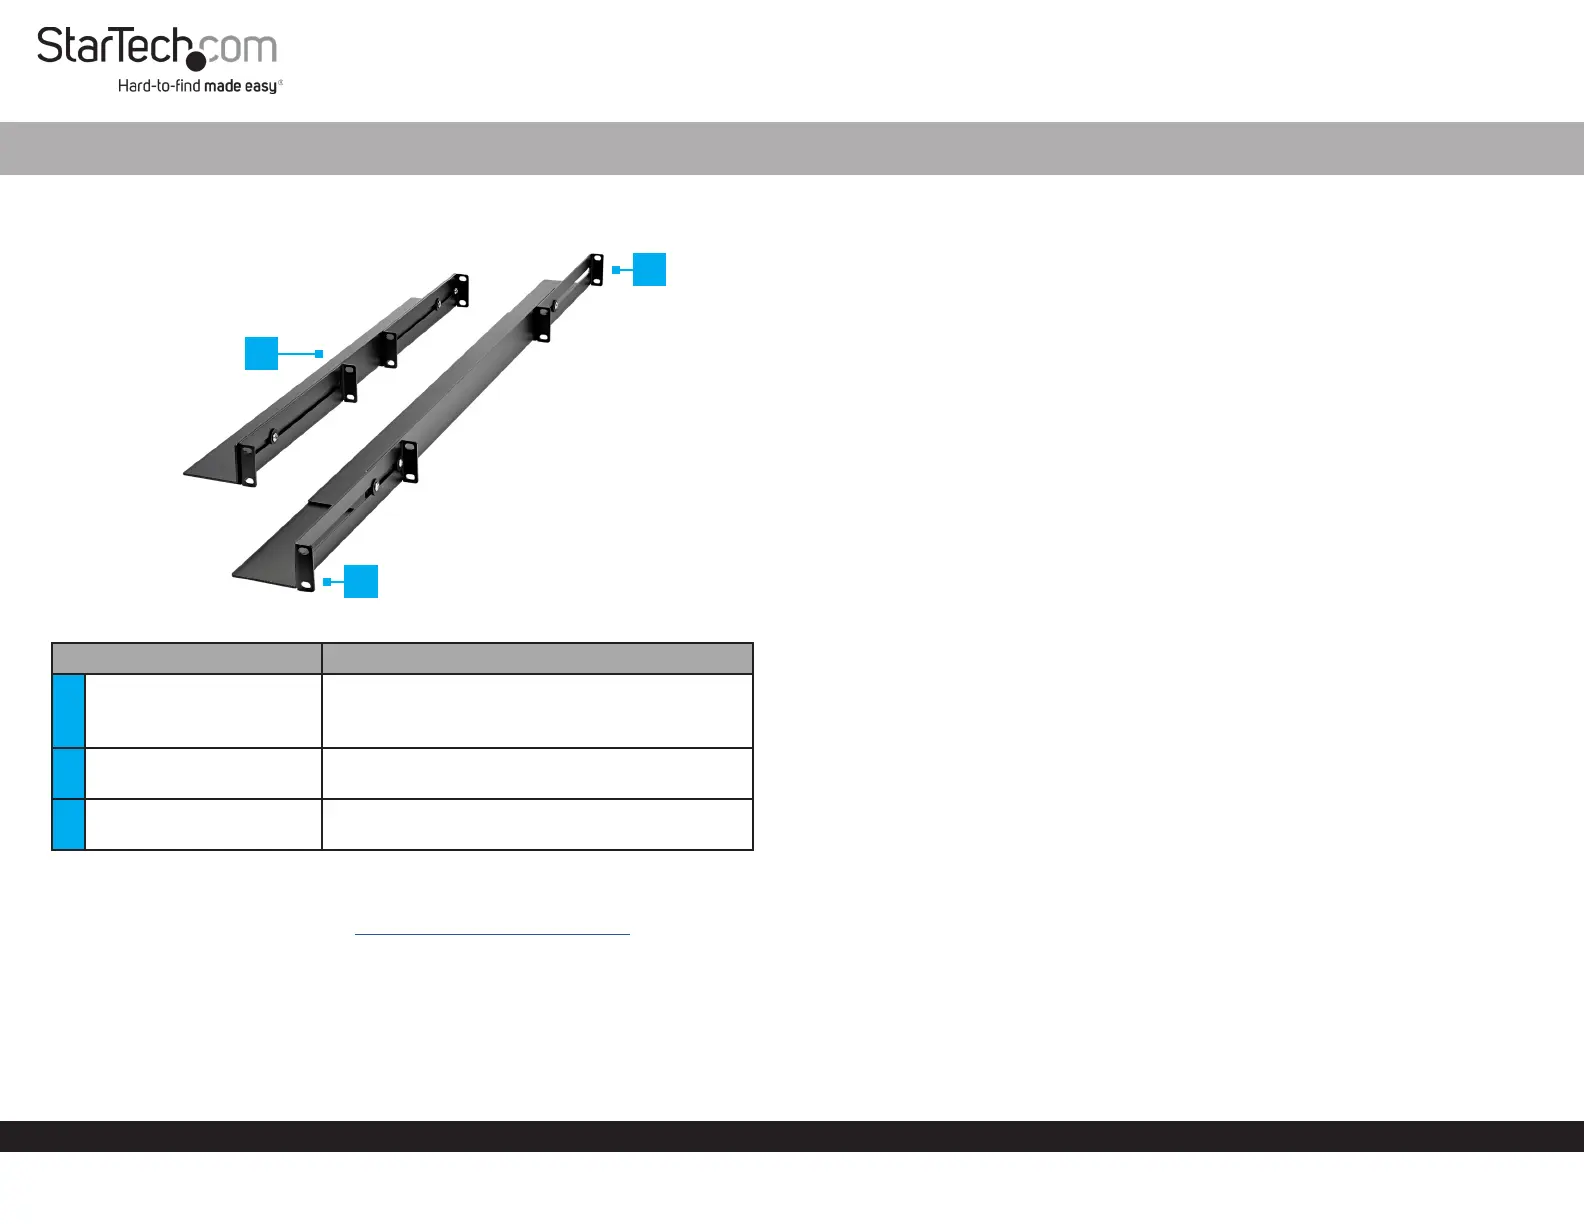
Product Diagram (UNIRAILS1UB)
ComponentFunction
1
Adjustable Depth Basic 1U
Universal Server Rail
• Used to securely mount equipment (1U in
height) in a Server Rack.
• Maximum Weight Capacity = 200 lb. (91.7 kg)
2Front Bracket
• Used to secure the Server Rail to a Server
Rack.
3Back Bracket
• Used to secure the Server Rail to a Server
Rack.
Requirements
For the latest requirements, please visit www.startech.com/UNIRAILS1UB
• Cage Nut Tool x 1 (Optional)
• Phillips Head Screwdriver x 1
4-Post 1U Universal Adjustable Mounting Depth Rack Rail
Package Contents
• Adjustable Depth Basic 1U Universal Server Rail x 2
• M6-12 Screws x 8
• Cage Nuts x 8
• M6 Plastic Cap Washers x 8
• Quick-Start Guide x 1
Installing the Server Rail
1. Insert the Cage Nuts x 4 into the Cage Nut Holes on the front and back Rails of the
Server Rack.
Note: You can use a Cage Nut Tool to aid in the installation of the Cage Nuts.
2. Align the Screw Hole on the Back Bracket on the Server Rail with the Cage Nuts
(inserted in step 1) on the back Rail on the Server Rack.
3. Slide an M6 Plastic Cap Washer over-top of the M6-12 Screw.
4. Insert an M6-12 Screw through the Server Rail Screw Hole and into the Cage Nut.
5. Insert a second M6-12 Screw through the bottom Washer and Server Rail Screw
Hole and into the Cage Nut.
6. Using a Phillips Head Screwdriver tighten the M6-12 Screws, being careful not to
over-tighten.
7. Align the Screw Hole on the Front Bracket on the Server Rail with the Cage Nuts
(inserted in step 1) on the front Rail on the Server Rack.
8. Slide an M6 Plastic Cap Washer over-top of the M6-12 Screw.
9. Insert an M6-12 Screw through the Server Rail Screw Hole and into the Cage Nut.
10. Insert a second M6-12 Screw through the bottom Washer and Server Rail Screw
Hole and into the Cage Nut.
11. Using a Phillips Head Screwdriver tighten the M6-12 Screws, being careful not to
over-tighten.
12. Repeat Steps 1 - 11 to install the second Server Rail.
2
3
1
Specyfikacje produktu
| Marka: | StarTech.com |
| Kategoria: | Niesklasyfikowane |
| Model: | UNIRAILS1UB |
Potrzebujesz pomocy?
Jeśli potrzebujesz pomocy z StarTech.com UNIRAILS1UB, zadaj pytanie poniżej, a inni użytkownicy Ci odpowiedzą
Instrukcje Niesklasyfikowane StarTech.com

9 Stycznia 2025
9 Stycznia 2025
9 Stycznia 2025
9 Stycznia 2025
9 Stycznia 2025
8 Stycznia 2025
8 Stycznia 2025
8 Stycznia 2025
8 Stycznia 2025
8 Stycznia 2025
Instrukcje Niesklasyfikowane
Najnowsze instrukcje dla Niesklasyfikowane
29 Stycznia 2025
29 Stycznia 2025
29 Stycznia 2025
29 Stycznia 2025
29 Stycznia 2025
29 Stycznia 2025
29 Stycznia 2025
29 Stycznia 2025
29 Stycznia 2025
29 Stycznia 2025